[No Programming Required] How to Automatically Link ChatGPT Generated Data to Discord
How to Integrate Applications
・
2025-04-28
[No Programming Required] How to Automatically Link ChatGPT Generated Data to Discord
r.suzuki
Are you considering using ChatGPT and Discord to improve work efficiency, but feel "unsure about how to integrate them specifically" or "worried if it can be set up without being an engineer"? Sometimes, manual information sharing and data processing can take up a lot of time, and it would be convenient if automation could be done more easily.
<span class="mark-yellow">In fact, by using the no-code tool Yoom, which requires no programming, you can easily achieve data integration between ChatGPT and Discord.</span>This article introduces various integration methods, starting with a flow that summarizes form responses with ChatGPT and notifies Discord.
Packed with tips to make your daily work more comfortable, be sure to check it out until the end!
For those who want to try it quickly
By using Yoom, you can easily integrate ChatGPT and Discord with no code. Yoom provides templates for integrating ChatGPT and Discord in advance, so you can achieve integration immediately just by registering, even without API knowledge.
What You Can Do by Integrating ChatGPT with Discord
By integrating the APIs of ChatGPT and Discord, you can automatically link ChatGPT data to Discord! For example, you can automatically perform data integration like the following without human intervention.
Summarize Form Responses with ChatGPT and Notify on Discord
This flow automatically summarizes the responses submitted in a form using ChatGPT and notifies them on Discord. It allows for concise understanding of key points, making <span class="mark-yellow">information sharing within the team smoother and enabling prompt responses.</span>
Generate Responses from Inquiry Emails with ChatGPT and Notify on Discord
This flow involves ChatGPT analyzing the content of received emails, automatically generating responses, and notifying on Discord. This allows for quick responses to inquiries, leading to improved efficiency and smoother communication.
Let's Create a ChatGPT and Discord Integration Flow
Let's get started by creating a flow that integrates ChatGPT and Discord!
We'll be using Yoom to proceed with the no-code integration of ChatGPT and Discord. If you don't have a Yoom account yet, please create one using this registration form.
[What is Yoom]
This time, we'll create a flow bot that summarizes form responses with ChatGPT and notifies Discord!
The creation process is broadly divided as follows:
Integrate ChatGPT and Discord with My Apps
Copy the template
Set up the ChatGPT trigger and Discord action
Turn on the trigger to complete the flow activation preparation
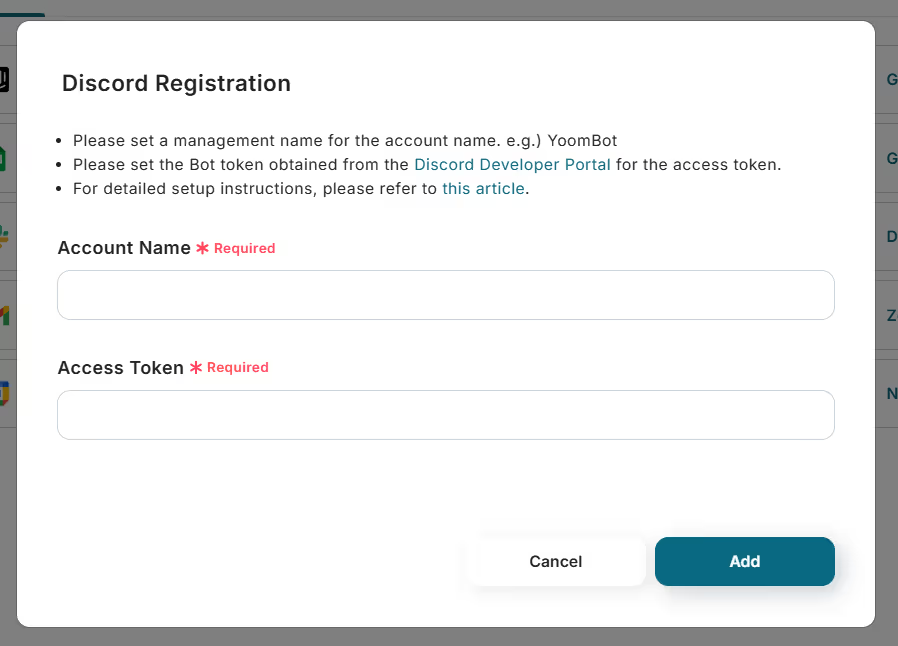
Step 1: Connect ChatGPT and Discord to My Apps
0) Access tokens are required for registering ChatGPT and Discord to My Apps.
Connecting ChatGPT to My Apps
To obtain the API key for ChatGPT, open the OpenAI page and create an account by clicking "SIGN UP".
Once sign-up is complete, click on "API keys" from the icon in the top left corner.
1) After logging into your Yoom account, register the app you will use next. Click "My Apps" and select "Add".
2) A list of apps that can be connected to Yoom will be displayed, and you can search for each app one by one using the search window.
Once you can select ChatGPT, use the information obtained earlier to input and click "Add".
Similarly, once you can select Discord, use the information obtained earlier to input and click "Add".
3) Once registration is complete, an icon will be displayed in My Apps. Check if the icon of the registered app is displayed.
Step 2: Copy the Template
Now, let's proceed with the explanation using the template. First, please click on this banner.
1) First, click on the "Try this template" icon.
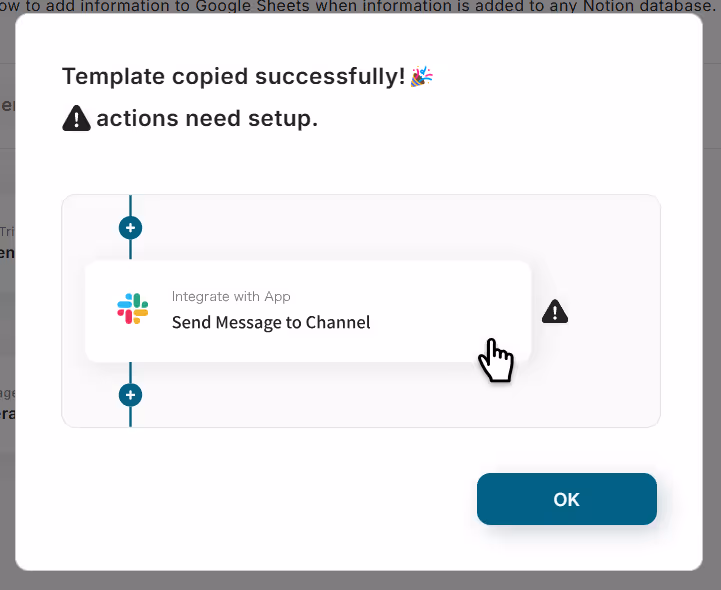
2) The following confirmation screen will appear, click "OK".
Once displayed as below, the template has been copied. You can edit the title and details by clicking on them.
Additionally, the copied template is saved in My Projects, so you can also open it from there.
Step 3: Set Triggers
Click the icons with "!" displayed on the right in order from top to bottom to set the operations. First, try clicking on "Form Trigger Response Form"!
1) Create a form. The information obtained here can be used when notifying messages to Discord, so set what you need. Once created, click "Next".
2) Confirm the form display and enter sample values for testing.
In the "Obtained Values" section, the usual form responses will be reflected, but since the flow has not been activated yet, please enter them yourself for this test!
Check the preview, enter the values, and click "Save" to complete the trigger setting.
Step 4: Set Up Summary of Responses with ChatGPT
1) Return to the flow and click on the "Summarize Response Content" icon.
* The use of ChatGPT's API is provided by OpenAI for a fee, and it is charged based on the tokens during API communication. Therefore, if you are not in a situation where you can make payments when using the API, an error will occur, so please be careful.
2) Select the action "Summarize Response Content" and click "Next".
3) Enter the required fields.
The message content can select the output of the response form.
Select and enter the information you want to use for ChatGPT generation. Here, it is set as "Response Content".
Once the input is complete, click "Test", and after the test is complete, click "Save".
Step 5: Set Up Notifications to Discord
1) Return to the flow and click on the "Integrate with App Notify by Message" icon.
2) Select the action "Notify by Message" and click "Next".
3) Enter the required fields.
The message content can select and enter the output of the response form or ChatGPT. Insert it according to the text.
Once the input is complete, click "Test", and after the test is complete, click "Save". This completes the flow of 【Summarizing the response content with ChatGPT and notifying Discord】.
Step 6: Test and Confirm
Once the setup is complete, the following display will appear, click "Turn on Trigger". Start the flow bot and check if it works correctly.
Other Automation Examples Using ChatGPT and Discord API
In addition to integrating ChatGPT with Discord, you can automate various tasks by utilizing APIs. If you find something interesting, please give it a try!
Convenient Automation Examples Using ChatGPT
You can use ChatGPT for tasks like translating or analyzing email content to send notifications, or translating image file data and storing it as data. It seems you can delegate previously time-consuming tasks to ChatGPT.
Convenient Automation Examples Using Discord
You can notify other apps of content posted on Discord, or receive completion notifications in return. Additionally, it can be utilized for task management, so try using something that suits your business needs!
Conclusion
By integrating ChatGPT with Discord, can you imagine how much easier information sharing and task automation could become? You might think, "It seems convenient, but the setup looks difficult..." However, with the no-code tool Yoom, you can easily achieve integration without any specialized knowledge.
By utilizing the workflow introduced in this article, you can reduce manual effort and create a smoother work environment. Start using Yoom for free and try integrating ChatGPT with Discord right away. Take this opportunity to get started!
The person who wrote this article
r.suzuki
I came across Yoom when I was searching for ways to improve work efficiency on a daily basis at a small and medium-sized enterprise in a region where human resources are limited.
I was casually thinking that it would be nice if this were the case, and by introducing Yoom, we can make it so much more efficient! I'm moved.
Even though I have no knowledge or experience with systems or programming, my work has changed drastically, so I'm writing that I hope I can share it with many people who feel the same way.
Tags
No items found.
Related Apps
No items found.
App integration
No items found.
What is Yoom hyperautomation?
Conventional RPA can only automate simple repetitive tasks, and the setup process was very complicated. With “hyperautomation,” which combines various technologies such as AI, API, RPA, and OCR, it is possible to automate many tasks that could not be realized until now more easily than before.
Most tools simply connect one app to another, leaving the complex tasks to you. Yoom goes much further: From document creation and browser automation to OCR and generative AI, Yoom handles it all seamlessly in one platform.
Why settle for basic integrations? Streamline your entire workflow with Yoom’s powerful hyperautomation.


.avif)


