.avif)
・

Read the following screen display and click "OK".

Let's actually operate the Flowbot.
First, click on the red frame area in the image below, "When the document status changes".

The "Select Linked Account and Action" screen will be displayed, so confirm that the GMO Sign account to be linked this time is correct, and click "Next".

From the "App Trigger Webhook Event Reception Settings" screen, copy the Webhook URL and set it in the GMO Sign management screen.

Next, click "Generate Access Token".

Click "Next" on the screen below.

A screen like the image below will be displayed.
Please inquire with GMO Sign for the "Secret Key" and "Customer ID".
Once you have entered them, click Test, and after the test is successful, click Save.

Next, click "User Search" on the screen below.

Click "Next".

A screen like the image below will be displayed.
Let's enter according to the content.
From the "API Connection Settings" screen, enter the secret key and customer ID.
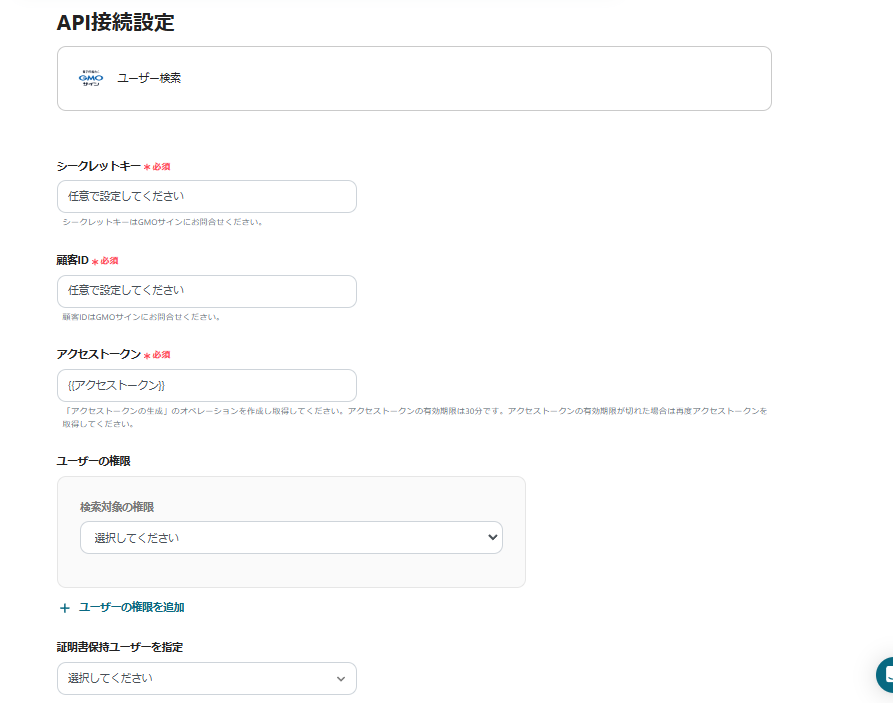
The red frame requires confirmation with GMO Sign.
Items without "※Required" can be set optionally.
Once you have entered, conduct a test and click "Save" after confirming the test is successful.

Next, proceed with the Sasuke settings.

A screen like the image below will be displayed, so click "Next".

To search for customer information by company name, conduct the test in this state, and after confirming the test is successful, click "Save".

The following screen will be displayed, so click "Edit Customer Information" in the red frame.
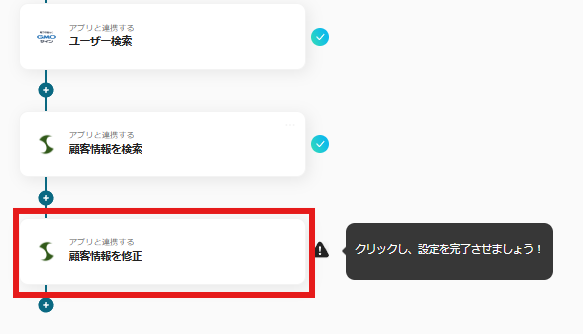
Click "Next" on the screen below.

Let's enter according to the content while checking the notes.
・Customer Number: It is fine to leave it as the value "{{Customer Number}}"
・Item Key: Proceed to "Customer Table Settings", right-click on the "Detailed Settings" part for each item, and obtain the link destination URL using "Get Link Address" or similar. The "f_code=●" part within the obtained URL will be the item key.
・Item Name: Proceed to "Customer Table Settings" and set the relevant item name.
・Value: Set any value. For classification items, specify only the code value starting with "g", and if specifying multiple, use a comma ",".
Conduct a test, and after confirming the test is successful, click "Save".

By clicking the red frame part "Turn on Trigger" on the screen below, the Flowbot will automatically start.

Here is the template used this time
① Update Google Spreadsheet Information When a Contract is Completed with GMO Sign
This flow updates Google Spreadsheet information when a contract is completed with GMO Sign. By eliminating the time spent on this task, the entire team can focus on core operations, leading to increased productivity.
②Create a contract with one click from kintone and send it via GMO Sign
This is the flow to create a contract with one click from kintone and send it via GMO Sign. By automating a series of tasks related to contracts, you can significantly reduce manual effort and time, thereby streamlining operations. Additionally, by eliminating manual input tasks, you can also expect to avoid the risk of human errors.
③ Update Sasuke when customer information is updated in Google Sheets
This is the flow for updating Sasuke when customer information is updated in Google Sheets. If there is an update to customer information in Google Sheets, Sasuke's customer information will also be automatically updated, ensuring that customer information is always kept up-to-date.
The integration of GMO Sign and Sasuke automates the update of deal status after contract signing, significantly improving the operational efficiency of the sales team. By reducing manual errors and maintaining data consistency, the quality of sales activities is enhanced, boosting the overall productivity of the company. With this integration, the sales team can focus more on strategic activities, which is expected to accelerate business growth.
Yoom's automation can be easily implemented by anyone without the need for complex coding, so please utilize the templates to streamline your daily operations!
.avif)


.avif)


