

Summarize Files Uploaded to Google Drive with Gemini and Issue Documents
Recommended for project managers and team leaders who spend a lot of time reviewing documents and summarizing texts!
.png)
・

"I spent so much time organizing documents..."
"I forgot to review important materials..." Mistakes like these can happen to anyone.
The time spent on file management and document organization in daily tasks is surprisingly significant, and many people wish to improve efficiency.
This is where the integration of Google Drive and Gemini comes in handy!
For instance, when a file is uploaded to Google Drive, Gemini can read and notify you automatically, making document review easier.
This way, you won't miss any file uploads and can review them promptly.
Additionally, files uploaded to Google Drive can be summarized by Gemini, allowing you to issue documents.
In this article, we will introduce how to simplify document review and management by integrating Google Drive and Gemini.
By using Yoom, you can easily integrate Google Drive and Gemini without any coding.
Yoom provides templates for integrating Google Drive and Gemini, so you can achieve integration immediately just by registering, even without API knowledge.
By integrating the APIs of Google Drive and Gemini, you can automatically sync data from Google Drive to Gemini!
For example, you can automatically perform data synchronization like the one below without human intervention.
Simply click "Try it out" on the automation example you're interested in and register an account to immediately experience the integration of Google Drive and Gemini.
Registration takes just 30 seconds, so feel free to give it a try!
When a file is uploaded to Google Drive, it will automatically be read by Gemini and notify you.
This is recommended for office staff managing multiple files.
Recommended for project managers and team leaders who spend a lot of time reviewing documents and summarizing texts!
Recommended for those who want to simplify file management! The ability to share files with your team in real-time is also an attractive feature.
Now, let's actually create a flow that integrates Google Drive and Gemini!
This time, we will use Yoom to proceed with the integration of Gmail and Google Calendar without any coding.
If you do not have a Yoom account yet, please issue one from the registration form here.
[What is Yoom]
This time, we will create a flow bot that transfers data to Gemini when a contact is registered in Google Drive!
The creation process is broadly divided into the following steps.
First, register "Google Drive" and "Gemini" as My Apps.
Click "Add" on the right from "My Apps" on the left.

After clicking "New Connection," search for "Google Drive" from the app list.

When the following screen appears, click "Sign with Google" to proceed.

Select the account you want to use.

Check the following screen and click "Next."

Check the following screen and click "Continue" to proceed.

Once "Google Drive" appears in My Apps, the registration is complete.
After clicking "New Connection," search for "Gemini" from the app list.

After entering the access token and account name, click "Add."
Here is a reference to obtain the API key and then obtain the access token.
The account name is recommended to be a surname or company name.

Once "Gemini" appears in My Apps, the registration is complete.
From here, we will actually create the flowbot!
Click "Try it" from the banner below to copy the template.
Once the template copy is complete, click "OK".

First, set up the app trigger.
Click "When a new file or folder is created in a specific folder".

When the following screen appears, check the account information to be linked and proceed to the next step.

Next, set up the API connection.
The trigger activation timing can be set to 5 minutes, 10 minutes, 15 minutes, 30 minutes, or 60 minutes.
Depending on the plan, the shortest interval for setting the trigger varies, so be sure to check that point.
It is generally recommended to use the shortest activation interval for that plan.

Select "Folder ID" from the options.
The trigger will activate when a file is uploaded to the specified folder.
Let's upload a file to Google Drive for testing.

Let's conduct a test.

By quoting the following output during the subsequent settings, we will achieve data integration between Google Drive and Gemini!
Click "Save" and proceed to the next step.

Next, configure the branching settings.
Click "Command Operation".
The "Branch" operation is available with the Mini Plan or higher.
Also, please note that using it with the Free Plan will result in an error.
Paid plans like the Mini Plan offer a 2-week free trial. During the free trial, you can freely try out apps and features that are usually restricted, so be sure to take advantage of it.

Specify the branching conditions.
For the branching operation and output, select as shown on the following screen.

Set the branching conditions for the desired criteria.
For example, "Minutes" is also acceptable!
This time, we will set it to branch based on whether the file name contains ".pdf", so we set it as follows.
Click "Save" and proceed to the next step.

The set branching conditions will branch as follows.
It will branch into .pdf and others.

Click "Download the file".

When the following screen appears, check the account information to be linked and proceed to the next step.

Next, set up the API connection.
Select "File ID" from the options.
Select the file you want to download.

Please conduct a test.
If the test is successful, the following screen will appear.
Click "Save" and proceed to the next step.

Next, click "Upload the file".

When the following screen appears, check the account information to be linked and proceed to the next step.

Next, set up the API connection.
Set the file attachment method and file from the dropdown as shown on the screen below.
After setting, conduct a test.
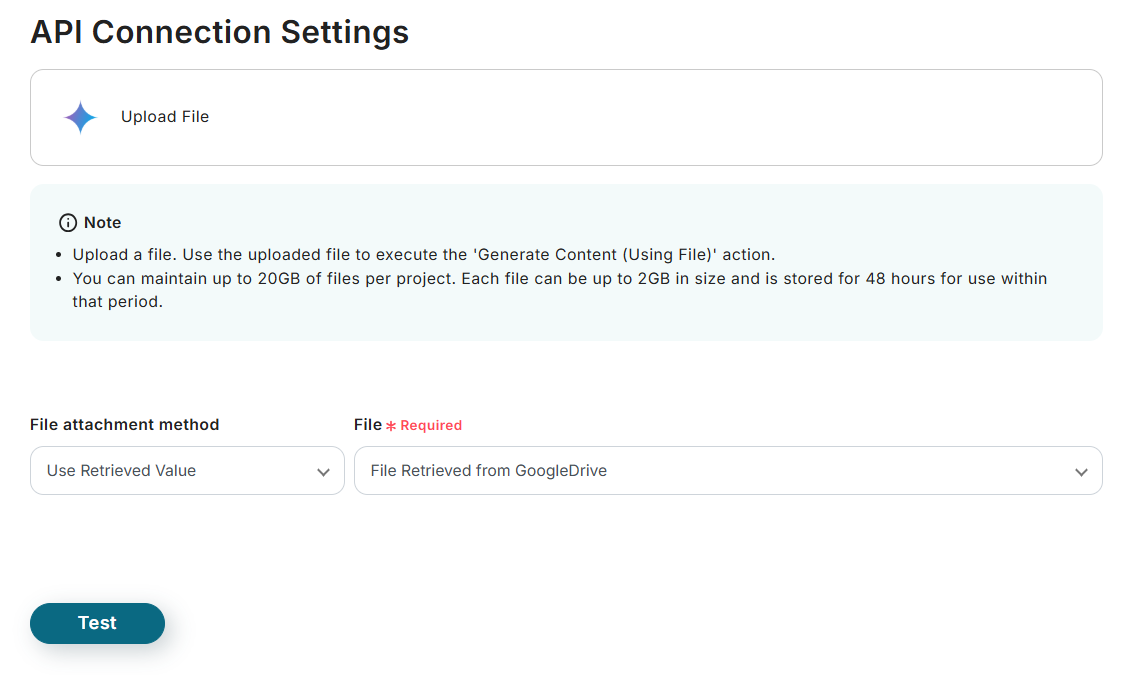
If the test is successful, the following screen will be displayed!

The following output can be quoted during subsequent settings!
Click "Save" and proceed to the next step.

Click "Generate Content (Using File)".

When the following screen appears, check the account information to be linked and proceed to the next step.

Next, set up the API connection.
Select "Model" from the options.

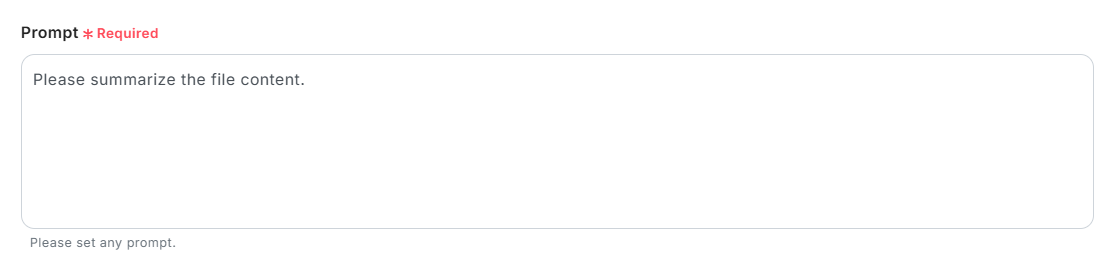
For "Prompt", please enter it with reference to the following setting example.
This is an image of the instruction text to Gemini.
For "systemInstruction", please enter it with reference to the following setting example.
Enter your company name in place of "Yoom Inc".

For "File URL", select the URL from the file upload output.

Finally, conduct a test.
If the test is successful, a "Test Successful" screen will be displayed!
Click the "Save" button at the bottom and proceed to the next step.
Next, click "Send a message to the channel".

When the following screen appears, check the account information to be linked and proceed to the next step.
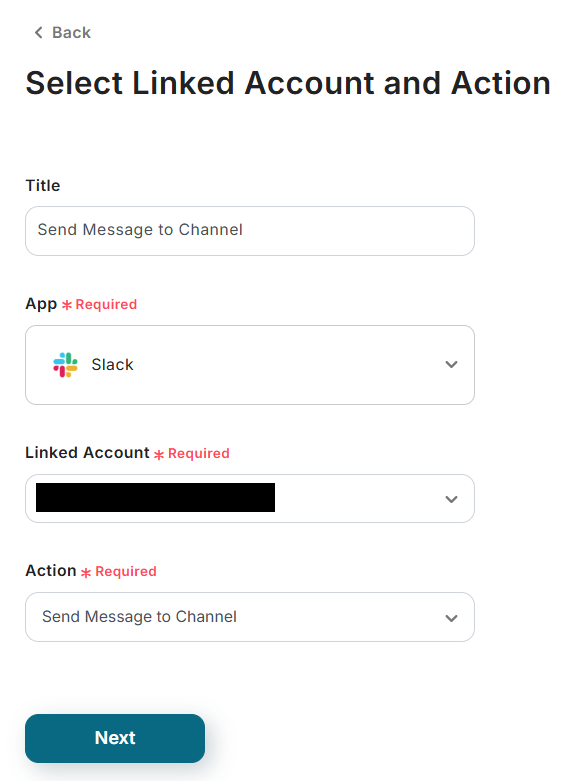
API connection settings.
Select the "Channel ID to Post" from the options for the Slack channel you want to notify.

For "Message", please enter it with reference to the following setting example.
By selecting "Generated Content" from the output and entering it, the generated text will be quoted in the Slack message.

Let's conduct a test.
If the test is successful, the following screen will be displayed.

Please also check the Slack channel.
Normally, the message will be notified with the text generated by Gemini as set above.

Finally, click "Save" and proceed to the next step.
When the following screen appears, click "Turn on Trigger".
All settings are complete!
Good job!

It is possible to automate various tasks using the Google Drive and Gemini APIs.
If you find something interesting, please give it a try!
You can create folders in Google Drive triggered by client registration or upload attachments to Google Drive.
It is also possible to store invoices and contract details in Google Drive.
You can analyze the content of messages posted in chat tools with Gemini and update responses.
The content answered in the form can be summarized with Gemini and notifications can be sent.
By integrating Google Drive with Gemini, you can automate file verification and document organization.
This reduces the workload of tasks such as file verification, summarizing and issuing documents, and reading updated files.
<span class="mark-yellow">Implementing this automation can prevent overlooking files and reduce the hassle of issuing documents.</span>
This automation is especially beneficial for those who want to reduce manual work and ensure thorough file verification!
If you are interested in automation using Yoom, please create a free account here.
Registration is simple and can be completed in about 30 seconds, making it possible to set up during work!
Let's utilize the templates introduced this time to streamline your operations!

.avif)


