

Automatically Issue and Send/Forward Quotations in Microsoft Excel to Chat Tools
It notifies the chat you are using with the issued quotation.
This ensures smooth information sharing within the team.
.avif)
・

When creating quotes in Microsoft Excel, do you ever feel that "it's a hassle to enter the same information every time" or "it's tedious to create an email for each send"?
Transcribing the content received from the form into Excel, creating a quote, and sending it via Gmail—doing this entire process manually can easily lead to input errors and delays in response.
That said, when trying to automate tasks, some might worry, "Is programming necessary?"
<span class="mark-yellow">That's where the no-code tool Yoom comes in handy.</span>
With Yoom, you can automatically create quotes in Excel triggered by form submissions and send them via Gmail, all without any specialized knowledge.
In this article, we will introduce ways to streamline your work by automating quote creation and integrating Microsoft Excel with other tools.
If you want to improve efficiency and reduce the burden of handling quotes, please take a look.
Yoom offers templates for Microsoft Excel and Gmail!
If you want to try it right away, click the banner below to get started!
There are several ways to automatically create quotations in Microsoft Excel.
Here are some methods we've picked out for you to check out!
Simply click "Try it out" on the automation example you're interested in and register an account to immediately experience automatic updates in Microsoft Excel.
Registration takes just 30 seconds, so feel free to give it a try!
The information from the form is reflected in Microsoft Excel, and after issuing the quotation, it will send an email for you.
<span class="mark-yellow">All the tasks that were previously done manually are fully automated, leading to improved work efficiency.</span>
It notifies the chat you are using with the issued quotation.
This ensures smooth information sharing within the team.
Automatically uploads issued quotations to the specified storage service.
Recommended for those who find uploading files and transcription cumbersome.
Now, let's actually create a flow to automatically generate quotes in Microsoft Excel!
This time, we'll proceed with the setup using Yoom without any coding, so if you don't have a Yoom account yet, please register through this form to create an account.
[What is Yoom]
<span class="mark-yellow">This time, we'll create a flow bot that links data to Gmail when a contact is registered in Microsoft Excel!</span>
The creation process is broadly divided as follows:
First, register your My Apps for Microsoft Excel and Gmail.
Click "Add" on the right from "My Apps" on the left.

After clicking "Add," search for "Microsoft Excel" from the list of apps.

Next, sign in to your Microsoft account.
There are personal and business plans (Microsoft 365 Business) for "Microsoft 365 (formerly Office 365)."
Please note that if you do not have a business plan, authentication from Yoom may not work properly.
First, enter your address.

Enter your password and sign in.

Once "Microsoft Excel" appears in My Apps, registration is complete!
Search for "Gmail" from the list of apps.

When the following screen appears, click "Sign in with Google."

Select the Google account you want to use.
Enter your password and sign in to your Google account.

Once "Gmail" appears in My Apps, registration is complete!
Let's start creating the Flowbot from here!
Click "Try it out" on the banner below to copy the template.
Once the template has been copied, the following screen will appear.
Click "OK" to proceed to the next step.

First, set up the app trigger.
Click "When a response is submitted to the form".

When the following screen appears, verify the account information to be linked and proceed to the next step.

Next is the API connection settings.
Select the trigger interval from the dropdown.
The trigger timing can be set to 5 minutes, 10 minutes, 15 minutes, 30 minutes, or 60 minutes.
Check the usage plan to see the shortest interval that can be set for the trigger.
We recommend using the shortest interval for your plan.

Enter the form ID after checking the notes below the input field.

Perform a test.

By quoting the following retrieved value during the subsequent settings, you will achieve data integration between Microsoft Excel and Gmail!
Click "Save" to proceed to the next step.

Next, click "Issue Document".

Next is the document integration.
After verifying the account information to be linked, scroll down.

Let's integrate the template document.
You can choose the file storage location from OneDrive and SharePoint.
Select the tool you usually use from the dropdown.
This time, we chose OneDrive.

Select the drive ID from the options.

Select the item ID from the options.
Select the target Microsoft Excel data.

Next is the issued document.
Select the destination folder ID from the options.
Specify the folder to store the issued document.

Set the file name when the issued document is exported.
Enter the exported file name with reference to the following example settings.
Select "Company Name" from the retrieved value.
Once the settings are complete, proceed to the next step.

Next, set the replacement conditions.
Refer to this guide for setting up the template document.
Select the matching item from the retrieved value for the replacement string (left) for the target string (right).
Refer to the screen below and enter the items for company name, contact person, email, and product name (item).

Perform a test.
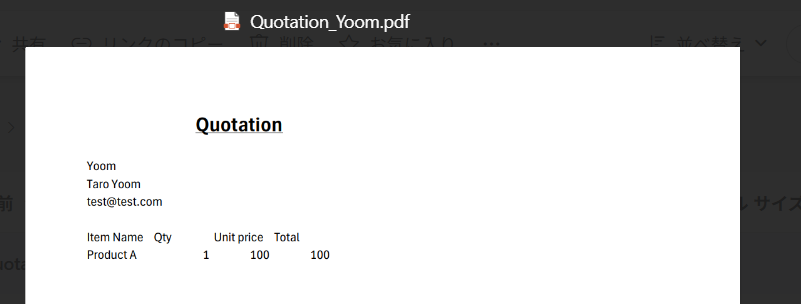
If the test is successful, download and check the document.

Check if the Google Form data is reflected in the issued document.
Once confirmed, click "Save" to proceed to the next step.
Next, click "Send Email".

Next is the email settings.
After verifying the account information to be linked, scroll down.

Set the email content.
Enter the From email address.
Select from the options.

To is the recipient of the issued document.
Select the email address from the retrieved value.

Enter the subject with reference to the example settings.

Enter the body text with reference to the example settings.
Select contact person and item from the retrieved value.

Set the attachment as follows.
The issued document will be attached.
Proceed to the next step.

Next, test the email sending.
Check the email content and perform the test.

If the test is successful, check if the email has been received.

Once you have checked the email, click "Save" to proceed to the next step.

When the following screen appears, click "Turn on Trigger".
This completes all the settings!

It is possible to notify and forward information obtained in Microsoft Excel to other tools. Additionally, you can add or update information from other tools in Microsoft Excel.
The effort involved in creating and sending quotes is one of the challenges that can accumulate in daily operations.
As introduced in this article, by using Yoom, you can easily build a process to create quotes in Microsoft Excel based on information received from forms and automatically send them via Gmail without any programming knowledge.
By streamlining repetitive tasks, you can focus more on important work.
Start with a free registration and experience the automation of quote tasks.
.avif)


