How to integrate Outlook with Notion to read invoices received in Outlook using OCR and add them to a Notion database
How to Utilize AI Operations
・
2025/01/23
How to integrate Outlook with Notion to read invoices received in Outlook using OCR and add them to a Notion database
n.watanabe
Are you struggling with the hassle of manually transcribing invoice information in your accounting tasks? Processing invoices takes time and effort, posing a challenge to overall business efficiency.
The solution to this problem is a workflow using the no-code tool Yoom to "read invoices received in Outlook with OCR and add them to a Notion database." This simplifies information management and allows you to focus on other important tasks.
In this article, we will specifically explain the setup steps and benefits of using Yoom, so read on to take a step towards efficiency.
Recommended for
Those who want to reduce the task of transcribing invoice information and improve work efficiency
Those who want to centrally manage invoice information in Notion for smooth searching and sharing
Personnel or managers in companies looking to promote paperless and digital accounting operations
Those aiming to automate the invoice management flow and speed up follow-up responses
Now, let's explain how to use the no-code tool Yoom to "read invoices received in Outlook with OCR and add them to a Notion database."
[What is Yoom]
How to read invoices received in Outlook with OCR and add them to a Notion database
It is possible to automatically read invoices received in your Outlook inbox with OCR functionality and add the necessary information to a Notion database using Notion's API. Generally, achieving such business automation requires programming knowledge and API expertise, but with the no-code tool Yoom, it can be easily accomplished without programming knowledge.
The general flow of setting up the process is as follows:
Connect Yoom with Outlook and Notion as My Apps
Copy the template
Detailed flow settings
Turn on the trigger
If you are not using Yoom, please register for free here. If you are already using Yoom, please log in.
Step 1: Connect Outlook and Notion with My Apps
First, let's connect the apps used in this flow with Yoom. After logging into Yoom, click on "+ New Connection" from "My Apps" in the left menu.
When the app search window appears, search for each app by name.
Connect Outlook with My Apps
Log in to your Microsoft account.
Once you enter the Microsoft account information you want to connect, it will automatically complete the connection with Yoom. No complicated settings are required.
※Microsoft365 (formerly Office365) has a home plan and a general business plan (Microsoft365 Business), and if you are not subscribed to the general business plan, authentication may fail.
Connect Notion with My Apps
※Before connecting with My Apps, create the data page to be used in the flow. The page created this time is as follows.
Enter your Notion login information and click "Select Page".
Proceed to the next step, and a list of pages created in Notion will be displayed.
The pages checked here will be connected with Yoom. If you create a page to be used in the flow after connecting with My Apps, you need to reconnect and check it. (Not necessary for modifications.)
Click "Allow Access" to complete the My Apps connection between Yoom and Notion.
Make sure the app is added to the list.
Now the preparation is complete. Let's move on to the detailed settings of the flow. Click "Try it" from the banner below to copy the template.
Step 2: Set Up App Trigger
The initial setting is "When an email with a specific subject is received". Specify the keywords included in the title to start the flow.
On the first page, the account information of the Outlook linked with My App is reflected.
Check the account information, and if necessary, modify the title before proceeding.
On the next page, set the trigger activation interval.
The trigger activation interval can be selected from 5 to 60 minutes, but please note that it may not be selectable depending on your Yoom subscription plan. Select the email folder ID from the candidates and specify the keywords to activate the flow.
Once all inputs are made, send a title containing the keyword to the specified email folder and click "Test".
If the test is successful, the output can be obtained.
Once confirmed, click "Save" to complete the trigger setup.
Step 3: Set Up Branching
Next, set up branching. Determine whether to proceed with the flow based on the presence or absence of attachments in the sent email.
Note that branching is a feature available in the Mini Plan or higher. If you are on the Free Plan, the flow bot you set will result in an error, so please be careful. The paid plan offers a 2-week free trial, during which you can use the branching feature.
In the very first flow, the output for "Presence of Attachments" is set to "true" to proceed to the next flow. If there are no issues, click "Save" to complete the branching setup.
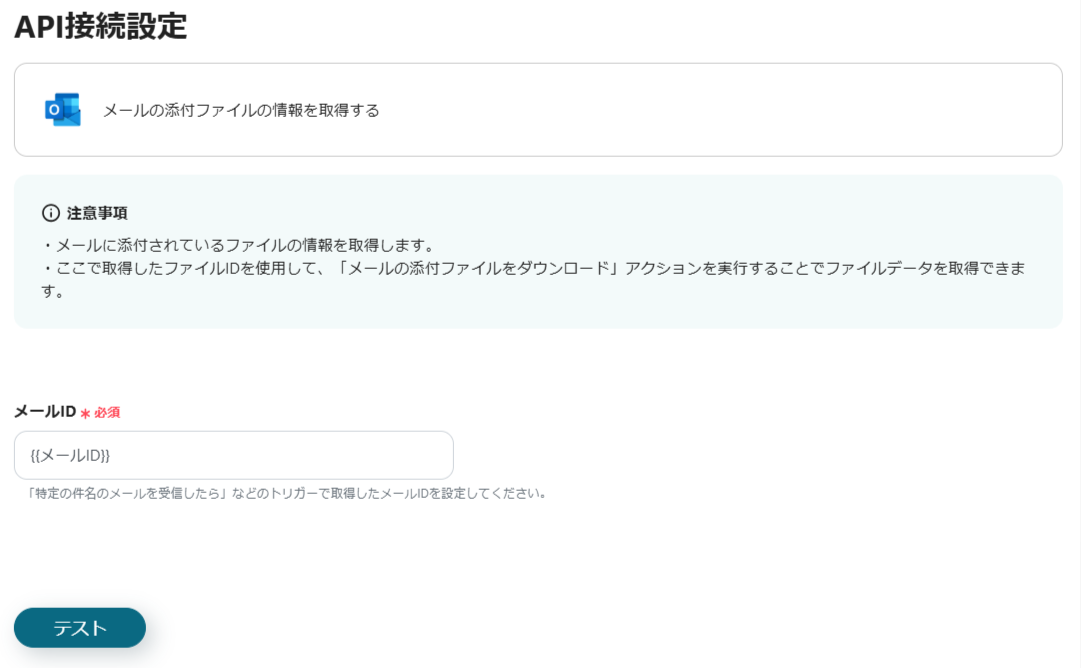
Step 4: Set Up to Retrieve Attachment Information
Next is the setup to "Retrieve Attachment Information from Email". On the first page, modify the title and verify the account information before proceeding.
Based on the "Email ID" output obtained in the app trigger setup, retrieve the attachment information. Click "Test" as is.
Once the test is successful and you have confirmed that the attachment information has been retrieved, click "Save" to complete the setup.
Step 5: Set Up to Download Files
Next is the setup to "Download Email Attachments".
After modifying the title and verifying the account information, proceed with the setup to download the file.
This setup downloads the attached files from the "File ID List" of the email specified by "Email ID".
Click "Test" as is.
The test was successful, and the download of the attachment is complete. Click "Save" to complete the setup so far.
Step 6: Set Up to Read Text
Next is the setup to "Read Text from Images/PDFs".
This AI operation (text reading) is available only in some paid plans. If your plan is not eligible, the operation of the flow bot you set will result in an error, so please be careful. The paid plan offers a 2-week free trial, during which you can use restricted AI operations.
First, set up the action.
Since the attached file is an invoice, the above setting is used, but there are also actions to read emails, resumes, receipts, etc., so set it according to the content of the attached file.
Next, configure the detailed settings for the information to be obtained.
Specify which information to extract from the obtained file. If there is information you want to obtain other than the default, enter it manually.
The content of the obtained file is as follows.
Once all inputs are made, click "Test".
The test was successful, and the default content and specified phone number information were obtained in the output. Once confirmed, click "Save" to complete the text reading setup.
Step 7: Set Up to Add Records to Notion
The final setup is to "Add Records". Reflect the information obtained so far in the Notion database.
On the first page, as with Outlook, modify the title and verify the account information. Proceed to the database integration input field, and enter the Notion page information you will use.
Click "Next" to confirm the connection to the database. Next, configure the detailed settings for the information to be reflected in Notion.
The "Values of the Records to be Added" reflect each item of the created Notion database. Utilize the output to set which information to reflect in which item.
Once all settings are made, click "Test".
The information was added as specified. Once confirmed, click "Save" to complete all settings.
Finally, turn on the trigger to activate the flow.
Now, invoices received via Outlook email are read by OCR and automatically added to Notion. The flow you set is as follows.
To Further Automate
Once you become familiar with operating Yoom, try arranging the flow to make it even more user-friendly. You can change triggers to specific dates or days of the week to collect data at set times or receive notifications when information is added to Notion.
Refer to the following to achieve "I wish it could do just a little more."
Check File Uploads with Scheduled Triggers
Some people may want files to be uploaded at a specific time due to work requirements. In that case, set a schedule trigger by date, time, or day of the week.
By incorporating this trigger, you can automatically perform OCR analysis on unprocessed document data at specific times or on weekly/monthly schedules, rename files, and manage the task of storing them in Box all at once.
For example, you can create a flow to check the inbox every Friday at 5 PM and process the documents for that week all at once.
Receive Notifications When Files Are Uploaded
By adding the communication tool you usually use at the end of the flow, you can receive notifications of file uploads.
If you are managing data such as business cards, you can quickly connect to an approach. In addition to Chatwork, you can also receive notifications via Discord or Slack.
If you are not using many other tools, you can also receive notifications from Yoom.
You can set it up by simply turning on "Notify Workflow Completion" from the "..." in the top right corner of the flow settings screen.
Other Automation Examples Using Outlook and Notion
Register Meeting Schedules with Clients in Google Calendar Based on Notion Information and Send Meeting URLs via Outlook
Utilize information from the Notion database to automatically register meeting schedules with clients in Google Calendar. At the same time, by sending meeting URLs via Outlook, you can streamline schedule management and invitation tasks.
This automation is expected to reduce errors when creating schedules and enable quick adjustments.
Create an invoice using Notion database information and send an email with Outlook
An invoice is created based on the information registered in the Notion database and automatically sent via Outlook. This significantly reduces the time required for invoice creation and is expected to achieve a faster billing process.
Additionally, it may reduce manual errors.
Automatically send emails in Outlook using Notion database information
This is a flow for automatically sending emails in Outlook using information stored in Notion. By automating regular notifications and follow-up emails, you can reduce manual workload and improve the overall efficiency of the team.
Benefits of Integrating Outlook and Notion and Specific Use Cases
Benefit 1: Reduce the frequency of checking email status and lighten the workload
By integrating Outlook with Notion, when an invoice is received via email, its content can be automatically read using OCR functionality and transferred to the Notion database. This mechanism allows you to <span class="mark-yellow">reduce the tasks of constantly checking email status and manually recording invoice information.</span> This can significantly reduce the workload for accounting personnel who regularly receive invoices from multiple clients.
For example, even if invoices from multiple clients arrive on the same day, the data is automatically added to Notion in the order received, allowing the person in charge to review the content collectively. By reducing manual tasks in this way, you can create an environment where you can focus on your core duties.
Benefit 2: Smooth search and reference through centralized information management
By utilizing the Notion database, you can manage invoice information collectively, making searches and references more efficient. Within the database, you can set fields such as client name, invoice date, and amount, allowing you to easily narrow down the necessary information. <span class="mark-yellow">This system helps organize information with unified fields, even if invoice formats differ.</span>
For instance, when reviewing past invoices, you can quickly narrow down results using conditions like "client name + period." Additionally, since information is centralized, data sharing within the accounting department or with other departments will proceed smoothly. This management method can be a means of further efficiency for organizations promoting paperless and digital transformation.
Benefit 3: Shorten working time and support faster follow-up responses
By linking invoice data received from Outlook to the Notion database, you can shorten the time spent on transcription tasks. As a result, <span class="mark-yellow">accounting personnel can allocate the freed-up time to other important tasks or follow-ups with clients.</span>
For example, if there are discrepancies in the invoice content, you can quickly request confirmation from the client based on the linked data. Additionally, by establishing a flow to manage multiple invoices collectively, processing can proceed in parallel with other tasks, enabling quick responses.
This system will be particularly useful for companies with a high volume of transactions or departments looking to improve the efficiency of accounting operations.
Conclusion
Yoom is a convenient tool that allows you to easily integrate Outlook and Notion without any coding. By automating everything from receiving invoices to reading information and registering it in the database, you can streamline complex accounting tasks.
By managing information centrally, searches and sharing become smoother, and the workflow is streamlined. Why not take the first step towards easy business improvement by registering for Yoom for free?
The person who wrote this article
n.watanabe
I have been an SEO writer for 5 years and have continued to write under the motto “easy to read” and “easy to convey.”
I want to bring the convenience of Yoom, which can be linked to apps without programming knowledge, to many people!
Tags
No items found.
Related Apps
No items found.
App integration
No items found.
What is Yoom hyperautomation?
Conventional RPA can only automate simple repetitive tasks, and the setup process was very complicated. With “hyperautomation,” which combines various technologies such as AI, API, RPA, and OCR, it is possible to automate many tasks that could not be realized until now more easily than before.
Most tools simply connect one app to another, leaving the complex tasks to you. Yoom goes much further: From document creation and browser automation to OCR and generative AI, Yoom handles it all seamlessly in one platform.
Why settle for basic integrations? Streamline your entire workflow with Yoom’s powerful hyperautomation.


.avif)


