How to integrate Outlook, OCR, and Microsoft SharePoint to store documents in Microsoft SharePoint after receiving document data in Outlook and renaming the file using OCR
How to Utilize AI Operations
・
2025/01/22
How to integrate Outlook, OCR, and Microsoft SharePoint to store documents in Microsoft SharePoint after receiving document data in Outlook and renaming the file using OCR
n.watanabe
Are you spending too much time managing document data received in Outlook? Checking documents attached to emails, manually renaming files, and saving them to folders can be surprisingly burdensome.
The solution to this problem is the integration flow between Outlook and Microsoft SharePoint using the no-code tool Yoom. With Yoom, you can automatically analyze document data using OCR, rename files according to rules, and automatically save them to Microsoft SharePoint. This will reduce the management workload and make searching and sharing smoother.
In this article, we will briefly introduce how to set up Yoom and its benefits. If you want to make document management easier, please read on.
Recommended for
Those aiming to improve the efficiency of managing document data received in Outlook
Those who want to streamline centralized management and sharing of documents in Microsoft SharePoint
Those who want to standardize document naming conventions to improve search and organization efficiency
Those considering using APIs and AI OCR to reduce manual work and automate operations
Benefits of Integrating Outlook and Microsoft SharePoint and Specific Use Cases
Benefit 1: Efficiently Organize and Manage Document Data Received in Outlook
Read document data such as invoices and contracts received in Outlook using OCR functionality, and rename files based on pre-set rules. <span class="mark-yellow">This system maintains file name consistency, making it easier to search and organize.</span>
For example, if an invoice is sent via email from a customer, the file name is changed to a format that includes the customer name and date read by OCR. By setting such rules, document management is simplified, and manual tasks are reduced.
Benefit 2: Centralized Management and Smooth Sharing of Document Data in Microsoft SharePoint
By automatically saving organized document data to a specified folder in Microsoft SharePoint, centralized data management becomes possible. <span class="mark-yellow">Additionally, using Microsoft SharePoint's sharing features enables quick information sharing with stakeholders.</span>
For example, if you set up to save estimates in the "Project A" folder used by multiple project members, anyone can access the necessary data. This reduces the hassle of sending and receiving files and improves work efficiency.
Benefit 3: Improve Search Efficiency with Unified File Naming
Automatic naming based on file content using OCR functionality achieves unified naming conventions. <span class="mark-yellow">As a result, you can efficiently search for necessary data among a vast number of files.</span>
For example, by setting a rule to unify estimate file names in the format "CustomerName_ProjectName_Date," you can easily find documents for specific customers or projects. Such rules not only improve search efficiency but also reduce errors and confusion, contributing to enhanced reliability in operations.
Now, let's explain how to use the no-code tool Yoom to "read document data received in Outlook with OCR, update the file name, and store it in Microsoft SharePoint."
[What is Yoom]
How to Read Document Data Received in Outlook with OCR, Update the File Name, and Store it in Microsoft SharePoint
This can be achieved by obtaining document data received in Outlook using Outlook's API, analyzing the content with OCR, and storing the data in a specified folder using Microsoft SharePoint's API.
Generally, programming knowledge is required to achieve this, but with the no-code tool Yoom, it can be easily realized without programming knowledge.
The general flow of setting up the process is as follows:
Integrate Yoom with Outlook and Microsoft SharePoint as My Apps
Copy the template
Detailed flow settings
Turn on the trigger
If you are not using Yoom, please register for free from here. If you are already using Yoom, please log in.
Step 1: Integrate Outlook and Microsoft SharePoint with My Apps
First, let's connect the apps used in this flow with Yoom. After logging into Yoom, click "+ New Connection" from "My Apps" in the left menu.
When the app search window appears, search for each app by name. Both are Microsoft apps, so the addition method is the same.
Log in to your Microsoft account.
Once you enter the Microsoft account information you want to integrate, it will automatically connect with Yoom. No complicated settings are required.
* Microsoft365 (formerly Office365) has both a home plan and a general business plan (Microsoft365 Business). If you are not subscribed to the general business plan, authentication may fail.
Once the My Apps integration is complete, it will be added to the list.
Now the preparation is complete. Next, we will move on to the detailed settings of the flow, so click "Try it" from the banner below to copy the template.
Step 2: Set Up App Trigger in Outlook
The initial setting is "When an email with a specific subject is received." Specify the keyword included in the title to start the flow.
On the first page, the account information of the Outlook linked with My Apps is reflected.
Check the account information and proceed to the next step after modifying the title if necessary.
On the next page, set the trigger interval.
The trigger interval can be selected from 5 to 60 minutes, but please note that it may not be selectable depending on your Yoom subscription plan. Select the email folder ID from the candidates and specify the keyword to start the flow.
Once everything is entered, send a title containing the keyword to the specified email folder and click "Test."
If the test is successful, the output can be obtained.
You can see that "Invoice" is reflected in the subject. Once confirmed, click "Save" to complete the trigger setup.
Step 3: Set Up Branching
Next, set up branching. Determine whether to proceed with the flow based on the presence of attachments in the sent email.
Note that branching is a feature available in the Mini Plan or higher. If you are on the Free Plan, the flow bot you set up will result in an error, so please be careful. The paid plan offers a 2-week free trial, during which you can use the branching feature.
In the very first flow, the output of "Presence of Attachments" is set to "true," which allows it to proceed to the next flow. If there are no issues, click "Save" to complete the branching setup.
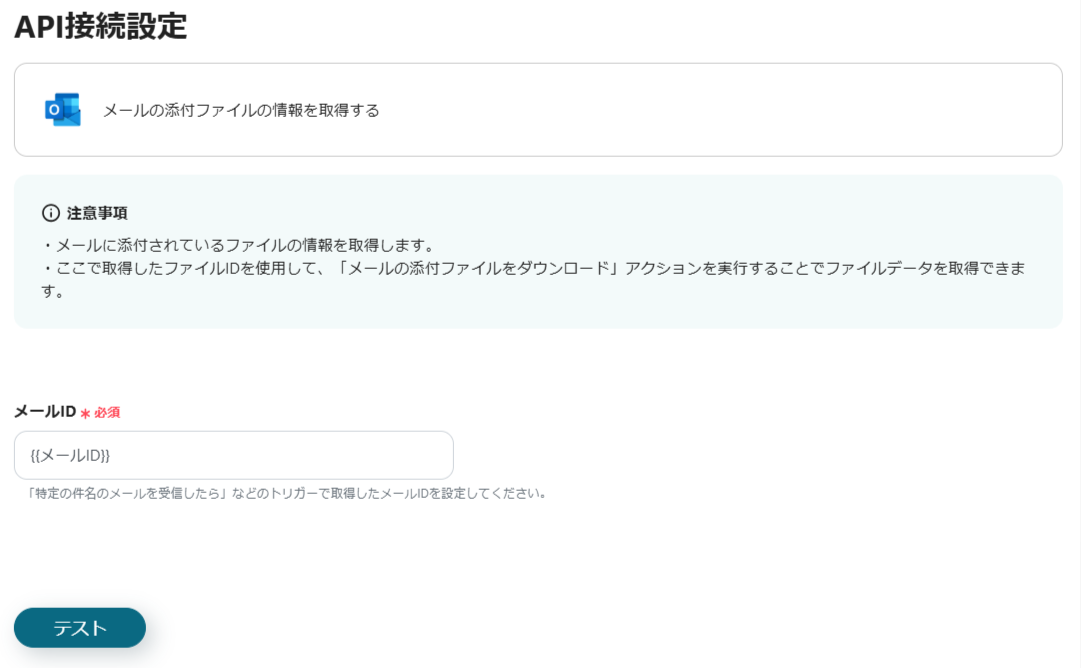
Step 4: Set Up to Retrieve File Information
Next, set up "Retrieve Information of Email Attachments." On the first page, modify the title and verify the account information before proceeding.
Based on the "Email ID" output obtained from the app trigger setup, retrieve the information of the attachments. Click "Test" as is.
Once the test is successful and you confirm that the attachment information has been retrieved, click "Save" to complete the setup.
Step 5: Set Up to Download Files
Next is the setup for "Download Email Attachments."
After modifying the title and verifying the account information, proceed to set up for downloading the file.
This is the setup to download attached files from the "List of File IDs" specified by the "Email ID."
Click "Test" as is.
The test was successful, and the download of the attachment is complete. Click "Save" to complete the setup so far.
Step 6: Set Up to Read Text
Next is the setup for "Read Text from Images/PDFs." This AI operation (text reading) is only available in some paid plans. If your plan is not eligible, the operation of the flow bot you set up will result in an error, so please be careful.
The paid plan offers a 2-week free trial, during which you can use the restricted AI operations.
First, let's set up the action.
Since the attached file this time is an invoice, the above setting is used, but there are actions to read emails, resumes, receipts, etc., so set it according to the content of the attachment.
Next, set the details of the information to be obtained.
Specify which information to extract from the obtained file. If there is information you want to obtain other than the default, enter it manually.
The contents of the obtained file are as follows.
Once everything is entered, click "Test."
The test was successful, and the default content and the specified phone number information were obtained in the output. Once confirmed, click "Save" to complete the text reading setup.
Step 7: Set Up to Upload Files
The final setup is "Upload Files." Utilize the information obtained so far to upload files to Microsoft SharePoint.
On the first page, as with Outlook, modify the title and verify the account information before proceeding. Next, perform the detailed setup for uploading.
Select each required item from the candidates or enter it manually. If the item ID does not appear in the search results based on the folder name entered, try entering only a part of it.
Once everything is set, click "Test." If the file is uploaded to Microsoft SharePoint as specified, the setup is complete. Click "Save."
Finally, turn ON the trigger.
The flow has now started. The following settings were configured:
To Further Automate
Once you become familiar with operating Yoom, try arranging the flow to make it even more user-friendly. You can set the flow to run at a specific date and time each month or accumulate data from uploaded files.
Refer to the following to achieve "It would be great if it were just a little more like this."
Manage File Uploads with Scheduled Triggers
Some people may want files to be uploaded at a specific time due to work circumstances. In that case, set a scheduled trigger by date, time, or day of the week.
By incorporating this trigger, you can automatically perform OCR analysis on unprocessed document data at specific times or on weekly/monthly schedules, rename files, and manage the task of storing them in Box collectively.
For example, you can create a flow to check the inbox every Friday at 5 PM and process the documents for that week all at once.
Accumulate Data in Google Sheets
You can set it up so that information is also added to Google Sheets when a file is uploaded. Utilizing sheets will facilitate not only sharing with other departments but also smoothly conveying information externally, such as to subcontractors.
To add information to the sheet, obtain the information using settings such as "Read text from images/PDFs," and create a corresponding Google Sheet to enable the setup.
Other Automation Examples Using Outlook and Microsoft SharePoint
Download a Document Template from Microsoft SharePoint and Send It via Outlook When a Form Is Answered
This flow automatically downloads a document template from Microsoft SharePoint and sends it to stakeholders via Outlook, triggered by a response to a form. It significantly reduces the effort of document creation and enables quick responses.
Not only is work efficiency expected to improve, but the speed of sharing with stakeholders is also expected to increase.
Extract information received in Outlook using AI and add it to Notion
This flow automatically analyzes information received in Outlook using AI and registers the necessary data into the Notion database. By reducing the burden of data entry and making it easier to organize important information, it is expected to improve work efficiency.
Additionally, centralized data management will likely enhance searchability later on.
Receive contracts via Google Forms, read them with OCR, add to kintone, and notify via Outlook
This is a flow where contract data received through Google Forms is analyzed with OCR, automatically registered in kintone, and then notified via Outlook. It eliminates the need for manual data entry and speeds up contract processing.
As a result, document management becomes easier, and it is expected to prevent oversights and improve information sharing.
Summary
By integrating Outlook with Microsoft SharePoint, managing document data becomes much easier. With Yoom, you can easily create a system that automatically analyzes documents received via email using OCR, names them according to unified rules, and saves them to SharePoint. This not only reduces effort but also improves searchability and facilitates smooth information sharing.
Yoom is a no-code tool that requires no programming, so anyone can start easily. Why not take this opportunity to register for Yoom for free and achieve efficient document management?
The person who wrote this article
n.watanabe
I have been an SEO writer for 5 years and have continued to write under the motto “easy to read” and “easy to convey.”
I want to bring the convenience of Yoom, which can be linked to apps without programming knowledge, to many people!
Tags
No items found.
Related Apps
No items found.
App integration
No items found.
What is Yoom hyperautomation?
Conventional RPA can only automate simple repetitive tasks, and the setup process was very complicated. With “hyperautomation,” which combines various technologies such as AI, API, RPA, and OCR, it is possible to automate many tasks that could not be realized until now more easily than before.
Most tools simply connect one app to another, leaving the complex tasks to you. Yoom goes much further: From document creation and browser automation to OCR and generative AI, Yoom handles it all seamlessly in one platform.
Why settle for basic integrations? Streamline your entire workflow with Yoom’s powerful hyperautomation.


.avif)


