・
BacklogとOneDriveを連携して、Backlogに新しい課題が追加されたら、OneDriveにフォルダを作成する方法

どのような職種においても、業務をスムーズに進めていくためにはタスク管理が大切と言えるはずです。中でもプロジェクトを遂行するにあたり、各メンバーとの連携やデータ共有などは非常に重要ではないでしょうか。
そのような場合に便利なのがBacklogなどのタスク管理ツールと、OneDriveなどのクラウドストレージサービスです。これらを併せて活用することにより、チームでとりかかっている課題が何なのかが把握しやすくなる上、メンバーと共有すべきデータはOneDriveで確認できるようになりますよね。
と言うことは、この2つのアプリを連携できれば、もっと便利になるのでは…?
と言うことで今回はBacklogとOneDriveを連携して、プロジェクト進行がスムースになる可能性があるアプリ連携をご紹介しましょう!
こんな方におすすめ
- Backlogでタスク管理を行っているチーム
- OneDriveでデータ共有を行っているチーム
- BacklogとOneDriveの連携で情報共有をスムーズにし、タスクと関連資料の把握を容易にしたいリーダー
- OneDriveに課題ごとのファイルを作成してデータの共有漏れを防ぎたいリーダー
それではここからノーコードツールYoomを使って、「Backlogに新しい課題が追加されたら、OneDriveにフォルダを作成する」方法をご説明します。
[Yoomとは]
BacklogとOneDriveを連携して、課題追加時にフォルダを自動作成する方法
まず、Backlogで課題が作成されるとBacklogのAPIでそのデータを取得します。その後、OneDriveのAPIで課題データを受けとり、課題と同じタイトルのフォルダをOneDriveに自動作成可能です。
このような連携の実現には、一般的にはプログラミングの知識が必要ですが、ノーコードツールのYoomを用いることでプログラミング知識がなくても簡単に実現できます。
今回の連携フローは大きく分けて以下のプロセスの通りです。
- BacklogとOneDriveをマイアプリ連携
- Backlogの課題データを取得する設定
- OneDriveにフォルダを新規作成する設定
- トリガーボタンをONにして、BacklogとOneDriveの連携動作を確認
まずはじめに、Yoomの登録を行いましょう。
Yoomは2週間のトライアルが可能です。実際に操作をして使用感を確かめることができます。
■概要
Backlogに新しい課題が追加されたら、OneDriveにフォルダを作成するフローです。
■このテンプレートをおすすめする方
1.BacklogとOneDriveを併用しているプロジェクトマネージャー・チームリーダー
・Backlogの課題ごとにOneDriveに専用のフォルダを作成し、関連ファイルを整理したい方
・手作業でのフォルダ作成の手間を省き、効率的にファイル管理を行いたい方
2.Backlogで課題管理を行い、OneDriveでファイル共有を行っているチーム
・課題関連のファイルをOneDriveの専用フォルダに集約することで、情報共有をスムーズにしたい方
・フォルダ作成を自動化することで、チームメンバーの負担を軽減したい方
■このテンプレートを使うメリット
・Backlogで新規課題が追加された際に、OneDriveへのフォルダ作成を自動化することで、手作業による作成の手間を省き、業務効率を向上させます。
・手作業によるフォルダ作成ミスを防ぎ、ファイル管理の正確性を向上させます。
・Backlogに追加された課題ごとに専用のフォルダが自動で作成されるため、関連ファイルの整理が容易となり、必要な情報をすぐに見つけることができます。
■注意事項
・OneDrive、BacklogのそれぞれとYoomを連携させてください。
・Microsoft365(旧Office365)には、家庭向けプランと一般法人向けプラン(Microsoft365 Business)があり、一般法人向けプランに加入していない場合には認証に失敗する可能性があります。
ステップ1:BacklogとOneDriveをマイアプリ連携
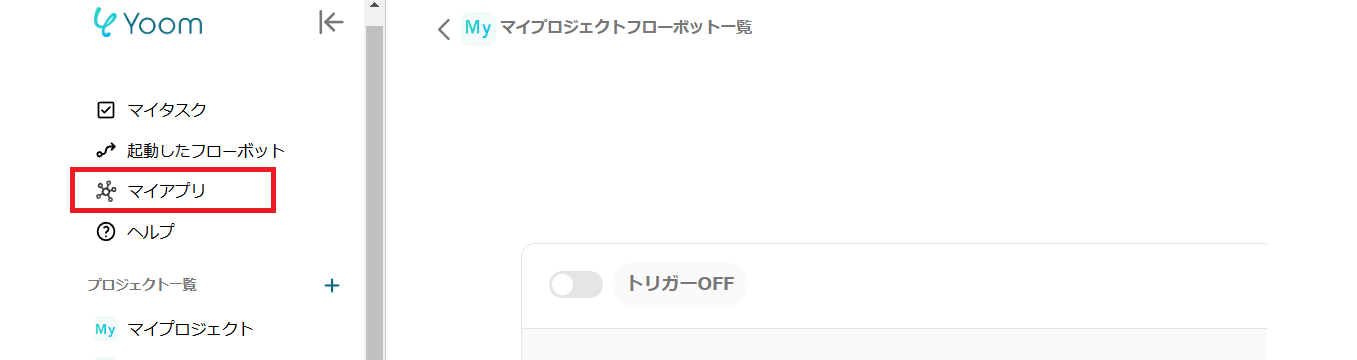
Yoomの登録完了後、左側にあるメニューから「マイアプリ」を選択してください。

次に、右上の新規接続ボタンをクリックします。
BacklogとYoomの連携
1.検索する

検索ボックスにBacklogとと入力し、Backlogのアイコンをクリックします。
2.ドメインの入力
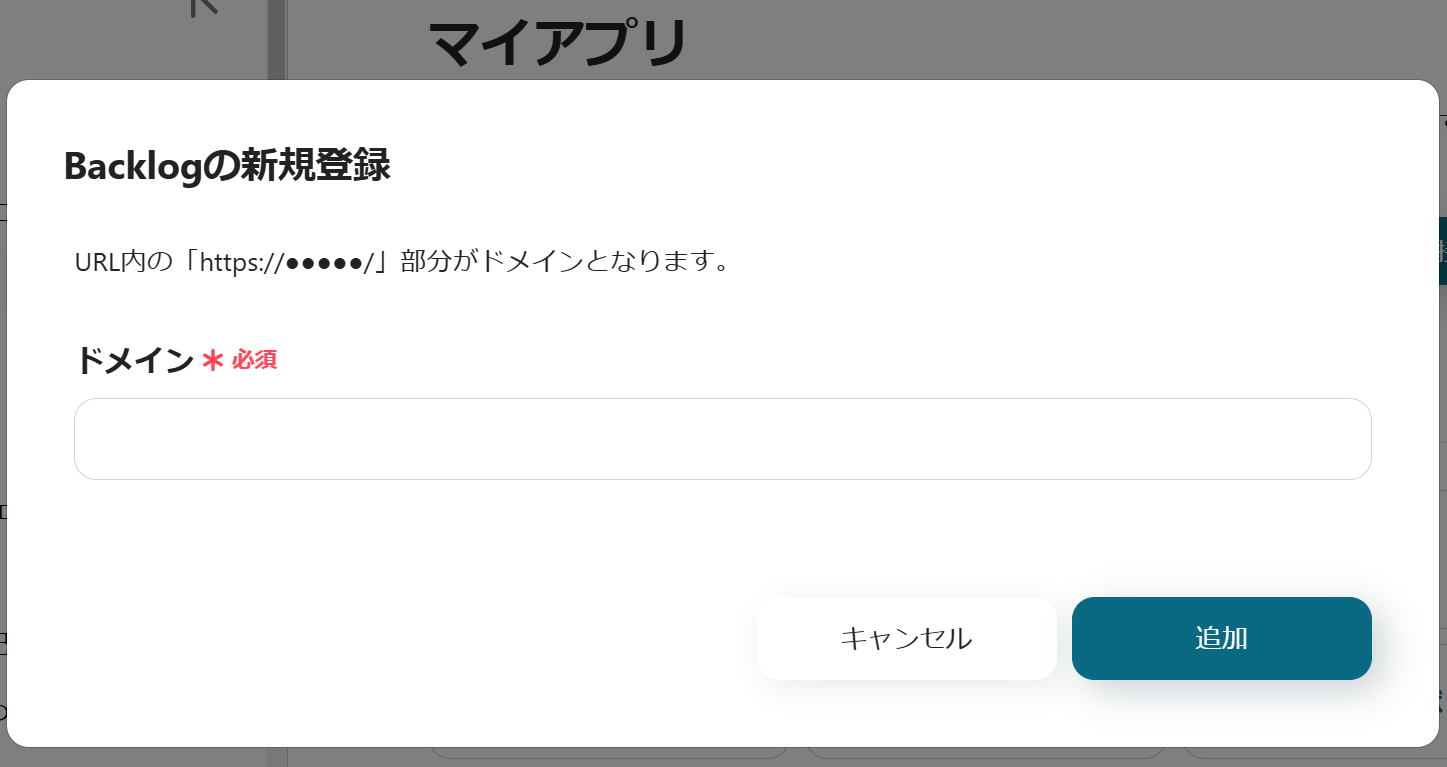
ドメインを入力します。
ドメイン=スペースIDとなるため、ログイン画面などから取得し入力してください。画像の赤枠の部分をペーストしましょう。

3.許可する
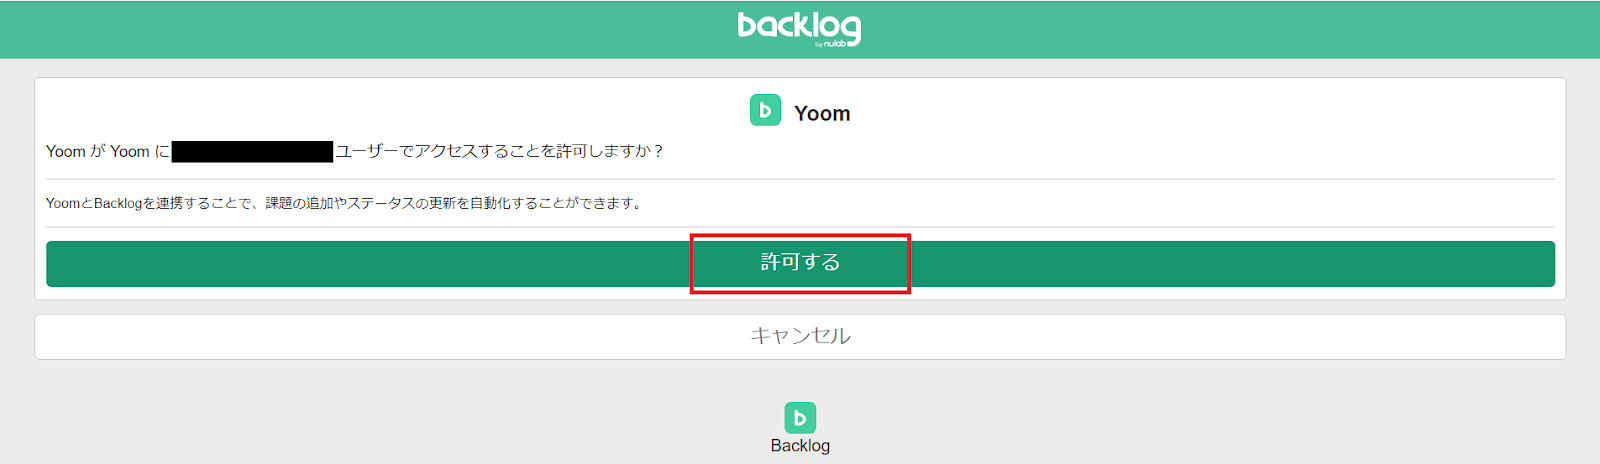
上記の画面に移行します。
赤枠の「許可する」をクリックしてください。

Yoomの画面に戻り、上記の表示が出たら連携完了です。
OneDriveとYoomの連携
1.ログインするMicrosoft365にログインしましょう。Microsoft365にログインしておくことで、マイアプリ連携が素早く完了します。
※Microsoft365(旧Office365)につきまして、一般法人向けプラン(Microsoft365 Business)に加入していない場合には認証に失敗する可能性があります。
2.検索する

OneDriveのアイコンをクリックします。
3.連携完了

すぐに画面が切り替わります。上記の表示がされれば連携完了です。
ステップ2:テンプレートのコピー
次に、今回使用するテンプレートをコピーしてください。
■概要
Backlogに新しい課題が追加されたら、OneDriveにフォルダを作成するフローです。
■このテンプレートをおすすめする方
1.BacklogとOneDriveを併用しているプロジェクトマネージャー・チームリーダー
・Backlogの課題ごとにOneDriveに専用のフォルダを作成し、関連ファイルを整理したい方
・手作業でのフォルダ作成の手間を省き、効率的にファイル管理を行いたい方
2.Backlogで課題管理を行い、OneDriveでファイル共有を行っているチーム
・課題関連のファイルをOneDriveの専用フォルダに集約することで、情報共有をスムーズにしたい方
・フォルダ作成を自動化することで、チームメンバーの負担を軽減したい方
■このテンプレートを使うメリット
・Backlogで新規課題が追加された際に、OneDriveへのフォルダ作成を自動化することで、手作業による作成の手間を省き、業務効率を向上させます。
・手作業によるフォルダ作成ミスを防ぎ、ファイル管理の正確性を向上させます。
・Backlogに追加された課題ごとに専用のフォルダが自動で作成されるため、関連ファイルの整理が容易となり、必要な情報をすぐに見つけることができます。
■注意事項
・OneDrive、BacklogのそれぞれとYoomを連携させてください。
・Microsoft365(旧Office365)には、家庭向けプランと一般法人向けプラン(Microsoft365 Business)があり、一般法人向けプランに加入していない場合には認証に失敗する可能性があります。
1.上のバナーの「詳細を見る」をクリック
2.移行した画面下部の「このテンプレートを試してみる」をクリック
3.Yoomの登録がまだの場合は、登録を行う
※既に登録が完了している場合はログイン画面が表示されるので、ログインしましょう。
フローボットのテンプレートが「マイプロジェクト」にコピーされると、上記の表示がされます。
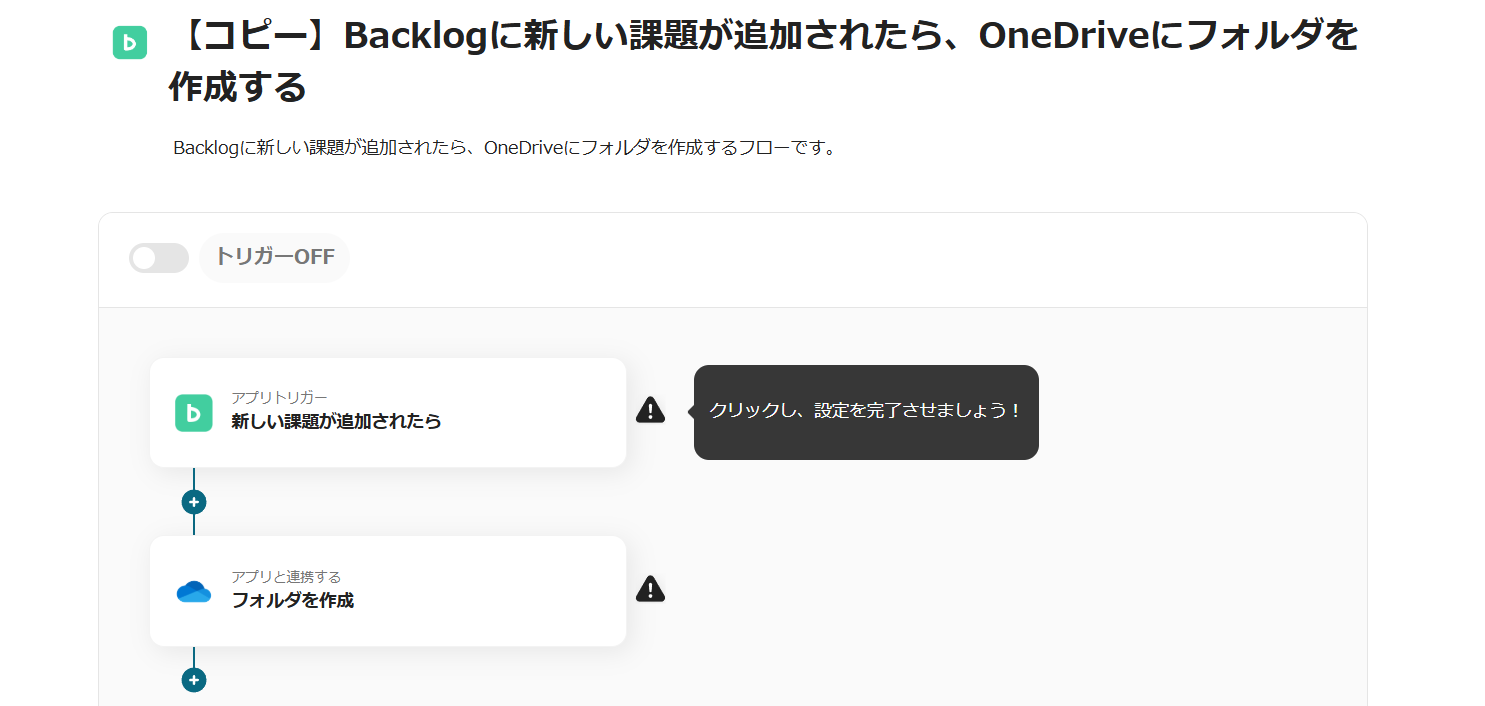
画像のようなページに移行するので、詳細な設定を行っていきましょう。
ステップ3:Backlogの課題データを取得する設定
1.マイプロジェクトを開く

画面左側のメニューから「マイプロジェクト」を開きましょう。
2.コピーしたテンプレートを開く
「【コピー】Backlogに新しい課題が追加されたら、OneDriveにフォルダを作成する」をクリックします。
3.アプリトリガーを選択
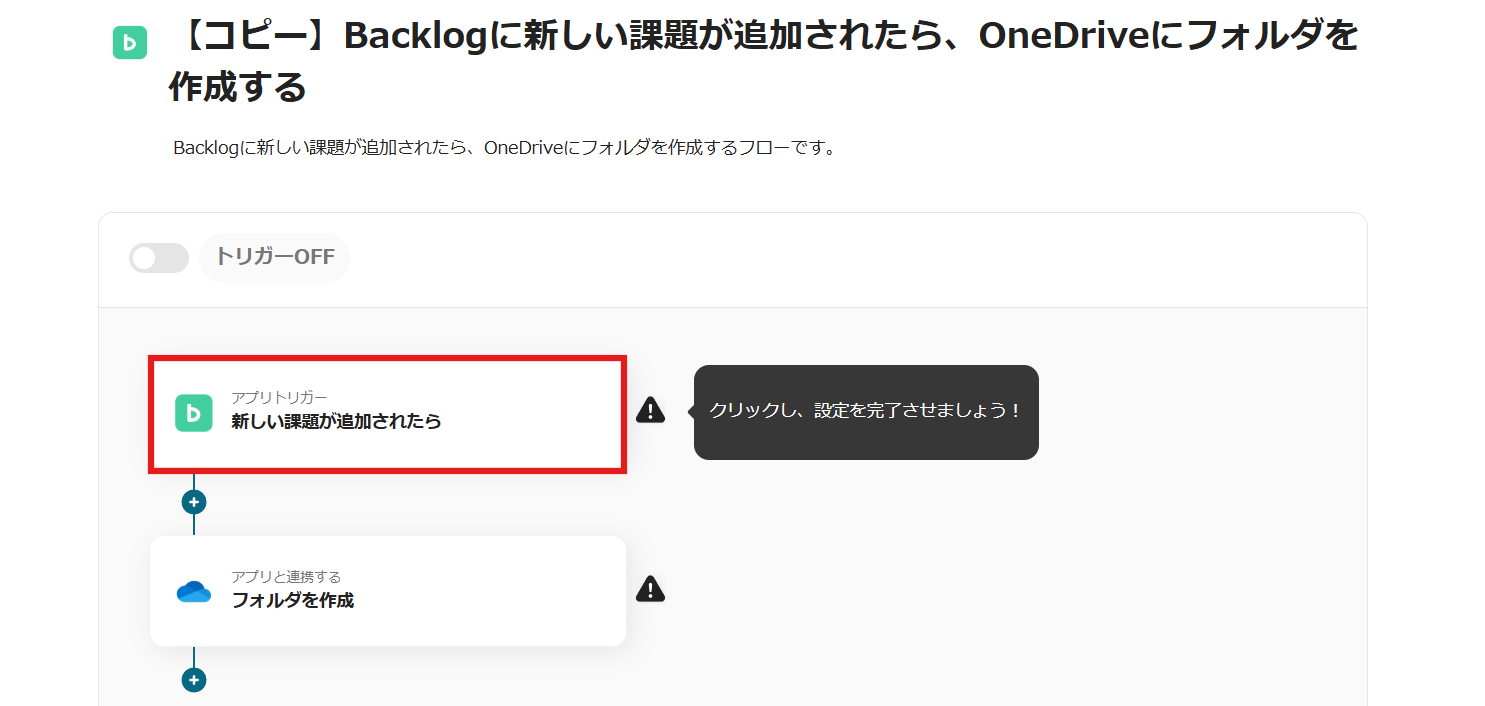
Backlogのアイコンの「新しい課題が追加されたら」をクリックします。
タイトルなどの設定は完了しているため、次へを押しましょう。
4.トリガーの起動間隔の設定
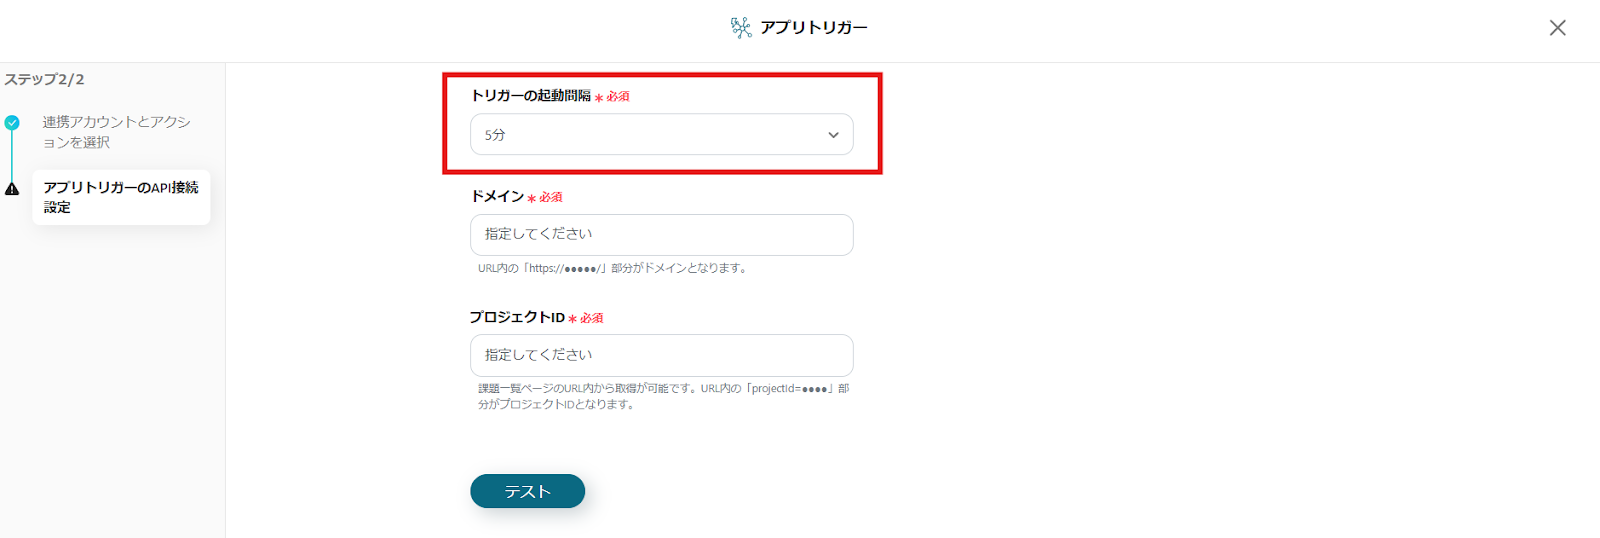
まずは起動間隔を設定しましょう。
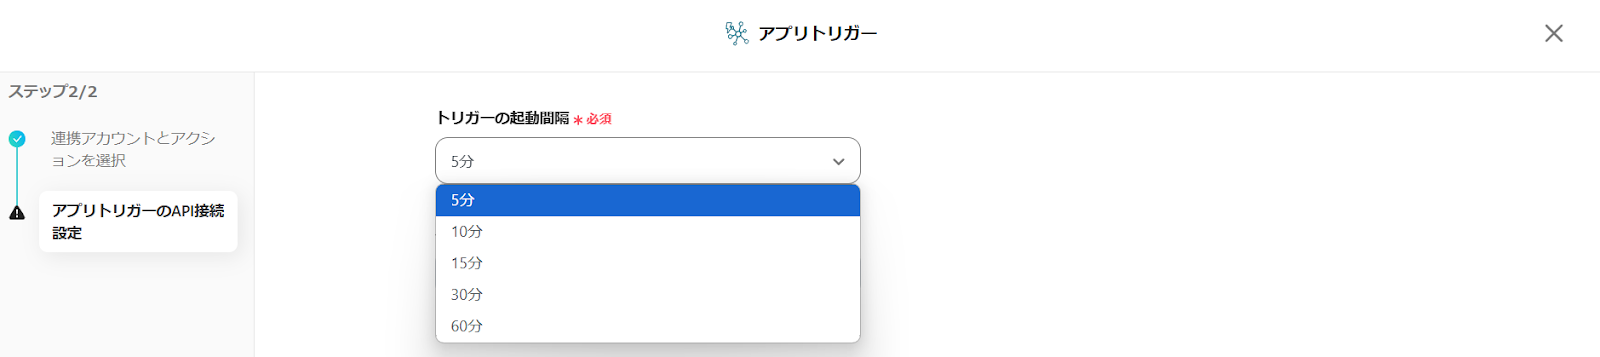
トリガーは5分、10分、15分、30分、60分の間隔で起動間隔を選択できます。
プランによって最短の起動間隔が異なりますので、ご注意ください。
5.IDの入力
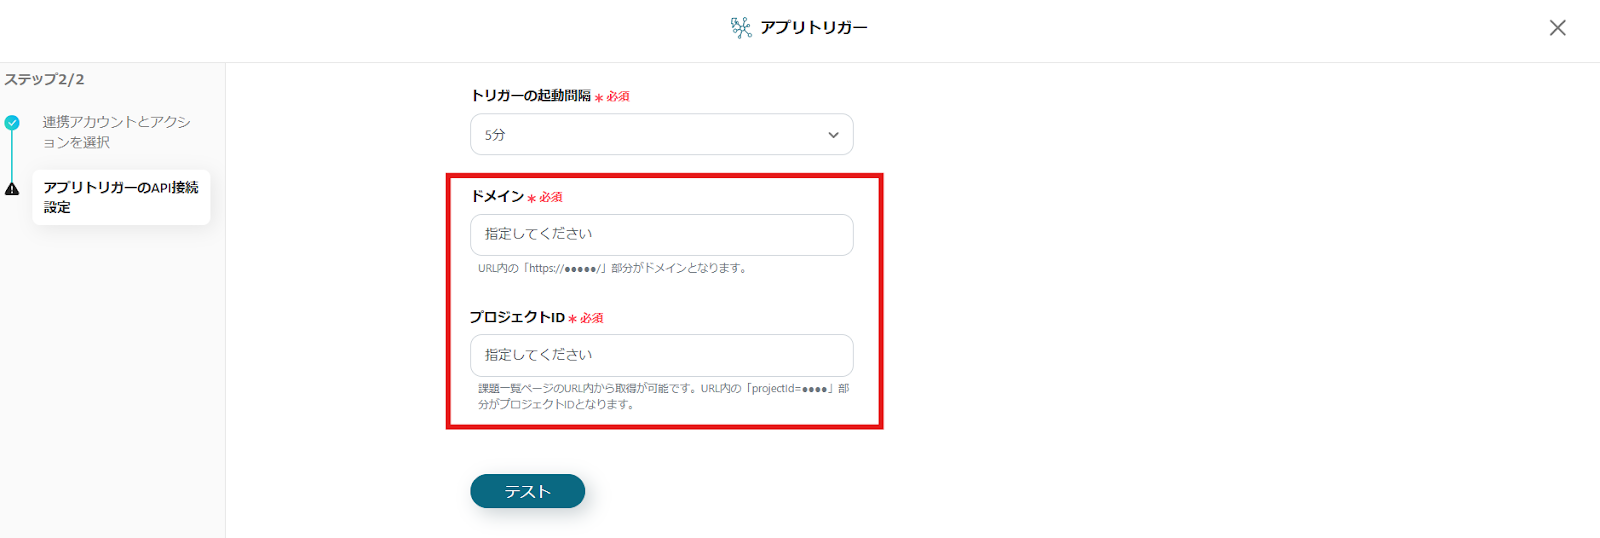
ドメインの設定と、どのプロジェクトに課題が追加されたらフォルダを作成するのか指定します。
ボックス下部の補足に従い設定しましょう。
6.テストの実行
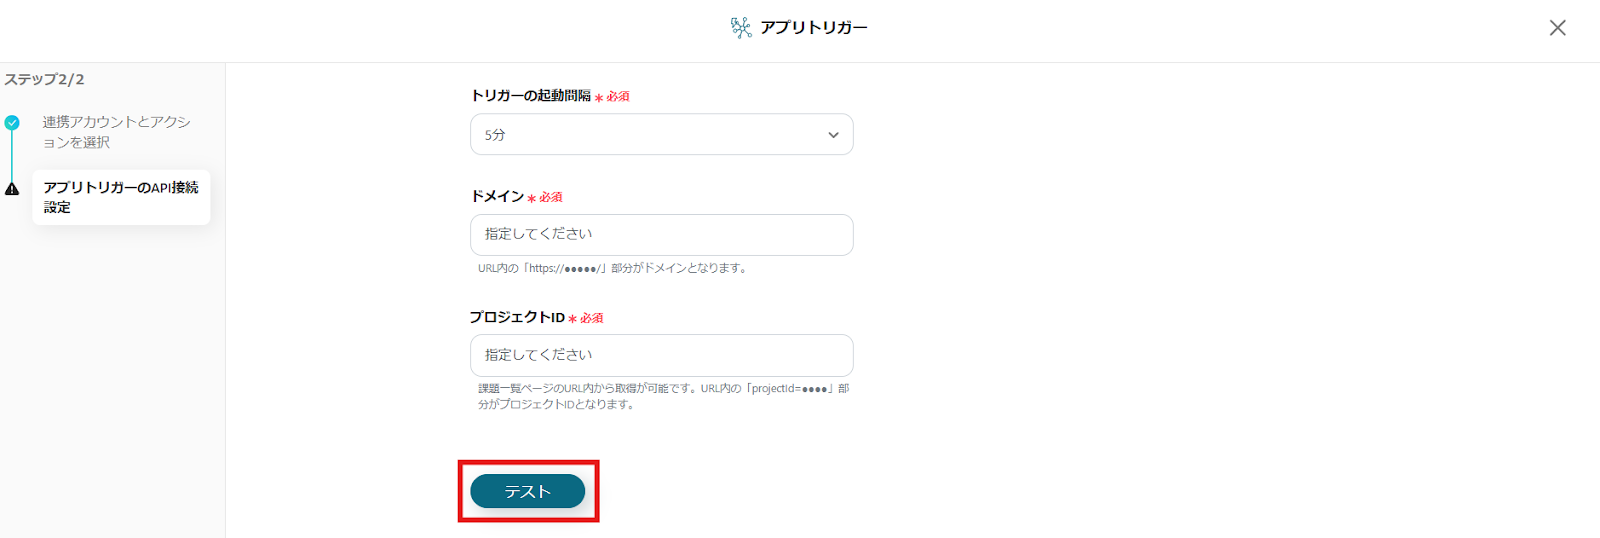
設定が完了したらテストボタンを押してください。
テスト成功と表示が出たら完了です。保存をクリックします。
ステップ4:OneDriveにフォルダを新規作成する設定
1.アプリと連携する

OneDriveのアイコンの「フォルダを作成」をクリックします。
次へを押してください。
2.必須項目の入力
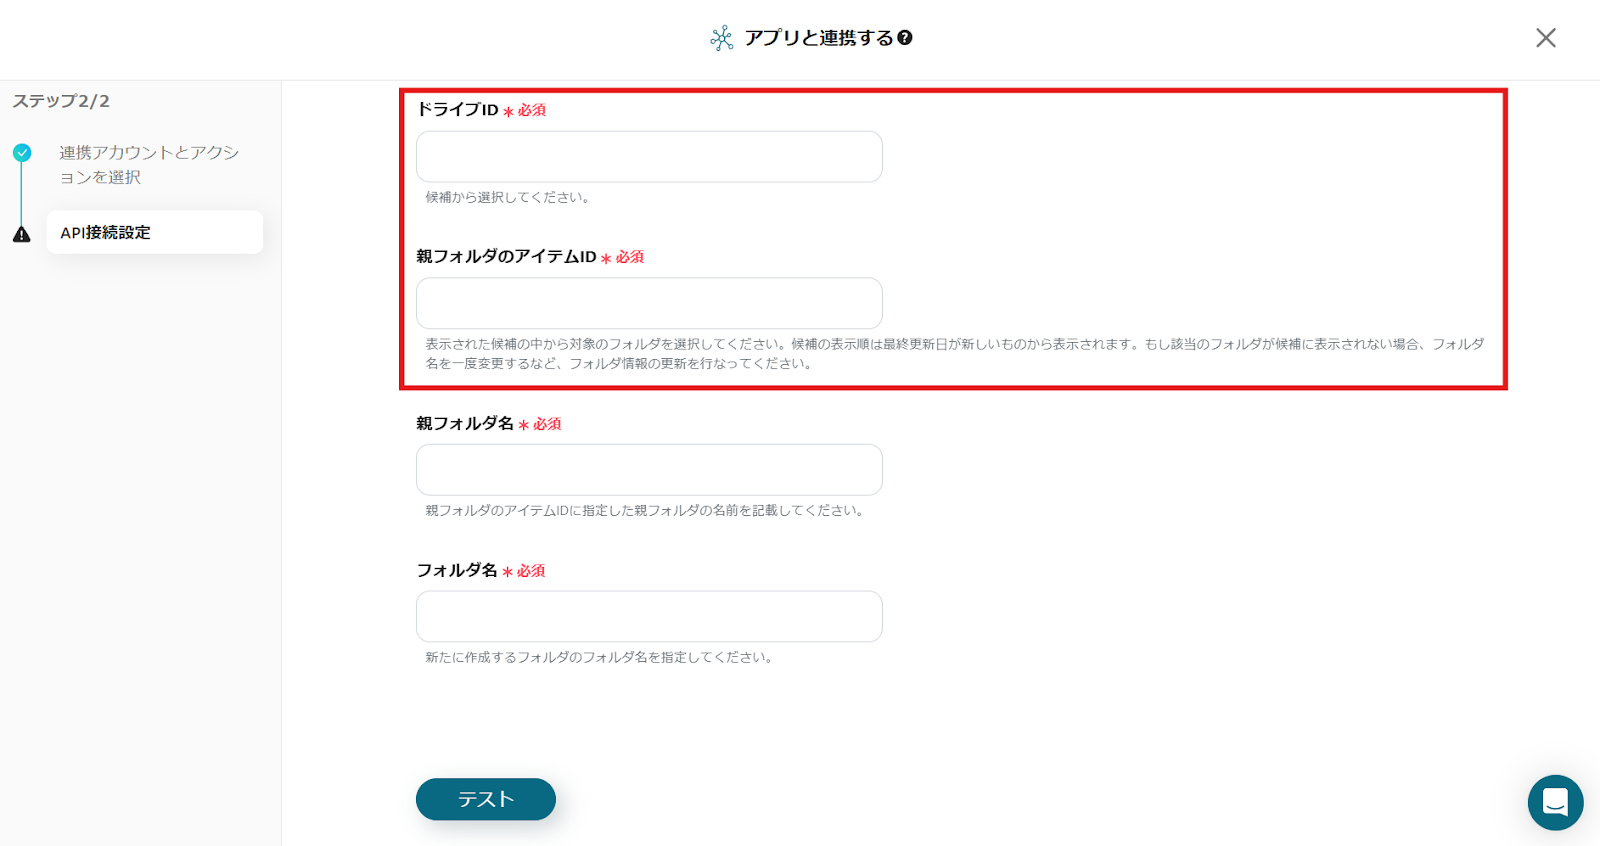
画像のページに移行します。必須項目の入力を行いましょう。
各IDはボックスをクリックすることで表示されます。
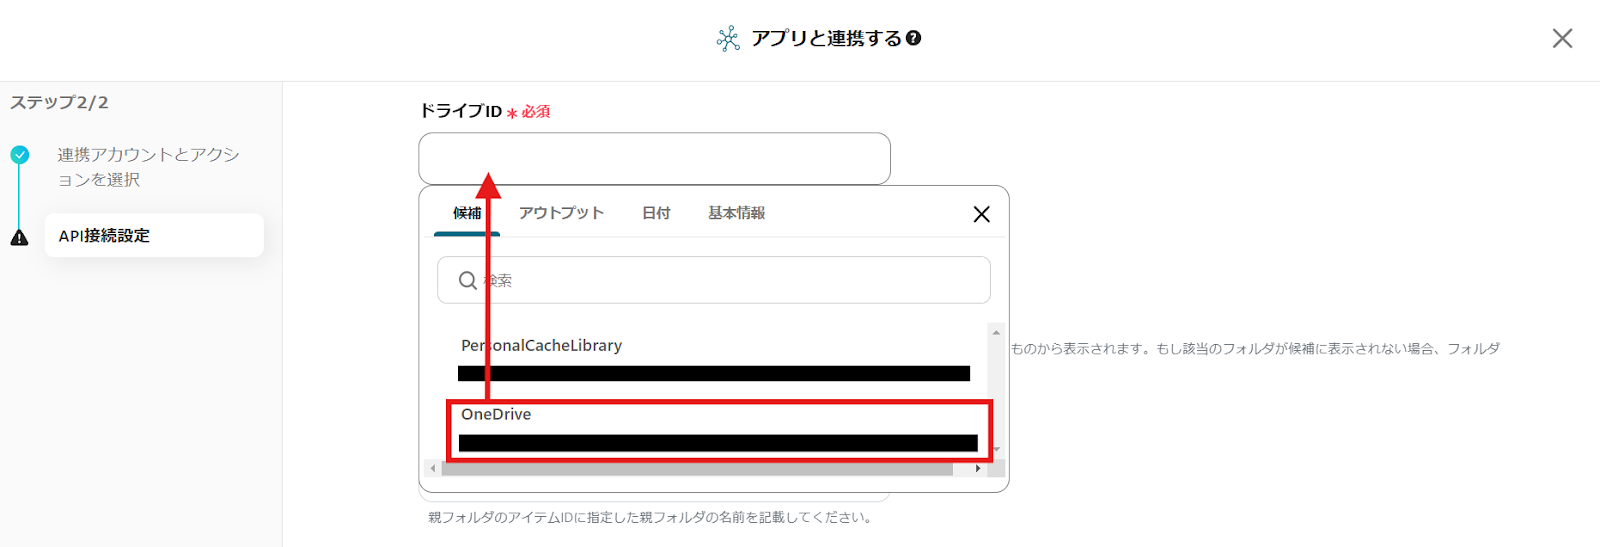
表示されたものの中からクリックで挿入しましょう。
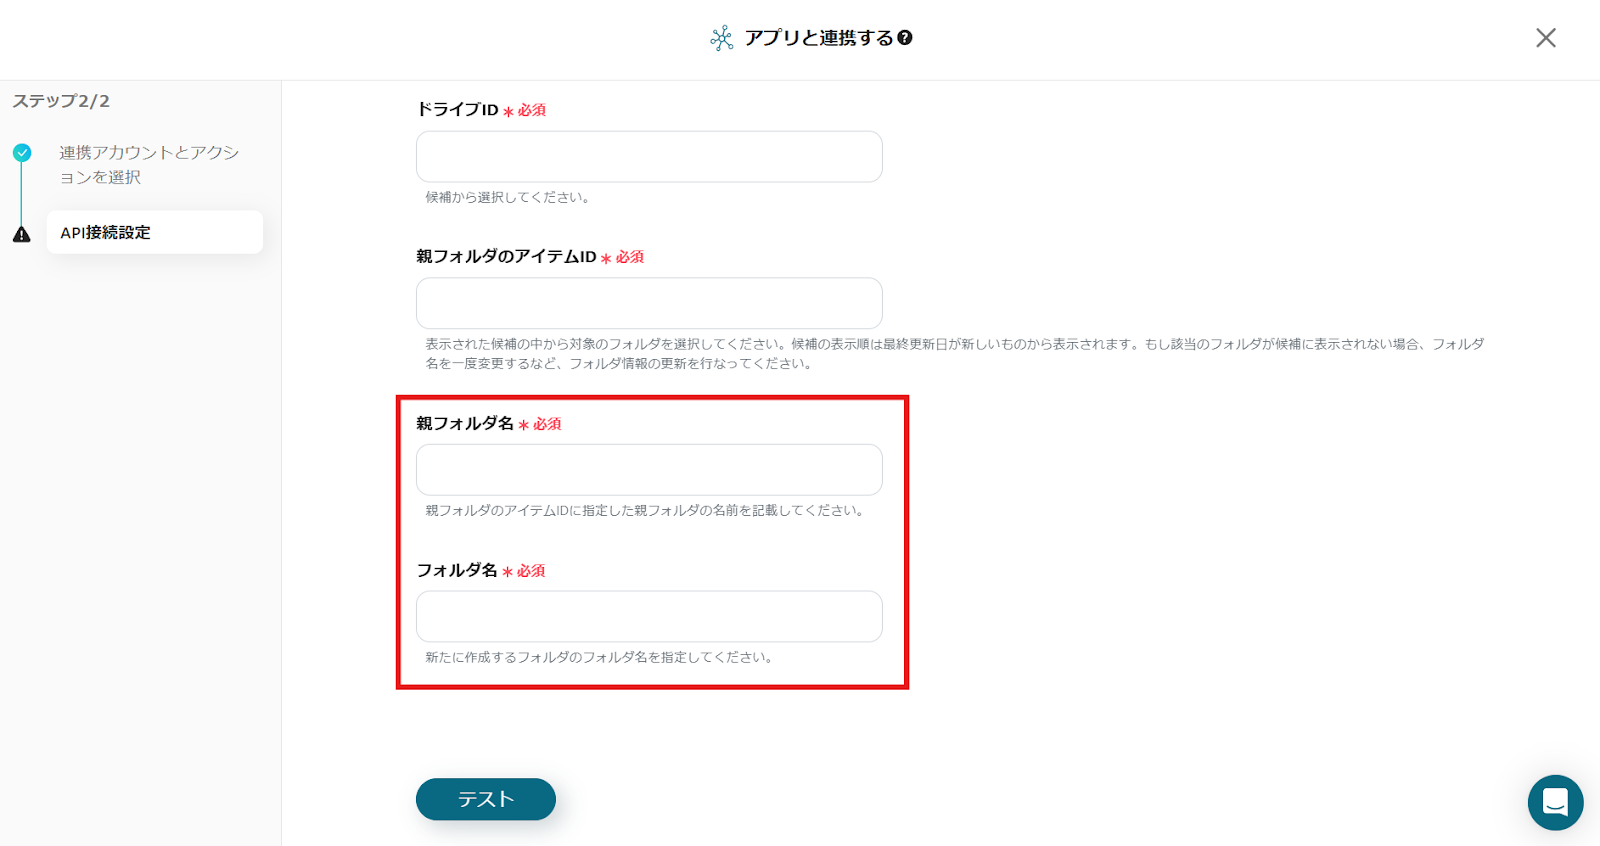
フォルダ名はテスト送信したデータを流用します。

ボックスをクリックしテキストからデータを抽出を選択しましょう。
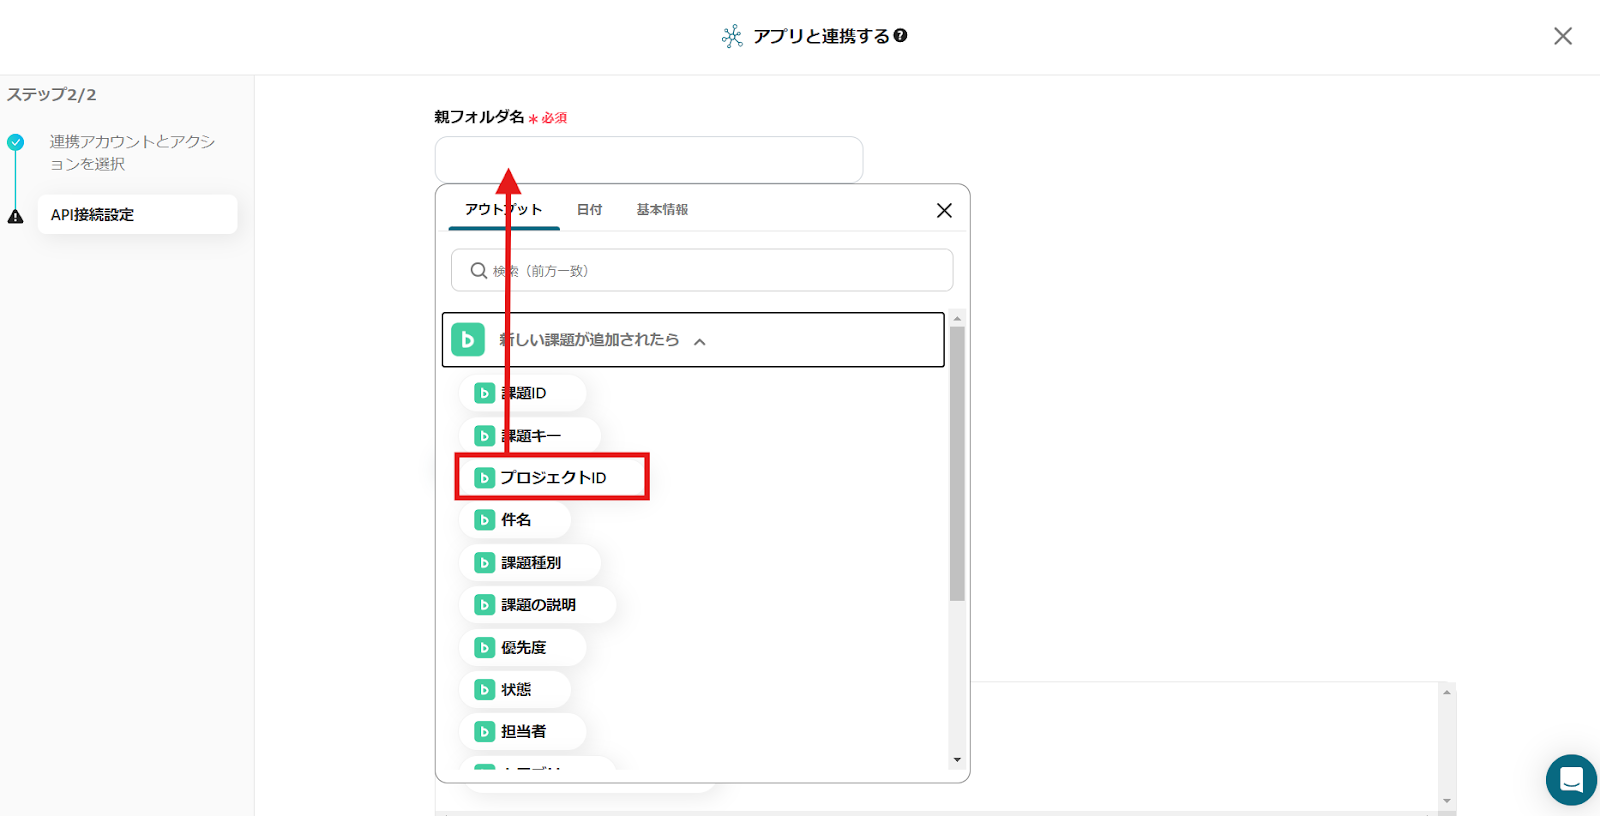
画像のように抽出したデータが表示されるため、その中から「プロジェクトID」を選択します。
こうすることで、プロジェクトIDをそのまま親フォルダ名として登録可能です。

フォルダ名は「件名」を流用しました。これにより、プロジェクトIDが親フォルダ名になり、課題の件名がフォルダ名となります。
3.テストの実行
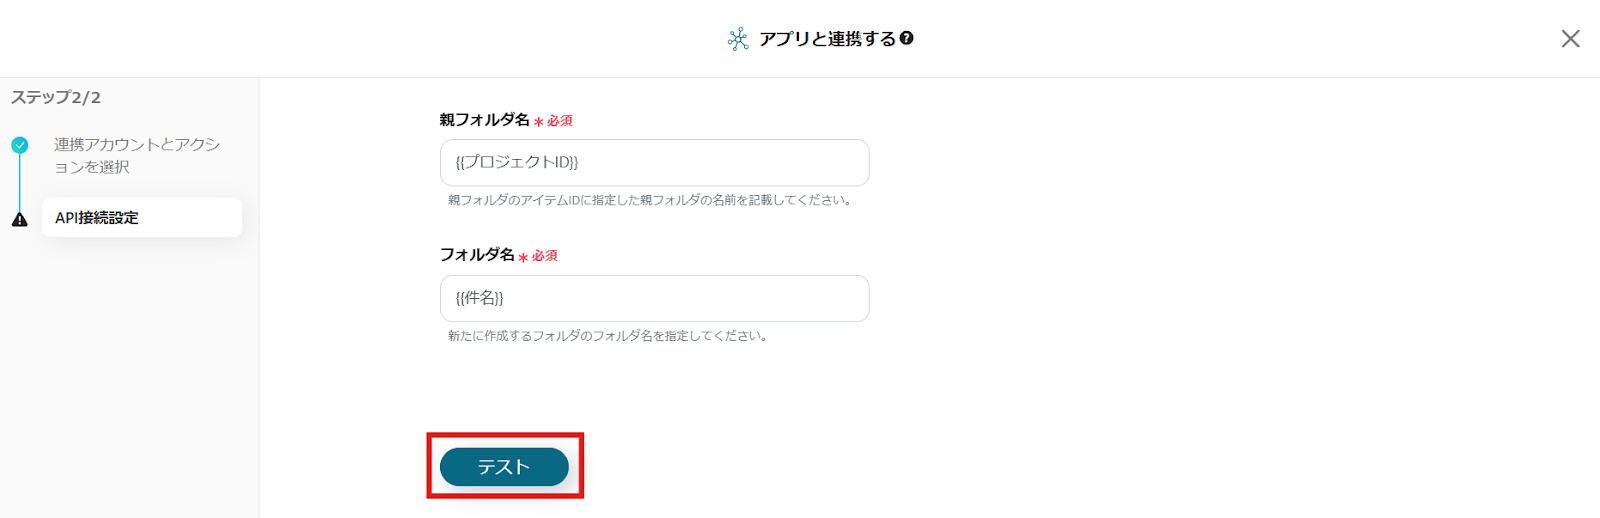
ここまで設定が完了したら、ページ下部にあるテストボタンを押しましょう。
青く「テスト成功」と表示がされたら設定完了です。保存を押してください。
4.トリガーをONにする
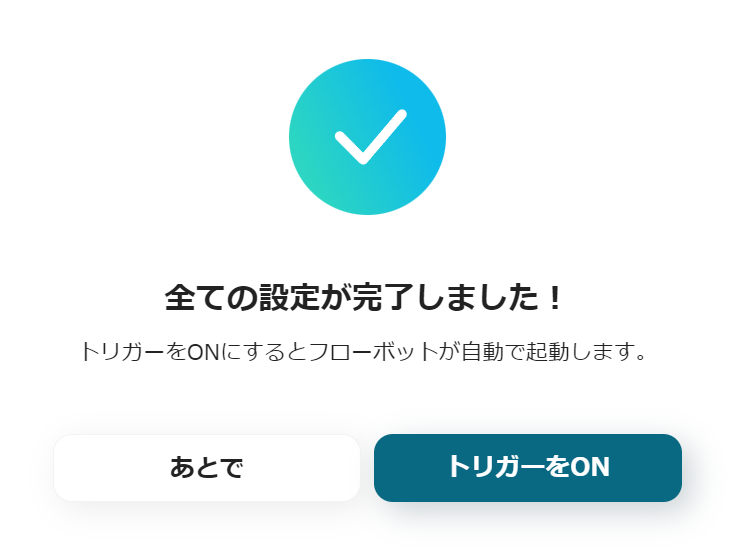
フローボットの作成が完了すると、上記のような表示がされます。トリガーは初期設定ではOFFの状態なので、ONにしましょう。
今回使用したフローボットテンプレート
Backlogに新しい課題が追加されたら、OneDriveにフォルダを作成する
■概要
Backlogに新しい課題が追加されたら、OneDriveにフォルダを作成するフローです。
■このテンプレートをおすすめする方
1.BacklogとOneDriveを併用しているプロジェクトマネージャー・チームリーダー
・Backlogの課題ごとにOneDriveに専用のフォルダを作成し、関連ファイルを整理したい方
・手作業でのフォルダ作成の手間を省き、効率的にファイル管理を行いたい方
2.Backlogで課題管理を行い、OneDriveでファイル共有を行っているチーム
・課題関連のファイルをOneDriveの専用フォルダに集約することで、情報共有をスムーズにしたい方
・フォルダ作成を自動化することで、チームメンバーの負担を軽減したい方
■このテンプレートを使うメリット
・Backlogで新規課題が追加された際に、OneDriveへのフォルダ作成を自動化することで、手作業による作成の手間を省き、業務効率を向上させます。
・手作業によるフォルダ作成ミスを防ぎ、ファイル管理の正確性を向上させます。
・Backlogに追加された課題ごとに専用のフォルダが自動で作成されるため、関連ファイルの整理が容易となり、必要な情報をすぐに見つけることができます。
■注意事項
・OneDrive、BacklogのそれぞれとYoomを連携させてください。
・Microsoft365(旧Office365)には、家庭向けプランと一般法人向けプラン(Microsoft365 Business)があり、一般法人向けプランに加入していない場合には認証に失敗する可能性があります。
さらに自動化するには
Yoomには自動化だけでなく、業務を円滑に進めるための工夫と機能が詰まっています。
例えば、今回紹介した自動化を、よりニーズに沿ったものにアレンジすることも可能です。
アレンジ1:フォルダの作成完了を通知する
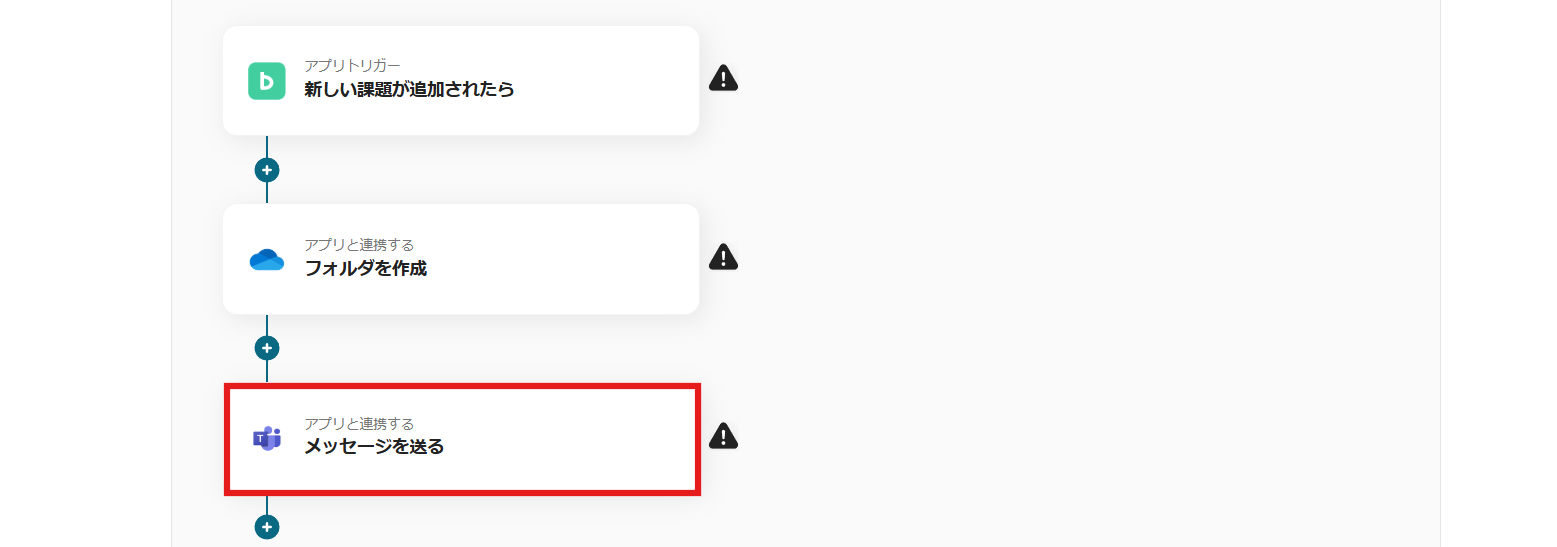
課題が追加されたことをMicrosoft Teamsに通知することができます。
また、課題の追加だけではなく、ファイルが作成済みであることもアナウンスできるため、メンバーは新しい課題にとりかかりやすくなるかもしれません。
アレンジ2:データベースに課題やフォルダデータを追加する
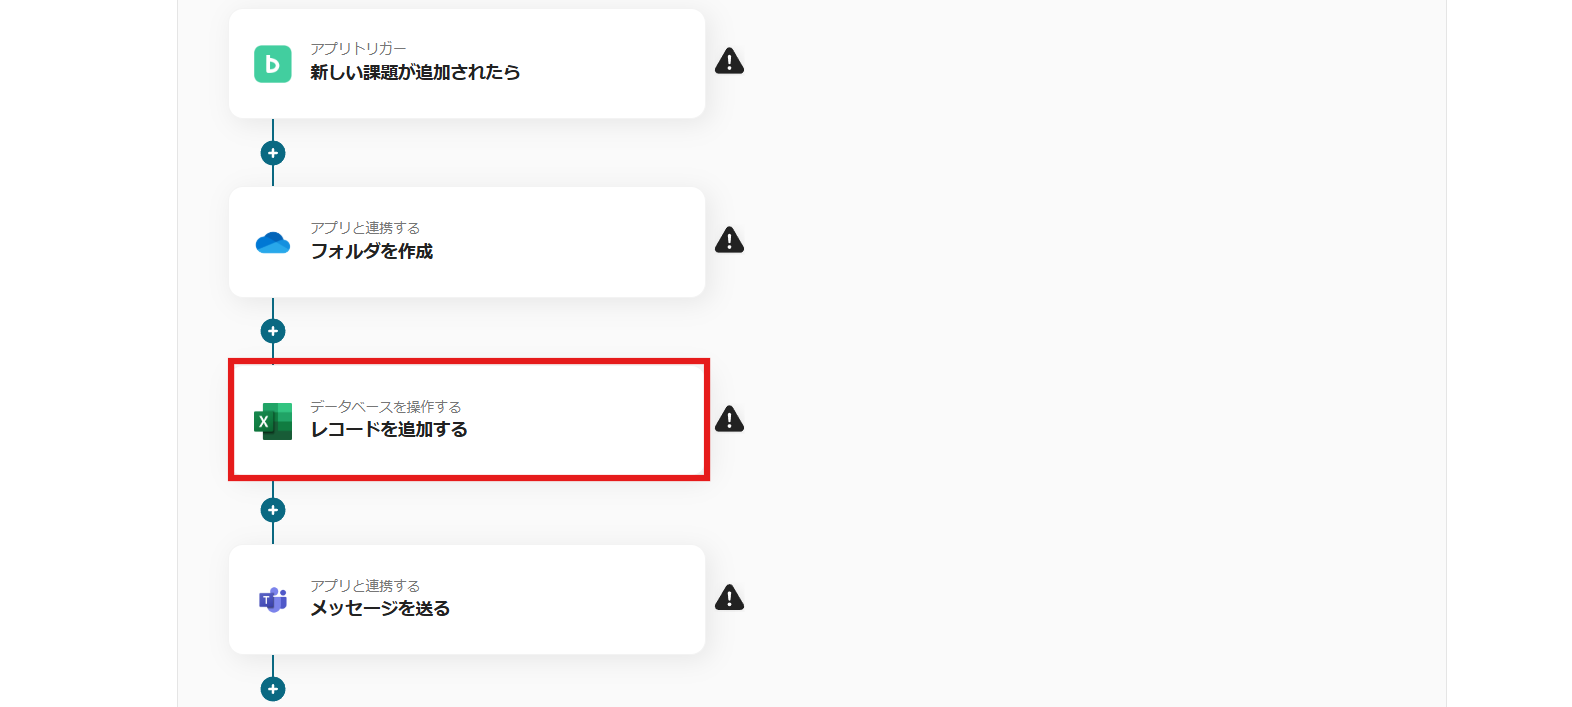
Backlogに作成した課題内容をMicrosoft Excelに追加することも可能です。課題の詳細な分析などを残したい場合にご活用ください。
もちろん、こちらの自動化を導入した際にもメンバーへ通知することができます。
BacklogとOneDriveを使ったその他の自動化例
他にも、BacklogとOneDriveを使った自動化の例をいくつか紹介します。
1.メールで届いた添付ファイルをOneDriveにアップロードし、Backlogの課題コメントにファイルを添付する
取引先などからの問い合わせや要望に添付されているファイルをBacklogに送信することで、課題の詳細な内容を把握しやすくなるかもしれません。
■概要
メールで届いた添付ファイルをOneDriveにアップロードし、Backlogの課題コメントにファイルを添付するフローです。
■このテンプレートをおすすめする方
1.BacklogとOneDriveを併用しているプロジェクトマネージャー・チームリーダー
・メールで受け取った資料やファイルをBacklogの課題に紐づけて管理したい方
・手作業でのファイルダウンロード・アップロードの手間を省きたい方
・添付ファイルをOneDriveに自動保存し、バックアップを取りたい方
2.Backlogでタスク管理、OneDriveでファイル共有を行っているチーム
・フォームから提出されたファイルをチームで共有し、共同作業を効率化したい方
■このテンプレートを使うメリット
・メールに添付されたファイルを自動でOneDriveに保存し、Backlogの課題コメントに添付するため、手作業によるファイルのダウンロード・アップロードの手間が省け、業務効率が向上します。
・メール、OneDrive、Backlogを連携させることで、ファイル管理と情報共有を効率化し、チームの生産性向上に貢献することができます。
■注意事項
・OneDrive、BacklogのそれぞれとYoomを連携させてください。
・Microsoft365(旧Office365)には、家庭向けプランと一般法人向けプラン(Microsoft365 Business)があり、一般法人向けプランに加入していない場合には認証に失敗する可能性があります。
2.フォームに添付された書類をOneDriveに保存し、Backlogにファイルを送信する
フォームから送信されたファイルをBacklogに添付することも可能です。定めた形式の問い合わせフォームを作成できるため、カスタマーサポートの業務がスムーズになる可能性があります。
■概要
フォームに添付された書類をOneDriveに保存し、Backlogに添付ファイルを送信するフローです。
■このテンプレートをおすすめする方
1.BacklogとOneDriveを併用しているプロジェクトマネージャー・チームリーダー
・フォームから提出された資料やファイルをBacklogの課題に紐づけて管理したい方
・手作業でのファイルアップロードの手間を省きたい方
・提出されたファイルをOneDriveに自動保存し、バックアップを取りたい方
2.Backlogでタスク管理、OneDriveでファイル共有を行っているチーム
・フォームから提出されたファイルをチームで共有し、共同作業を効率化したい方
・提出されたファイルのバージョン管理を徹底したい方
■このテンプレートを使うメリット
・フォームから提出されたファイルを自動でOneDriveに保存し、Backlogに添付するため、手作業によるファイルのダウンロード・アップロードの手間が省け、業務効率が向上します。
・提出されたファイルをOneDriveに集約することで、Backlogの課題と関連付けて管理でき、情報の一元化が実現します。
■注意事項
・OneDrive、BacklogのそれぞれとYoomを連携させてください。
・Microsoft365(旧Office365)には、家庭向けプランと一般法人向けプラン(Microsoft365 Business)があり、一般法人向けプランに加入していない場合には認証に失敗する可能性があります。
3.Backlogで課題が登録されたらGoogle スプレッドシートにも追加する
課題について詳細なデータを記載・共有したい場合におすすめです。データ転記が自動化され、業務負担の軽減も見込めます。
■概要
Backlogで課題が登録されたらGoogle スプレッドシートにも追加するフローです。
■このテンプレートをおすすめする方
1.課題管理をBacklogで行っている方
・プロジェクトの課題をBacklogで管理しているチーム
・Backlogでプロジェクトの課題を一元管理している方
2.情報共有のツールとしてGoogle スプレッドシートを使用している方
・Google スプレッドシートを使用して社内外の関係者と情報共有を行う方
・プロジェクトの課題状況をGoogle スプレッドシートで分析している方
■このテンプレートを使うメリット
Backlogはプロジェクトの課題を可視化できるため、管理業務を効率化できるツールです。
しかし、Google スプレッドシートを使用してプロジェクトの課題状況を共有する場合、都度Backlogの情報をGoogle スプレッドシートに転記する必要があり、非効率的だと感じているかもしれません。
このテンプレートは、Backlogで追加された課題をGoogle スプレッドシートに自動で追加することができるため、手動による作業が不要になります。
Google スプレッドシートへの課題追加を自動化することで、共有資料の作成を効率化することができるため、業務の効率化を図ることができます。
また、異なるチーム間での課題共有もスピーディーに行うことができ、進捗状況や課題分析をスムーズに行うことが可能です。
■注意事項
・Backlog、Google スプレッドシートのそれぞれとYoomを連携してください。
BacklogとOneDriveを連携するメリットと具体例
メリット1:課題とフォルダを結びつけるためタスクの把握がしやすくなる
Backlogの課題データを取得したうえでOneDriveにフォルダを作成するため、自動で課題タイトルや担当者のデータの流用を行いフォルダを作成可能となります。これにより、請け負っているプロジェクトの中にどのような課題があるのか把握しやすくなるはずです。
例えば、新しい課題が追加されているか判断するためには、通常であればBacklogを確認しにいく必要があります。しかし今回の自動化を導入していれば、課題に紐づいているフォルダがOneDriveに自動作成されるため、OneDriveを確認するだけでもタスクを把握しやすくなる可能性があるでしょう。
結果として異なるツールを幾度も往来することなく、自分が取り掛かるべきタスクをスタートさせられるかもしれません。
メリット2:指定したプロジェクトのチーム連携の強化になる
今回の連携は指定したプロジェクトに課題が追加された時のみフォルダを作成します。そのため、特定のプロジェクトにおけるチーム連携の強化になるかもしれません。
例えば、複雑な課題がいくつもあり、データ共有を頻繁に行う必要がある場合に役立つでしょう。Backlogはプロジェクトごとに細かく課題を追加できるため、複数のプロジェクトを同時進行している場合にも使いやすい自動化ではないでしょうか。これにより、特定のプロジェクトメンバーはOneDriveを介して必要なファイルのやり取りなどをスムーズに行えるかもしれません。
メリット3:フォルダが自動作成されるためデータの保管場所が明確になる
Backlogの特定のプロジェクトに新しい課題を追加する度、OneDriveに新規のフォルダが作成されるため、課題専用のフォルダが明確になり、データの保存場所が明確になります。これにより、どのフォルダがどの課題のものなのか把握しやすくなるでしょう。
これによるメリットは、例えば課題ごとにフォルダを作成したけれど課題名とフォルダ名が異なっているため素早く判断しにくかったり、誰がどの課題フォルダを使用すればいいのかわかりにくいといったものが挙げられます。
迷わずに必要なフォルダにアクセスしたり、データを保存できるようになれば、業務の効率向上にもなるはずです。
まとめ
タスク管理を行うことで今やるべき業務内容はどのようなものなのか、何を優先すべきかが見えてきますよね。一方でOneDriveはメンバーとのデータ共有がしやすいため、チームプロジェクトでの活用がしやすいツールと言えます。
つまり、この2つを併せることで、今以上にパフォーマンスを発揮しやすくなる環境ができあがるかもしれません!
Yoomはプログラミング不要でアプリ連携が可能です。非エンジニアであっても簡単にアプリ連携ができるため、これまであきらめていた方や、「難しそうでチャレンジしにくいな…」と思っていた方でも、お気軽にお試しいただけるはずです。
ぜひこの機会にYoomをご活用いただき、自動化のメリットをご体感ください。
プログラミング知識なしで手軽に構築できます。