・
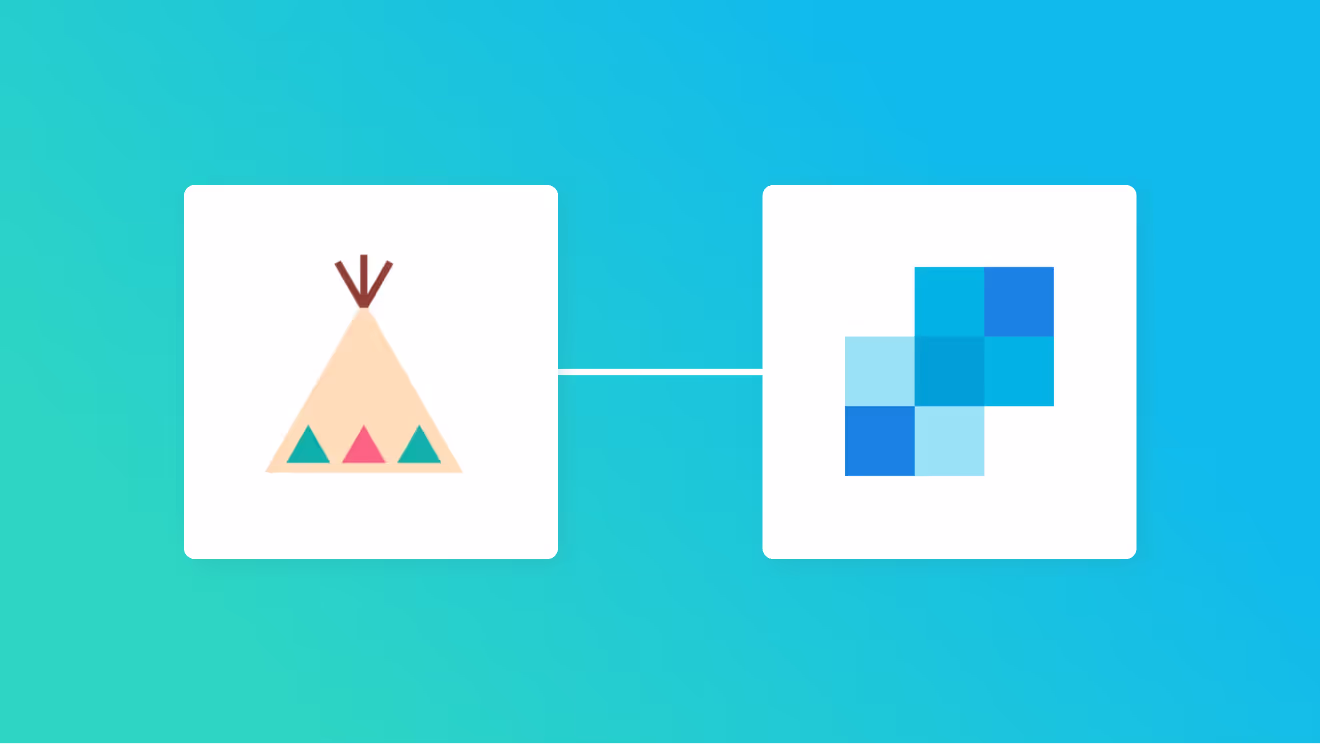
BASEとSendGridを連携して、BASEで注文が発生したら会員情報をSendGridに登録する方法

日々の業務の中で手作業での情報登録や管理は意外と時間がかかり、効率を上げたいと感じることが多いですよね。
特に、マーケティング活動の効率化を課題としている企業も多いのではないでしょうか。
そこで今回は、BASEでの注文が発生した際に、会員情報を自動的にSendGridに登録する便利な方法をご紹介します。
手作業によるデータ入力の手間を省き、最新の顧客情報を活用したメール配信が期待できます。
これにより手間が減り業務のスムーズな進行も見込めます。
ぜひ業務の効率化の参考にしてみてください!
BASEとSendGridを連携するメリット
1.効率的な顧客情報の管理
BASEでの注文情報が自動的にSendGridに登録されることで、手作業のデータ入力が不要になります。
これにより、常に最新の顧客リストを使ってメール配信を行うことができ、業務効率の向上が期待できます。
例えば、マーケティング部門が新規の顧客情報を手動でSendGridに登録していると、キャンペーンメール送信までにタイムラグが発生しやすいですが、自動化されることで素早い送信が見込めます。
そのため、データ更新の遅延がなくなり、効率的なメールマーケティングが実現できそうです。
2.人為的ミスの削減
手作業でのデータ入力や会員登録はミスが発生しやすいですが、自動化によってデータの登録漏れや誤入力の防止が期待できます。
例えば、カスタマーサポート部門では、BASEでの注文と同時に自動登録されることで、常に正確なデータが利用可能となり、顧客対応時に連絡先が異なるといったエラーが回避できそうです。
では早速Yoomを使って連携設定を行いましょう!
[Yoomとは]
BASEとSendGridの連携フローの作り方
まずはじめにYoomの公式サイトにアクセスし、アカウント作成をお願いします。
既にアカウント登録済みの方はログインしてください。
Yoomのアカウント発行ページ
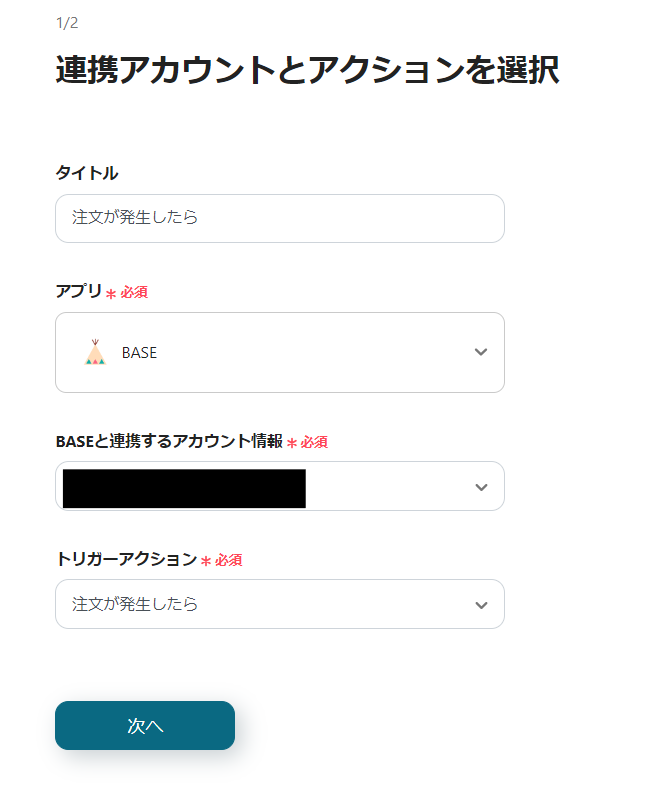
ステップ1:BASEとSendGridをマイアプリ連携
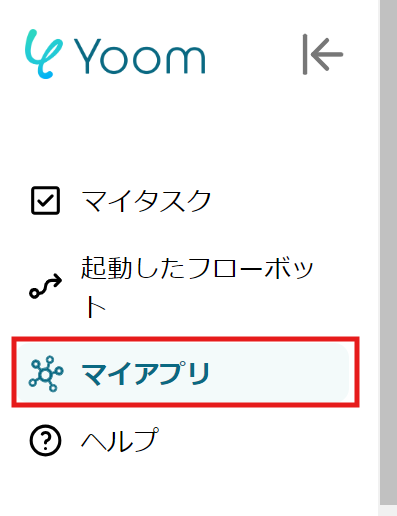
1)Yoomのアカウントにログインしたら、使用するアプリを登録します。
「マイアプリ」をクリックし、「新規接続」を選択してください。
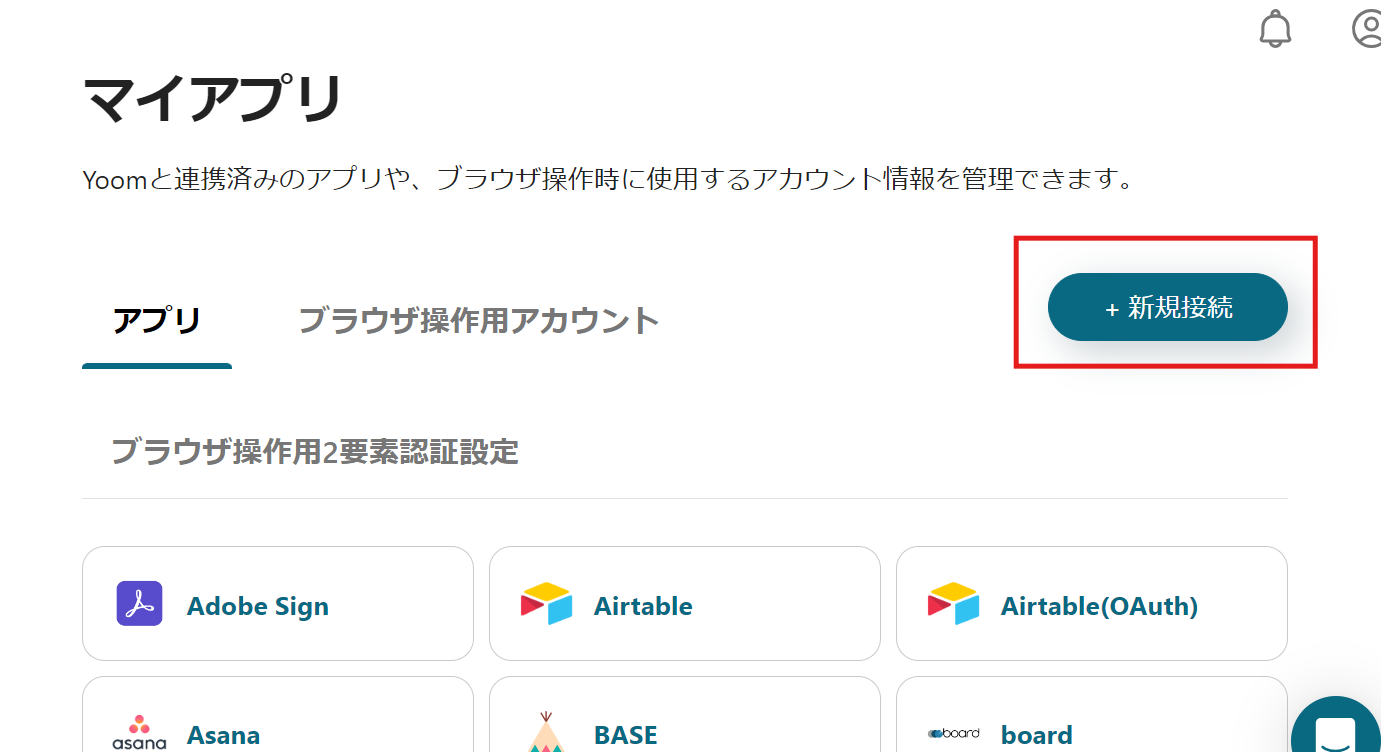
2)登録したいアプリを選択し、アプリごとに使用するアカウントでログインしてください。
1つ目のアプリが登録できたら、もう一度「新規接続」をクリックして、2つ目のアプリを登録します。
3)登録ができるとマイアプリにアイコンが表示されます。
登録した2つのアプリのアイコンが表示されたか確認してください。
今回は、【BASEで注文が発生したら会員情報をSendGridに登録する】というフローを作成します。
作成の流れは以下の通りです。
・テンプレートをコピー
・BASEで「注文が発生したら」というトリガーを作成
・BASEで「注文情報を取得」というアクションを設定
・次に、SendGridで「コンタクトリストに新規コンタクトを追加」というアクションを設定
・最後にトリガーが起動するようにON
■概要BASEで新しい注文が入るたびに、購入者の情報を手動でSendGridのコンタクトリストに追加していませんか?この作業は顧客へのアプローチに不可欠ですが、件数が増えると入力ミスや対応漏れのリスクも高まります。このワークフローを活用すれば、BASEで注文が発生した際に、注文情報から顧客データを自動で取得し、SendGridへ会員情報として登録する一連の流れを自動化できるため、手作業による手間やミスを削減できます。
■このテンプレートをおすすめする方- BASEで運営するECサイトの注文情報を、手作業でSendGridに登録している方
- 顧客へのメルマガ配信のため、SendGridのコンタクトリストを最新に保ちたい方
- 手動でのデータ移行による入力ミスや、登録漏れなどの課題を削減したいと考えている方
■このテンプレートを使うメリット- BASEで注文が入ると自動でSendGridへ顧客情報が登録されるため、これまで手作業で行っていたデータ入力の時間を短縮できます。
- 手作業での情報転記が減ることで、入力間違いや登録漏れといったヒューマンエラーの発生を防ぎ、データの正確性を保ちます。
■フローボットの流れ- はじめに、BASEとSendGridをYoomと連携します。
- 次に、トリガーでBASEを選択し、「注文が発生したら」というアクションを設定します。
- 次に、オペレーションでBASEの「注文情報を取得」アクションを設定し、トリガーとなった注文の詳細情報を取得します。
- 最後に、オペレーションでSendGridの「コンタクトリストに新規コンタクトを追加」アクションを設定し、取得した注文情報をもとにコンタクトを登録します。
※「トリガー」:フロー起動のきっかけとなるアクション、「オペレーション」:トリガー起動後、フロー内で処理を行うアクション
■このワークフローのカスタムポイント- SendGridのコンタクトリストに登録する際、BASEから取得した注文情報の中から、氏名やメールアドレスなど、どの情報を登録するかを任意で設定できます。
■注意事項- BASE、SendGridのそれぞれとYoomを連携してください。
- トリガーは5分、10分、15分、30分、60分の間隔で起動間隔を選択できます。
- プランによって最短の起動間隔が異なりますので、ご注意ください。
- BASEで運営するECサイトの注文情報を、手作業でSendGridに登録している方
- 顧客へのメルマガ配信のため、SendGridのコンタクトリストを最新に保ちたい方
- 手動でのデータ移行による入力ミスや、登録漏れなどの課題を削減したいと考えている方
- BASEで注文が入ると自動でSendGridへ顧客情報が登録されるため、これまで手作業で行っていたデータ入力の時間を短縮できます。
- 手作業での情報転記が減ることで、入力間違いや登録漏れといったヒューマンエラーの発生を防ぎ、データの正確性を保ちます。
- はじめに、BASEとSendGridをYoomと連携します。
- 次に、トリガーでBASEを選択し、「注文が発生したら」というアクションを設定します。
- 次に、オペレーションでBASEの「注文情報を取得」アクションを設定し、トリガーとなった注文の詳細情報を取得します。
- 最後に、オペレーションでSendGridの「コンタクトリストに新規コンタクトを追加」アクションを設定し、取得した注文情報をもとにコンタクトを登録します。
■このワークフローのカスタムポイント
- SendGridのコンタクトリストに登録する際、BASEから取得した注文情報の中から、氏名やメールアドレスなど、どの情報を登録するかを任意で設定できます。
- BASE、SendGridのそれぞれとYoomを連携してください。
- トリガーは5分、10分、15分、30分、60分の間隔で起動間隔を選択できます。
- プランによって最短の起動間隔が異なりますので、ご注意ください。
ステップ2: テンプレートの選択とコピー
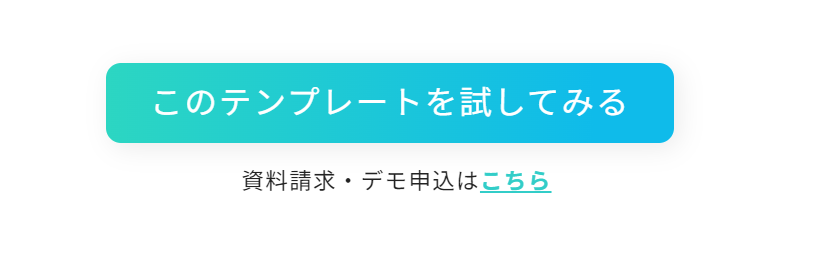
1)上記のテンプレートを開き、「このテンプレートを試してみる」のアイコンをクリックします。
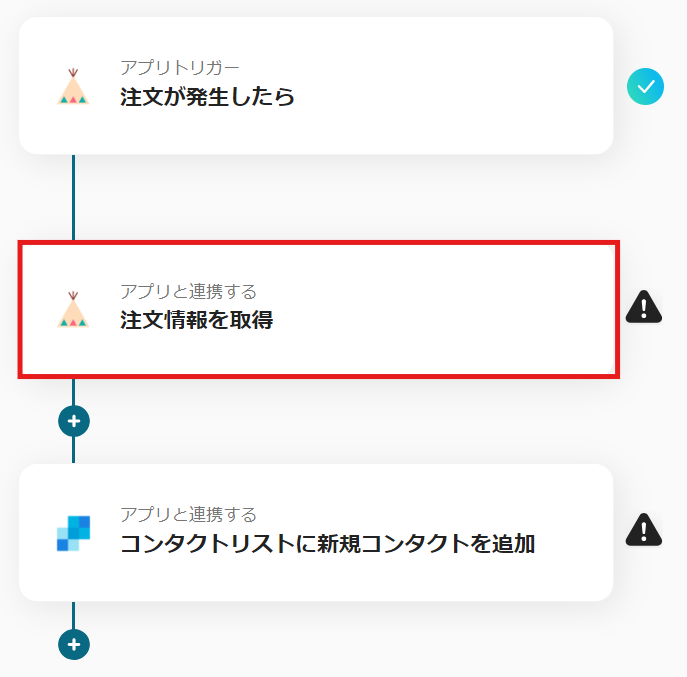
2) 以下のような表示が出てきます。
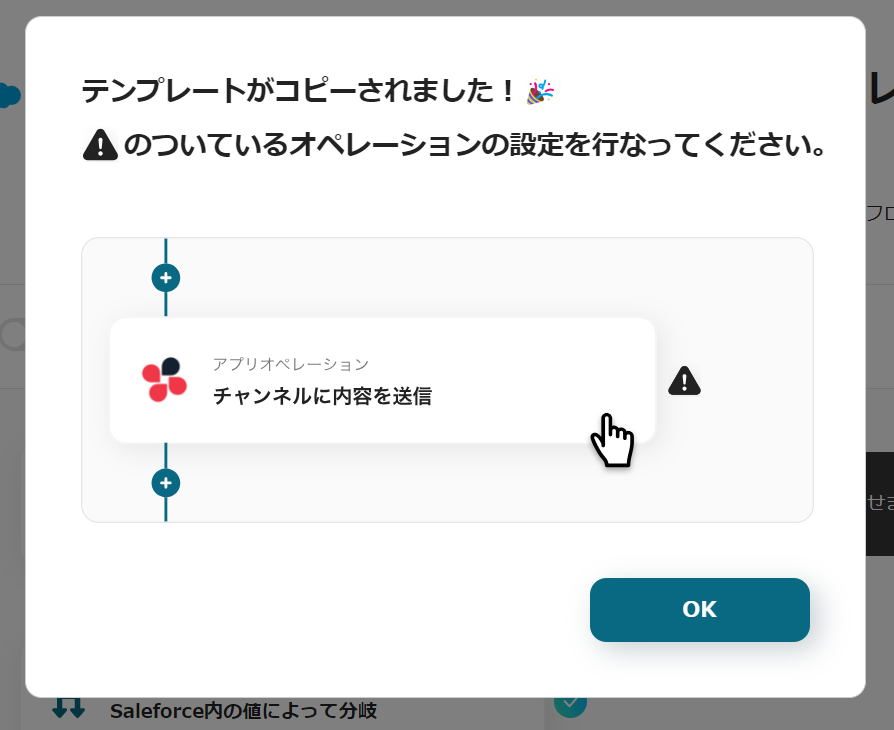
右に「!」が表示されているアイコンを順番にクリックし、オペレーションを設定します。
タイトルや詳細は、クリックで編集できるので、適宜変更してください。
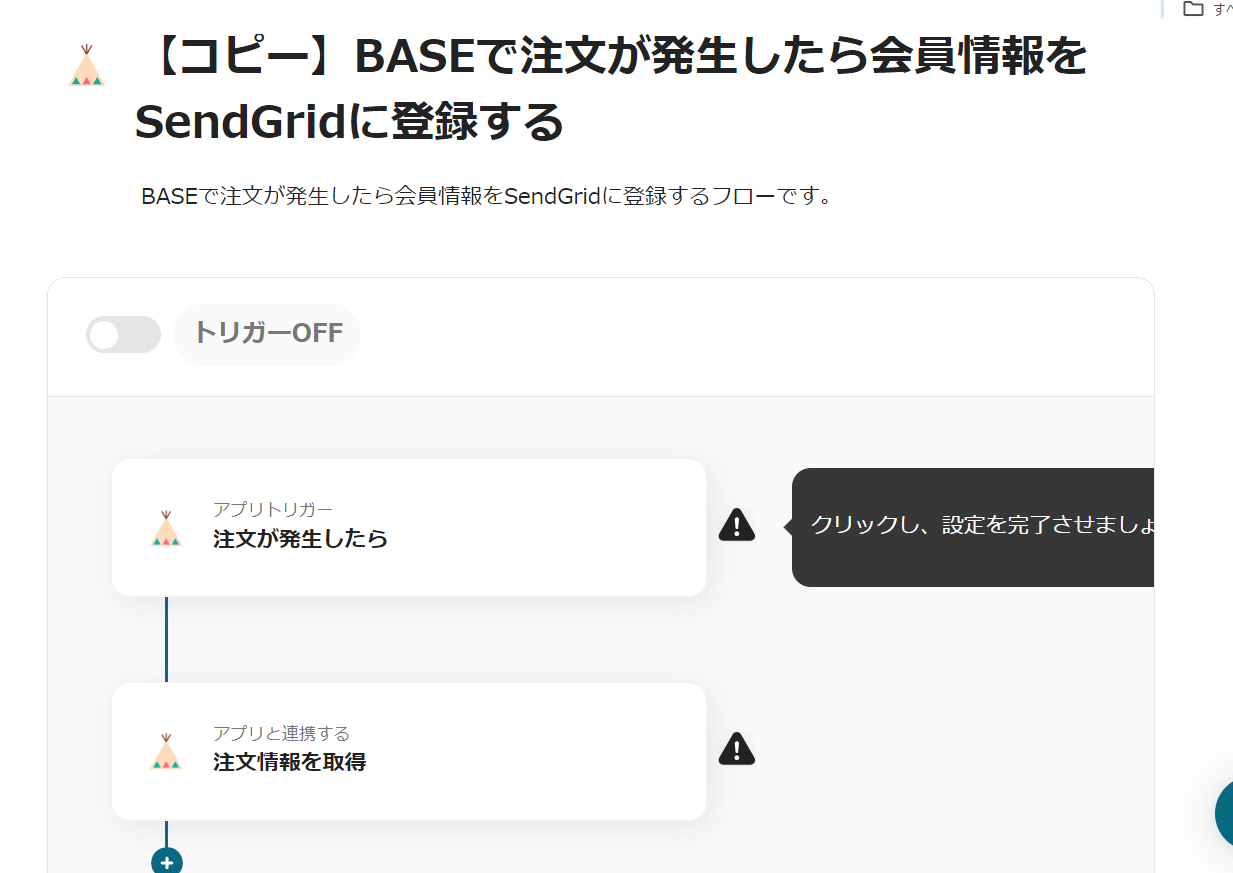
ステップ3:トリガーを設定
「アプリトリガー 注文が発生したら」をクリックします。
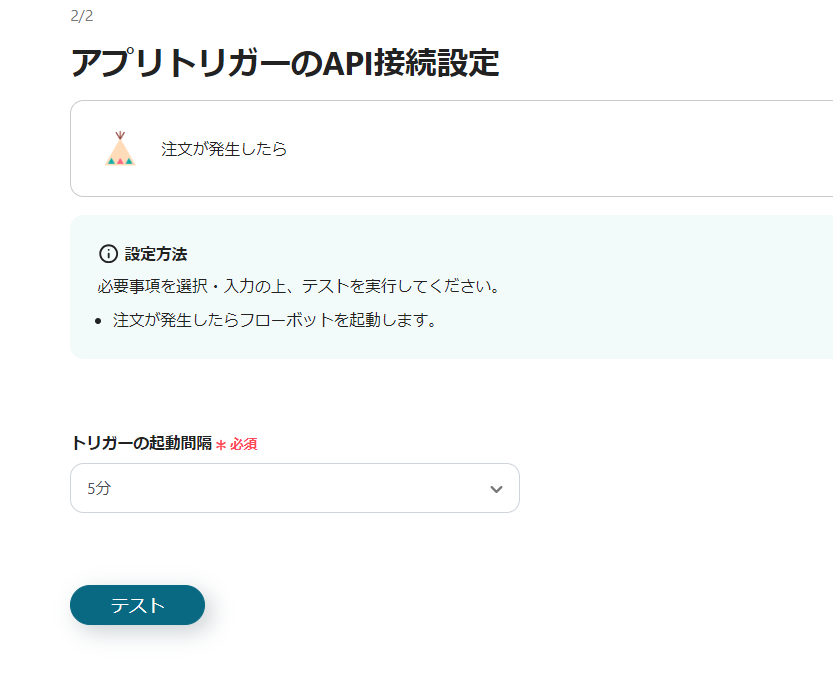
ステップ4:BASEのトリガーアクションを設定(注文が発生したら)
1) アクションは「注文が発生したら」を選択して、「次へ」をクリックします。
2) トリガーの起動間隔を選択し、「テスト」をクリックします。
テストが成功したら「保存」します。
※起動間隔は契約プランによって変わります。
各プランの詳細については、公式サイトをご覧ください。
各プランの機能制限や使用上限の一覧 | Yoomヘルプセンター (intercom.help)
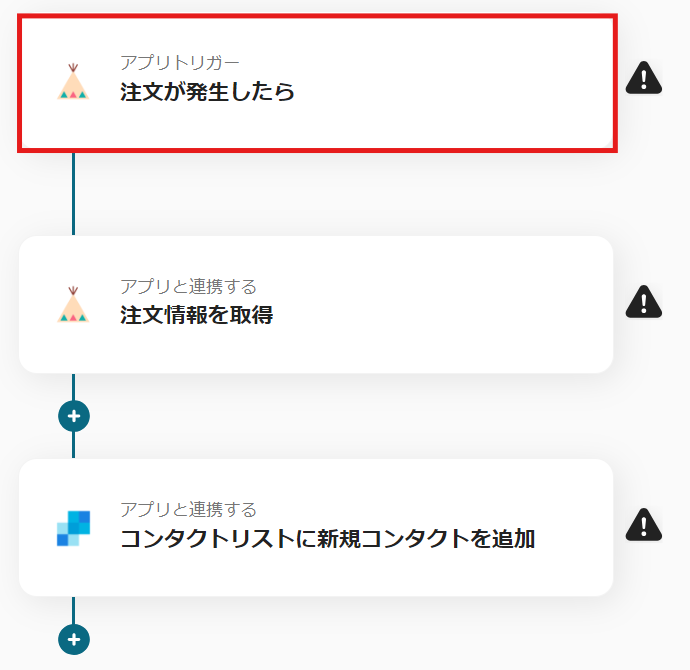
ステップ5:BASEのアクションを設定(注文情報を取得)
1) フローに戻り、「アプリと連携する 注文情報を取得」のアイコンをクリックします。
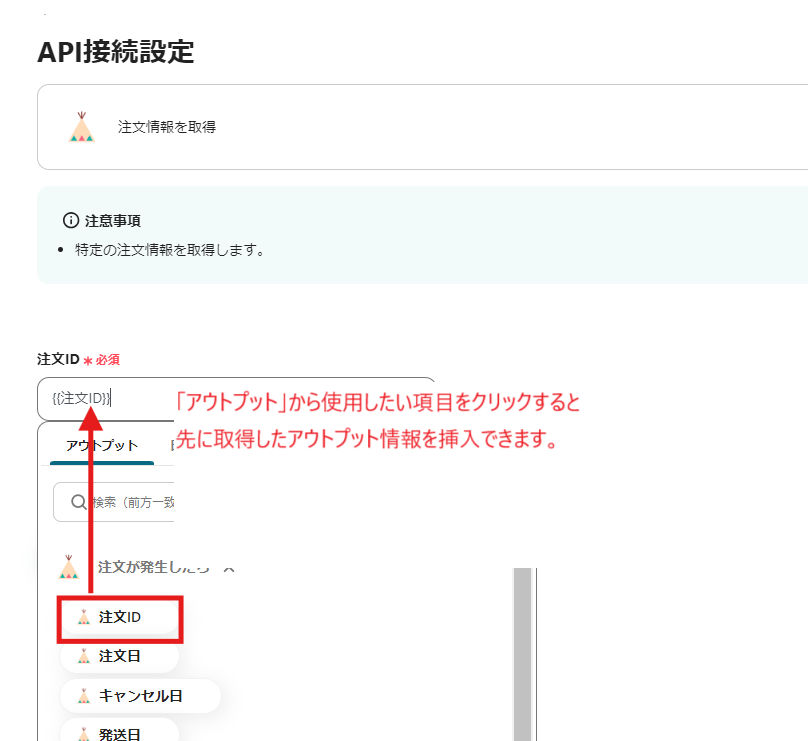
2) アクションは「注文情報を取得」を選択して、「次へ」をクリックします。

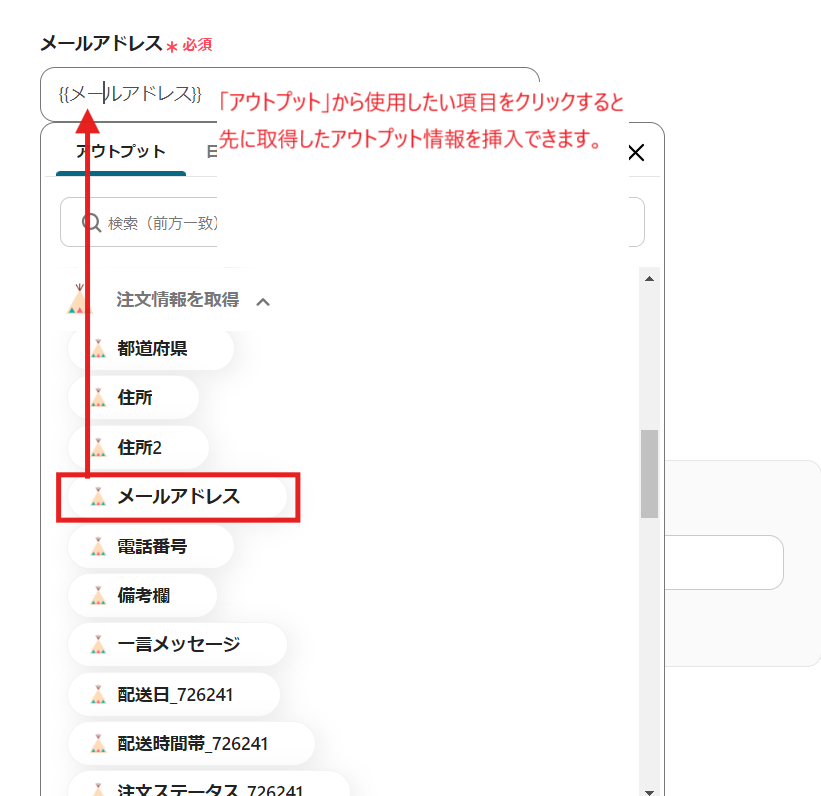
3) 必須項目を入力します。
アプリが連携出来ているとBASEのアウトプット情報を活用して入力できます。
必要に応じて候補から選択したら、「テスト」をクリックします。
テスト成功後「保存」します。
ステップ6:SendGridのアクションを設定
1) フローに戻り、「アプリと連携する コンタクトリストに新規コンタクトを追加」のアイコンをクリックします。
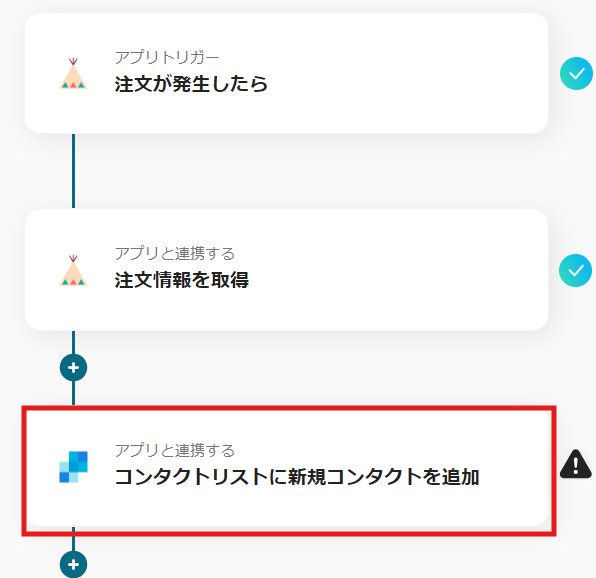
2) アクションは「コンタクトリストに新規コンタクトを追加」を選択して、「次へ」をクリックします。
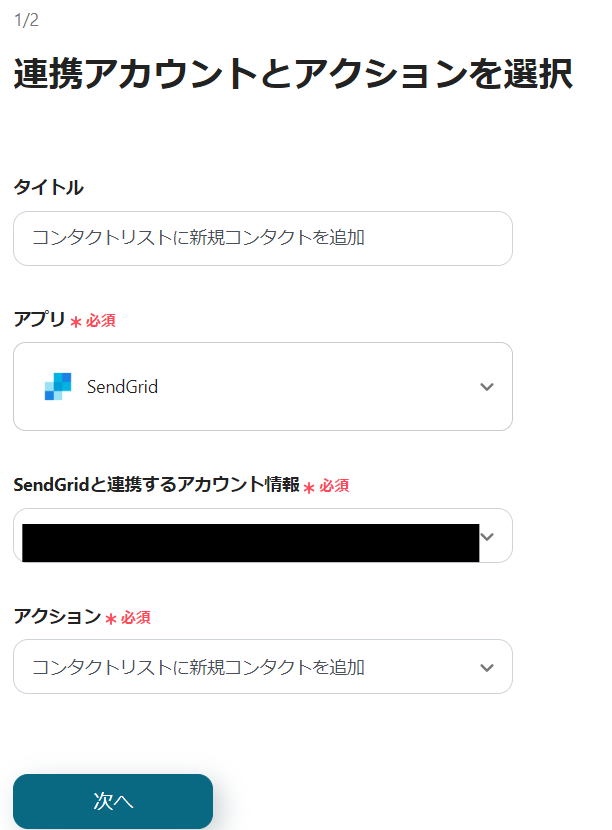
3) 必須項目を入力します。
アプリが連携出来ているとBASEのアウトプット情報を活用して入力できます。
必要に応じて候補から選択したら、「テスト」をクリックします。
テスト成功後「保存」します。
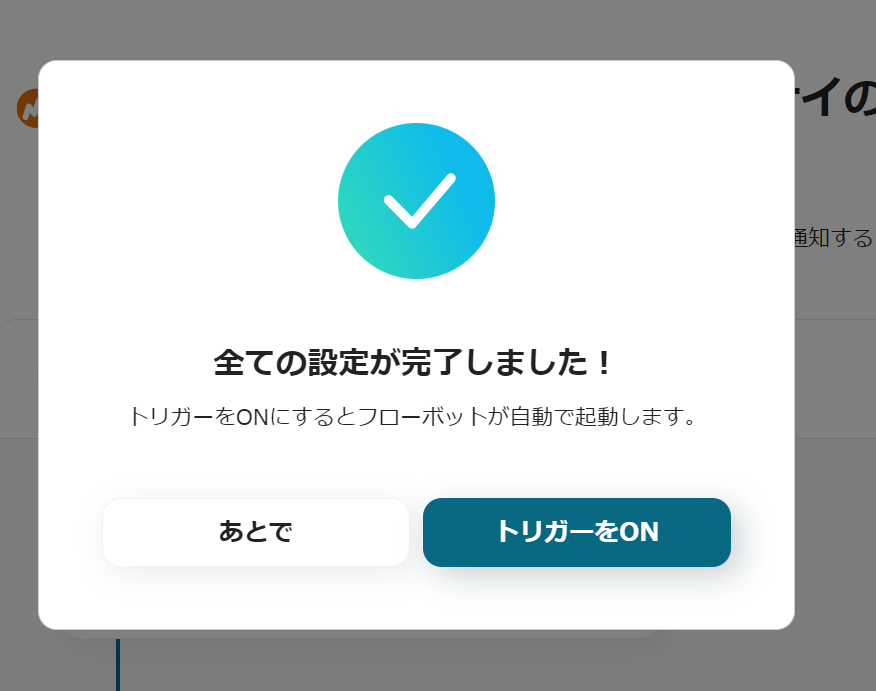
これで【BASEで注文が発生したら会員情報をSendGridに登録する】というフローが完成です。
ステップ7: テストと確認
設定が完了すると、以下のような表示が出てくるので、「トリガーをON」をクリックします。
フローボットを起動し、作動するか確認してください。
今回使用したテンプレートはこちら
■概要BASEで新しい注文が入るたびに、購入者の情報を手動でSendGridのコンタクトリストに追加していませんか?この作業は顧客へのアプローチに不可欠ですが、件数が増えると入力ミスや対応漏れのリスクも高まります。このワークフローを活用すれば、BASEで注文が発生した際に、注文情報から顧客データを自動で取得し、SendGridへ会員情報として登録する一連の流れを自動化できるため、手作業による手間やミスを削減できます。
■このテンプレートをおすすめする方- BASEで運営するECサイトの注文情報を、手作業でSendGridに登録している方
- 顧客へのメルマガ配信のため、SendGridのコンタクトリストを最新に保ちたい方
- 手動でのデータ移行による入力ミスや、登録漏れなどの課題を削減したいと考えている方
■このテンプレートを使うメリット- BASEで注文が入ると自動でSendGridへ顧客情報が登録されるため、これまで手作業で行っていたデータ入力の時間を短縮できます。
- 手作業での情報転記が減ることで、入力間違いや登録漏れといったヒューマンエラーの発生を防ぎ、データの正確性を保ちます。
■フローボットの流れ- はじめに、BASEとSendGridをYoomと連携します。
- 次に、トリガーでBASEを選択し、「注文が発生したら」というアクションを設定します。
- 次に、オペレーションでBASEの「注文情報を取得」アクションを設定し、トリガーとなった注文の詳細情報を取得します。
- 最後に、オペレーションでSendGridの「コンタクトリストに新規コンタクトを追加」アクションを設定し、取得した注文情報をもとにコンタクトを登録します。
※「トリガー」:フロー起動のきっかけとなるアクション、「オペレーション」:トリガー起動後、フロー内で処理を行うアクション
■このワークフローのカスタムポイント- SendGridのコンタクトリストに登録する際、BASEから取得した注文情報の中から、氏名やメールアドレスなど、どの情報を登録するかを任意で設定できます。
■注意事項- BASE、SendGridのそれぞれとYoomを連携してください。
- トリガーは5分、10分、15分、30分、60分の間隔で起動間隔を選択できます。
- プランによって最短の起動間隔が異なりますので、ご注意ください。
- BASEで運営するECサイトの注文情報を、手作業でSendGridに登録している方
- 顧客へのメルマガ配信のため、SendGridのコンタクトリストを最新に保ちたい方
- 手動でのデータ移行による入力ミスや、登録漏れなどの課題を削減したいと考えている方
- BASEで注文が入ると自動でSendGridへ顧客情報が登録されるため、これまで手作業で行っていたデータ入力の時間を短縮できます。
- 手作業での情報転記が減ることで、入力間違いや登録漏れといったヒューマンエラーの発生を防ぎ、データの正確性を保ちます。
- はじめに、BASEとSendGridをYoomと連携します。
- 次に、トリガーでBASEを選択し、「注文が発生したら」というアクションを設定します。
- 次に、オペレーションでBASEの「注文情報を取得」アクションを設定し、トリガーとなった注文の詳細情報を取得します。
- 最後に、オペレーションでSendGridの「コンタクトリストに新規コンタクトを追加」アクションを設定し、取得した注文情報をもとにコンタクトを登録します。
■このワークフローのカスタムポイント
- SendGridのコンタクトリストに登録する際、BASEから取得した注文情報の中から、氏名やメールアドレスなど、どの情報を登録するかを任意で設定できます。
- BASE、SendGridのそれぞれとYoomを連携してください。
- トリガーは5分、10分、15分、30分、60分の間隔で起動間隔を選択できます。
- プランによって最短の起動間隔が異なりますので、ご注意ください。
BASEを使ったその他の自動化例
他にもYoomには、BASEやSendGridを使った自動化のテンプレートがあるのでご紹介します。
自動化を試みたい業務内容や現在利用しているアプリとの組み合わせに応じて、テンプレートを活用してください。
1.BASEで注文が発生したらMicrosoft Excelに追加する
このテンプレートは、BASEでの注文の発生をトリガーに自動でMicrosoft Excelにデータの追加を行います。
そのため手作業を省くだけでなく、ヒューマンエラーを防ぎ、情報の透明性を保つことが期待できます。
また、手入力を待つことなく情報が共有できるため、素早い業務進行も見込めます。
■概要BASEで新しい注文が入るたびに、注文情報を手作業でMicrosoft Excelに転記していませんか?この作業は時間がかかるだけでなく、コピー&ペーストのミスや入力漏れといったヒューマンエラーの原因にもなりがちです。このワークフローを活用すれば、BASEで注文が発生した際に、その内容を自動でMicrosoft Excelの指定したシートに記録するため、こうした課題を解消し、正確なデータ管理を支援します。
■このテンプレートをおすすめする方- BASEで発生する注文情報をMicrosoft Excelで管理しており、手入力を効率化したい方
- ECサイトの注文データの転記作業に時間を取られ、コア業務に集中できていない方
- 手作業による入力ミスをなくし、注文管理の正確性を高めたいと考えている担当者の方
■このテンプレートを使うメリット- BASEで注文が発生すると、注文情報が自動でMicrosoft Excelに追加されるため、これまで手作業で行っていた転記時間を短縮できます。
- 人の手によるデータ入力をなくすことで、注文情報の転記ミスや入力漏れといったヒューマンエラーの発生を防ぎます。
■フローボットの流れ- はじめに、BASEとMicrosoft ExcelをYoomと連携します。
- 次に、トリガーでBASEを選択し、「注文が発生したら」というアクションを設定します。
- 最後に、オペレーションでMicrosoft Excelを選択し、「レコードを追加する」アクションを設定し、前のステップで取得した注文情報を任意のシートに追加します。
※「トリガー」:フロー起動のきっかけとなるアクション、「オペレーション」:トリガー起動後、フロー内で処理を行うアクション
■このワークフローのカスタムポイント- Microsoft Excelにレコードを追加する際、どの列にどの注文情報(注文ID、購入者名、商品名、金額など)を紐付けるかを任意で設定できます。
- また、トリガーで取得した注文情報だけでなく、対応ステータスなどの固定値を特定の列に設定することも可能です。
■注意事項- BASE、Microsoft ExcelのそれぞれとYoomを連携してください。
- トリガーは5分、10分、15分、30分、60分の間隔で起動間隔を選択できます。
- プランによって最短の起動間隔が異なりますので、ご注意ください。
- Microsoft365(旧Office365)には、家庭向けプランと一般法人向けプラン(Microsoft365 Business)があり、一般法人向けプランに加入していない場合には認証に失敗する可能性があります。
- Microsoft Excelのデータベースを操作するオペレーションの設定に関しては「【Excel】データベースを操作するオペレーションの設定に関して」をご参照ください。
■このテンプレートをおすすめする方
- BASEで発生する注文情報をMicrosoft Excelで管理しており、手入力を効率化したい方
- ECサイトの注文データの転記作業に時間を取られ、コア業務に集中できていない方
- 手作業による入力ミスをなくし、注文管理の正確性を高めたいと考えている担当者の方
■このテンプレートを使うメリット
- BASEで注文が発生すると、注文情報が自動でMicrosoft Excelに追加されるため、これまで手作業で行っていた転記時間を短縮できます。
- 人の手によるデータ入力をなくすことで、注文情報の転記ミスや入力漏れといったヒューマンエラーの発生を防ぎます。
■フローボットの流れ
- はじめに、BASEとMicrosoft ExcelをYoomと連携します。
- 次に、トリガーでBASEを選択し、「注文が発生したら」というアクションを設定します。
- 最後に、オペレーションでMicrosoft Excelを選択し、「レコードを追加する」アクションを設定し、前のステップで取得した注文情報を任意のシートに追加します。
■このワークフローのカスタムポイント
- Microsoft Excelにレコードを追加する際、どの列にどの注文情報(注文ID、購入者名、商品名、金額など)を紐付けるかを任意で設定できます。
- また、トリガーで取得した注文情報だけでなく、対応ステータスなどの固定値を特定の列に設定することも可能です。
■注意事項
- BASE、Microsoft ExcelのそれぞれとYoomを連携してください。
- トリガーは5分、10分、15分、30分、60分の間隔で起動間隔を選択できます。
- プランによって最短の起動間隔が異なりますので、ご注意ください。
- Microsoft365(旧Office365)には、家庭向けプランと一般法人向けプラン(Microsoft365 Business)があり、一般法人向けプランに加入していない場合には認証に失敗する可能性があります。
- Microsoft Excelのデータベースを操作するオペレーションの設定に関しては「【Excel】データベースを操作するオペレーションの設定に関して」をご参照ください。
2. BASEで注文が発生したらSPIRALに追加する
このテンプレートは、注文が発生したら自動でその情報をSPIRALに追加することで手入力を省きます。
また追加するデータは引用した情報を使用するため、ヒューマンエラーのリスクを回避することが期待できます。
手入力にかけていた時間をコア業務に充てることで、チーム全体の生産性向上も見込めます。
■概要
BASEで注文が発生したらSPIRALに追加するフローです。
■このテンプレートをおすすめする方
1.BASEを業務に活用している方
・ECサイトの運営に活用している方
・顧客情報や在庫情報を管理する方
2.SPIRALを使用してデータ管理を行う方
・データを集計・分析に使用している方
・リードに関連する情報の蓄積を行う方
■このテンプレートを使うメリット
BASEはECサイト運営のプラットフォームとして活用できるツールです。
しかし注文情報をSPIRALにも追加する際に毎回手入力するのは手間がかかり、ヒューマンエラーのリスクを高めます。
手作業による入力ミスを防ぐ方法を考えている方にこのフローは適しています。
注文が発生したら自動でその情報をSPIRALに追加することで手入力を省きます。
また追加するデータは引用した情報を使用するため、ヒューマンエラーのリスクを回避することができます。
これまで手入力にかけていた時間をコア業務に充てることで、チーム全体の生産性向上に繋げることができます。
■注意事項
・BASE、SPIRALのそれぞれとYoomを連携してください。
・トリガーは5分、10分、15分、30分、60分の間隔で起動間隔を選択できます。
・プランによって最短の起動間隔が異なりますので、ご注意ください。
3.BASEで注文が発生したらGoogle Chatに通知する
このテンプレートは、BASEで注文が発生した際にGoogle Chatへ自動的に通知されるため、Google Chat上での注文情報を確認できるようになります。
そのため、BASEとGoogle Chatを行き来する手間を省くことができ、業務の効率化が期待できます。
また、自動化によってヒューマンエラーを防ぎ、情報の正確性を保つことが見込めます。
■概要ネットショップを運営する上で、BASEで新規注文が入るたびに手動で確認し、チームに共有する作業は手間がかかるものではないでしょうか。また、対応の遅れや共有漏れは、顧客満足度の低下に繋がりかねません。このワークフローを活用すれば、BASEで注文が発生したタイミングで、即座にGoogle Chatへ通知を自動で送信できます。これにより、注文情報をスムーズに関係者へ共有することができます。
■このテンプレートをおすすめする方- BASEで運営するECサイトの注文情報を、手作業でチームに共有している方
- Google Chatを活用して、注文発生の通知を自動化し、見落としを防ぎたい方
- 注文から発送までのリードタイムを短縮し、顧客満足度を向上させたい店舗責任者の方
■このテンプレートを使うメリット- BASEで注文が発生すると即座にGoogle Chatへ自動で通知が送られるため、都度管理画面を確認する手間や時間を削減できます。
- 手動での共有作業が不要になることで、注文情報の共有漏れや遅延といったヒューマンエラーを防ぎ、迅速な対応を支援します。
■フローボットの流れ- はじめに、BASEとGoogle ChatをYoomと連携します。
- 次に、トリガーでBASEを選択し、「注文が発生したら」というアクションを設定します。
- 最後に、オペレーションでGoogle Chatの「メッセージを送信」アクションを設定し、トリガーで取得した注文情報を任意の宛先に通知するように設定します。
※「トリガー」:フロー起動のきっかけとなるアクション、「オペレーション」:トリガー起動後、フロー内で処理を行うアクション
■このワークフローのカスタムポイント- Google Chatへの通知先は、任意のスペースやユーザーに設定することが可能です。
- 通知するメッセージの本文は自由に編集でき、BASEから取得した注文番号や商品名、顧客情報といった動的な情報を組み込むことで、通知内容を具体的にカスタマイズできます。
■注意事項- BASE、Google ChatのそれぞれとYoomを連携してください。
- トリガーは5分、10分、15分、30分、60分の間隔で起動間隔を選択できます。
- プランによって最短の起動間隔が異なりますので、ご注意ください。
- Google Chatとの連携はGoogle Workspaceの場合のみ可能です。詳細は「Google Chatでスペースにメッセージを送る方法」を参照ください。
■このテンプレートをおすすめする方
- BASEで運営するECサイトの注文情報を、手作業でチームに共有している方
- Google Chatを活用して、注文発生の通知を自動化し、見落としを防ぎたい方
- 注文から発送までのリードタイムを短縮し、顧客満足度を向上させたい店舗責任者の方
■このテンプレートを使うメリット
- BASEで注文が発生すると即座にGoogle Chatへ自動で通知が送られるため、都度管理画面を確認する手間や時間を削減できます。
- 手動での共有作業が不要になることで、注文情報の共有漏れや遅延といったヒューマンエラーを防ぎ、迅速な対応を支援します。
■フローボットの流れ
- はじめに、BASEとGoogle ChatをYoomと連携します。
- 次に、トリガーでBASEを選択し、「注文が発生したら」というアクションを設定します。
- 最後に、オペレーションでGoogle Chatの「メッセージを送信」アクションを設定し、トリガーで取得した注文情報を任意の宛先に通知するように設定します。
■このワークフローのカスタムポイント
- Google Chatへの通知先は、任意のスペースやユーザーに設定することが可能です。
- 通知するメッセージの本文は自由に編集でき、BASEから取得した注文番号や商品名、顧客情報といった動的な情報を組み込むことで、通知内容を具体的にカスタマイズできます。
■注意事項
- BASE、Google ChatのそれぞれとYoomを連携してください。
- トリガーは5分、10分、15分、30分、60分の間隔で起動間隔を選択できます。
- プランによって最短の起動間隔が異なりますので、ご注意ください。
- Google Chatとの連携はGoogle Workspaceの場合のみ可能です。詳細は「Google Chatでスペースにメッセージを送る方法」を参照ください。
まとめ
今回は、BASEで注文が発生した際に会員情報を自動でSendGridに登録する方法についてお伝えしました。
BASEとSendGridの連携により、顧客情報の管理が効率化され、手作業によるミスの削減が見込めます。
これにより、マーケティング活動の効率化と顧客満足度の向上が期待できます。Yoomを使って連携設定を行えば、専門的な知識がなくても気軽に始められます。
自動化の導入は、業務の効率化を図る上で非常に有効な手段になりそうです。
ぜひ、この記事を参考にして、あなたのビジネスに役立ててください。
プログラミング知識なしで手軽に構築できます。