・
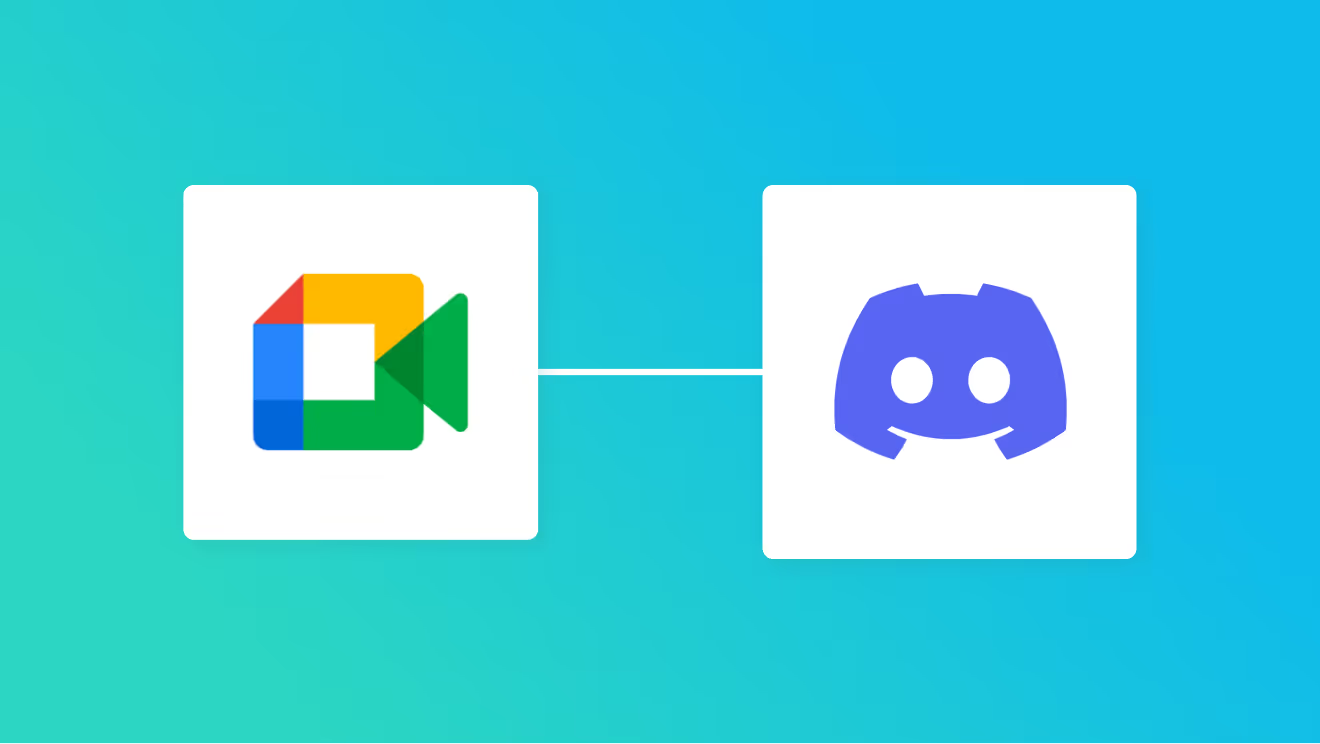
Google MeetとDiscordを連携して、Google Meetで会議が終了したらDiscordに通知する方法
リモートワークの普及に伴い、オンライン会議が日常的になっています。
しかし、会議が終わった後の情報共有には手間がかかることがありますよね。
そこで今回は、Google Meetで会議が終了した際に自動的にDiscordに通知するフローを紹介します。
この自動化により、会議後のフォローアップがスムーズになり、業務効率の向上が期待できます。また、情報が一元管理され、情報の見逃し防止できる見込みもあります。
具体的な設定方法やそのメリットについて詳しく解説しますので、ぜひご覧ください。とにかく早く試したい方へ
YoomにはGoogle MeetとDiscordとを連携するためのテンプレートが用意されています。 今すぐ試したい方は以下のバナーをクリックしてスタートしましょう!
■概要
オンライン会議が終了した後、参加者への連絡や議事録作成の依頼などを手作業で行っていませんか?こうした定型的な連絡作業は、手間がかかるだけでなく、通知の遅延や漏れにつながることもあります。このワークフローを活用すれば、Google Meetでの会議が終了したタイミングで、自動的にDiscordの指定チャンネルへメッセージを送信できるため、会議後の情報共有を自動化し、スムーズな連携を実現します。
■このテンプレートをおすすめする方
- Google Meetでの会議後の情報共有を手作業で行い、手間を感じている方
- Discordをチームの連絡手段としており、会議関連の通知を自動化したい方
- 会議後のタスク依頼などの連絡漏れを防ぎ、業務を円滑に進めたいチームリーダーの方
■このテンプレートを使うメリット
- Google Meetの会議終了後、自動でDiscordに通知が送信されるため、手作業での連絡に費やしていた時間を削減できます
- 手動での通知による連絡漏れや遅延といったヒューマンエラーを防ぎ、チームへの確実な情報共有を実現します
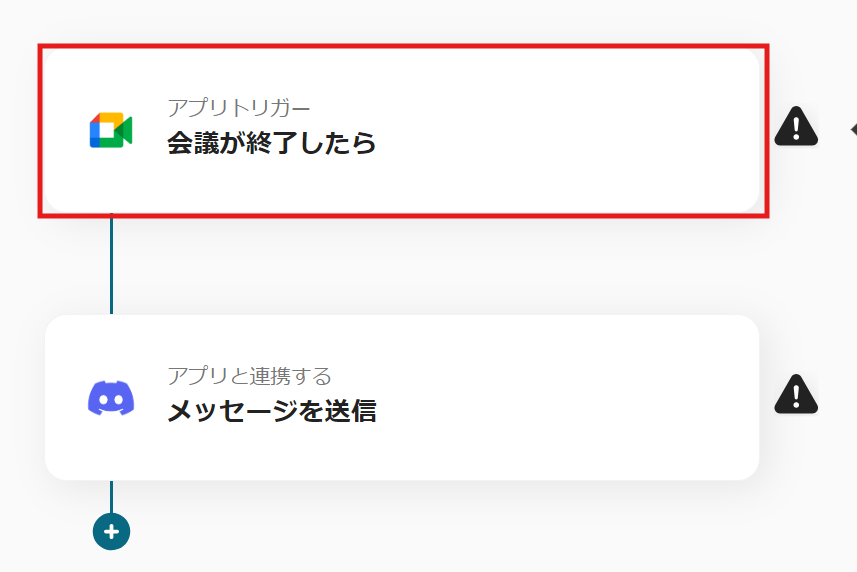
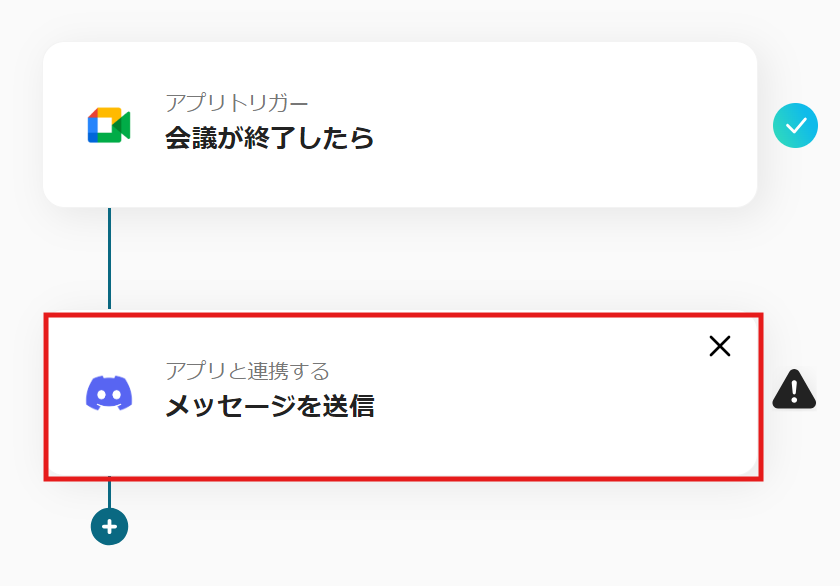
■フローボットの流れ
- はじめに、Google MeetとDiscordをYoomと連携します
- 次に、トリガーでGoogle Meetを選択し、「会議が終了したら」というアクションを設定します
- 最後に、オペレーションでDiscordの「メッセージを送信」アクションを設定し、任意のチャンネルへ通知します
※「トリガー」:フロー起動のきっかけとなるアクション、「オペレーション」:トリガー起動後、フロー内で処理を行うアクション
■このワークフローのカスタムポイント
- Discordへの通知先は、任意のチャンネルやダイレクトメッセージに設定できますプロジェクトごとやチームごとに通知先を使い分けることが可能です
- 通知するメッセージの本文は自由にカスタマイズできます固定のテキストだけでなく、Google Meetのトリガーから取得した会議名や終了時刻などの情報を変数として埋め込み、より具体的な通知を作成できます
■注意事項
- Google Meet、DiscordのそれぞれとYoomを連携してください。
- トリガーは5分、10分、15分、30分、60分の間隔で起動間隔を選択できます。
- プランによって最短の起動間隔が異なりますので、ご注意ください。
■概要
オンライン会議が終了した後、参加者への連絡や議事録作成の依頼などを手作業で行っていませんか?こうした定型的な連絡作業は、手間がかかるだけでなく、通知の遅延や漏れにつながることもあります。このワークフローを活用すれば、Google Meetでの会議が終了したタイミングで、自動的にDiscordの指定チャンネルへメッセージを送信できるため、会議後の情報共有を自動化し、スムーズな連携を実現します。
■このテンプレートをおすすめする方
- Google Meetでの会議後の情報共有を手作業で行い、手間を感じている方
- Discordをチームの連絡手段としており、会議関連の通知を自動化したい方
- 会議後のタスク依頼などの連絡漏れを防ぎ、業務を円滑に進めたいチームリーダーの方
■このテンプレートを使うメリット
- Google Meetの会議終了後、自動でDiscordに通知が送信されるため、手作業での連絡に費やしていた時間を削減できます
- 手動での通知による連絡漏れや遅延といったヒューマンエラーを防ぎ、チームへの確実な情報共有を実現します
■フローボットの流れ
- はじめに、Google MeetとDiscordをYoomと連携します
- 次に、トリガーでGoogle Meetを選択し、「会議が終了したら」というアクションを設定します
- 最後に、オペレーションでDiscordの「メッセージを送信」アクションを設定し、任意のチャンネルへ通知します
※「トリガー」:フロー起動のきっかけとなるアクション、「オペレーション」:トリガー起動後、フロー内で処理を行うアクション
■このワークフローのカスタムポイント
- Discordへの通知先は、任意のチャンネルやダイレクトメッセージに設定できますプロジェクトごとやチームごとに通知先を使い分けることが可能です
- 通知するメッセージの本文は自由にカスタマイズできます固定のテキストだけでなく、Google Meetのトリガーから取得した会議名や終了時刻などの情報を変数として埋め込み、より具体的な通知を作成できます
■注意事項
- Google Meet、DiscordのそれぞれとYoomを連携してください。
- トリガーは5分、10分、15分、30分、60分の間隔で起動間隔を選択できます。
- プランによって最短の起動間隔が異なりますので、ご注意ください。
Google MeetとDiscordを連携するメリット
メリット1: 情報の一元管理
Google MeetからDiscordへの自動通知により、会議の結果がDiscordに集約されます。
これにより、情報が一元管理され、チームメンバーは必要な情報をすぐに確認できます。
会議の情報確認やフォローアップがしやすくなり、重要な決定事項を見逃すリスクが減少します。
さらに、情報共有が促進され、チームの意思決定のスピードアップにもつながります。
例えば、営業部門では、会議終了後に自動でDiscordに通知されるので、次の営業訪問状況のスピーディーな把握が期待できます。
また、状況の把握は素早いフォローアップにもつながります。
メリット2: 業務プロセスの効率化
自動化されたフローにより、会議終了と同時にDiscordに通知が送信されるため、手間が省け、業務プロセスの効率化が期待できます。
これにより、チームメンバーは他の重要な業務へ集中できるような時間の確保が見込めます。
また、会議の議題や結果を把握しやすくなり、次回の会議に向けた準備もスムーズに進む可能性が高く、全体的な業務の生産性が向上も期待できます。
例えば、マーケティング部門では、キャンペーンの戦略会議終了後、自動で各メンバーにDiscordに通知が送信されることで、メンバーは素早い次のタスクへの行動が期待できます。
そのため、キャンペーンの準備がスピーディーに進み、全体的な業務の生産性の向上も見込めます。
Google MeetとDiscordの連携フローを作ってみよう
それでは早速、実際にGoogle MeetとDiscordを連携したフローを作成してみましょう!今回はYoomを使用してノーコードで連携を進めていきます。
もしまだYoomのアカウントをお持ちでない場合は、こちらの登録フォームからアカウントを発行しておきましょう。
※今回連携するアプリの公式サイト:Google Meet/Discord
[Yoomとは]
フローの作成方法
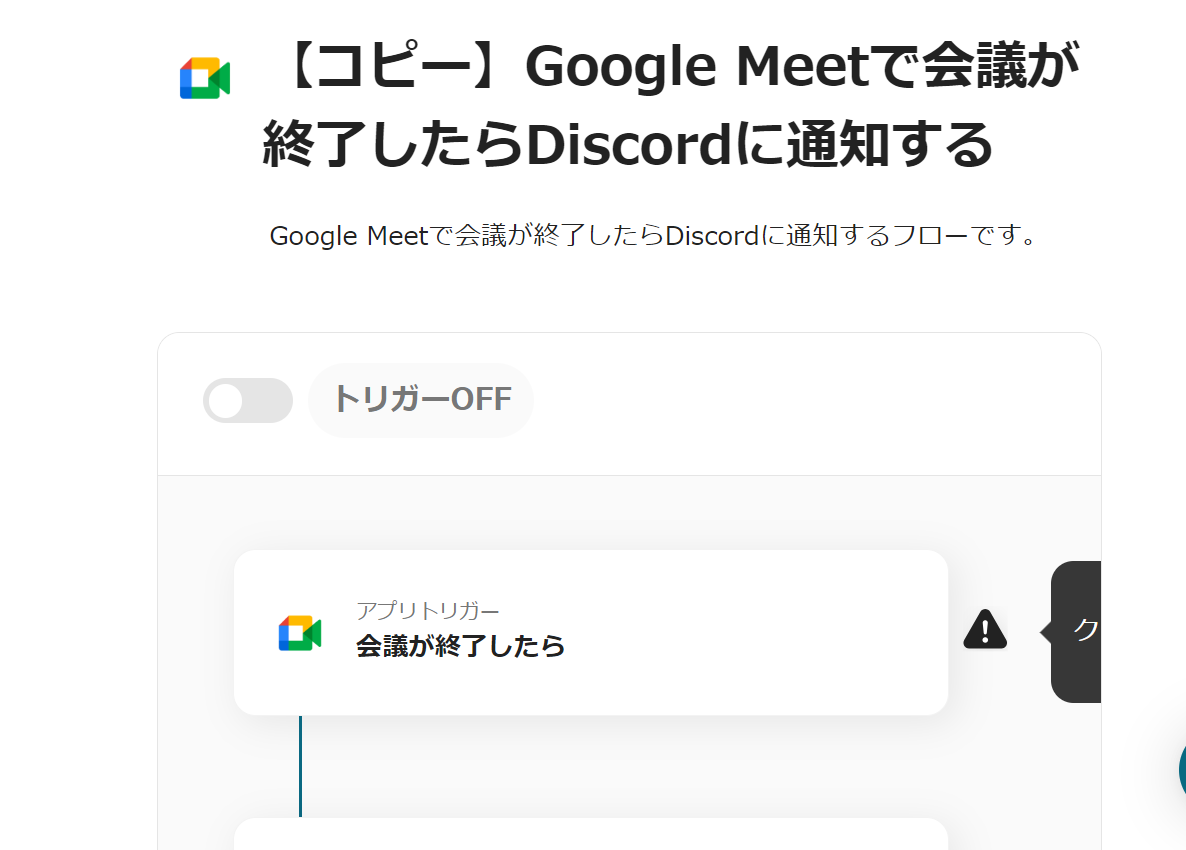
今回は「Google Meetで会議が終了したらDiscordに通知する」フローを作成していきます!
作成の流れは大きく分けて以下の通りです。
- Google MeetとDiscordのマイアプリ連携
- 該当のテンプレートをコピー
- Google Meetのトリガー設定とDiscordのアクション設定
- トリガーをONにし、フローが起動するか確認
■概要
オンライン会議が終了した後、参加者への連絡や議事録作成の依頼などを手作業で行っていませんか?こうした定型的な連絡作業は、手間がかかるだけでなく、通知の遅延や漏れにつながることもあります。このワークフローを活用すれば、Google Meetでの会議が終了したタイミングで、自動的にDiscordの指定チャンネルへメッセージを送信できるため、会議後の情報共有を自動化し、スムーズな連携を実現します。
■このテンプレートをおすすめする方
- Google Meetでの会議後の情報共有を手作業で行い、手間を感じている方
- Discordをチームの連絡手段としており、会議関連の通知を自動化したい方
- 会議後のタスク依頼などの連絡漏れを防ぎ、業務を円滑に進めたいチームリーダーの方
■このテンプレートを使うメリット
- Google Meetの会議終了後、自動でDiscordに通知が送信されるため、手作業での連絡に費やしていた時間を削減できます
- 手動での通知による連絡漏れや遅延といったヒューマンエラーを防ぎ、チームへの確実な情報共有を実現します
■フローボットの流れ
- はじめに、Google MeetとDiscordをYoomと連携します
- 次に、トリガーでGoogle Meetを選択し、「会議が終了したら」というアクションを設定します
- 最後に、オペレーションでDiscordの「メッセージを送信」アクションを設定し、任意のチャンネルへ通知します
※「トリガー」:フロー起動のきっかけとなるアクション、「オペレーション」:トリガー起動後、フロー内で処理を行うアクション
■このワークフローのカスタムポイント
- Discordへの通知先は、任意のチャンネルやダイレクトメッセージに設定できますプロジェクトごとやチームごとに通知先を使い分けることが可能です
- 通知するメッセージの本文は自由にカスタマイズできます固定のテキストだけでなく、Google Meetのトリガーから取得した会議名や終了時刻などの情報を変数として埋め込み、より具体的な通知を作成できます
■注意事項
- Google Meet、DiscordのそれぞれとYoomを連携してください。
- トリガーは5分、10分、15分、30分、60分の間隔で起動間隔を選択できます。
- プランによって最短の起動間隔が異なりますので、ご注意ください。
ステップ1:Google MeetとDiscordをマイアプリ連携
ここでは、Yoomとそれぞれのアプリを連携して、操作が行えるようにしていきます。
まずは基本的な設定方法を解説しているナビをご覧ください!
この後、今回のフローで使用するアプリのマイアプリ登録方法を解説します。
Google Meetのマイアプリ登録
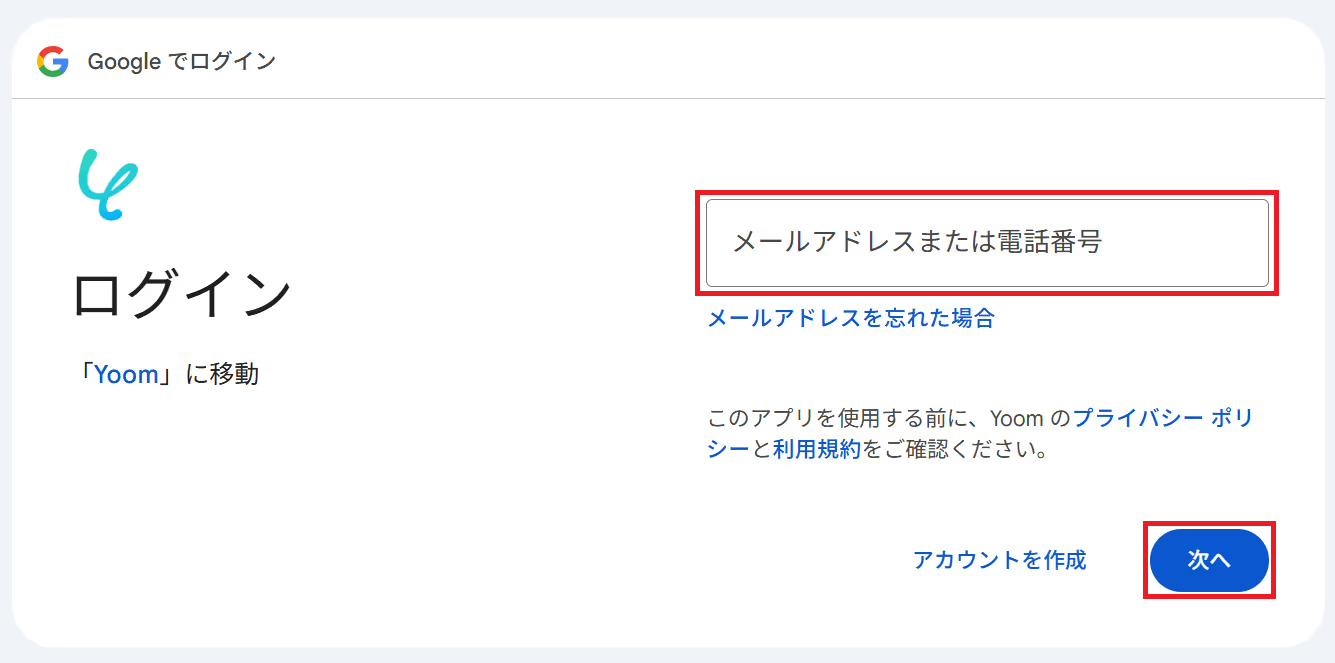
Google Meetを検索すると下の画像が表示されるので「Sign in with Google」をクリックします。

メールアドレスまたは電話番号を入力し「次へ」をクリックします。
※既にGoogleアカウントを使ってマイアプリ連携したことがある場合は、そのアカウントを選択するだけでOKです。
パスワードを入力してもう一度「次へ」をクリックします。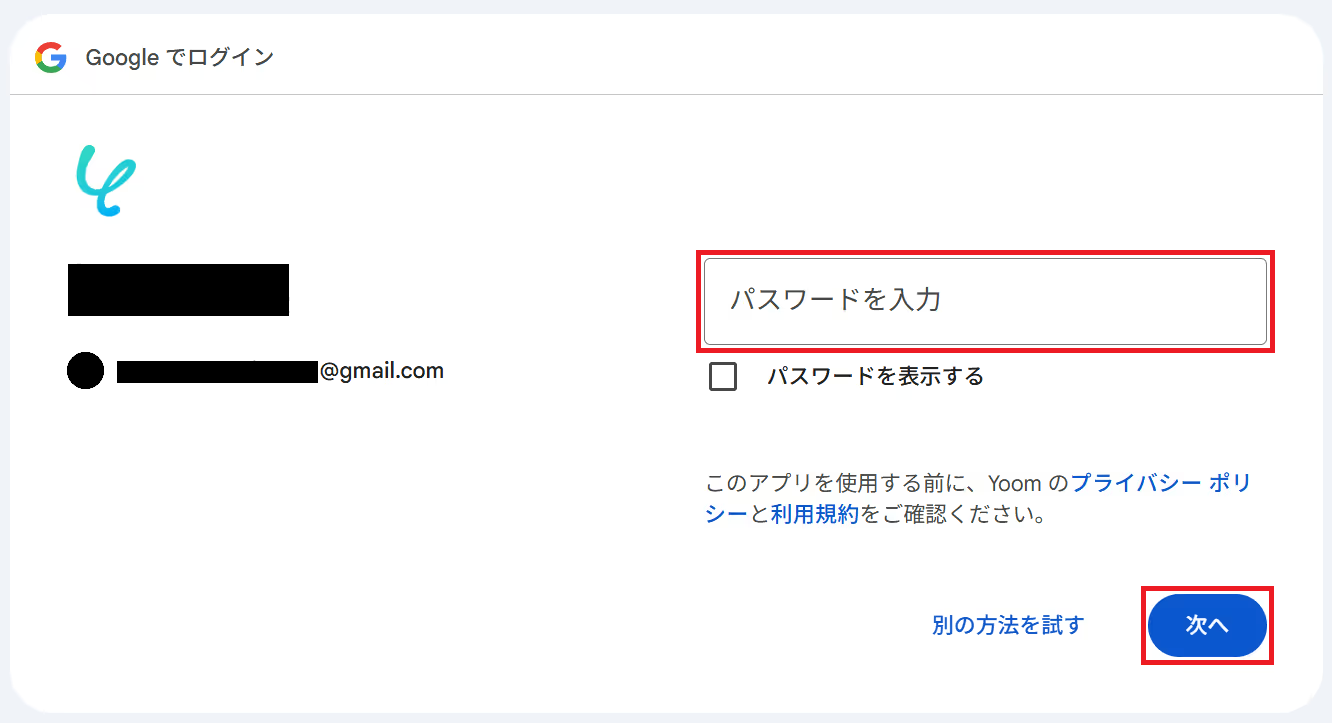
両方のチェックボックスにチェックを入れ「続行」をクリックするとGoogle Meetのマイアプリ連携が完了です!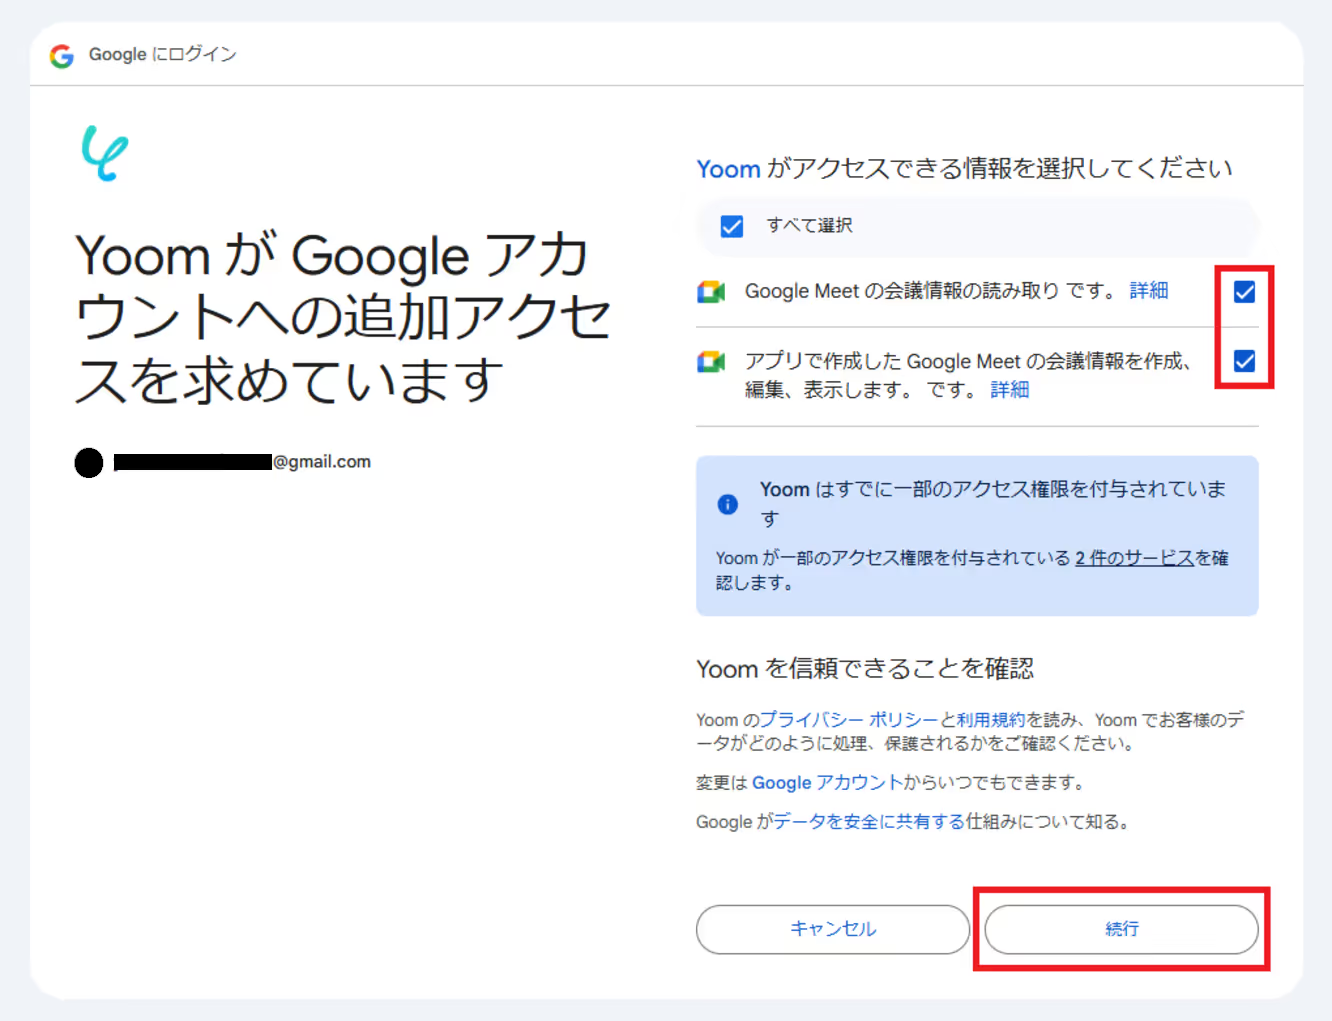
Discordのマイアプリ連携
Discordの連携方法は、以下の手順をご参照ください。
Discordのアプリ登録についてはDiscord Botのマイアプリ連携方法も参考にしてください。登録ができるとマイアプリにアイコンが表示されます。
登録した2つのアプリのアイコンが表示されたか確認してください。
ステップ2: テンプレートの選択とコピー
1)Yoomにログインして、以下のバナーの「試してみる」をクリックします。
■概要
オンライン会議が終了した後、参加者への連絡や議事録作成の依頼などを手作業で行っていませんか?こうした定型的な連絡作業は、手間がかかるだけでなく、通知の遅延や漏れにつながることもあります。このワークフローを活用すれば、Google Meetでの会議が終了したタイミングで、自動的にDiscordの指定チャンネルへメッセージを送信できるため、会議後の情報共有を自動化し、スムーズな連携を実現します。
■このテンプレートをおすすめする方
- Google Meetでの会議後の情報共有を手作業で行い、手間を感じている方
- Discordをチームの連絡手段としており、会議関連の通知を自動化したい方
- 会議後のタスク依頼などの連絡漏れを防ぎ、業務を円滑に進めたいチームリーダーの方
■このテンプレートを使うメリット
- Google Meetの会議終了後、自動でDiscordに通知が送信されるため、手作業での連絡に費やしていた時間を削減できます
- 手動での通知による連絡漏れや遅延といったヒューマンエラーを防ぎ、チームへの確実な情報共有を実現します
■フローボットの流れ
- はじめに、Google MeetとDiscordをYoomと連携します
- 次に、トリガーでGoogle Meetを選択し、「会議が終了したら」というアクションを設定します
- 最後に、オペレーションでDiscordの「メッセージを送信」アクションを設定し、任意のチャンネルへ通知します
※「トリガー」:フロー起動のきっかけとなるアクション、「オペレーション」:トリガー起動後、フロー内で処理を行うアクション
■このワークフローのカスタムポイント
- Discordへの通知先は、任意のチャンネルやダイレクトメッセージに設定できますプロジェクトごとやチームごとに通知先を使い分けることが可能です
- 通知するメッセージの本文は自由にカスタマイズできます固定のテキストだけでなく、Google Meetのトリガーから取得した会議名や終了時刻などの情報を変数として埋め込み、より具体的な通知を作成できます
■注意事項
- Google Meet、DiscordのそれぞれとYoomを連携してください。
- トリガーは5分、10分、15分、30分、60分の間隔で起動間隔を選択できます。
- プランによって最短の起動間隔が異なりますので、ご注意ください。
2) 以下のような表示が出てきます。
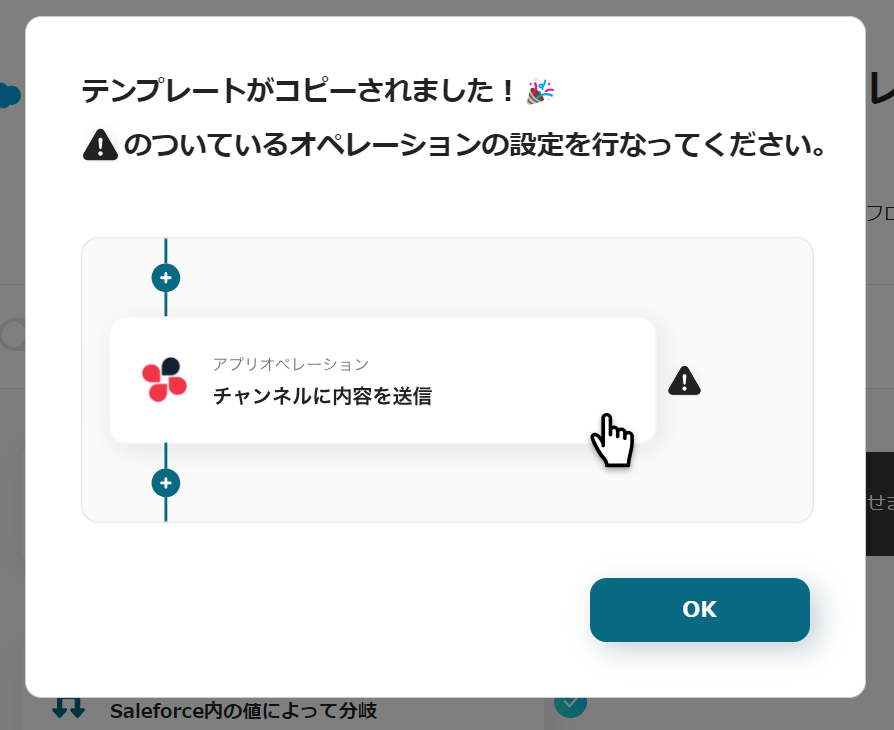
右に表示される「!」のアイコンを順番にクリックし、フローを編集します。
タイトルや詳細は、クリックすると、変更可能です。
適宜変更してください。
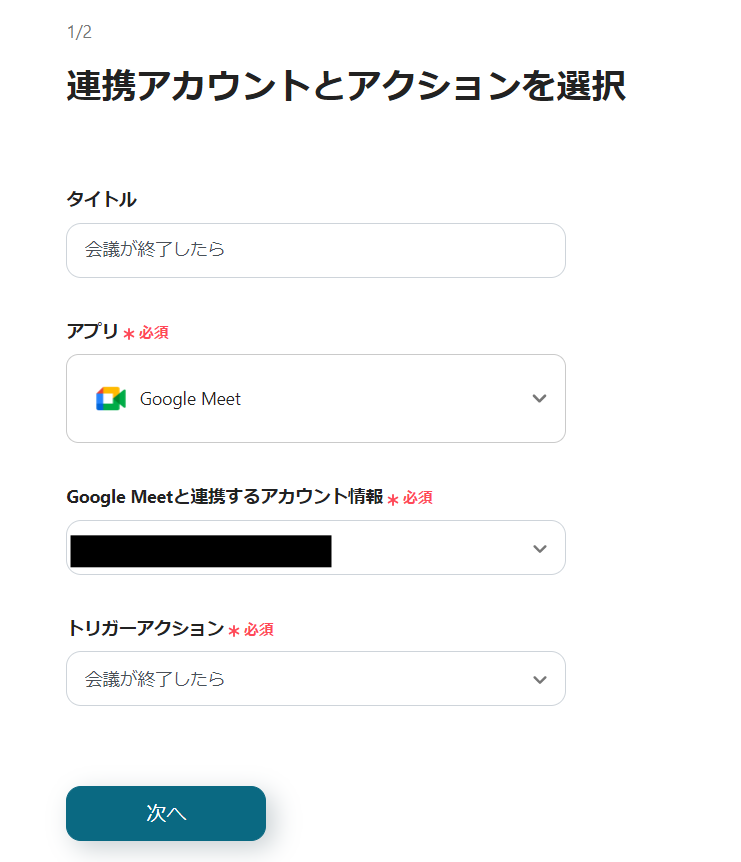
ステップ3:トリガーを設定
「会議が終了したら」をクリックします。
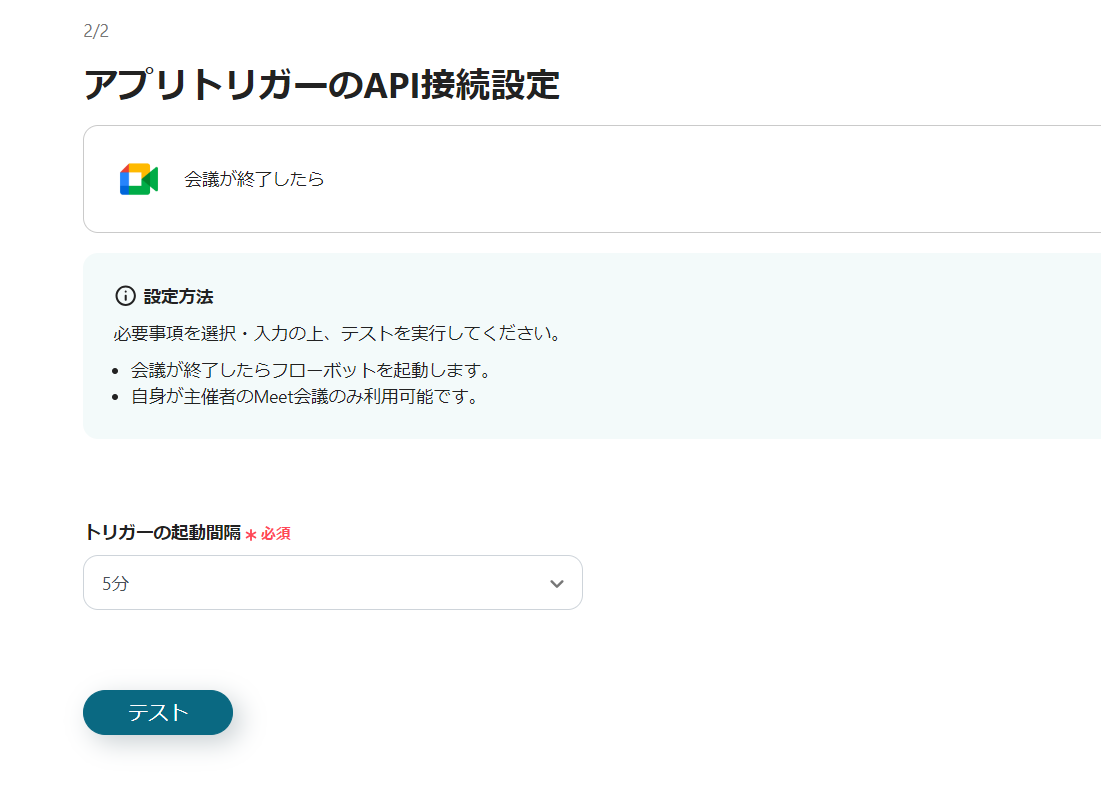
アクションは「会議が終了したら」を選択して、「次へ」をクリックします。
トリガーの起動間隔を選択します。
起動間隔は契約プランによって変わります。
各プランの内容については各プランの機能制限や使用上限の一覧 | Yoomヘルプセンター (intercom.help)をご確認ください。
設定が完了したら「テスト」をクリックし、テスト成功後「保存」します。
ここで取得した「アウトプット(取得した値)」についての詳しい解説はアウトプットについて | Yoomヘルプセンター (intercom.help)をご確認ください。
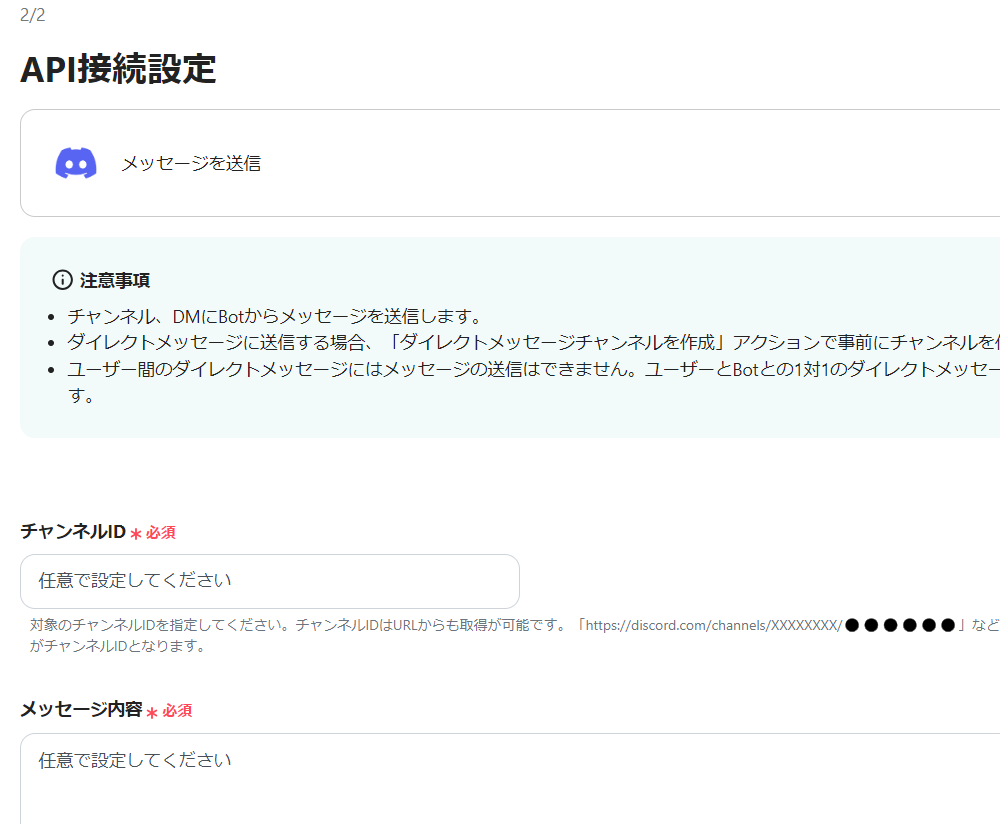
ステップ4:Discordのアクションを設定
フローに戻り、「アプリと連携する メッセージを送信」のアイコンをクリックします。
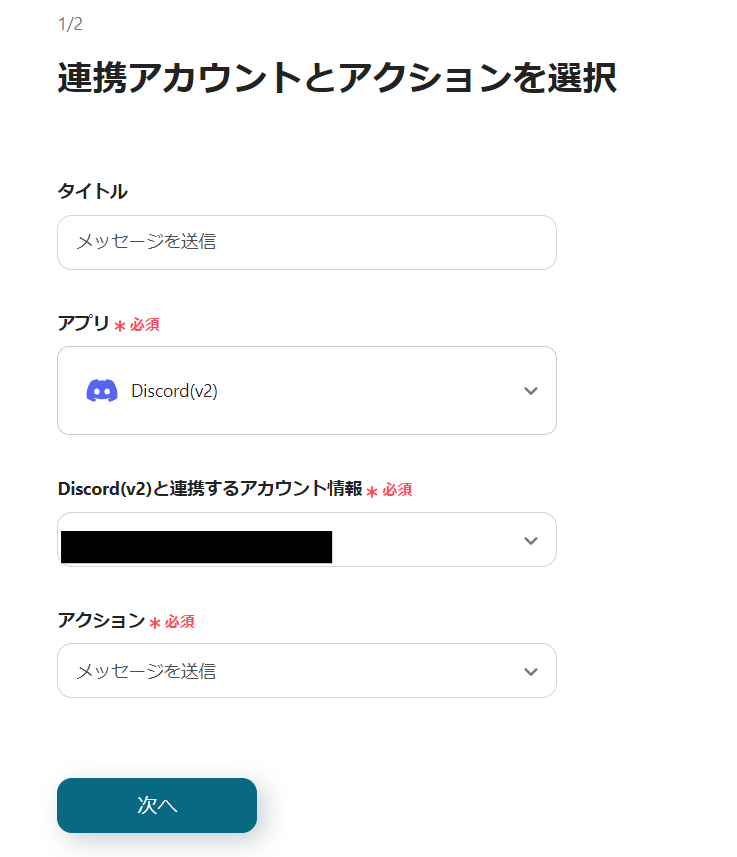
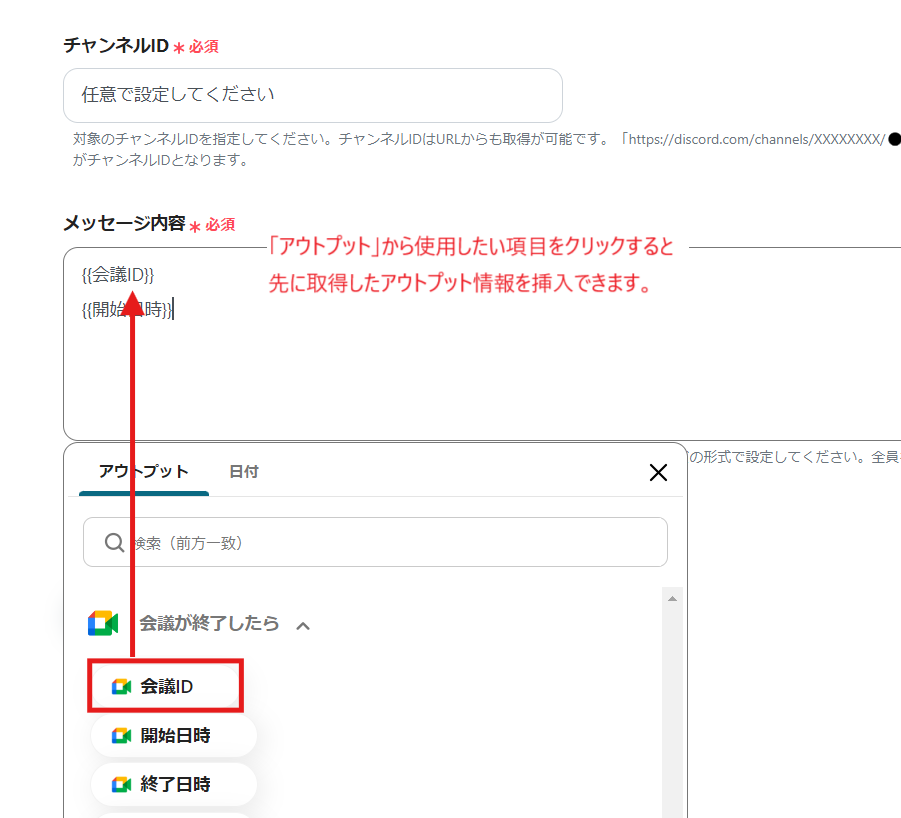
必須項目を入力します。
アプリが連携出来ているとGoogle Meetの「アウトプット(取得した値)」を活用して入力できます。
必要に応じて候補から選択してください。
手入力でメッセージ内容を設定してしまうと、フローボットを起動する度に同じメッセージ内容が反映されてしまうので注意してください。
「アウトプット(取得した値)」を埋め込むことで、最新のGoogle Meetのデータが反映されるようになります!
入力が完了したら、テストを実行して問題なければ「保存」します。
※「テスト」をクリックすると設定したチャンネルに実際に投稿されます。テストの際はテスト用のチャンネルに投稿したり、事前にメンバーに通知しておくなどがおすすめです。
ステップ5: テストと確認
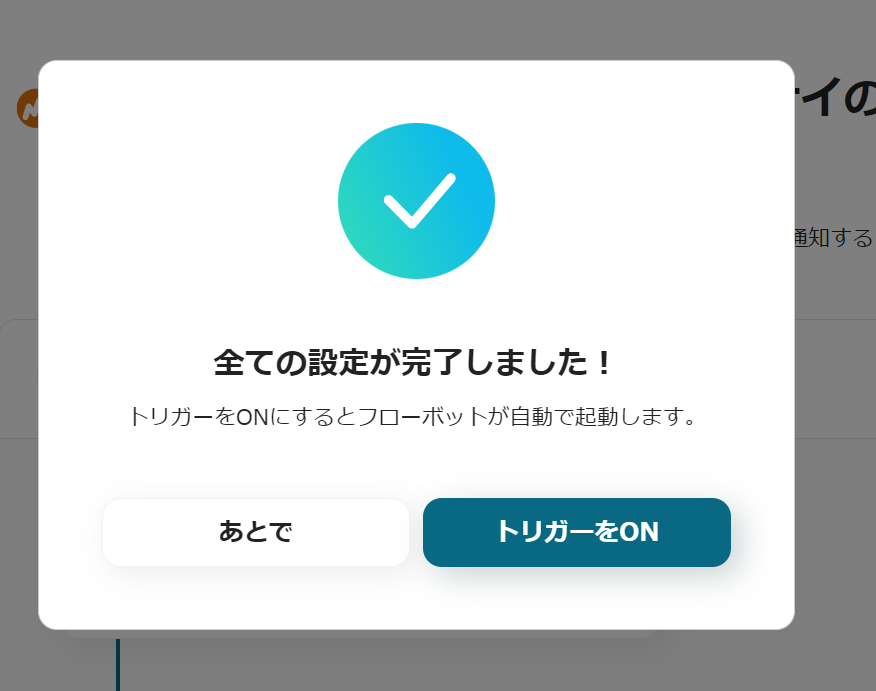
最後まで設定すると以下のような表示が出てくるので、「トリガーをON」をクリックします。
フローボットを起動し、正しく作動するか確認してください。
以上で【Google Meetで会議が終了したらDiscordに通知する】というフローが完成です。
DiscordのデータをGoogle Meetに連携したい場合
今回はGoogle MeetからDiscordへデータ連携する方法をご紹介しました。
逆にDiscordでのアクションをトリガーにGoogle Meetへ情報を連携する自動化も可能です。
これまで手作業で行っていた会議設定やURL共有などを自動化したい場合は、下記のテンプレートも併せてご利用ください。
Discordでメッセージが送信されたら、Google Meetで会議スペースを作成し通知する
Discordの特定チャンネルにメッセージが送信された際、その内容をトリガーとして自動的にGoogle Meetの会議スペースを作成し、生成されたURLをDiscordへ通知するフローです。
会議設定からメンバーへの共有までの一連の流れが自動化されるため、手作業による時間的コストと共有ミスを削減してスムーズな会議開催を実現します。
■概要
Discordでのコミュニケーション中に、急遽Google Meetでの会議が必要になる場面はありませんか?その度に手動で会議URLを発行し、Discordに共有するのは手間がかかり、コミュニケーションの速度を落とす原因にもなります。
このワークフローを活用すれば、Discordの特定のメッセージをきっかけに、Google Meetの会議スペースを自動で作成し、URLを即座に通知することが可能です。面倒な手作業をなくし、シームレスな連携を実現します。
■このテンプレートをおすすめする方
- Discordでのやり取りからGoogle Meetでの会議設定を手作業で行っている方
- コミュニケーションツール間の連携を自動化し、業務効率を改善したいと考えているチームリーダーの方
- 突発的なオンラインミーティングが多く、会議URLの発行と共有を効率化したい方
■このテンプレートを使うメリット
- Discordでの特定のメッセージをトリガーにGoogle Meetの会議URLが自動で発行・通知されるため、手作業での設定時間を短縮できます。
- 手動でのURL発行やコピー&ペースト作業が不要になるため、URLの共有漏れや貼り間違いといったヒューマンエラーを防ぎます。
■フローボットの流れ
- はじめに、DiscordとGoogle MeetをYoomと連携します。
- 次に、トリガーでDiscordを選択し、「チャンネルでメッセージが送信されたら」というアクションを設定します。
- 次に、オペレーションでGoogle Meetの「会議スペースを作成」アクションを設定します。
- 最後に、オペレーションでDiscordの「メッセージを送信」アクションを設定し、作成された会議URLを指定のチャンネルに通知します。
※「トリガー」:フロー起動のきっかけとなるアクション、「オペレーション」:トリガー起動後、フロー内で処理を行うアクション
■このワークフローのカスタムポイント
- Discordのトリガー設定では、フローボットを起動させたいメッセージの投稿先であるサーバーIDとチャンネルIDを任意で設定してください。
- Discordへの通知オペレーションでは、通知先のチャンネルを自由に設定できます。また、通知するメッセージ本文は、前段のオペレーションで取得したGoogle Meetの会議URLなどを変数として埋め込むことが可能です。
■注意事項
- Discord、Google MeetのそれぞれとYoomを連携してください。
- トリガーは5分、10分、15分、30分、60分の間隔で起動間隔を選択できます。
- プランによって最短の起動間隔が異なりますので、ご注意ください。
Google MeetやDiscordのAPIを使ったその他の自動化例
Yoomでは、Google MeetやDiscordに関しての様々な業務効率化テンプレートを提供しています。
Google MeetやDiscordでの操作をトリガーに、様々な業務工程を自動化することで業務の効率化と人的ミスの削減が可能です。
ご自身の業務に合わせて、これらのテンプレートもぜひ活用してみてくださいね!
Google Meetを使った便利な自動化例
Google Meetの会議を自動で文字起こししてNotionに議事録として追加したり、会議終了後に録画データや文字起こし内容をGoogle DriveやGoogleスプレッドシートに格納したりできます。
また他のツールをトリガーにGoogle Meetで会議スペースを作成することも可能です。
■概要
Google Meetでの会議後、録画データを聞き返しながら手作業で文字起こしを行い、議事録を作成してNotionに転記する作業に手間を感じていませんか。このワークフローを活用すれば、Google Meetでの会議終了をトリガーとして、音声の文字起こしから要約の作成、Notionへの議事録追加までの一連のプロセスを自動化し、これらの定型業務を効率化できます。
■このテンプレートをおすすめする方
- Google Meetでの会議が多く、議事録作成の工数を削減したいと考えている方
- Notionで議事録を管理しており、情報の転記作業の手間を省きたい方
- 会議内容の記録や共有の精度とスピードを高めたいプロジェクトマネージャーの方
■このテンプレートを使うメリット
- 会議終了後の文字起こしや要約作成、Notionへの登録が自動化されるため、議事録作成にかかる時間を短縮し、より重要な業務に集中できます。
- 手作業による文字の転記ミスや、Notionへの登録漏れといったヒューマンエラーのリスクを軽減し、議事録の正確性を保つことに繋がります。
■フローボットの流れ
- はじめに、Google MeetとNotionをYoomと連携します。
- トリガーでGoogle Meetを選択し、「会議が終了したら」というアクションを設定します。
- オペレーションで待機機能を設定し、レコーディング処理が完了するまでフローを待機させます。
- 次に、Google Meetの「レコーディング情報を取得する」アクションで、会議の録画情報を取得します。
- Google Driveの「音声ファイルをダウンロードする」アクションで、録画データをダウンロードします。
- 音声文字起こし機能で、ダウンロードした音声データをテキストに変換します。
- 要約機能で、文字起こししたテキストから議事録の要約を作成します。
- 最後に、Notionの「レコードを追加する」アクションで、文字起こし結果や要約内容をデータベースに登録します。
※「トリガー」:フロー起動のきっかけとなるアクション、「オペレーション」:トリガー起動後、フロー内で処理を行うアクション
■このワークフローのカスタムポイント
- Google Meetのトリガー設定では、会議の終了をチェックする間隔を任意で設定できます。
- 待機機能では、レコーディング処理の完了を待つ時間を任意で設定することが可能です。
- 音声文字起こし機能では、話者の分離など、文字起こしに関する条件を自由に設定できます。
- 要約機能では、どのような要約を作成するかをプロンプトなどで自由に設定することが可能です。
- Notionにレコードを追加する際、会議名や文字起こし結果、要約など、どの情報をどのフィールドに登録するかを自由に設定できます。
■注意事項
- Googleスプレッドシート、Google Drive、NotionのそれぞれとYoomを連携してください。
- OCRまたは音声を文字起こしするAIオペレーションはチームプラン・サクセスプランでのみご利用いただける機能となっております。フリープラン・ミニプランの場合は設定しているフローボットのオペレーションはエラーとなりますので、ご注意ください。
- チームプランやサクセスプランなどの有料プランは、2週間の無料トライアルを行うことが可能です。無料トライアル中には制限対象のアプリやAI機能(オペレーション)を使用することができます。
- ダウンロード可能なファイル容量は最大300MBまでです。アプリの仕様によっては300MB未満になる可能性があるので、ご注意ください。
- トリガー、各オペレーションでの取り扱い可能なファイル容量の詳細は下記をご参照ください。
- https://intercom.help/yoom/ja/articles/9413924
Google Meetで録画した会議データの管理やチームへの共有を、手動で行うのは手間のkる作業ではないでしょうか。会議が終了した後に録画の処理を待ち、ファイルをダウンロードしてGoogle Driveにアップロードし、さらにSlackでメンバーにURLを連絡する、といった一連の作業は、忙しい業務の中では後回しになりがちで、共有漏れの原因にもなります。このワークフローを活用すれば、会議終了と同時に録画データを自動で取得してGoogle Driveへ格納し、Slackへの通知までを一気通貫で自動化できるため、情報共有のスピードと効率を大幅に向上させます。
■このテンプレートをおすすめする方
- Google Meetの録画データを毎回手動でGoogle Driveに保存・共有している方
- 社内ミーティングや顧客との商談の録画データを、チーム内へ素早く確実に共有したい方
- 会議の振り返りや議事録作成のための情報集約を効率化したいと考えている方
■このテンプレートを使うメリット
- 会議終了から録画データの保存、Slack通知までが完全に自動化され、手作業にかかっていた工数と時間を削減します。
- 録画データの格納やSlackへの共有漏れといったヒューマンエラーを防ぎ、会議に参加できなかったメンバーへの情報共有もスムーズに行えます。
■フローボットの流れ
- はじめに、Google Meet、Google Drive、SlackをYoomと連携します。
- 次に、トリガーでGoogle Meetを選択し、「会議が終了したら」というアクションを設定します。
- 次に、録画データの生成を待つため、待機機能の「待機する」アクションを設定します。
- 次に、オペレーションでGoogle Meetの「レコーディング情報を取得」アクションを設定します。
- 次に、オペレーションでGoogle Driveの「ファイルをダウンロードする」アクションを設定し、録画データを取得します。
- 最後に、オペレーションでSlackの「ファイルを送る」アクションを設定し、指定のチャンネルやユーザーへファイルを通知します。
■このワークフローのカスタムポイント
- Google Meetのトリガーやオペレーションでは、会議IDや取得件数などを任意で設定することが可能です。
- 「待機する」のオペレーションでは、録画データの処理時間に合わせた待機時間を任意で設定できます。
- Google Driveのオペレーションでは、対象とするファイルIDを任意で設定可能です。
- Slackのオペレーションでは、通知先(チャンネルやユーザー)や、送付するメッセージ内容を業務に合わせて自由にカスタマイズしてください。
■注意事項
- Google Meet、Google Drive、SlackのそれぞれとYoomを連携してください。
- ダウンロード可能なファイル容量は最大300MBまでです。アプリの仕様によっては300MB未満になる可能性があるので、ご注意ください。
- トリガー、各オペレーションでの取り扱い可能なファイル容量の詳細は「ファイルの容量制限について」をご参照ください。
- 「待機する」オペレーションは、パーソナルプラン以上のプランでご利用いただける機能となっております。フリープランの場合は設定しているフローボットのオペレーションやデータコネクトはエラーとなりますので、ご注意ください。
- パーソナルプランなどの有料プランは、2週間の無料トライアルを行うことが可能です。無料トライアル中には制限対象のアプリや機能(オペレーション)を使用することができます。
■概要
Google Meetで会議が終了したら、文字起こししてSlackに自動通知するフローです。
Yoomではプログラミング不要でアプリ間の連携ができるため、簡単にこのフローを実現することができます。
■このテンプレートをおすすめする方
- Google Meetを使用した定例会議や重要な商談を頻繁に行い、議事録の作成と共有に時間を取られている営業担当者
- 複数のプロジェクトを同時進行で管理しており、ミーティングの内容をチーム間で共有する必要があるプロジェクトマネージャー
- 会議に出席できなかったメンバーとSlackで内容をスムーズに共有したい方
- リモートワークやフレックスタイム制を導入し、非同期コミュニケーションを重視している部署の責任者
■このテンプレートを使うメリット
このフローにより、Google Meetの録画からの文字起こしとSlackでの通知が自動的に行われます。
手動で議事録の作成や共有を行う必要がなくなり、会議後の作業時間を削減できます。
会議に参加できなかった場合や会議の内容を振り返りたい場合、情報をスムーズに把握できます。
また、Slack上で会議内容を簡単に検索できるようになるため、過去の議論や決定事項への素早いアクセスが可能になります。
■概要
オンライン会議後の議事録作成は、重要な業務でありながらも、録画データの文字起こしや内容の転記に多くの時間を要する作業ではないでしょうか。このワークフローを活用すれば、Google Meetの会議が終了すると、録画データを自動で文字起こしし、その結果をGoogle スプレッドシートに記録できます。議事録作成の手間を省き、コア業務に集中できる環境を整えます。
■このテンプレートをおすすめする方
- Google Meetでの会議が多く、議事録作成の工数に課題を感じている方
- 会議内容の記録や共有を効率化し、チームの生産性を高めたいマネージャーの方
- 手作業での文字起こしによる抜け漏れを防ぎ、正確な議事録を残したい担当者の方
■このテンプレートを使うメリット
- 会議終了後の文字起こしから転記までが自動処理されるため、議事録作成にかかる時間を短縮し、他の業務に時間を充てられます。
- 手作業での転記ミスや記録漏れといったヒューマンエラーを防ぎ、会議での決定事項や議論の内容を正確に蓄積することができます。
■フローボットの流れ
- はじめに、Google Meet、Google Drive、Google スプレッドシートをYoomと連携します。
- トリガーでGoogle Meetを選択し、「会議が終了したら」というアクションを設定して、フローが起動するきっかけを作ります。
- 次に、オペレーションでGoogle Meetの「レコーディング情報を取得」アクションを設定し、終了した会議の録画データを特定します。
- 続いて、Google Driveの「ファイルをダウンロードする」アクションで、取得したレコーディングデータをYoom内に取り込みます。
- その後、AI機能の「音声データを文字起こしする」アクションを設定し、ダウンロードした音声データをテキストに変換します。
- 最後に、Google スプレッドシートの「レコードを追加する」アクションで、文字起こしされたテキストを指定のシートに追加します。
※「トリガー」:フロー起動のきっかけとなるアクション、「オペレーション」:トリガー起動後、フロー内で処理を行うアクション
■このワークフローのカスタムポイント
- Google Meetのトリガー設定では、フローをチェックする起動間隔を任意で指定できます。
- Google Meetの「レコーディング情報を取得」では、特定の会議IDを指定して、対象の会議のみを処理するように設定できます。
- Google Driveの「ファイルをダウンロードする」では、前のステップで取得したレコーディング情報のファイルIDをアウトプットから選択して指定します。
- AI機能の「音声データを文字起こしする」では、文字起こしする音声ファイルの添付方法や、日本語や英語などの言語を任意で設定できます。
- Google スプレッドシートの「レコードを追加する」では、記録先のシートIDやタブ名、テーブル範囲を自由に設定し、どのセルにどの情報を記録するかを指定できます。
■注意事項
- Google Meet、Google Drive、Google スプレッドシートのそれぞれをYoomに連携してください。
- OCRまたは音声を文字起こしするAIオペレーションはチームプラン・サクセスプランでのみご利用いただける機能となっております。フリープラン・ミニプランの場合は設定しているフローボットのオペレーションはエラーとなりますので、ご注意ください。
- チームプランやサクセスプランなどの有料プランは、2週間の無料トライアルを行うことが可能です。無料トライアル中には制限対象のアプリやAI機能(オペレーション)を使用することができます。
■このテンプレートをおすすめする方
- Google Meetでの会議が多く、録画共有を手作業で行うことに手間を感じている方
- チーム内での迅速な情報共有を仕組み化し、共有漏れをなくしたいと考えている方
- 会議の議事録や振り返りのための情報連携を効率化したいプロジェクトリーダーの方
■このテンプレートを使うメリット
- 会議終了後に自動で録画情報が共有されるため、手作業での共有に費やしていた時間を短縮し、他の業務に集中できます。
- 手動での対応による共有忘れや、誤ったチャンネルへの投稿といったヒューマンエラーを防ぎ、確実な情報連携に繋がります。
■フローボットの流れ
- はじめに、Google MeetとSlackをYoomと連携します
- 次に、トリガーでGoogle Meetを選択し、「会議が終了したら」というアクションを設定します
- 次に、オペレーションで待機機能を設定し、録画ファイルが生成されるまでの時間を任意で設定します
- 次に、オペレーションでGoogle Meetの「レコーディング情報を取得」アクションを設定します
- 最後に、オペレーションでSlackの「チャンネルにメッセージを送る」アクションを設定し、取得した録画URLを含むメッセージを指定チャンネルに送信します
■このワークフローのカスタムポイント
- Google Meetのトリガー設定では、特定の会議IDのみを対象にするなど、自動化の起動条件を任意で設定できます。
- 待機機能では、会議の録画データが生成されるまでの時間を考慮し、待機時間を任意で調整してください。
- Slackへの通知設定では、送信先のチャンネルやメッセージ本文の内容を自由にカスタマイズすることが可能です。
■注意事項
- Google Meet、SlackのそれぞれとYoomを連携してください。
- トリガーは5分、10分、15分、30分、60分の間隔で起動間隔を選択できます。
- プランによって最短の起動間隔が異なりますので、ご注意ください。
- 「待機する」オペレーションは、パーソナルプラン以上のプランでご利用いただける機能となっております。フリープランの場合は設定しているフローボットのオペレーションやデータコネクトはエラーとなりますので、ご注意ください。
- パーソナルプランなどの有料プランは、2週間の無料トライアルを行うことが可能です。無料トライアル中には制限対象のアプリや機能(オペレーション)を使用することができます。
■概要
Salesforceで管理している商談が受注となった後、顧客へのオンボーディング準備に手間を感じていませんか。手動で会議を設定し、案内メールを作成する作業は時間がかかるだけでなく、対応漏れなどのミスにも繋がりかねません。このワークフローを活用すれば、Salesforceの商談フェーズ更新をトリガーとして、Google Meetでの顧客オンボーディング会議スペースの作成から案内メールの送信までを自動化できます。スムーズな顧客対応を実現し、オンボーディングの質を高めます。
■このテンプレートをおすすめする方
- Salesforceで管理している顧客のオンボーディングプロセスを効率化したい方
- Salesforceの商談成立後、手作業で会議設定や案内を行っているご担当者様
- 顧客へのスピーディな対応を実現し、オンボーディング体験を向上させたい方
■このテンプレートを使うメリット
- Salesforceの商談フェーズ更新を起点に、顧客オンボーディング用の会議作成と案内が自動で完了するため、手作業の時間を削減できます。
- 手動での会議案内に伴う、宛先間違いなどのヒューマンエラーを防ぎ、確実な顧客対応につながります。
■フローボットの流れ
- はじめに、SalesforceとGoogle MeetをYoomと連携します。
- 次に、トリガーでSalesforceを選択し、「商談オブジェクトにレコードが登録または更新されたら」を設定します。
- オペレーションで分岐機能を設定し、商談フェーズが特定のステータスになった場合のみ後続の処理に進むようにします。
- 次に、Salesforceの「レコードを取得する」アクションで、対象の顧客情報を取得します。
- 続いて、Google Meetの「会議スペースを作成する」アクションを設定し、オンボーディング用の会議を作成します。
- 最後に、メール機能の「メールを送る」アクションで、取得した顧客情報と作成した会議URLを本文に含めた案内メールを送信します。
※「トリガー」:フロー起動のきっかけとなるアクション、「オペレーション」:トリガー起動後、フロー内で処理を行うアクション
■このワークフローのカスタムポイント
- Salesforceと連携する際に、ご利用の環境に応じた任意のマイドメインURLを設定してください。
- オペレーションでSalesforceを設定する際、メール送信の宛先や本文に必要な情報が登録された任意のオブジェクト(例:取引先責任者など)を対象としてください。
■注意事項
- Salesforce、Google MeetのそれぞれとYoomを連携してください。
- トリガーは5分、10分、15分、30分、60分の間隔で起動間隔を選択できます。
- プランによって最短の起動間隔が異なりますので、ご注意ください。
- 分岐はミニプラン以上のプランでご利用いただける機能(オペレーション)となっております。フリープランの場合は設定しているフローボットのオペレーションはエラーとなりますので、ご注意ください。
- ミニプランなどの有料プランは、2週間の無料トライアルを行うことが可能です。無料トライアル中には制限対象のアプリや機能(オペレーション)を使用することができます。
- 【Salesforce】はチームプラン・サクセスプランでのみご利用いただけるアプリとなっております。フリープラン・ミニプランの場合は設定しているフローボットのオペレーションやデータコネクトはエラーとなりますので、ご注意ください。
- チームプランやサクセスプランなどの有料プランは、2週間の無料トライアルを行うことが可能です。無料トライアル中には制限対象のアプリを使用することができます。
■概要
Gmailで打ち合わせの依頼メールを受信した後、手作業でGoogle Meetの会議URLを発行し、関係者に共有する作業に手間を感じていませんか。このワークフローを活用することで、Gmailで特定のキーワードを含むメールを受信した際に、自動でGoogle Meetの会議スペースを作成し、その情報を関係者にメールで通知する一連のプロセスを自動化できます。これにより、会議設定の手間を省き、スムーズなコミュニケーションを実現します。
■このテンプレートをおすすめする方
- Gmailでのやり取りを起点に、Google Meetでの打ち合わせを頻繁に行う営業担当者やカスタマーサクセスの方
- 手動での会議設定やURL共有による日程の調整ミスや、関係者への共有漏れを防ぎたいと考えている方
- GmailとGoogle Meetの連携を通じて、日々のコミュニケーション業務の効率化を目指すすべてのビジネスパーソン
■このテンプレートを使うメリット
- Gmailで特定のメールを受信後、自動でGoogle Meetの会議が設定されるため、手作業によるURL発行や共有にかかる時間を短縮できます
- 会議URLのコピー&ペーストミスや関係者への共有漏れといったヒューマンエラーを防ぎ、確実でスムーズな会議設定を実現します
■フローボットの流れ
- はじめに、GmailとGoogle MeetをYoomと連携します
- 次に、トリガーでGmailを選択し、「特定のキーワードに一致するメールを受信したら」というアクションを設定します
- 続いて、オペレーションでGoogle Meetの「会議スペースを作成」アクションを設定します
- 最後に、オペレーションでGmailの「メールを送る」アクションを設定し、作成された会議情報を関係者に自動で送信します
※「トリガー」:フロー起動のきっかけとなるアクション、「オペレーション」:トリガー起動後、フロー内で処理を行うアクション
■このワークフローのカスタムポイント
- Gmailのトリガー設定では、自動化の起点としたいメールに含まれるキーワード(例:「打ち合わせ依頼」「Web会議」など)を任意に設定できます
- メール送信のオペレーションでは、宛先や件名、本文を自由にカスタマイズすることが可能です。前のオペレーションで取得したGoogle Meetの会議URLや受信メールの件名などを変数として本文に含めることで、状況に応じた案内メールを送信できます
■注意事項
- Gmail、Google MeetのそれぞれとYoomを連携してください。
- トリガーは5分、10分、15分、30分、60分の間隔で起動間隔を選択できます。
- プランによって最短の起動間隔が異なりますので、ご注意ください。
■概要
Google Meetで会議を行う際、議事録用のGoogleドキュメントに都度URLを手動で貼り付けていませんか?このようなアプリ間の細かな行き来は、集中力を妨げるだけでなく、作業の非効率にも繋がります。
このワークフローを活用すれば、Googleドキュメント上から直接Google Meetの会議スペースを作成し、発行されたURLを自動でドキュメントに追記することが可能で、会議準備をよりスムーズに進められます。
■このテンプレートをおすすめする方
- Google MeetとGoogleドキュメントを日常的に利用し、議事録作成を効率化したい方
- 会議準備におけるURLの発行や転記といった手作業を削減したいと考えている方
- ドキュメント作成から会議設定までの一連の流れをシームレスに行いたい方
■このテンプレートを使うメリット
- Googleドキュメント上からGoogle Meetの会議URLを直接発行し、自動で追記するため、アプリを切り替える手間やコピー&ペーストの時間を短縮できます。
- URLの貼り間違いや貼り忘れといったヒューマンエラーを防ぎ、会議参加者への正確な情報共有をサポートします。
■フローボットの流れ
- はじめに、GoogleドキュメントとGoogle MeetをYoomと連携します。
- 次に、トリガーでGoogleドキュメントを選択し、「Googleドキュメント上から起動」を設定します。
- 次に、オペレーションでGoogle Meetを選択し、「会議スペースを作成する」アクションを設定します。
- 最後に、オペレーションでGoogleドキュメントを選択し、「文末にテキストを追加」アクションで、作成された会議URLなどをドキュメントに追記するように設定します。
※「トリガー」:フロー起動のきっかけとなるアクション、「オペレーション」:トリガー起動後、フロー内で処理を行うアクション
■このワークフローのカスタムポイント
- Googleドキュメントの「文末にテキストを追加」オペレーションでは、追加するテキストの内容を任意で設定できます。
- Google Meetで作成した会議URLの変数だけでなく、「会議URL:」のような固定のテキストを組み合わせたり、その他の情報を埋め込んだりすることが可能です。
■注意事項
- Googleドキュメント、Google MeetのそれぞれとYoomを連携してください。
- Chrome拡張機能を使ったトリガーの設定方法はこちらをご参照ください。
https://intercom.help/yoom/ja/articles/8831921
■概要
Boxにアップロードされた書類の内容を確認し、手作業でGoogle Meetの会議を設定する業務に手間を感じていませんか?このワークフローを活用すれば、Boxへのファイルアップロードをきっかけに、OCR機能が書類のテキストを自動で読み取り、その情報をもとにGoogle Meetの会議を自動で作成します。Google MeetとBoxを連携させることで、会議設定にかかる手作業をなくし、よりスムーズな業務進行を支援します。
■このテンプレートをおすすめする方
- Boxにアップロードされた書類をもとに、手作業でGoogle Meetの会議を設定している方
- Google MeetとBoxを活用した定型業務が多く、自動化による効率化を目指している方
- 書類の内容確認から会議設定までの一連の流れを自動化し、ヒューマンエラーをなくしたい方
■このテンプレートを使うメリット
- BoxへのファイルアップロードからGoogle Meetの会議作成までが自動化されるため、手作業の時間を削減し、より重要な業務に集中できます
- 手動での情報転記や設定作業がなくなることで、会議の日時間違いや参加者の招待漏れといったヒューマンエラーの防止に繋がります
■フローボットの流れ
- はじめに、GoogleカレンダーとBoxをYoomと連携します
- 次に、トリガーでBoxを選択し、「フォルダにファイルがアップロードされたら」というアクションを設定し、対象のフォルダを指定します
- 続いて、オペレーションでBoxの「ファイルをダウンロード」アクションを設定し、アップロードされたファイルを取得します
- 次に、オペレーションでOCR機能の「OCRで文字を抽出」アクションを設定し、ファイル内のテキスト情報を読み取ります
- その後、オペレーションでGoogleカレンダーの「予定を作成」アクションを設定し、抽出した情報をもとにGoogle Meetの会議を作成します
- 最後に、オペレーションでメール機能の「メールを送る」アクションを設定し、関係者に会議作成の通知を送ります
※「トリガー」:フロー起動のきっかけとなるアクション、「オペレーション」:トリガー起動後、フロー内で処理を行うアクション
■このワークフローのカスタムポイント
- Googleカレンダーで予定を作成する際、特定のカレンダーに会議が作成されるように、任意のカレンダーIDを設定してください。これにより、個人のカレンダーやチーム共有のカレンダーなど、目的に応じた使い分けが可能です
■注意事項
- Box、GoogleカレンダーのそれぞれとYoomを連携してください。
- OCRまたは音声を文字起こしするAIオペレーションはチームプラン・サクセスプランでのみご利用いただける機能となっております。フリープラン・ミニプランの場合は設定しているフローボットのオペレーションはエラーとなりますので、ご注意ください。
- チームプランやサクセスプランなどの有料プランは、2週間の無料トライアルを行うことが可能です。無料トライアル中には制限対象のアプリやAI機能(オペレーション)を使用することができます。
- OCRデータは6,500文字以上のデータや文字が小さい場合などは読み取れない場合があるので、ご注意ください。
- ダウンロード可能なファイル容量は最大300MBまでです。アプリの仕様によっては300MB未満になる可能性があるので、ご注意ください。
- トリガー、各オペレーションでの取り扱い可能なファイル容量の詳細はこちらをご参照ください。
■概要
ClickUpでタスクを管理し、関連する打ち合わせをGoogle Meetで行う際、手動で会議URLを発行しタスクに転記する作業に手間を感じていませんか?
この作業は単純ですが、会議の都度発生するため、積み重なると大きな負担になりがちです。
このワークフローを活用すれば、ClickUpに特定のタスクが作成されると自動でGoogle Meetの会議スペースを作成し、そのURLをタスクに追記するため、こうした連携作業を効率化できます。
■このテンプレートをおすすめする方
- ClickUpとGoogle Meetを併用し、会議設定の手間を削減したいプロジェクトマネージャーの方
- ClickUpのタスクに関連するGoogle MeetのURL発行と転記作業を自動化したい方
- タスク管理とWeb会議の連携をスムーズにし、チームの生産性を向上させたいと考えている方
■このテンプレートを使うメリット
- ClickUpへのタスク作成をトリガーにGoogle Meetの会議URLが自動発行・追記されるため、手作業の時間を削減できます
- URLのコピー&ペーストミスや発行忘れといった、手作業に起因するヒューマンエラーを防ぎ、スムーズな会議設定を実現します
■フローボットの流れ
- はじめに、ClickUpとGoogle MeetをYoomと連携します
- 次に、トリガーでClickUpを選択し、「タスクが作成されたら」というアクションを設定します
- 次に、オペレーションで、ClickUpの「タスクを取得」アクションを設定し、トリガーで作成されたタスクの詳細情報を取得します
- 次に、オペレーションの分岐機能で、取得したタスク情報をもとに後続の処理を行うかどうかを判断する条件を設定します
- 次に、オペレーションで、Google Meetの「会議スペースを作成」アクションを設定します
- 最後に、オペレーションでClickUpの「タスクを更新」アクションを設定し、作成されたGoogle MeetのURLを該当タスクに追記します
※「トリガー」:フロー起動のきっかけとなるアクション、「オペレーション」:トリガー起動後、フロー内で処理を行うアクション
■このワークフローのカスタムポイント
- ClickUpのトリガー設定では、自動化の対象としたいチーム、スペース、フォルダ、リストを任意で設定してください
- ClickUpの「タスクを取得」や「タスクを更新」のアクションでは、操作の対象としたいタスクのIDを、固定値や前段のオペレーションで取得した値から設定できます
- 分岐機能では、取得したタスクのタイトルや担当者などの情報をもとに、会議スペースを作成するかどうかを判断する条件を任意で設定できます
- ClickUpの「タスクを更新」アクションでは、作成したGoogle MeetのURLをタスクのどの項目に追記するかなどを任意で設定できます
■注意事項
- Clickup、Google MeetのそれぞれとYoomを連携してください。
- 分岐はミニプラン以上のプランでご利用いただける機能(オペレーション)となっております。フリープランの場合は設定しているフローボットのオペレーションはエラーとなりますので、ご注意ください。
- ミニプランなどの有料プランは、2週間の無料トライアルを行うことが可能です。無料トライアル中には制限対象のアプリや機能(オペレーション)を使用することができます。
Discordを使った便利な自動化例
Slackにメッセージが投稿されたらDiscordに通知したり、Google AdsやGoogleアナリティクスのレポートを毎日通知したり、Zoomのミーティング終了後に録画URLを通知したりと、チーム内の情報共有を効率化できます。
また、Discordの通知を元に他のツールでタスク作成なども可能なため、通知だけでなく日々の業務の指示などをDiscordで行っている方にもオススメです。
■このテンプレートをおすすめする方
- SlackとDiscordを併用し、情報共有の効率化を図りたいと考えている方
- 特定のSlackチャンネルの投稿を、Discordメンバーにもれなく通知したい方
- コミュニケーションツールの手作業による情報転記を自動化したいと考えている方
■このテンプレートを使うメリット
- Slackの特定チャンネルへの投稿を検知し、自動でDiscordに通知するため、これまで手作業で行っていた情報共有の時間を短縮できます。
- 手作業での転記による通知漏れや内容の誤りといったヒューマンエラーを防ぎ、重要な情報を確実に関係者へ共有することが可能になります。
■フローボットの流れ
- はじめに、DiscordとSlackをYoomと連携します。
- 次に、トリガーでSlackを選択し、「メッセージがチャンネルに投稿されたら」というアクションを設定します。
- 最後に、オペレーションでDiscordの「メッセージを送信」アクションを設定し、Slackで取得した情報を基に通知内容を作成します。
■このワークフローのカスタムポイント
- Slackのトリガー設定では、通知のきっかけとしたいチャンネルを任意で設定してください。
- Discordへの通知設定では、通知先のチャンネルを自由に選択できます。また、通知するメッセージの本文は、固定のテキストを設定したり、Slackの投稿内容を変数として埋め込んだりするなど、柔軟なカスタマイズが可能です。
■注意事項
- Slack、DiscordのそれぞれとYoomを連携してください。
- トリガーは5分、10分、15分、30分、60分の間隔で起動間隔を選択できます。
- プランによって最短の起動間隔が異なりますので、ご注意ください。
- Google Adsの日次レポート作成とチームへの共有を効率化したい広告運用担当者の方
- 広告の費用対効果をリアルタイムで把握し、迅速な意思決定を行いたいチームリーダーの方
- 手作業によるレポート共有でのミスを減らし、業務の正確性を高めたいと考えている方
- 毎日決まった時間にレポートが自動で取得・共有されるため、これまで手作業に費やしていた時間を他のコア業務に充てることができます。
- 手作業でのデータ転記による入力間違いや、関係者への共有漏れといったヒューマンエラーを防ぎ、業務の正確性を高めます。
- はじめに、Google AdsとDiscordをYoomと連携します
- 次に、トリガーでスケジュールトリガーを選択し、「毎日10時」など、フローを起動したい任意の時間を設定します
- 次に、オペレーションでGoogle Adsの「アカウントレポートの取得」アクションを設定し、広告アカウントのパフォーマンスデータを取得します
- 続けて、オペレーションの「計算処理」を用いて、レポートで取得した費用データを通常の通貨単位に変換するよう設定します
- 最後に、オペレーションでDiscordの「メッセージを送信」アクションを設定し、取得・整形したレポート内容を指定のチャンネルに通知します
■このワークフローのカスタムポイント
- スケジュールトリガーの設定では、レポートを取得・通知したい時間帯を業務に合わせて任意で設定してください。
- Discordへの通知アクションでは、メッセージを送るチャンネルや、レポートの数値を盛り込んだ通知本文を自由にカスタマイズしてください。
- Google Ads、DiscordのそれぞれとYoomを連携してください。
■このテンプレートをおすすめする方
- Googleフォームで受け付けた回答を、手作業でチームに共有している担当者の方
- Discordを主要なコミュニケーションツールとして利用し、情報共有の効率化を図りたい方
- フォームからの問い合わせ対応のスピードを上げ、顧客満足度を向上させたいと考えている方
■このテンプレートを使うメリット
- Googleフォームへの回答送信をトリガーに、Discordへ自動で通知されるため、手作業での確認や共有にかかる時間を短縮できます
- 手動でのコピー&ペーストが不要になるため、転記ミスや通知漏れなどのヒューマンエラーを防ぎ、確実な情報共有を実現します
■フローボットの流れ
- はじめに、GoogleフォームとDiscordをYoomに連携します
- 次に、トリガーでGoogleフォームを選択し、「フォームに回答が送信されたら」というアクションを設定します
- 最後に、オペレーションでDiscordの「メッセージを送信」アクションを設定し、通知したいチャンネルやメッセージ内容を編集します。メッセージには、トリガーで取得したフォームの回答内容を埋め込むことも可能です
■このワークフローのカスタムポイント
- Googleフォームのトリガー設定では、通知の対象としたいフォームを任意で指定することが可能です
- Discordへの通知設定では、メッセージを送信するチャンネルを任意で指定できます
- 通知メッセージの本文は、固定のテキストを設定するだけでなく、Googleフォームで受け取った回答内容を動的に埋め込むといったカスタマイズが可能です
■注意事項
- Googleフォーム、DiscordのそれぞれとYoomを連携してください。
- Googleフォームをトリガーとして使用した際の回答内容を取得する方法は「Googleフォームトリガーで、回答内容を取得する方法」を参照ください。
- トリガーは5分、10分、15分、30分、60分の間隔で起動間隔を選択できます。
- プランによって最短の起動間隔が異なりますので、ご注意ください。
- Google アナリティクスでのサイト分析が日課で、レポート確認を効率化したいWeb担当者の方
- Discordを活用してチームでKPIを共有しており、報告の手間を省きたいマーケティング担当者の方
- 手作業でのレポート取得や共有作業を自動化し、分析などのコア業務に注力したいと考えている方
- 毎日決まった時間にGoogle アナリティクスのレポートが自動でDiscordに通知されるため、確認や共有にかかる時間を短縮できます。
- 手作業によるレポートの取得漏れや共有忘れを防ぎ、チーム全体で最新の数値を確実に把握することが可能になります。
- はじめに、Google アナリティクスとDiscordをYoomと連携します。
- 次に、トリガーでスケジュールトリガーを選択し、「指定したスケジュールになったら」というアクションを設定します。
- 続いて、オペレーションでGoogle アナリティクスを選択し、「【GA4】ユーザーレポートを取得」のアクションを設定します。
- 最後に、オペレーションでDiscordの「メッセージを送る」アクションを設定し、取得したレポート内容を指定のチャンネルに通知します。
■このワークフローのカスタムポイント
- スケジュールトリガーの設定では、レポートを通知したい曜日や時間帯を任意で設定してください。
- Google アナリティクスでレポートを取得する際に、対象となる期間を任意で設定することが可能です。
- Discordでメッセージを送るアクションでは、通知先のチャンネルやメッセージ本文を自由にカスタマイズしてください。
- Google アナリティクス、DiscordのそれぞれとYoomを連携してください。
- ZoomでのWeb会議が多く、録画共有の手間を削減したいチームリーダーの方
- Discordを主な連絡ツールとして利用し、情報共有を効率化したいと考えている方
- ミーティング後の定型的な連絡作業を自動化し、コア業務に集中したい方
- Zoomミーティング終了後、自動でDiscordに通知が送信されるため、これまで手作業で行っていた共有作業にかかる時間を短縮できます。
- 手作業によるレコーディングURLの共有漏れや、通知先の間違いといったヒューマンエラーを防ぎ、確実な情報伝達をサポートします。
- はじめに、ZoomとDiscordをYoomと連携します。
- 次に、トリガーでZoomを選択し、「ミーティングが終了したら」というアクションを設定します。
- 続けて、オペレーションでZoomの「ミーティングのレコーディング情報を取得」アクションを設定します。
- 最後に、オペレーションでDiscordの「メッセージを送信」を設定し、取得したレコーディング情報を指定のチャンネルに通知します。
- Zoomのトリガー設定では、ミーティング終了を検知したいホストのメールアドレスを任意で設定してください。
- Discordへの通知メッセージは、レコーディングURLだけでなく、ミーティングのトピックや開始時間など、Zoomから取得した情報を自由に組み合わせて作成できます。
- Zoom、DiscordのそれぞれとYoomを連携してください。
- トリガーは5分、10分、15分、30分、60分の間隔で起動間隔を選択できます。
- プランによって最短の起動間隔が異なりますので、ご注意ください。
- Zoomのプランによって利用できるアクションとそうでないアクションがあるため、ご注意ください。
- 現時点では以下のアクションはZoomの有料プランのみ利用可能です。
- ミーティングが終了したら
- ミーティングのレコーディング情報を取得する(クラウド上に存在するレコーディングのみ取得可能なため)
- 詳細は「Zoomでミーティングのレコーディング情報を取得する際の注意点」をご参照ください。
■概要
Discordで受け取る請求書を都度ダウンロードし、内容を確認してfreee会計へ手入力する作業に手間を感じていませんか。このような手作業は時間がかかるだけでなく、入力ミスといったヒューマンエラーの原因にもなりがちです。
このワークフローを活用すれば、Discordに投稿された請求書のOCR処理からfreee会計へのデータ登録までを自動化できるため、請求書処理に関する課題をスムーズに解消できます。
■このテンプレートをおすすめする方
- Discordとfreee会計を利用して請求書処理を行っている経理担当者の方
- 請求書のOCR処理を手作業で行っており、一連の業務を自動化したいと考えている方
- 請求書の転記作業におけるヒューマンエラーをなくし、業務効率を改善したい方
■このテンプレートを使うメリット
- Discordへの請求書投稿を起点にOCRでの読み取りからfreee会計への登録までを自動化でき、手作業に費やしていた時間を削減します
- 手作業でのデータ転記が不要になるため、金額や取引先名などの入力ミスや計上漏れといったヒューマンエラーの防止に繋がります
■フローボットの流れ
- はじめに、Discordとfreee会計をYoomと連携します
- 次に、トリガーでDiscordを選択し、「チャンネルでメッセージが送信されたら」というアクションを設定します
- 次に、オペレーションでDiscordの「メッセージ内のファイルをダウンロードする」アクションを設定し、投稿された請求書ファイルをダウンロードします
- 次に、オペレーションでOCR機能の「任意の画像やPDFを読み取る」アクションを設定し、ダウンロードしたファイルから請求情報を抽出します
- 次に、オペレーションでfreee会計の「取引先の検索」アクションを設定し、OCR機能で読み取った取引先名をもとに検索します
- 最後に、オペレーションでfreee会計の「未決済取引の登録」アクションを設定し、OCR機能で読み取った請求情報を登録します
※「トリガー」:フロー起動のきっかけとなるアクション、「オペレーション」:トリガー起動後、フロー内で処理を行うアクション
■このワークフローのカスタムポイント
- Discordのトリガー設定では、請求書が投稿されるサーバーIDやチャンネルIDを任意で設定してください
- OCR機能の設定では、お使いの請求書フォーマットに合わせて、読み取りたいテキスト項目を任意で設定してください
- freee会計のオペレーション設定では、対象となる事業所IDや、取引先を検索する際の検索キーワードなどを任意で設定してください
■ 注意事項
- Discordとfreee会計のそれぞれをYoomと連携してください。
- トリガーは5分、10分、15分、30分、60分の間隔で起動間隔を選択できます。
- プランによって最短の起動間隔が異なりますので、ご注意ください。
- OCRまたは音声を文字起こしするAIオペレーションはチームプラン・サクセスプランでのみご利用いただける機能となっております。フリープラン・ミニプランの場合は設定しているフローボットのオペレーションはエラーとなりますので、ご注意ください。
- チームプランやサクセスプランなどの有料プランは、2週間の無料トライアルを行うことが可能です。無料トライアル中には制限対象のアプリやAI機能(オペレーション)を使用することができます。
- OCRデータは6,500文字以上のデータや文字が小さい場合などは読み取れない場合があるので、ご注意ください。
- ダウンロード可能なファイル容量は最大300MBまでです。アプリの仕様によっては300MB未満になる可能性があるので、ご注意ください。
- トリガー、各オペレーションでの取り扱い可能なファイル容量の詳細は「ファイルの容量制限について」をご参照ください。
■概要
チームでの情報共有にDiscordを活用しているものの、投稿されたファイルの管理や整理に手間を感じていませんか?
重要なファイルが他のメッセージに埋もれてしまったり、手動でストレージに保存する際に漏れが発生したりすることもあります。
このワークフローは、そうした課題を解消するためのDiscordの自動化を実現します。Discordの特定チャンネルに添付ファイル付きのメッセージが投稿されると、自動でMicrosoft SharePointにファイルが格納され、ファイル管理の効率化に繋がります。
■このテンプレートをおすすめする方
- Discordを主要な連絡ツールとしており、ファイル管理に課題を感じている方
- Microsoft SharePointをファイルストレージとしており、手動でのアップロード作業をなくしたい方
- Discordの自動化を活用し、チーム内の情報共有フローを改善したいと考えている方
■このテンプレートを使うメリット
- Discordにファイルが投稿されると自動でMicrosoft SharePointに格納されるため、手作業でのダウンロードやアップロードにかかる時間を短縮できます
- 手作業によるファイルの保存漏れや格納先の間違いといったヒューマンエラーを防ぎ、属人化しないファイル管理体制を構築できます
■フローボットの流れ
- はじめに、お使いのDiscordアカウントとMicrosoft SharePointアカウントをYoomに連携します
- 次に、トリガーでDiscordを選択し、「チャンネルでメッセージが送信されたら」というアクションを設定します
- 次に、オペレーションでDiscordの「メッセージ内のファイルをダウンロードする」アクションを設定し、トリガーで取得したメッセージに含まれるファイルをダウンロードします
- 最後に、オペレーションでMicrosoft SharePointの「ファイルをアップロード」アクションを設定し、ダウンロードしたファイルを指定のフォルダに格納します
※「トリガー」:フロー起動のきっかけとなるアクション、「オペレーション」:トリガー起動後、フロー内で処理を行うアクション
■このワークフローのカスタムポイント
- Discordのトリガー設定では、自動化の対象としたいサーバーのIDおよびチャンネルのIDを任意で設定してください
- Microsoft SharePointのファイルアップロード設定では、格納先となるサイトのID、ドライブのID、およびフォルダのアイテムIDを任意で指定してください
■注意事項
- Discord、Microsoft SharePointのそれぞれとYoomを連携してください。
- トリガーは5分、10分、15分、30分、60分の間隔で起動間隔を選択できます。
- プランによって最短の起動間隔が異なりますので、ご注意ください。
- Microsoft365(旧Office365)には、家庭向けプランと一般法人向けプラン(Microsoft365 Business)があり、一般法人向けプランに加入していない場合には認証に失敗する可能性があります。
- ダウンロード可能なファイル容量は最大300MBまでです。アプリの仕様によっては300MB未満になる可能性があるので、ご注意ください。
- トリガー、各オペレーションでの取り扱い可能なファイル容量の詳細は「ファイルの容量制限について」をご参照ください。
■概要
Discordでの活発なコミュニケーションの中で、重要な依頼やタスクがメッセージに埋もれてしまい、管理が煩雑になっていませんか。手動でタスク管理ツールに転記する作業は手間がかかるだけでなく、対応漏れの原因にもなり得ます。このワークフローを活用すれば、Discordの特定チャンネルへの投稿をきっかけにWrikeへ自動でタスクを作成するDiscordの自動化を実現し、これらの課題を解消します。
■このテンプレートをおすすめする方
- Discordでの依頼事項をWrikeで管理しており、転記作業の自動化を検討している方
- Discordの自動化に関心があり、メッセージの見落としによるタスク漏れを防ぎたいチームリーダーの方
- コミュニケーションツールからのタスク生成を効率化し、生産性を高めたいプロジェクトマネージャーの方
■このテンプレートを使うメリット
- DiscordのメッセージをトリガーにWrikeへタスクが自動で作成されるため、これまで手作業で行っていた転記の手間を省き、時間を有効活用できます
- 手動での転記作業がなくなることで、タスクの登録漏れや内容の誤りといったヒューマンエラーを防ぎ、確実なタスク管理を実現します
■フローボットの流れ
- はじめに、DiscordとWrikeをYoomと連携します
- 次に、トリガーでDiscordを選択し、「チャンネルでメッセージが送信されたら」というアクションを設定します
- 次に、オペレーションでテキスト抽出機能を用いて、投稿されたメッセージからタスク名や内容など必要な情報を抽出します
- 最後に、オペレーションでWrikeの「タスクを作成」アクションを設定し、抽出した情報を基にタスクを作成します
※「トリガー」:フロー起動のきっかけとなるアクション、「オペレーション」:トリガー起動後、フロー内で処理を行うアクション
■このワークフローのカスタムポイント
- Discordのトリガー設定では、自動化の対象としたいサーバーIDおよびチャンネルIDを任意で設定してください。これにより、特定のチャンネルへの投稿のみを検知できます
- Wrikeでタスクを作成するアクションでは、タスクを追加したいフォルダーのIDを任意で設定してください。プロジェクトごとにタスクの保存先を指定することが可能です
■注意事項
- Discord、WrikeのそれぞれとYoomを連携してください。
- トリガーは5分、10分、15分、30分、60分の間隔で起動間隔を選択できます。
- プランによって最短の起動間隔が異なりますので、ご注意ください。
■概要
Discordでのコミュニティ運営において、特定のユーザーへの個別対応や限定チャンネルへの案内に手間がかかっていませんか。手作業での対応は、連絡漏れや遅延の原因となり、運営上の負担になることもあります。
このワークフローを活用すれば、特定のメッセージ投稿をきっかけに、対象ユーザーの検索からダイレクトメッセージチャンネルの作成、案内メッセージの送信までを自動化できます。これにより、Discordでの限定チャンネルへの案内などを効率化し、スムーズなコミュニティ運営を実現します。
■このテンプレートをおすすめする方
- Discordのコミュニティ運営で、限定チャンネルへの案内などを手作業で行っている方
- 特定の条件を満たしたユーザーへの個別連絡を自動化し、運営を効率化したい方
- オンラインサロンやイベント運営でDiscordを活用し、参加者管理を円滑に進めたい方
■このテンプレートを使うメリット
- 特定メッセージの投稿からユーザー検索、DMチャンネルの作成までが自動化されるため、手作業での個別対応にかかっていた時間を短縮できます
- 手動での対応時に起こりうるユーザーの選択ミスや、限定チャンネルへの案内漏れといったヒューマンエラーを防ぎ、確実な対応を実現します
■フローボットの流れ
- はじめに、DiscordをYoomと連携します
- 次に、トリガーでDiscordを選択し、「チャンネルでメッセージが送信されたら」というアクションを設定します
- オペレーションで、特定の条件に応じて処理を分けるため「分岐機能」を設定します
- 必要に応じて、AI機能の「テキスト抽出」を設定し、メッセージ内容からユーザー情報などを取得します
- 次に、Discordの「サーバー内のユーザーを検索」アクションで、対象ユーザーを特定します
- その後、Discordの「ダイレクトメッセージチャンネルを作成」アクションを設定します
- 最後に、作成したチャンネルに対してDiscordの「メッセージを送信」アクションで案内などを送信します
■このワークフローのカスタムポイント
- Discordでメッセージを送信するアクションでは、送信する本文を自由に設定することが可能です
- 固定の案内文を送るだけでなく、前段のオペレーションで取得したユーザー名などの動的な情報を、変数として本文に埋め込むこともできます
※「トリガー」:フロー起動のきっかけとなるアクション、「オペレーション」:トリガー起動後、フロー内で処理を行うアクション
■注意事項
- DiscordとYoomを連携してください。
- トリガーは5分、10分、15分、30分、60分の間隔で起動間隔を選択できます。
- プランによって最短の起動間隔が異なりますので、ご注意ください。
- 分岐はミニプラン以上のプランでご利用いただける機能(オペレーション)となっております。フリープランの場合は設定しているフローボットのオペレーションはエラーとなりますので、ご注意ください。
- ミニプランなどの有料プランは、2週間の無料トライアルを行うことが可能です。無料トライアル中には制限対象のアプリや機能(オペレーション)を使用することができます。
- オペレーション数が5つを越えるフローボットを作成する際は、ミニプラン以上のプランで設定可能です。フリープランの場合はフローボットが起動しないため、ご注意ください。
■概要
Discordでのコミュニケーションと、会計ソフトであるXeroでの顧客管理が分断されており、情報連携に手間を感じていませんか。特に、Discordで受けた連絡内容を手作業でXeroへコンタクトとして登録するのは、入力漏れやミスの原因にもなり得ます。このワークフローを活用すれば、Discordの特定チャンネルへのメッセージ送信をきっかけに、Xeroへコンタクト情報を自動で作成できるため、こうした課題をスムーズに解消します。
■このテンプレートをおすすめする方
- DiscordとXeroを併用しており、手作業での顧客情報登録に課題を感じている方
- Discordのメッセージを基にしたXeroへの転記ミスをなくしたいと考えている方
- コミュニティ運営などで発生する連絡を、効率的に顧客管理へ繋げたい方
■このテンプレートを使うメリット
- Discordでのメッセージ受信をきっかけにXeroへのコンタクト作成が自動化されるため、手作業での情報登録に費やしていた時間を短縮できます
- 手作業によるデータの転記が不要になることで、入力ミスや登録漏れといったヒューマンエラーのリスクを軽減し、データの正確性を保ちます
■フローボットの流れ
- はじめに、DiscordとXeroをYoomと連携します
- 次に、トリガーでDiscordを選択し、「チャンネルでメッセージが送信されたら」というアクションを設定します
- 次に、オペレーションでAI機能の「テキスト抽出」を設定し、トリガーで受信したメッセージからコンタクト作成に必要な情報を抽出します
- 最後に、オペレーションでXeroの「Create Contacts」アクションを設定し、抽出した情報を基にコンタクトを作成します
※「トリガー」:フロー起動のきっかけとなるアクション、「オペレーション」:トリガー起動後、フロー内で処理を行うアクション
■このワークフローのカスタムポイント
- Xeroのコンタクト作成アクションでは、各設定項目に固定値を入力したり、前段のAI機能で抽出した値を変数として埋め込んだりするなど、柔軟な設定が可能です
■注意事項
- Discord、FrontのそれぞれとYoomを連携してください。
- トリガーは5分、10分、15分、30分、60分の間隔で起動間隔を選択できます。
- プランによって最短の起動間隔が異なりますので、ご注意ください。
まとめ
このブログでは、Google Meetでの会議終了後に自動的にDiscordに通知を送るフローの導入について詳しく解説しました。
Google MeetからDiscordへの自動通知により、会議後のフォローアップがスムーズになり、業務プロセスの効率化が期待できます。
また、情報の一元管理によって重要な決定事項を見逃すリスクが減少し、チーム全体の生産性の向上も見込めそうですね。
今回ご紹介したような業務自動化を実現できるノーコードツールYoomを使えば、プログラミングの知識がない方でも、直感的な操作で簡単に業務フローを構築できます。
もし自動化に少しでも興味を持っていただけたら、ぜひ無料登録フォームからアクセスして具体的な設定方法を参考にしながらぜひこの自動化を導入してみてください。
よくあるご質問
Q:通知が失敗した場合の検知や再実行は可能ですか?
A:
進行中のフローボットがエラーで停止された場合、Yoomに登録したメールアドレス宛てに通知が届きます。
エラー原因は、設定内容・フローボット起動時の取得した値の誤りやアプリの接続切れなどが挙げられます。
その際には該当フローを確認し、エラーの原因や種類が表示される「エラーコード」を確認して修正してください。詳しくはエラー時の対応方法についてをご確認ください。
また、再実行についてはエラー修正後に再度フローボットを実行すれば問題ありません。
ヘルプページで解決しない場合は、サポート窓口を利用することもできます。
Q:この連携を無料で使い続けることはできますか?
A:
Google MeetとDiscordは無料プランで使用できるアプリです。
ただ、無料プランは「月の無料タスク数」が100タスクが上限です。
今回ご紹介したフローの場合、1回の起動で1つのタスクが消費されます。
そのため、月100回以上連携を実行する場合はミニプラン以上のプランもご検討ください。
詳細について確認したい場合は料金プランやタスク実行数のカウント方法をご参照ください。
Q:Zoomでも同じような連携は可能ですか?
A:
Zoomを含む他のアプリとの連携ももちろん可能です。
Yoomには、今回紹介したフローボット以外にも数多くのテンプレートが準備されています。
Zoomとの連携としてZoomでミーティングが終了したら、DiscordにレコーディングURLを通知やZoomで会議終了後、内容を議事録化してDiscordに通知するなどもぜひお試しください。
プログラミング知識なしで手軽に構築できます。