・
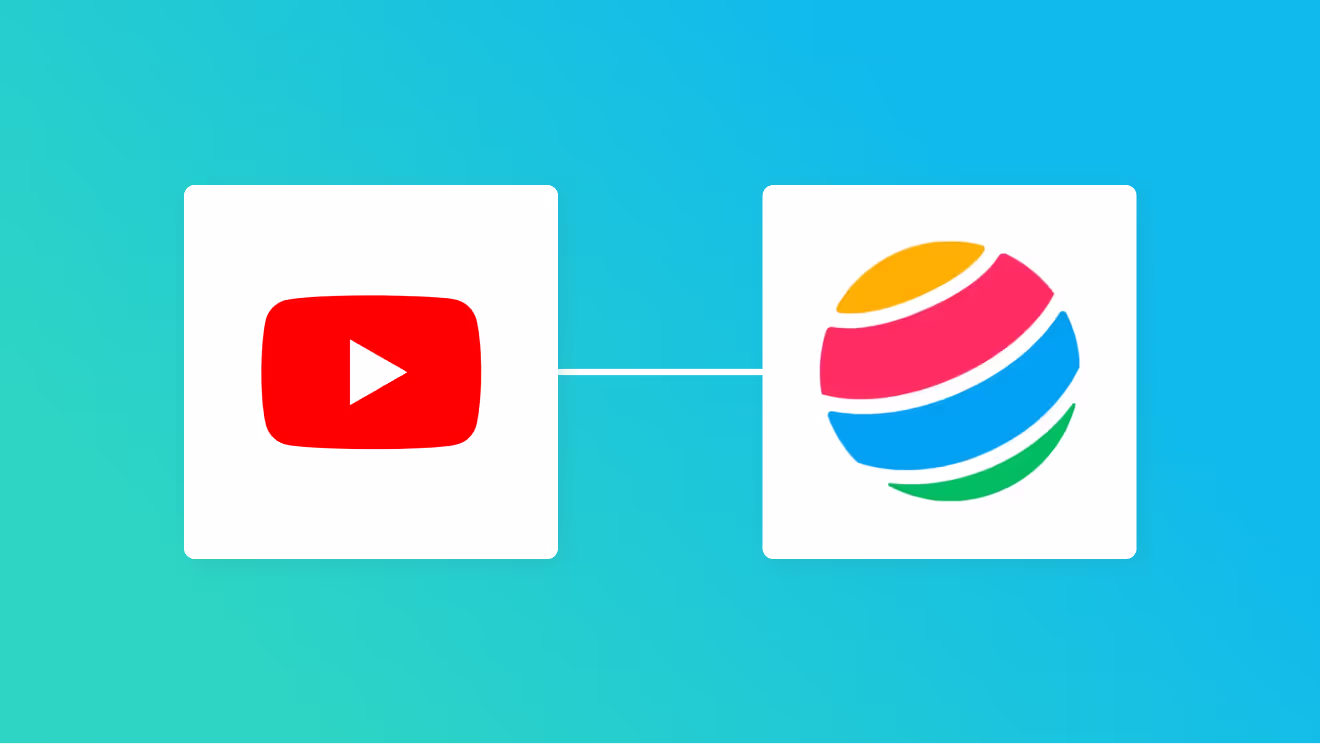
YouTubeとTalknoteを連携して、YouTubeに最新の動画が公開されたら、Talknoteに通知する方法

今やマーケティング担当者にとって、YouTubeの最新の動画情報を素早く把握することは重要な業務だと思います。
でもYouTubeにアップロードされた最新動画を都度アクセスしてチェックするには時間も労力もかかります。
そこで今回はYouTubeとTalknoteを連携することで、最新動画が公開された際に自動で通知を受け取ることができるようにしたいと思います。
これにより、チームメンバーにも素早く情報を共有することが可能になります。このブログでは、ノーコードで連携を実現する方法を詳しくご紹介します。
ぜひ参考にしてください!
YouTubeとTalknoteを連携するメリット
メリット1: 最新情報の素早い共有
YouTubeとTalknoteを連携することで、最新の動画が公開された際に自動で通知を送ることができます。
最新の動画公開を通知できるので、チームメンバーが素早く新しいコンテンツにアクセスできるようになります。
特に、マーケティングチームやコンテンツクリエイターにとっては、最新情報を迅速に共有することで、次のプロモーション準備へ素早く取りかかれたり、正しく公開されたかの確認がスムーズに行えます。
メリット2: 作業効率の向上
手動でYouTubeの更新情報を確認し、Talknoteで通知を送る作業は時間と労力がかかります。
通知が自動化されることで、動画の確認や通知の作成などの手間を省くことができます。
さらに、複数のYouTubeチャンネルを管理している場合や、頻繁に動画をアップロードする場合には、作業効率の向上が期待できます。
これにより、他の重要な業務に集中することができるようになります。
[Yoomとは]
YouTubeとTalknoteの連携フローの作り方
ステップ1:Yoom登録・ログインとアプリ登録
はじめにYoomの公式サイトにアクセスし、アカウント作成をお願いします。
アカウント登録済みの方はログインしてください。
Yoomのアカウント発行ページ
Yoomのアカウントにログインしたら、使用するアプリを登録します。
まずは基本的な設定方法を解説しているナビをご覧ください!
YouTubeのアプリ登録
YouTubeのアプリ登録については、以下の手順をご参照ください。
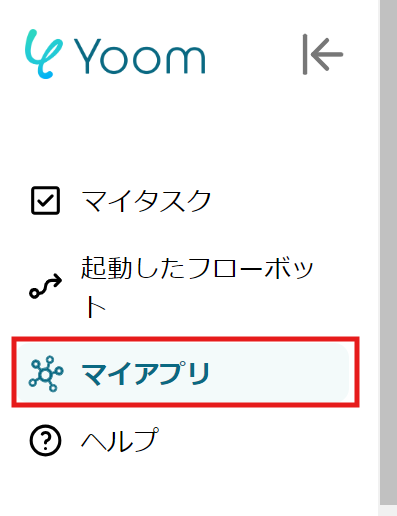
Talknoteのアプリ連携
1)「マイアプリ」をクリックし、「新規接続」を選択してください。
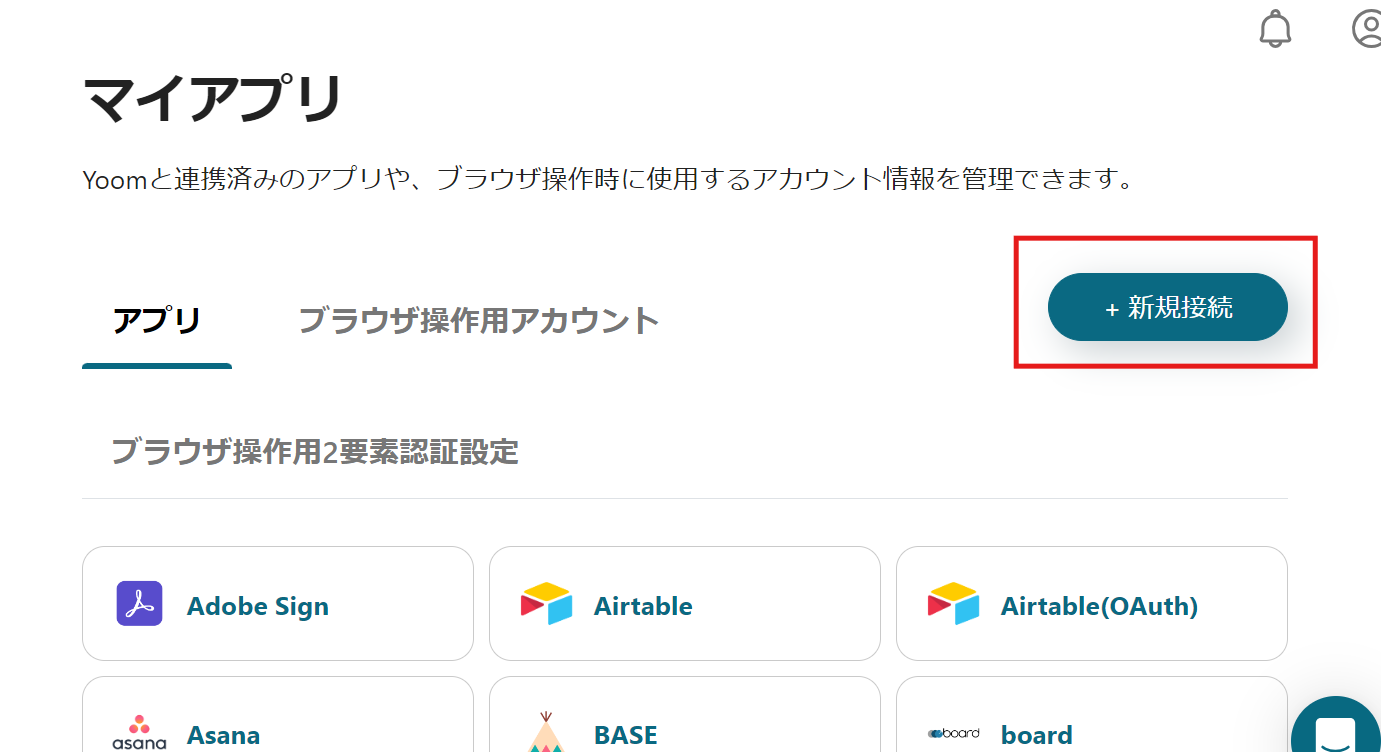
2)Talknoteを選択し、使用するアカウントでログインしてください。
3)登録ができるとマイアプリにアイコンが表示されます。
アイコンが表示されたかを確認をしてください。
ステップ2: テンプレートの選択と格納場所の準備
今回は、【YouTubeに最新の動画が公開されたら、Talknoteに通知する】というフローを作成します。
このフローを活用することによって、新着動画が公開された際にTalknoteに通知されるので、担当者はこまめにYouTubeを確認する必要がなくなります。
今まで手作業で確認していた時間を他の業務に充てることができます。
さらにTalknote上で動画情報を一元管理することでチーム内での情報共有がスムーズになり迅速に対応することができ業務効率の改善にもつながります。
■概要
自社や競合のYouTubeチャンネルに新しい動画が公開された際、都度確認して手作業で社内SNSに共有するのは手間がかかる作業ではないでしょうか。このワークフローを活用すれば、YouTubeとTalknoteの連携を自動化できるため、最新動画が公開されると即座に指定のスレッドへ通知することが可能です。手動での確認や共有作業が不要になり、情報共有の迅速化と業務効率化を実現します。
■このテンプレートをおすすめする方
- YouTubeでの情報発信を分析し、最新動画を迅速にチーム共有したいマーケティング担当者の方
- 自社のYouTubeチャンネル更新を、Talknoteを使い効率的に周知したい広報・PR担当者の方
- YouTubeとTalknoteの連携による情報共有の自動化で、定型業務を効率化したいと考えている方
■このテンプレートを使うメリット
- YouTubeチャンネルの更新を自動で検知しTalknoteへ通知するため、手動での確認や共有作業にかかる時間を削減できます
- システムが自動で処理するので、動画の見落としや共有漏れといったヒューマンエラーを防ぎ、確実な情報共有を実現します
■フローボットの流れ
- はじめに、YouTubeとTalknoteをYoomと連携します
- 次に、トリガーでYouTubeを選択し、「YouTubeチャンネルで最新の動画が公開されたら」というアクションを設定します
- 最後に、オペレーションでTalknoteを選択し、「スレッドにメッセージを投稿」アクションを設定して、動画情報を指定のスレッドに通知するようにします
※「トリガー」:フロー起動のきっかけとなるアクション、「オペレーション」:トリガー起動後、フロー内で処理を行うアクション
■このワークフローのカスタムポイント
- YouTubeのトリガー設定では、通知の対象としたいチャンネルのIDを任意で設定してくださ
- Talknoteでメッセージを投稿するアクションを設定する際に、通知を送りたいスレッドのIDを任意で設定してください
■注意事項
- YouTube、TalknoteのそれぞれとYoomを連携してください。
- トリガーは5分、10分、15分、30分、60分の間隔で起動間隔を選択できます。
- プランによって最短の起動間隔が異なりますので、ご注意ください。
ステップ3:YouTubeとTalknoteの連携設定
1)先ほど紹介したテンプレートの「このテンプレートを試してみる」のアイコンをクリックしてマイプロジェクトへコピーします。
2)以下のような表示が出てきます。
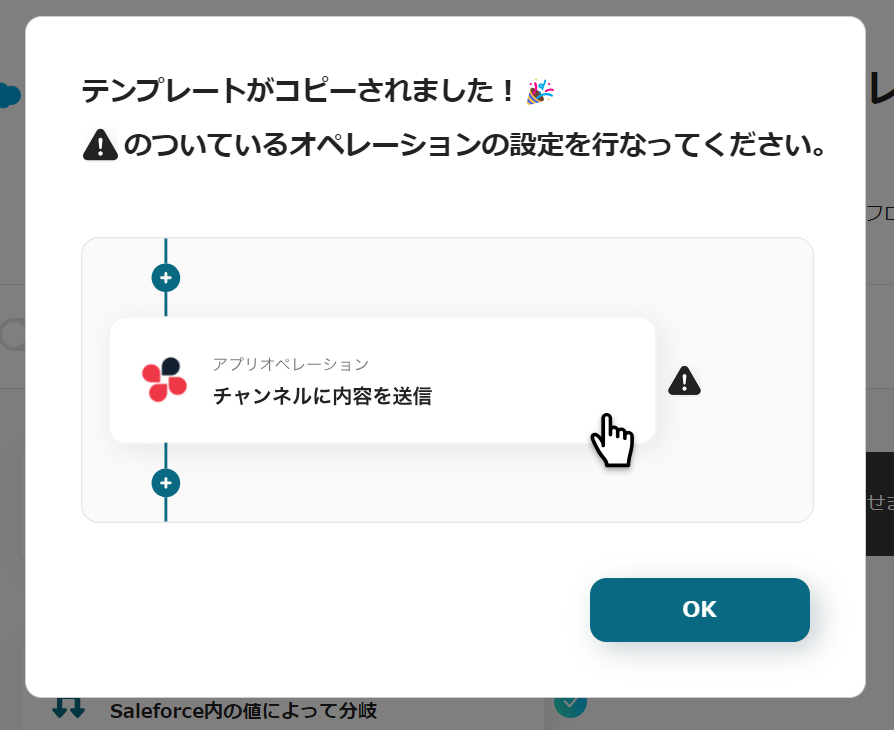
指示にしたがって、右に「!」のついているフローのアイコンを順番にクリックし、編集していきます。
タイトルや詳細はクリックすると変更可能です。
使用しやすいように変更してください。
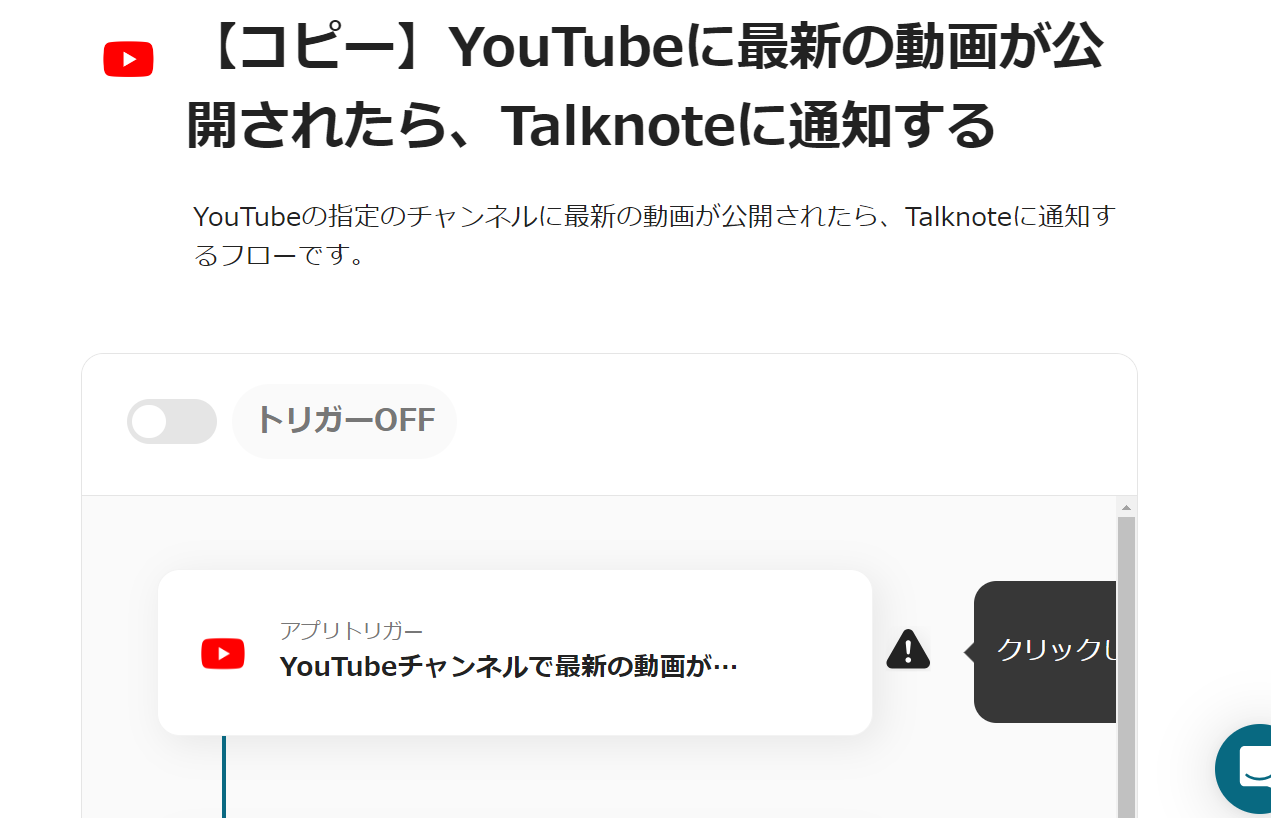
3)「アプリトリガー YouTubeチャンネルで最新の動画が公開されたら」をクリックします。
4)アクションは「YouTubeチャンネルで最新の動画が公開されたら」を選択し、「次へ」をクリックします。
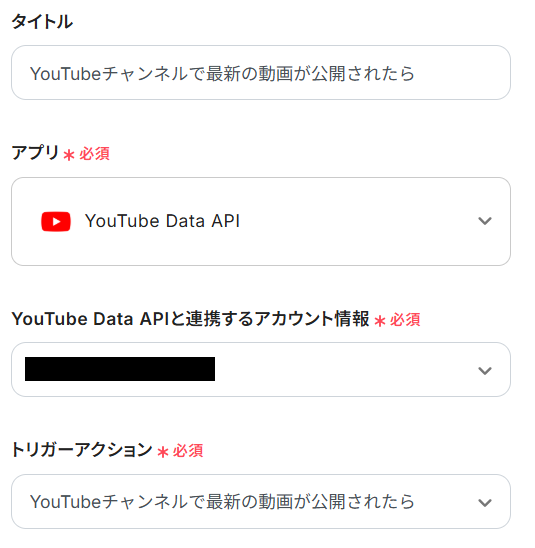
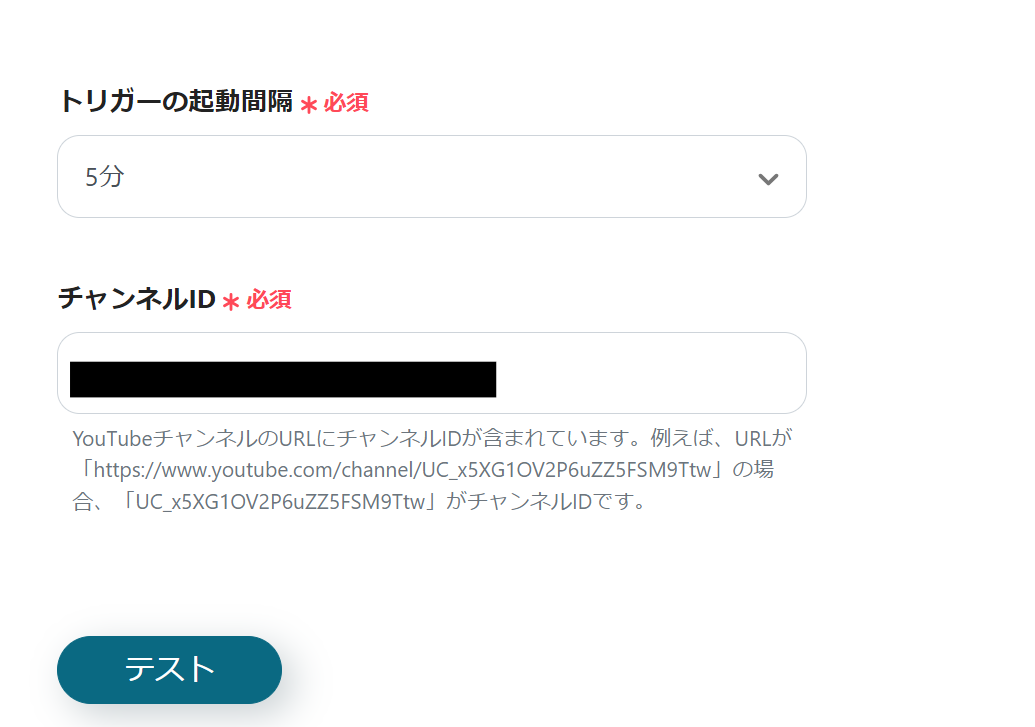
5)トリガーの起動間隔を選択し、チャンネルIDを入力したら、「テスト」をクリック、テストが成功したら「保存」します。
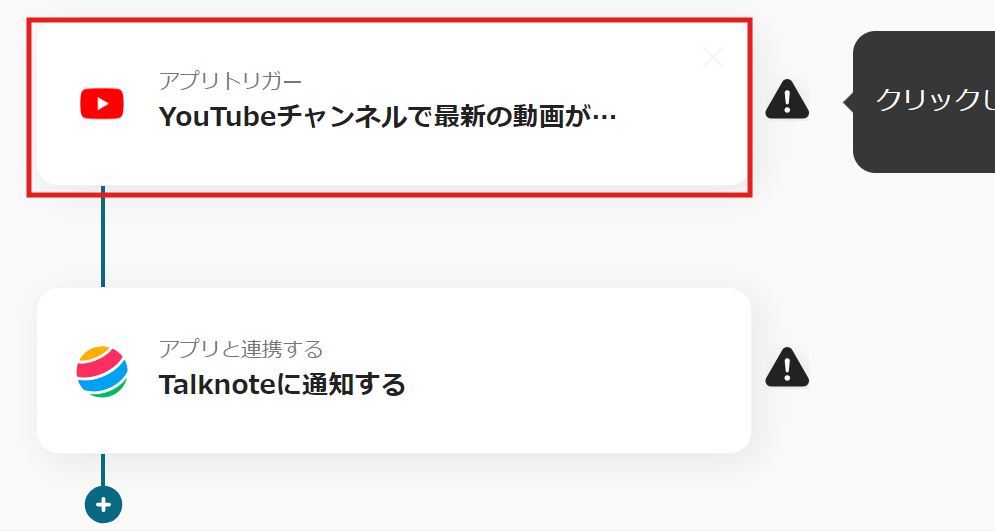
6)フローに戻ったら、「アプリと連携する Talknoteに通知する」のアイコンをクリックします
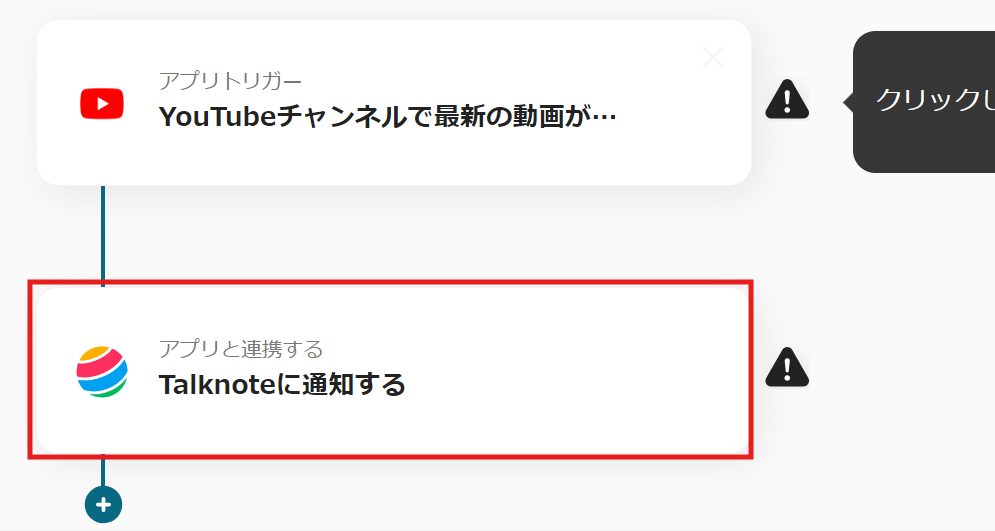
7)アクションは「スレッドにメッセージを投稿」を選択し、「次へ」をクリックします。

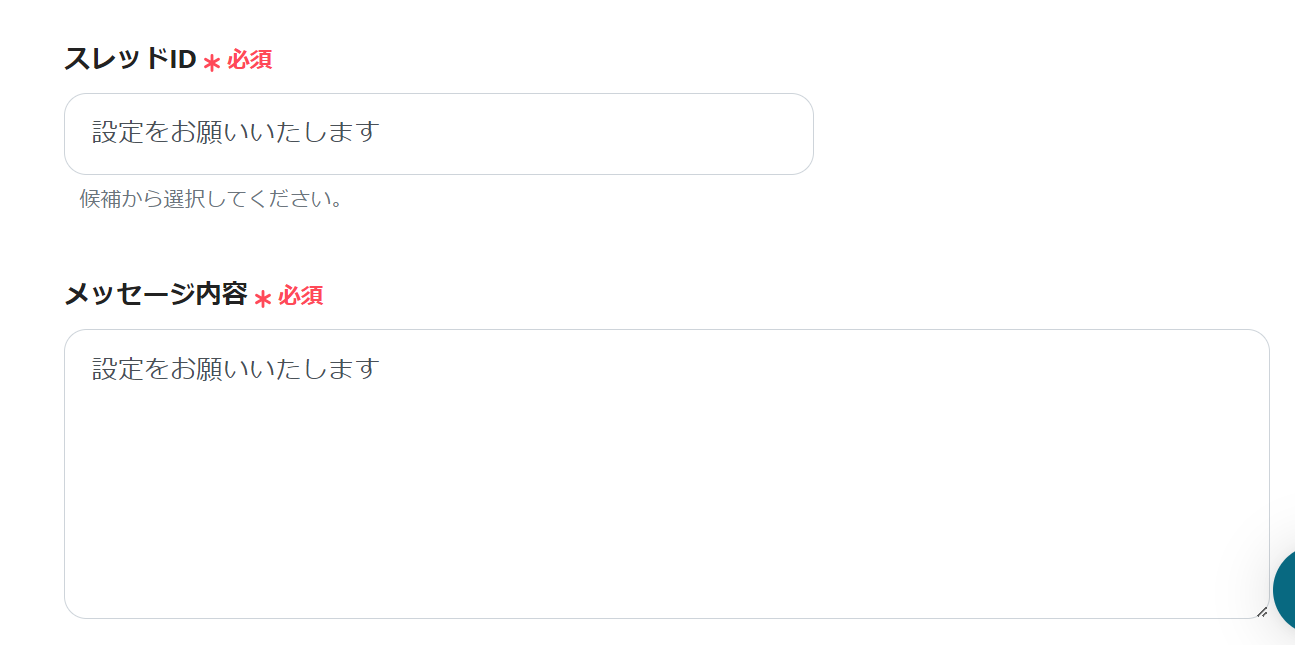
8)各項目を入力します。
入力ができたら「テスト」をクリックし、テストが成功したら「保存」します。
9)これで【YouTubeに最新の動画が公開されたら、Talknoteに通知する】というフローの完成です。
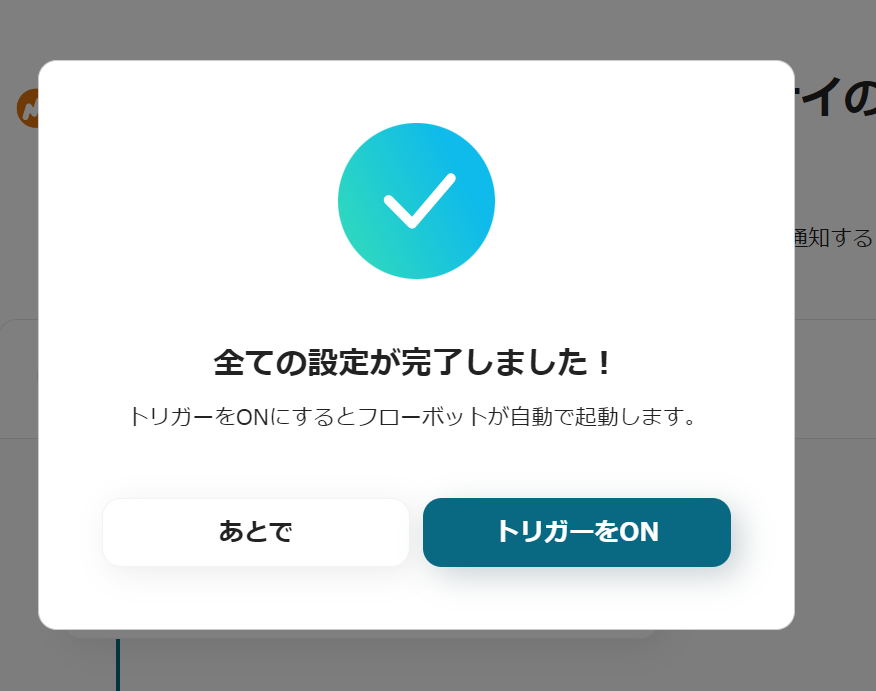
ステップ4: テストと確認
10)最後まで設定すると以下のような表示が出てくるので、「トリガーをON」をクリック。フローボットを起動させて、一度正しく作動するか確認してください。
今回使用したテンプレートはこちら
■概要
自社や競合のYouTubeチャンネルに新しい動画が公開された際、都度確認して手作業で社内SNSに共有するのは手間がかかる作業ではないでしょうか。このワークフローを活用すれば、YouTubeとTalknoteの連携を自動化できるため、最新動画が公開されると即座に指定のスレッドへ通知することが可能です。手動での確認や共有作業が不要になり、情報共有の迅速化と業務効率化を実現します。
■このテンプレートをおすすめする方
- YouTubeでの情報発信を分析し、最新動画を迅速にチーム共有したいマーケティング担当者の方
- 自社のYouTubeチャンネル更新を、Talknoteを使い効率的に周知したい広報・PR担当者の方
- YouTubeとTalknoteの連携による情報共有の自動化で、定型業務を効率化したいと考えている方
■このテンプレートを使うメリット
- YouTubeチャンネルの更新を自動で検知しTalknoteへ通知するため、手動での確認や共有作業にかかる時間を削減できます
- システムが自動で処理するので、動画の見落としや共有漏れといったヒューマンエラーを防ぎ、確実な情報共有を実現します
■フローボットの流れ
- はじめに、YouTubeとTalknoteをYoomと連携します
- 次に、トリガーでYouTubeを選択し、「YouTubeチャンネルで最新の動画が公開されたら」というアクションを設定します
- 最後に、オペレーションでTalknoteを選択し、「スレッドにメッセージを投稿」アクションを設定して、動画情報を指定のスレッドに通知するようにします
※「トリガー」:フロー起動のきっかけとなるアクション、「オペレーション」:トリガー起動後、フロー内で処理を行うアクション
■このワークフローのカスタムポイント
- YouTubeのトリガー設定では、通知の対象としたいチャンネルのIDを任意で設定してくださ
- Talknoteでメッセージを投稿するアクションを設定する際に、通知を送りたいスレッドのIDを任意で設定してください
■注意事項
- YouTube、TalknoteのそれぞれとYoomを連携してください。
- トリガーは5分、10分、15分、30分、60分の間隔で起動間隔を選択できます。
- プランによって最短の起動間隔が異なりますので、ご注意ください。
YouTubeとTalknoteを使ったその他の自動化の例
YouTubeとTalknoteの連携を活用するために、Yoomには他にも便利な自動化テンプレートが用意されています。
1.YouTubeチャンネルに動画がアップされたらLINEに通知するフローです。
今回ご紹介したテンプレートと同じように最新の動画が公開された際に通知を行いますが、Talknoteではなく、LINEに通知します。
LINEで通知を受け取れることで、手入力の手間を省き、素早い情報共有が行えます。
■概要
YouTubeチャンネルに動画がアップされたらLINEに通知するフローです。
■このテンプレートをおすすめする方
1.YouTubeチャンネルの運営者、動画コンテンツ作成者
・YouTubeチャンネルを運営しているチーム、企業の方
・動画のアップロード状況を管理し、マーケティングに役立てたい方
・動画のアップロード状況を迅速にメンバー間で共有したい方
2.主要となるコミュニケーションツールとしてLINEを使用している方
・メンバー間でLINEのやりとりが多い方
・LINEによる通知を手軽に受け取りたい方
3.手動によるLINEによる通知を自動化したいと考えている方
・LINEによるメッセージの送付を日常的にされている方
・業務の自動化を目指している中小企業の経営者や動画作成チーム
・YouTubeとLINEを連携して効率化したい方
■このテンプレートを使うメリット
・YouTubeチャンネルに動画がアップされたらLINEに通知することができるため、業務の効率化を図ることができます。
・LINEへの通知を自動化できるため、手入力による宛先誤りや通知漏れといったヒューマンエラーの防止に効果があります。
・LINEから手動で通知をする必要が無くなり、他の重要な作業に時間を充てることができます。
・LINEへ通知を出すトークルームは任意でカスタマイズすることができます。
■注意事項
・YouTubeとLINE公式アカウントを連携させてください。
2.最新のYouTubeチャンネルレポートを取得し、Microsoft Excelに追加するフローです。
YouTubeチャンネルの分析データは、動画コンテンツの改善や戦略立案に不可欠な情報です。
しかし、YouTubeからレポートを手動でダウンロードしてMicrosoft Excelに転記する作業は、入力の手間とミスの発生がしやすいものです。
このフローを活用することにより、YouTubeからのチャンネルレポートを取得するとMicrosoft Excelへ自動でデータ追加がされるため、手作業によるダウンロードや転記作業が不要になります。
■概要YouTubeチャンネルのパフォーマンス分析は重要ですが、定期的にレポートを取得し、Microsoft Excelに手作業で転記するのは手間のかかる作業ではないでしょうか。また、手作業によるコピー&ペーストは、入力ミスなどのヒューマンエラーを引き起こす原因にもなります。このワークフローを活用すれば、指定したスケジュールで自動的にYouTube Analytics APIから最新のチャンネルレポートを取得し、Microsoft Excelにデータを追加するため、こうしたレポート作成業務の課題を解消できます。
■このテンプレートをおすすめする方- YouTubeチャンネルのレポート作成を定期的に手作業で行っている方
- YouTube Analytics APIのデータをMicrosoft Excelで管理・分析しているマーケティング担当者の方
- レポート作成業務を自動化し、より戦略的な分析業務に時間を割きたいと考えている方
■このテンプレートを使うメリット- 指定した日時にYouTube Analytics APIからレポートが自動取得され、Microsoft Excelに追加されるため、これまで手作業で行っていた時間を短縮できます。
- 手作業によるデータのコピー&ペーストが不要になることで、転記ミスや数値の間違いといったヒューマンエラーの発生を防ぎます。
■フローボットの流れ- はじめに、Microsoft ExcelとYouTube Analytics APIをYoomと連携します。
- 次に、トリガーでスケジュールトリガー機能を選択し、フローボットを起動したい日時を設定します。
- 次に、オペレーションでYouTube Analytics APIを選択し、「チャンネルレポートを取得」アクションを設定します。
- 最後に、オペレーションでMicrosoft Excelを選択し、「レコードを追加する」アクションを設定して、取得したレポート情報を指定のファイルに追加します。
※「トリガー」:フロー起動のきっかけとなるアクション、「オペレーション」:トリガー起動後、フロー内で処理を行うアクション
■このワークフローのカスタムポイント- スケジュールトリガー機能では、レポートを取得したい任意の曜日や日時を自由に設定可能です。
- YouTube Analytics APIでレポートを取得する際に、取得したい指標など、任意の項目を固定値や前段階で取得した情報を用いて設定できます。
- Microsoft Excelの各項目に、前段階で取得したどの情報を割り当てるか、または固定値を設定するかなどを柔軟にカスタマイズできます。
■注意事項- YouTube Analytics APIとMicrosoft Excelを連携させてください。
- 仕様上、レポートの取得は3日前のデータから取得が可能です。日付を設定する際は日時の加算減算オペレーションなどを用いるかあらかじめ3日より前の日付データを取得し、その日付で範囲指定を行ってください。
- Microsoft365(旧Office365)には、家庭向けプランと一般法人向けプラン(Microsoft365 Business)があり、一般法人向けプランに加入していない場合には認証に失敗する可能性があります。
- Microsoft Excelのデータベースを操作するオペレーションの設定に関しては「【Excel】データベースを操作するオペレーションの設定に関して」をご参照ください。
■このテンプレートをおすすめする方
- YouTubeチャンネルのレポート作成を定期的に手作業で行っている方
- YouTube Analytics APIのデータをMicrosoft Excelで管理・分析しているマーケティング担当者の方
- レポート作成業務を自動化し、より戦略的な分析業務に時間を割きたいと考えている方
■このテンプレートを使うメリット
- 指定した日時にYouTube Analytics APIからレポートが自動取得され、Microsoft Excelに追加されるため、これまで手作業で行っていた時間を短縮できます。
- 手作業によるデータのコピー&ペーストが不要になることで、転記ミスや数値の間違いといったヒューマンエラーの発生を防ぎます。
■フローボットの流れ
- はじめに、Microsoft ExcelとYouTube Analytics APIをYoomと連携します。
- 次に、トリガーでスケジュールトリガー機能を選択し、フローボットを起動したい日時を設定します。
- 次に、オペレーションでYouTube Analytics APIを選択し、「チャンネルレポートを取得」アクションを設定します。
- 最後に、オペレーションでMicrosoft Excelを選択し、「レコードを追加する」アクションを設定して、取得したレポート情報を指定のファイルに追加します。
■このワークフローのカスタムポイント
- スケジュールトリガー機能では、レポートを取得したい任意の曜日や日時を自由に設定可能です。
- YouTube Analytics APIでレポートを取得する際に、取得したい指標など、任意の項目を固定値や前段階で取得した情報を用いて設定できます。
- Microsoft Excelの各項目に、前段階で取得したどの情報を割り当てるか、または固定値を設定するかなどを柔軟にカスタマイズできます。
■注意事項
- YouTube Analytics APIとMicrosoft Excelを連携させてください。
- 仕様上、レポートの取得は3日前のデータから取得が可能です。日付を設定する際は日時の加算減算オペレーションなどを用いるかあらかじめ3日より前の日付データを取得し、その日付で範囲指定を行ってください。
- Microsoft365(旧Office365)には、家庭向けプランと一般法人向けプラン(Microsoft365 Business)があり、一般法人向けプランに加入していない場合には認証に失敗する可能性があります。
- Microsoft Excelのデータベースを操作するオペレーションの設定に関しては「【Excel】データベースを操作するオペレーションの設定に関して」をご参照ください。
まとめ
YouTubeとTalknoteの連携を設定することで、最新の動画が公開された際に自動で通知を受け取ることができるようになりました。
これにより、チームメンバーに素早く情報を共有できそうです。
さらに、自動化により手動作業を短縮し、業務の効率化も期待できます。
また、Yoomを使用することで、ノーコードで簡単に連携を設定できるため、技術的な知識がなくても安心です。
ぜひ、このブログを参考にして、業務の効率化を図ってみてください!
プログラミング知識なしで手軽に構築できます。