・
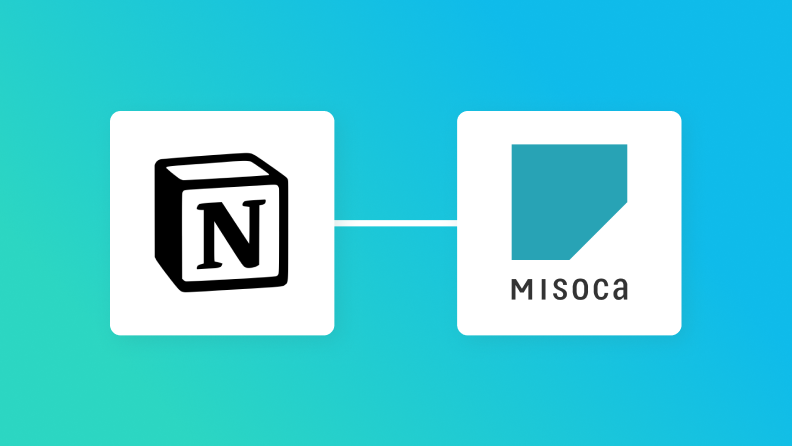
【簡単設定】Chrome拡張機能トリガーを活用し、Notionのデータを基にMisocaで見積書を自動作成する方法

手動での見積書作成から解放されたいとお悩みではありませんか?
この問題を解決するためには、NotionとMisocaを連携して見積書の作成を自動化するのが有効です。
これにより、手動での見積書作成から解放されるだけでなく、ヒューマンエラーも防げます。
さらに、NotionのWebページを開いた状態で拡張機能から自動化を起動させるので、見積書の作成が滞ることもなくなるでしょう。
とにかく早く試したい方へ
YoomにはNotionとMisocaを連携して見積書の作成を自動化するテンプレートが用意されているので、「まずは試してみたい!」という方は、以下のバナーをクリックして、すぐに自動化を体験してみましょう!
■このテンプレートをおすすめする方
- Notionで案件管理を行い、Misocaで見積書を手作業で作成している営業担当者の方
- 見積書作成時のデータ転記作業をなくし、ヒューマンエラーを防止したいと考えている方
- 定型的な見積書作成業務を効率化して、より重要なコア業務に集中したい方
■このテンプレートを使うメリット
- Notionの情報をもとに自動で見積書が作成されるため、これまで手作業で行っていた転記業務の時間を短縮することができます。
- 手作業でのデータ転記がなくなることで、金額や品目の入力間違いや記載漏れといったヒューマンエラーのリスク軽減に繋がります。
■フローボットの流れ
- はじめに、NotionとMisocaをYoomと連携します。
- 次に、トリガーでNotionのChrome拡張機能を選択し、「特定のページから起動」アクションを設定します。
- 次に、オペレーションでNotionの「レコードを取得する(ID検索)」アクションを設定し、トリガーとなったページから案件詳細を取得します。
- 続けて、オペレーションでMisocaの「特定の取引先に紐づく送り先IDを取得」アクションを設定します。
- 最後に、オペレーションでMisocaの「見積書を作成」アクションを設定し、Notionから取得した情報をもとに見積書を自動で作成します。
■このワークフローのカスタムポイント
- Notionでレコード情報を取得する際に、操作対象としたいデータベースなどを任意で設定してください。
- Misocaで見積書を作成する際に、自動入力したい取引先情報や送り先IDなどを任意で設定してください。
■注意事項
- NotionとMisocaのそれぞれとYoomを連携してください。
- Chrome拡張機能を使用したトリガーを使用することで、Notion上から直接トリガーを起動させることができます。
- Chrome拡張機能を使ったトリガーの設定方法は「Chrome拡張機能を使ったトリガーの設定方法」をご参照ください。
- 送り先が複数ある場合は、データを操作変換するオペレーションの『リスト型のアウトプットを個々のアウトプットに分割』を用い、対象の送り先IDを個々に分割し送付したい送り先IDのみ設定することも可能です。
こんな方におすすめ
- 見積書作成の時間を短縮したい方
- 複数の見積書作成に手間を感じる方
- Notionのデータを基にMisocaで見積書を作成するという自動化を検討している方
NotionとMisocaの連携メリットと具体例
メリット1:作業時間を節約できる
見積書作成の手間を解消するには、NotionとMisocaを連携した自動化がおすすめです。
たとえば、Notionに登録された取引データを基にMisocaで見積書を自動作成できるため、作業時間を大幅に短縮できます。
これにより、手動で見積書を作成していた時間を他の業務に充てることができます。
その結果、見積書を作成する際に、複数のアプリケーションを操作する煩雑さがなくなり、より効率的に業務を進められるでしょう。
メリット2:ヒューマンエラーを削減する
手作業での見積書作成は工程が多く、ヒューマンエラーが起こりがちです。
しかし、自動化を導入することでそのリスクを軽減し、担当者の確認手間を減らせます。
たとえば、見積データの入力ミスが防げるので、スムーズに見積書を作成できるでしょう。
これにより、正確なデータを維持したまま見積書を作成できるので、業務の正確性とスピードが向上するかもしれません。
特に、繁忙期などの忙しい時期に役立ち、安定した品質を保ちながら見積書を作成できるでしょう。
メリット3:一貫した業務フローを確立できる
一貫した業務フローが確立できると、作業効率を向上できるかもしれません。
たとえば、Notionのデータに基づいてMisocaで見積書を作成する流れを自動化すれば、従業員の作業負担を軽減できます。
これにより、誰が見積書を作成しても同様の形式で作成できるので、作業のムラを防げます。
また、見積書作成の流れが滞ることがなくなるので、作成漏れや遅延を防ぐことができるでしょう。
この自動化は、複数の見積書を同時に作成する必要がある場合に、特におすすめの自動化です。
NotionとMisocaを連携してできること
NotionとMisocaのAPIを連携させることで、データベースと連動した見積書や請求書の発行、メール送信などを自動化できます。
これにより、手作業によるタイムラグを減らし、素早く書類を作成することが可能になります。
ここでは具体的な自動化の例を複数ご紹介しますので、気になる内容があれば、ぜひクリックしてみてください!
NotionからMisocaに取引先を追加する
Chrome拡張機能のAPIをNotionのページからクリックのみで起動し、Notionに格納している取引先データを受け取ることができます。
その後、Misocaの提供するAPIを用いて取引先データの自動登録が可能です。
■このテンプレートをおすすめする方
- Notionで顧客管理を行い、Misocaで請求書を発行している営業やバックオフィスの方
- NotionからMisocaへの手作業での取引先情報の転記に、手間やミスを感じている方
- 取引先の情報管理から請求書発行までの一連のフローを自動化し、効率化したい方
■このテンプレートを使うメリット
- Notionに情報を追加するだけでMisocaに取引先が自動作成されるため、二重入力の手間がなくなり、作業時間を短縮できます。
- 手作業での情報転記がなくなることで、取引先情報の入力間違いや登録漏れといったヒューマンエラーを防ぎます。
■フローボットの流れ
- はじめに、NotionとMisocaをYoomと連携します。
- 次に、トリガーでNotionを選択し、「特定のデータベースから起動」を設定して、取引先情報を管理しているデータベースを指定します。
- 続いて、オペレーションでNotionの「レコードを取得する」アクションを設定し、トリガーで起動したレコードの情報を取得します。
- 最後に、オペレーションでMisocaの「取引先を作成」アクションを設定し、前のステップで取得したNotionの情報をマッピングします。
■このワークフローのカスタムポイント
- Misocaで取引先を作成する際に、Notionから取得した情報(会社名、担当者名など)をどの項目に反映させるか任意で設定できます。
- また、Notionの情報だけでなく、特定のテキストを固定値として入力するなど、登録内容を柔軟にカスタマイズすることも可能です。
■注意事項
- Notion、MisocaのそれぞれとYoomを連携してください。
- Chrome拡張機能を使用したトリガーを使用することで、Airtable上から直接トリガーを起動させることができます。
- Chrome拡張機能を使ったトリガーの設定方法は「Chrome拡張機能を使ったトリガーの設定方法」をご参照ください。
NotionとMisocaを連携してメールを送信する
Notionで複数の案件を管理し、進捗に応じてMisocaが自動的に請求書を作成する仕組みにより、業務負担を軽減できます。
さらに、Misocaで作成した請求書をGmailを通じて送信する設定を追加することで、請求業務全体をスムーズに進める環境を整えることができます。
■このテンプレートをおすすめする方
- Notionで案件管理を行い、Misocaで請求書を発行している方
- 手作業による請求書の作成や送付業務に時間がかかっている経理担当者の方
- 請求書発行に伴う情報の転記ミスや、送付漏れなどのヒューマンエラーを防ぎたい方
■このテンプレートを使うメリット
- Notionのステータスを更新するだけで、請求書の作成から送付までが自動で実行されるため、これまで手作業に費やしていた時間を短縮できます
- 手作業でのデータ転記が減るため、請求金額や宛先の間違いといったヒューマンエラーの発生リスクを軽減することに繋がります
■フローボットの流れ
- はじめに、Notion、Misoca、GmailをYoomと連携します
- 次に、トリガーでNotionを選択し、「特定のデータソースのページが作成・更新されたら」というアクションを設定します
- 続いて、オペレーションでNotionの「レコードを取得する(ID検索)」アクションを設定し、更新されたページ情報を取得します
- オペレーションの分岐機能で、特定の条件に合致した場合のみ後続の処理に進むよう設定します
- 次に、オペレーションでMisocaの「特定の取引先に紐づく送り先IDを取得」し、「請求書を作成」します
- さらに、オペレーションでMisocaの「請求書PDFを取得」アクションを設定します
- 最後に、オペレーションでGmailの「メールを送る」アクションを設定し、取得した請求書PDFを添付してメールを送信します
■このワークフローのカスタムポイント
- 分岐機能の条件は、Notionの特定のステータスなどをトリガーにするなど、運用に合わせて任意で設定してください
- Gmailで送信するメールの宛先、件名、本文は、Notionから取得した情報などを活用して任意で設定してください
■注意事項
- NotionとMisocaとGmailのそれぞれとYoomを連携してください。
- トリガーは5分、10分、15分、30分、60分の間隔で起動間隔を選択できます。
- プランによって最短の起動間隔が異なりますので、ご注意ください。
- 分岐はパーソナルプラン以上のプランでご利用いただける機能(オペレーション)となっております。フリープランの場合は設定しているフローボットのオペレーションはエラーとなりますので、ご注意ください。
- パーソナルプランなどの有料プランは、2週間の無料トライアルを行うことが可能です。無料トライアル中には制限対象のアプリや機能(オペレーション)を使用することができます。
NotionとMisocaの連携フローを作ってみよう
それでは、さっそく実際にNotionとMisocaが連携したフローを作成してみましょう!
今回はYoomを使用して、ノーコードでNotionとMisocaの連携を進めていきますので、もしまだYoomのアカウントをお持ちでない場合は、こちらの登録フォームからアカウントを発行しておきましょう。
※今回連携するアプリの公式サイト:Notion/Misoca
[Yoomとは]
フローの作成方法
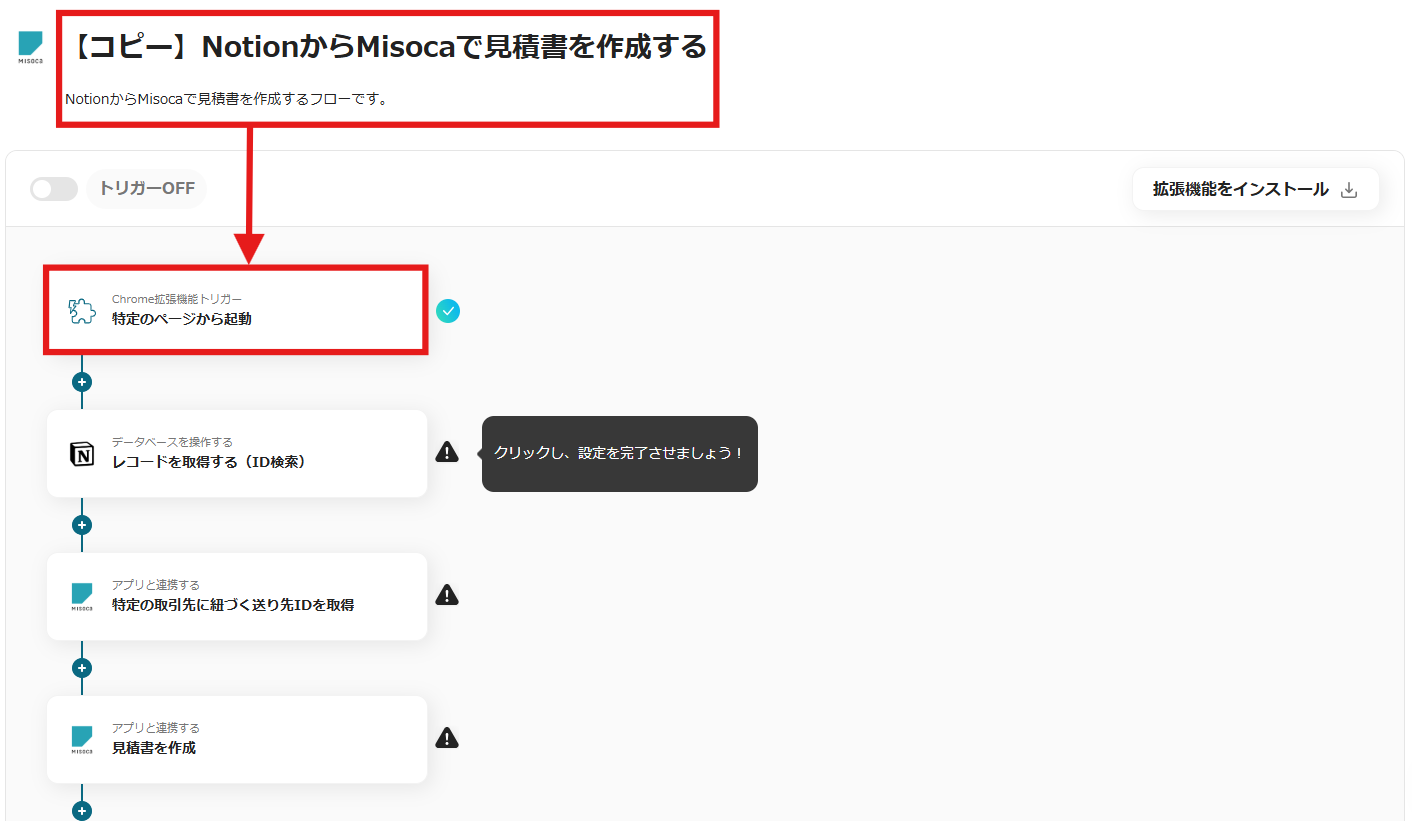
今回は「NotionからMisocaで見積書を作成する」フローを作成していきます!
作成の流れは大きく分けて以下です。
- NotionとMisocaをマイアプリ連携
- 該当のテンプレートをコピー
- トリガー設定およびNotionとMisocaのアクション設定
- トリガーをONにし、フローが起動するかを確認
■このテンプレートをおすすめする方
- Notionで案件管理を行い、Misocaで見積書を手作業で作成している営業担当者の方
- 見積書作成時のデータ転記作業をなくし、ヒューマンエラーを防止したいと考えている方
- 定型的な見積書作成業務を効率化して、より重要なコア業務に集中したい方
■このテンプレートを使うメリット
- Notionの情報をもとに自動で見積書が作成されるため、これまで手作業で行っていた転記業務の時間を短縮することができます。
- 手作業でのデータ転記がなくなることで、金額や品目の入力間違いや記載漏れといったヒューマンエラーのリスク軽減に繋がります。
■フローボットの流れ
- はじめに、NotionとMisocaをYoomと連携します。
- 次に、トリガーでNotionのChrome拡張機能を選択し、「特定のページから起動」アクションを設定します。
- 次に、オペレーションでNotionの「レコードを取得する(ID検索)」アクションを設定し、トリガーとなったページから案件詳細を取得します。
- 続けて、オペレーションでMisocaの「特定の取引先に紐づく送り先IDを取得」アクションを設定します。
- 最後に、オペレーションでMisocaの「見積書を作成」アクションを設定し、Notionから取得した情報をもとに見積書を自動で作成します。
■このワークフローのカスタムポイント
- Notionでレコード情報を取得する際に、操作対象としたいデータベースなどを任意で設定してください。
- Misocaで見積書を作成する際に、自動入力したい取引先情報や送り先IDなどを任意で設定してください。
■注意事項
- NotionとMisocaのそれぞれとYoomを連携してください。
- Chrome拡張機能を使用したトリガーを使用することで、Notion上から直接トリガーを起動させることができます。
- Chrome拡張機能を使ったトリガーの設定方法は「Chrome拡張機能を使ったトリガーの設定方法」をご参照ください。
- 送り先が複数ある場合は、データを操作変換するオペレーションの『リスト型のアウトプットを個々のアウトプットに分割』を用い、対象の送り先IDを個々に分割し送付したい送り先IDのみ設定することも可能です。
ステップ1:NotionとMisocaをマイアプリ連携
ここでは、Yoomとそれぞれのアプリ連携して、操作が行えるようにしていきます。
まずは基本的な設定方法を解説しているナビをご覧ください!
NotionとYoomのマイアプリ登録
以下の手順をご参照ください。
MisocaとYoomのマイアプリ登録
マイアプリ登録の検索欄でMisocaを検索するか、一覧から探してください。
以下の画面が表示されるので、Misocaにログインしましょう。
これでアプリ連携は完了です!
ステップ2:テンプレートをコピーする
続いてYoomのテンプレートをコピーします。
以下バナーの「試してみる」をクリックします。
■このテンプレートをおすすめする方
- Notionで案件管理を行い、Misocaで見積書を手作業で作成している営業担当者の方
- 見積書作成時のデータ転記作業をなくし、ヒューマンエラーを防止したいと考えている方
- 定型的な見積書作成業務を効率化して、より重要なコア業務に集中したい方
■このテンプレートを使うメリット
- Notionの情報をもとに自動で見積書が作成されるため、これまで手作業で行っていた転記業務の時間を短縮することができます。
- 手作業でのデータ転記がなくなることで、金額や品目の入力間違いや記載漏れといったヒューマンエラーのリスク軽減に繋がります。
■フローボットの流れ
- はじめに、NotionとMisocaをYoomと連携します。
- 次に、トリガーでNotionのChrome拡張機能を選択し、「特定のページから起動」アクションを設定します。
- 次に、オペレーションでNotionの「レコードを取得する(ID検索)」アクションを設定し、トリガーとなったページから案件詳細を取得します。
- 続けて、オペレーションでMisocaの「特定の取引先に紐づく送り先IDを取得」アクションを設定します。
- 最後に、オペレーションでMisocaの「見積書を作成」アクションを設定し、Notionから取得した情報をもとに見積書を自動で作成します。
■このワークフローのカスタムポイント
- Notionでレコード情報を取得する際に、操作対象としたいデータベースなどを任意で設定してください。
- Misocaで見積書を作成する際に、自動入力したい取引先情報や送り先IDなどを任意で設定してください。
■注意事項
- NotionとMisocaのそれぞれとYoomを連携してください。
- Chrome拡張機能を使用したトリガーを使用することで、Notion上から直接トリガーを起動させることができます。
- Chrome拡張機能を使ったトリガーの設定方法は「Chrome拡張機能を使ったトリガーの設定方法」をご参照ください。
- 送り先が複数ある場合は、データを操作変換するオペレーションの『リスト型のアウトプットを個々のアウトプットに分割』を用い、対象の送り先IDを個々に分割し送付したい送り先IDのみ設定することも可能です。
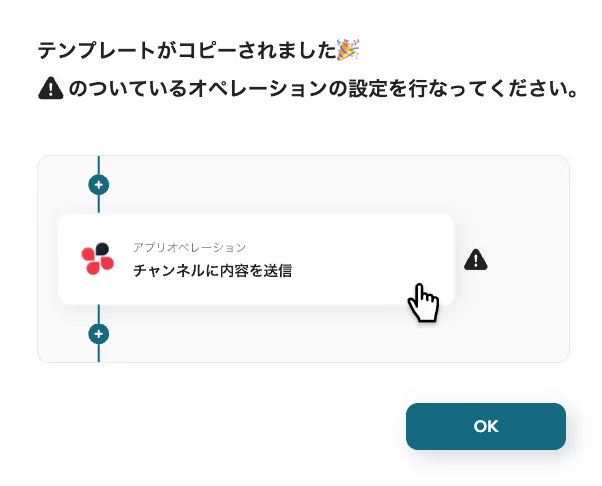
以下のポップアップが表示されたらOKをクリックし設定をはじめましょう!
以下の画面が表示されたら、「タイトル」と「説明」を確認しましょう。
変更する場合は、以下のページで変更してください。
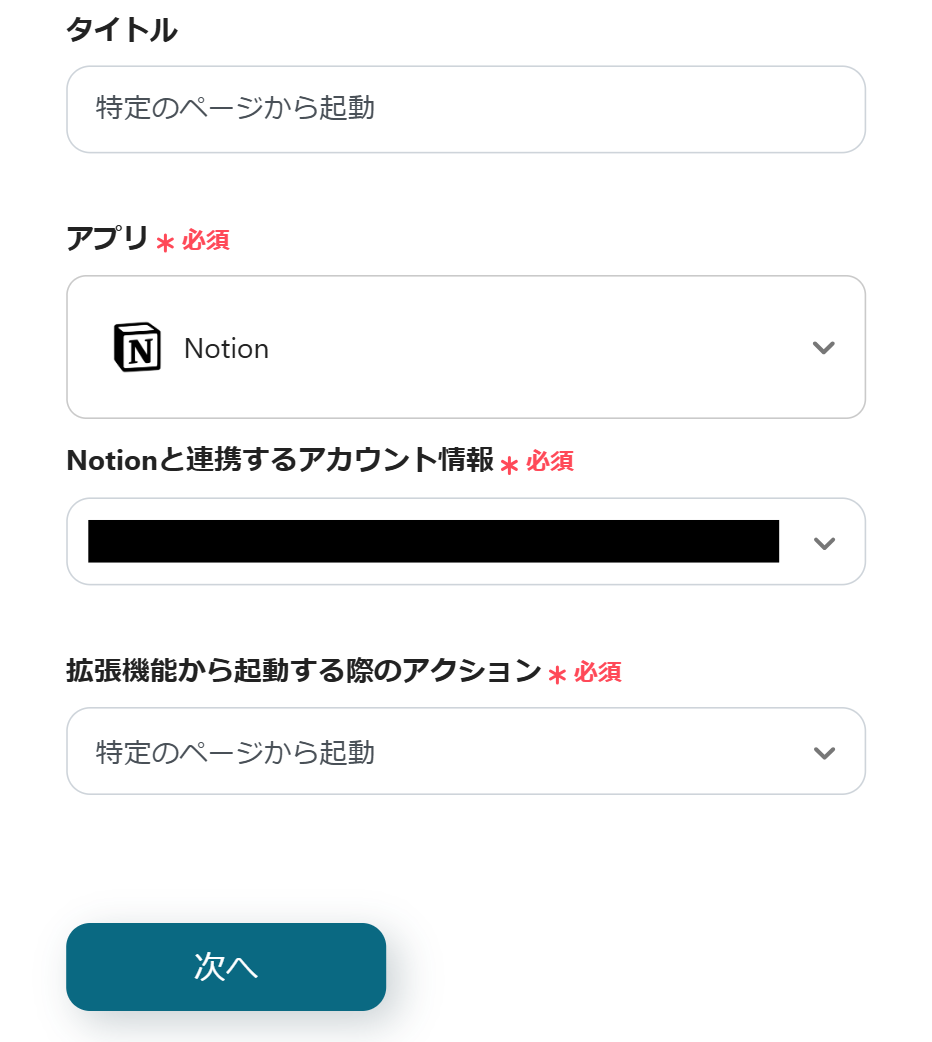
NotionのWebページを開いた状態で、拡張機能からYoomのフローボットを起動する設定を行うため、「レコードの詳細ページから起動」をクリックします。
ステップ3:フローの起点となるNotionのトリガー設定とその後に続くMisocaのオペレーション設定
以下の画面が表示されるので、設定方法を確認してください。
こちらからChrome拡張機能の詳しい設定方法を確認しましょう。
Chrome拡張機能をインストールしていない方は、こちらのページからインストールしてください。

以下の画面が表示されたら、設定を確認します。
- 「タイトル」→変更可能
- 「Notionと連携するアカウント情報」→アカウントに相違がないか確認
- 「拡張機能から起動する際のアクション」→特定のページから起動
以下の設定方法を確認しましょう。
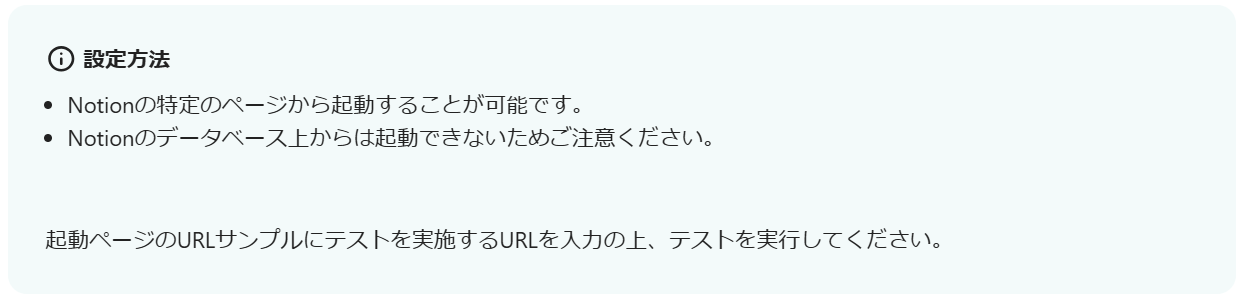
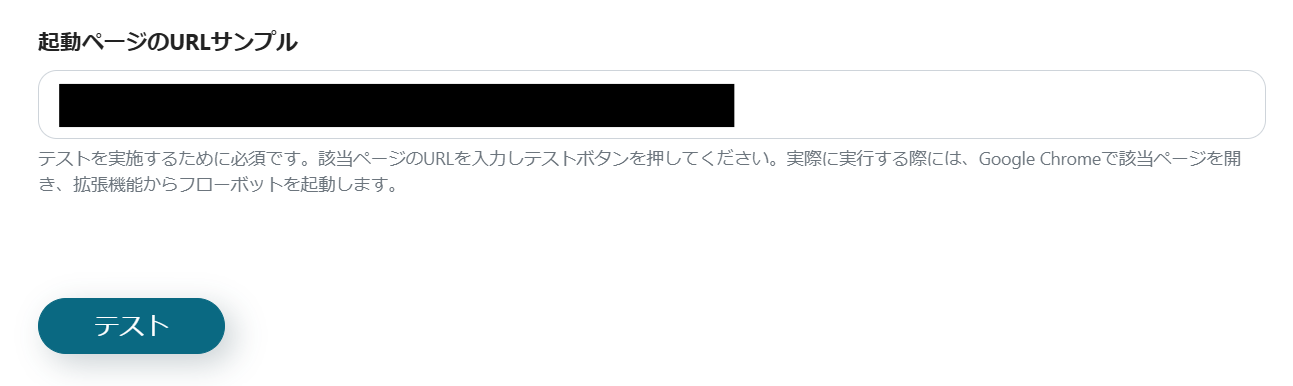
スクロールし、「起動ページのURLサンプル」を設定してください。
設定が完了したら、「テスト」→「テスト成功」→「保存」をクリックしましょう。
次に、Notionのレコードを取得する設定を行うので、「レコードを取得する(ID検索)」をクリックします。
以下の画面が表示されるので、設定を確認してください。
- 「タイトル」→変更可能
- 「Notionと連携するアカウント情報」→アカウントに相違がないか確認
- 「実行アクション」→レコードを取得する(ID検索)

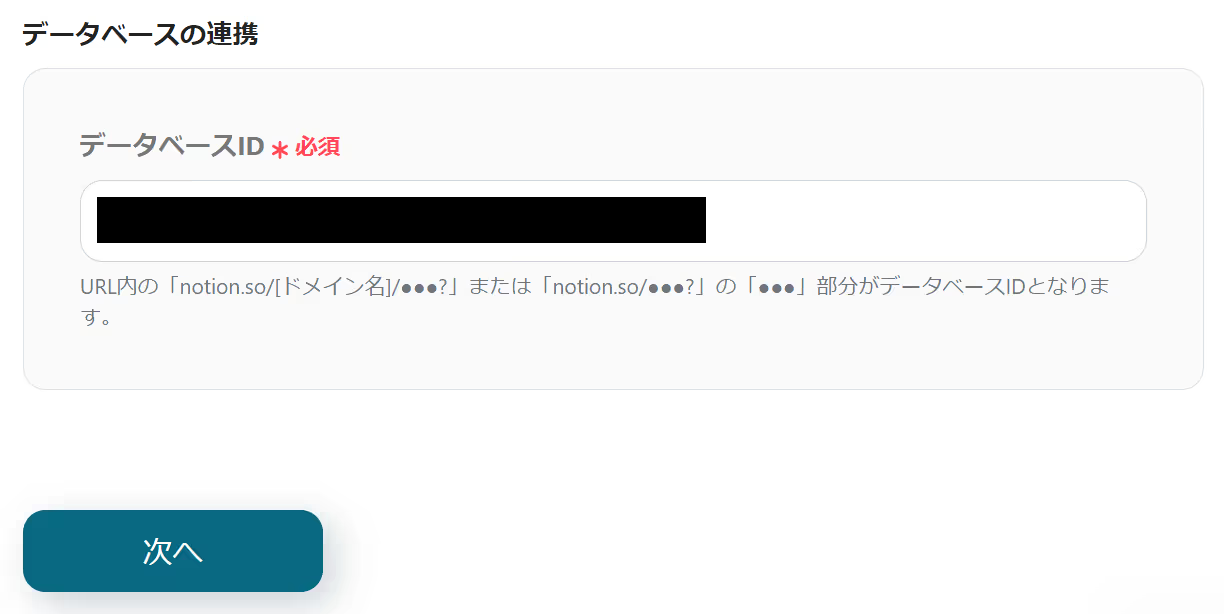
スクロールして「データベースの連携」を設定します。
説明を確認し、データベースIDを設定しましょう。
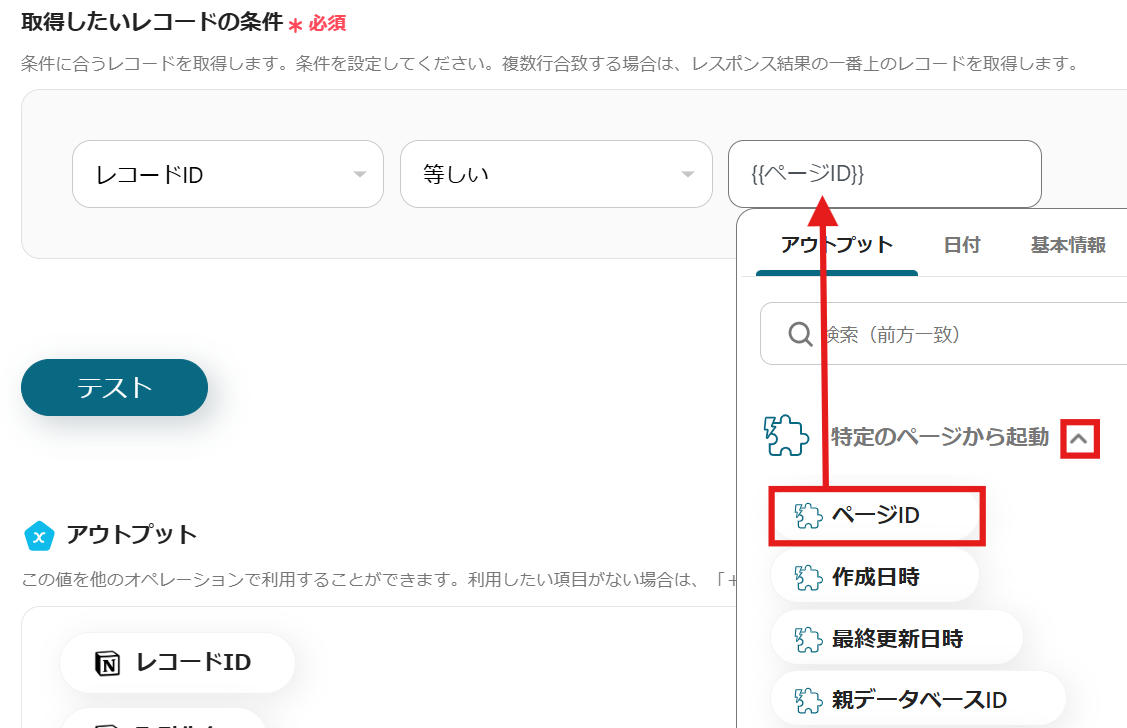
以下の画面が表示されたら、「取得したいレコードの条件」を設定します。
「特定のページから起動」のアウトプットを活用して、以下のように設定してください。
アウトプットは、赤枠内の矢印をクリックすると表示されます。
設定が完了したら、「テスト」→「テスト成功」→「保存」をクリックしましょう。
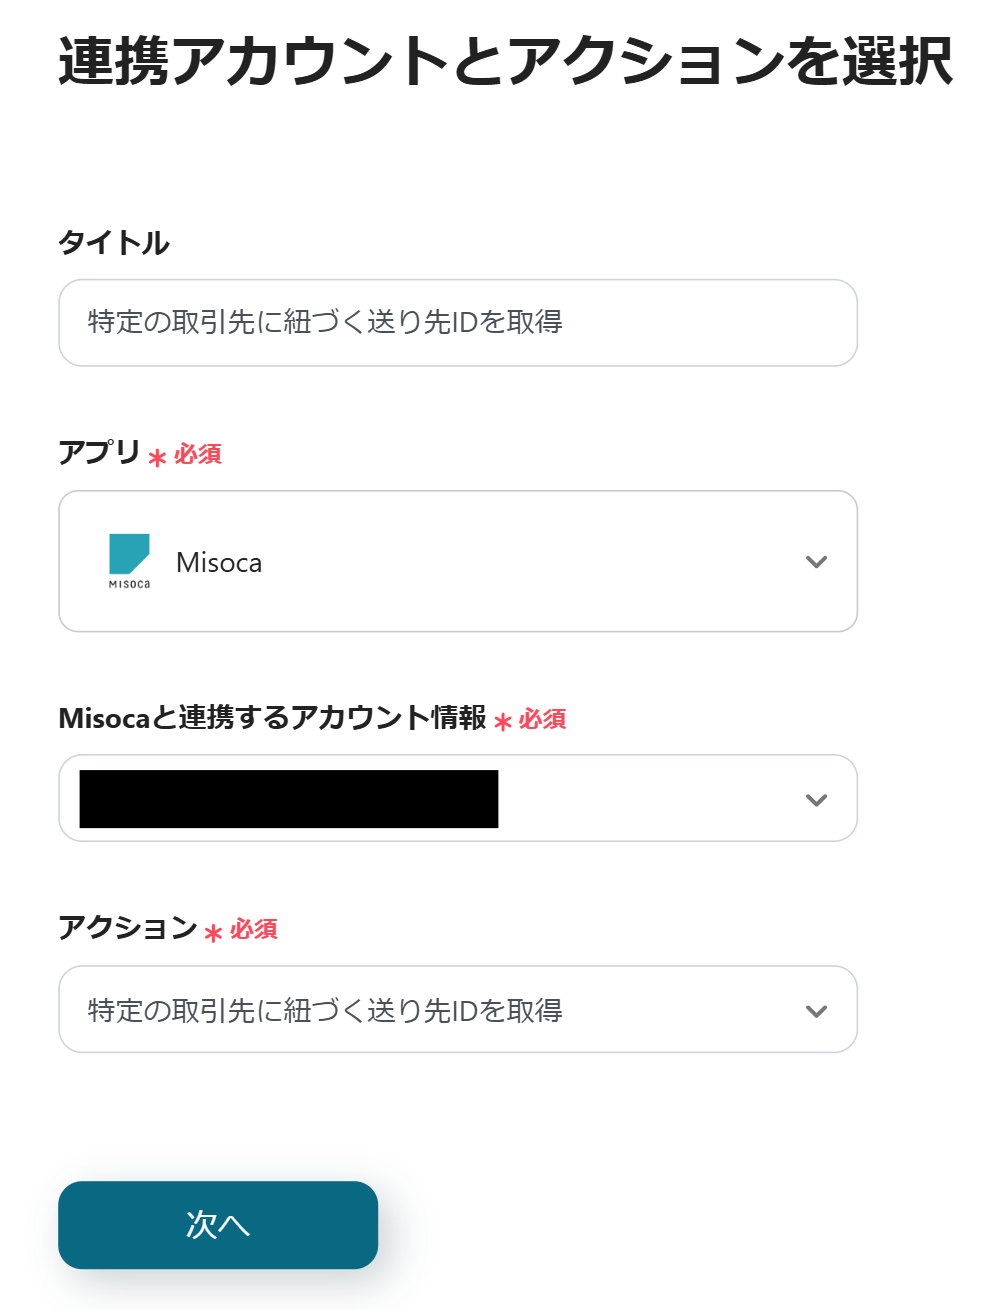
続いて、Misocaの設定を行うので、「特定の取引先に紐づく送り先IDを取得」をクリックしてください。
以下の画面が表示されるので、設定を確認しましょう。
- 「タイトル」→変更可能
- 「Misocaと連携するアカウント情報」→アカウントに相違がないか確認
- 「アクション」→特定の取引先に紐づく送り先IDを取得
以下の画面が表示されたら、「取引先ID」を設定します。
Notionで設定した項目がアウトプットとして表示されます。
※設定する際はテーブルビューを使用してください。
Notionのアウトプットを活用して、取引先IDを選択してください。
設定が完了したら、「テスト」→「テスト成功」→「保存」をクリックしましょう。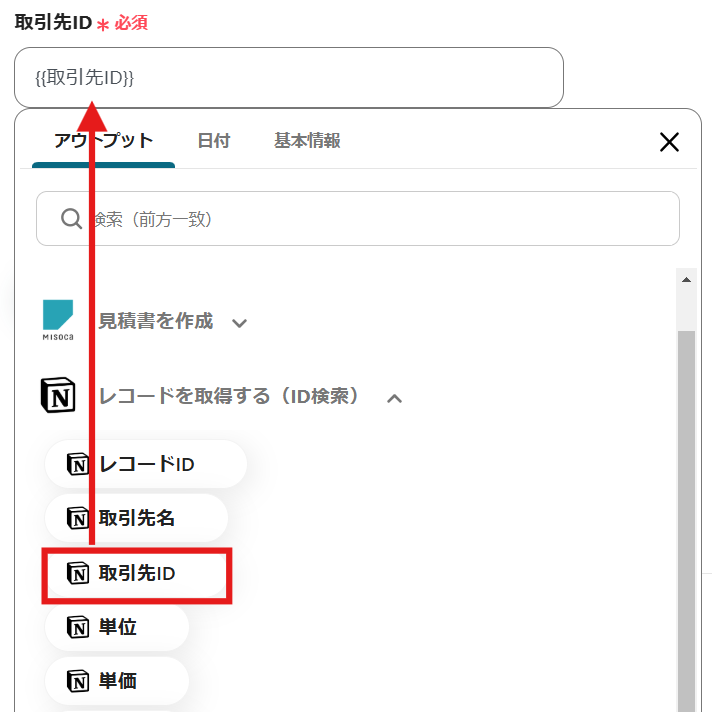
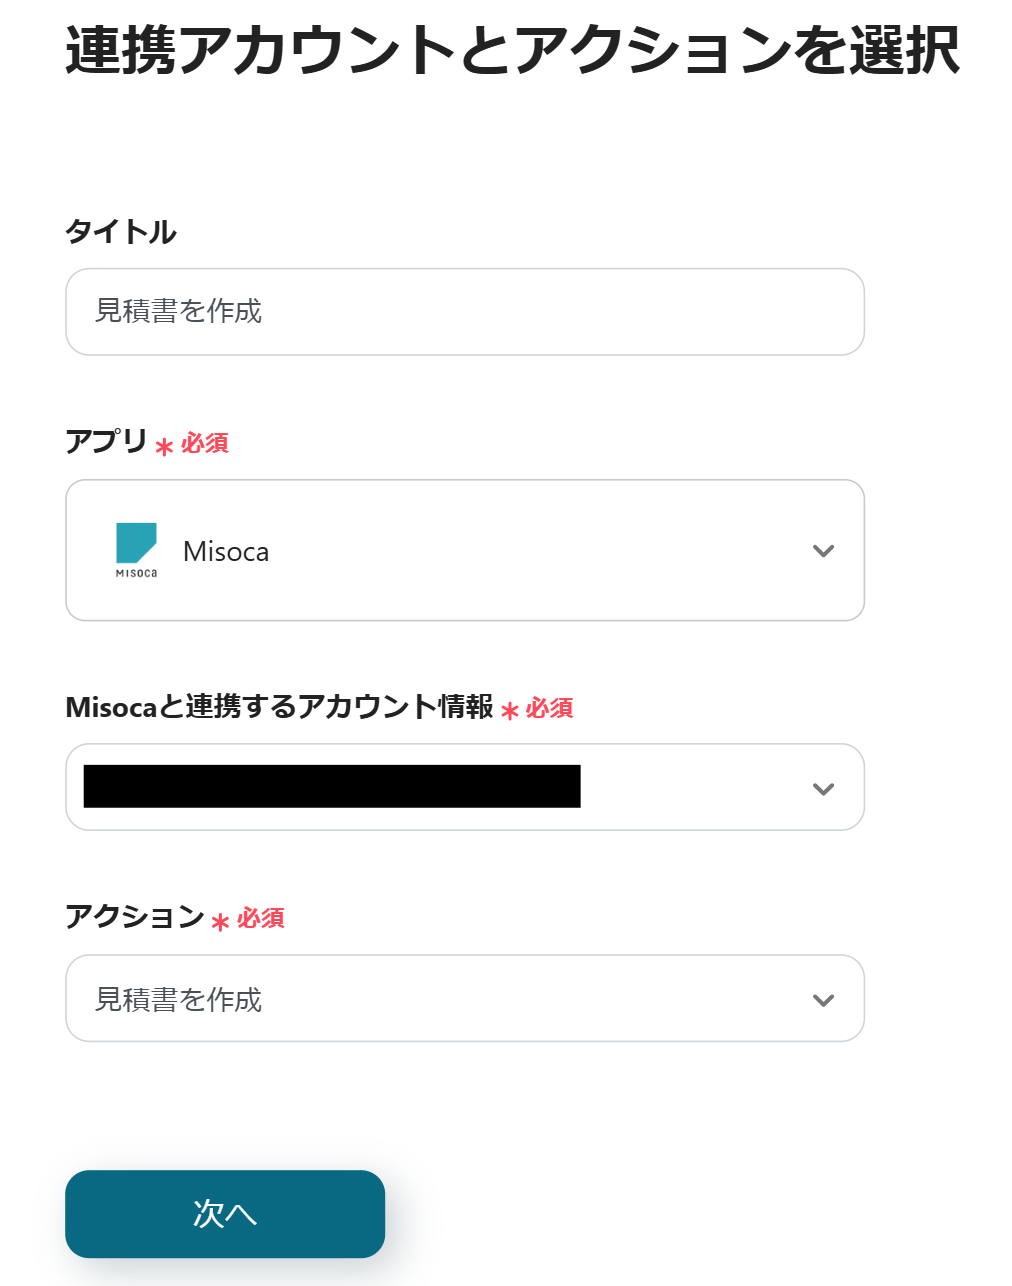
続いて、Misocaで見積書を作成する設定を行うので、「見積書を作成」をクリックします。
以下の画面が表示されるので、設定を確認しましょう。
- 「タイトル」→変更可能
- 「Misocaと連携するアカウント情報」→アカウントに相違がないか確認
- 「アクション」→見積書を作成
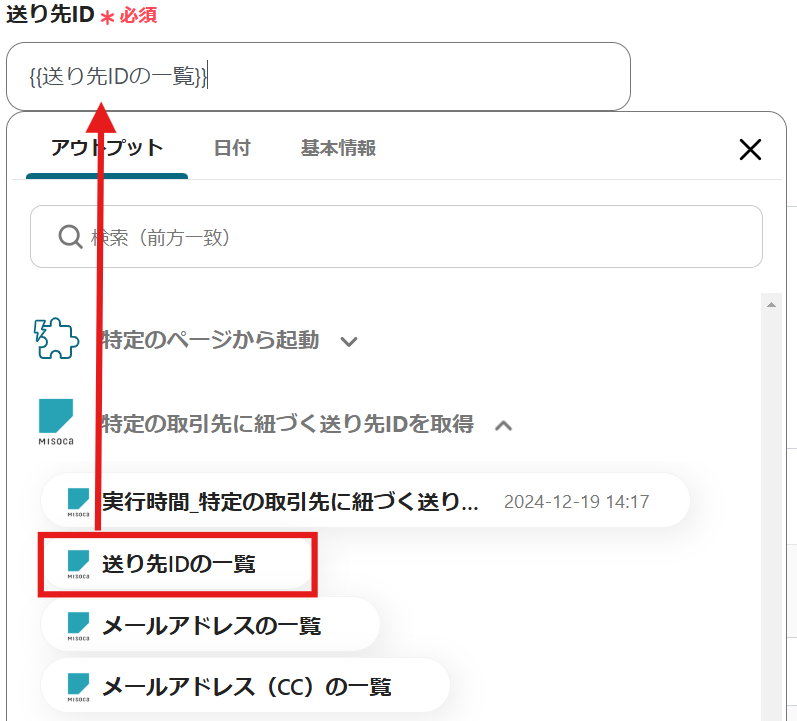
以下の注意事項を確認してください。

スクロールし、設定を行いましょう。
「送り先ID」は「特定の取引先に紐づく送り先IDを取得」から選択します。
※送り先が複数ある場合は、データを操作変換するオペレーションの『リスト型のアウトプットを個々のアウトプットに分割』を用いて、対象の送り先IDを個々に分割し、送付したい送り先IDのみ設定することも可能です。
他にも設定が必要な項目があるので、Notionのアウトプットを活用して設定してください。
設定が完了したら、「テスト」→「テスト成功」→「保存」をクリックしましょう。
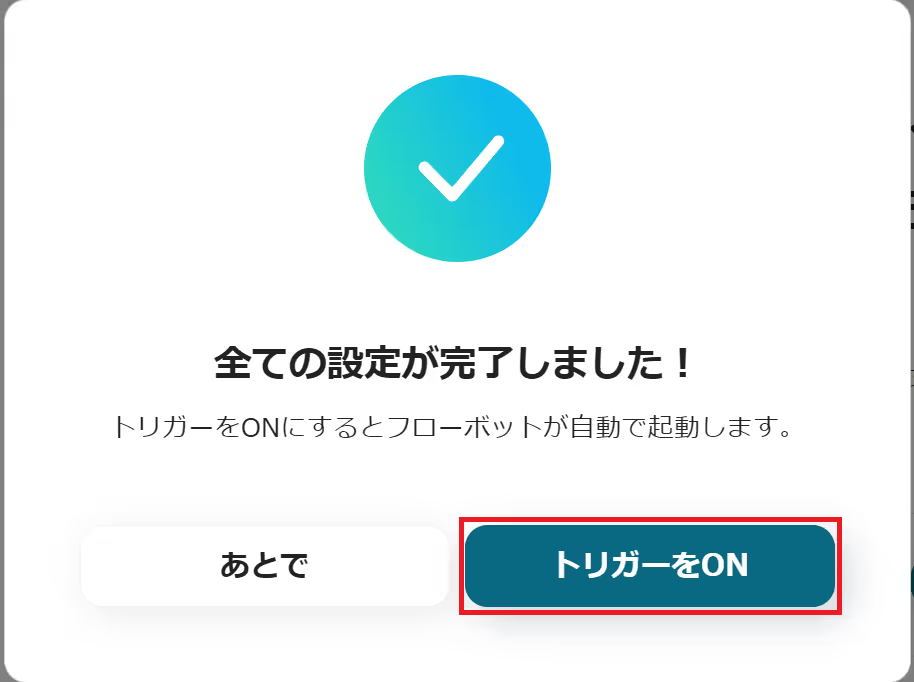
ステップ4:トリガーボタンをONにして、NotionとMisocaの連携動作を確認
最後に「トリガーをON」をクリックしたら、自動化の設定は完了です。
フローボットが正常に起動するかチェックしてください。
今回使用したテンプレートはこちらです。
■このテンプレートをおすすめする方
- Notionで案件管理を行い、Misocaで見積書を手作業で作成している営業担当者の方
- 見積書作成時のデータ転記作業をなくし、ヒューマンエラーを防止したいと考えている方
- 定型的な見積書作成業務を効率化して、より重要なコア業務に集中したい方
■このテンプレートを使うメリット
- Notionの情報をもとに自動で見積書が作成されるため、これまで手作業で行っていた転記業務の時間を短縮することができます。
- 手作業でのデータ転記がなくなることで、金額や品目の入力間違いや記載漏れといったヒューマンエラーのリスク軽減に繋がります。
■フローボットの流れ
- はじめに、NotionとMisocaをYoomと連携します。
- 次に、トリガーでNotionのChrome拡張機能を選択し、「特定のページから起動」アクションを設定します。
- 次に、オペレーションでNotionの「レコードを取得する(ID検索)」アクションを設定し、トリガーとなったページから案件詳細を取得します。
- 続けて、オペレーションでMisocaの「特定の取引先に紐づく送り先IDを取得」アクションを設定します。
- 最後に、オペレーションでMisocaの「見積書を作成」アクションを設定し、Notionから取得した情報をもとに見積書を自動で作成します。
■このワークフローのカスタムポイント
- Notionでレコード情報を取得する際に、操作対象としたいデータベースなどを任意で設定してください。
- Misocaで見積書を作成する際に、自動入力したい取引先情報や送り先IDなどを任意で設定してください。
■注意事項
- NotionとMisocaのそれぞれとYoomを連携してください。
- Chrome拡張機能を使用したトリガーを使用することで、Notion上から直接トリガーを起動させることができます。
- Chrome拡張機能を使ったトリガーの設定方法は「Chrome拡張機能を使ったトリガーの設定方法」をご参照ください。
- 送り先が複数ある場合は、データを操作変換するオペレーションの『リスト型のアウトプットを個々のアウトプットに分割』を用い、対象の送り先IDを個々に分割し送付したい送り先IDのみ設定することも可能です。
NotionとMisocaを使ったその他の自動化例
今回ご紹介した連携以外でも、さまざまな業務を自動化することが可能です。
もし気になるものがあればぜひこちらもお試しになってみてください!
Notionを使った自動化例
ページの作成やレコードが登録されたら、顧客管理システムや開発プラットフォームへ情報を自動登録します。
逆に、他ツールの情報をトリガーにデータを自動追加・更新します。
手動でのデータ転記が減り、業務効率が向上するでしょう。
■このテンプレートをおすすめする方
- Notionで案件管理を行い、Misocaで請求書を手作業で発行している方
- データ転記による請求書作成の工数や入力ミスを削減したい経理担当者の方
- SaaS間の連携を自動化し、請求業務全体の効率化を図りたいと考えている方
■このテンプレートを使うメリット
- Notionでの操作を起点にMisocaの請求書が自動作成されるため、これまで手作業での転記に費やしていた時間を短縮することができます。
- 手作業による情報の転記がなくなることで、金額や宛先などの入力間違いといったヒューマンエラーの発生を防ぎます。
■フローボットの流れ
- はじめに、NotionとMisocaをYoomと連携します。
- 次に、トリガーでYoomのChrome拡張機能を選択し、Notionのデータベースページでボタンをクリックした際にフローが起動するよう設定します。
- 次に、オペレーションでNotionの「レコードを取得する(ID検索)」を選択し、トリガーで取得したページのIDをもとに案件情報を取得します。
- 次に、オペレーションでMisocaの「特定の取引先に紐づく送り先IDを取得」を設定し、Notionから取得した顧客情報をもとに送り先を特定します。
- 最後に、オペレーションでMisocaの「請求書を作成」を設定し、取得した各情報をもとに請求書を自動で作成します。
■このワークフローのカスタムポイント
- Notionでトリガーやレコード取得アクションを設定する際、請求情報を管理しているデータベースや、請求書に記載したい項目(金額、品名など)を任意で設定してください。
- Misocaで請求書を作成するアクションでは、使用する請求書のテンプレートや、デフォルトで記載する品目、備考欄などを任意で設定できます。
■注意事項
- NotionとMisocaのそれぞれとYoomを連携してください。
- Chrome拡張機能を使用したトリガーを使用することで、Notion上から直接トリガーを起動させることができます。
- Chrome拡張機能を使ったトリガーの設定方法は「Chrome拡張機能を使ったトリガーの設定方法」をご参照ください。
- 送り先が複数ある場合は、データを操作変換するオペレーションの『リスト型のアウトプットを個々のアウトプットに分割』を用い、対象の送り先IDを個々に分割し送付したい送り先IDのみ設定することも可能です。
■このテンプレートをおすすめする方
- Notionで顧客管理を行い、Misocaで請求書を発行している営業やバックオフィスの方
- NotionからMisocaへの手作業での取引先情報の転記に、手間やミスを感じている方
- 取引先の情報管理から請求書発行までの一連のフローを自動化し、効率化したい方
■このテンプレートを使うメリット
- Notionに情報を追加するだけでMisocaに取引先が自動作成されるため、二重入力の手間がなくなり、作業時間を短縮できます。
- 手作業での情報転記がなくなることで、取引先情報の入力間違いや登録漏れといったヒューマンエラーを防ぎます。
■フローボットの流れ
- はじめに、NotionとMisocaをYoomと連携します。
- 次に、トリガーでNotionを選択し、「特定のデータベースから起動」を設定して、取引先情報を管理しているデータベースを指定します。
- 続いて、オペレーションでNotionの「レコードを取得する」アクションを設定し、トリガーで起動したレコードの情報を取得します。
- 最後に、オペレーションでMisocaの「取引先を作成」アクションを設定し、前のステップで取得したNotionの情報をマッピングします。
■このワークフローのカスタムポイント
- Misocaで取引先を作成する際に、Notionから取得した情報(会社名、担当者名など)をどの項目に反映させるか任意で設定できます。
- また、Notionの情報だけでなく、特定のテキストを固定値として入力するなど、登録内容を柔軟にカスタマイズすることも可能です。
■注意事項
- Notion、MisocaのそれぞれとYoomを連携してください。
- Chrome拡張機能を使用したトリガーを使用することで、Airtable上から直接トリガーを起動させることができます。
- Chrome拡張機能を使ったトリガーの設定方法は「Chrome拡張機能を使ったトリガーの設定方法」をご参照ください。
■このテンプレートをおすすめする方
- Notionで案件管理を行い、Misocaで請求書を発行している経理や営業担当の方
- 請求書作成から送付までのプロセスを手作業で行っており、効率化したいと考えている方
- 手動での請求書送付による宛先間違いや、送信漏れなどのミスを防止したい方
■このテンプレートを使うメリット
- Notionのステータス更新を起点に請求書が自動で作成・送付されるため、手作業の時間を短縮することができます。
- システムが自動で処理を行うため、手作業による請求情報の転記ミスやメールの送信漏れといったヒューマンエラーの防止に繋がります。
■フローボットの流れ
- はじめに、Notion、Misoca、OutlookをYoomと連携します
- 次に、トリガーでNotionを選択し、「特定のデータソースのページが作成・更新されたら」というアクションを設定します
- 次に、オペレーションでNotionの「レコードを取得する(ID検索)」を設定し、更新されたページの詳細情報を取得します
- 次に、オペレーションの分岐機能で、特定のステータスに変更された場合のみ後続の処理に進むよう設定します
- 次に、オペレーションでMisocaの「請求書を作成」を設定し、Notionで取得した情報を基に請求書を作成します
- 次に、オペレーションでMisocaの「請求書PDFを取得」を設定し、作成された請求書をPDFデータとして取得します
- 最後に、オペレーションでOutlookの「メールを送る」を設定し、取得した請求書PDFを添付して取引先にメールを送信します
■このワークフローのカスタムポイント
- 分岐機能の条件設定では、Notionのどのステータスになったら請求書作成のフローを起動させるか、任意で設定してください。
- Outlookの「メールを送る」オペレーションでは、送信先のメールアドレス、件名、本文を任意の内容で設定できます。Notionから取得した顧客名などを本文に含めることも可能です。
■注意事項
- NotionとMisocaとOutlookのそれぞれとYoomを連携してください。
- Microsoft365(旧Office365)には、家庭向けプランと一般法人向けプラン(Microsoft365 Business)があり、一般法人向けプランに加入していない場合には認証に失敗する可能性があります。
- トリガーは5分、10分、15分、30分、60分の間隔で起動間隔を選択できます。
- プランによって最短の起動間隔が異なりますので、ご注意ください。
- 分岐はパーソナルプラン以上のプランでご利用いただける機能(オペレーション)となっております。フリープランの場合は設定しているフローボットのオペレーションはエラーとなりますので、ご注意ください。
- パーソナルプランなどの有料プランは、2週間の無料トライアルを行うことが可能です。無料トライアル中には制限対象のアプリや機能(オペレーション)を使用することができます。
- NotionとGoogleカレンダーを併用し、タスクの二重入力に手間を感じている方
- タスクの期日を手動でカレンダー登録しており、入力漏れやミスを防ぎたい方
- チーム全体のタスク管理をよりスムーズにし、生産性を高めたいと考えている方
- Notionへのタスク登録をきっかけに、Googleカレンダーへ自動で予定が作成されるため、これまで手作業で行っていた転記作業の時間を短縮できます。
- 手作業によるカレンダーへの入力漏れや、期日の設定ミスといったヒューマンエラーを防ぎ、タスク管理を実現します。
- はじめに、NotionとGoogleカレンダーをYoomと連携します。
- 次に、トリガーでNotionを選択し、「特定のデータソースのページが作成・更新されたら」というアクションを設定します。
- 次に、オペレーションで分岐機能を設定し、カレンダーに登録したいタスクの条件を指定します。
- 次に、オペレーションでNotionの「レコードを取得する(ID検索)」アクションを設定し、タスクの詳細情報を取得します。
- 最後に、オペレーションでGoogleカレンダーの「予定を作成」アクションを設定し、取得した情報をもとにカレンダーへ予定を登録します。
■このワークフローのカスタムポイント
- Notionのトリガー設定では、連携の対象としたいデータベースを任意で設定してください。
- 分岐機能では、「期日が入力されている」や「ステータスが未着手」など、自動化を実行したい条件を任意で設定できます。
- Googleカレンダーに予定を作成する際、Notionから取得したどの情報を予定の件名や日時に反映させるかを任意で設定してください。
- Notion、GoogleカレンダーのそれぞれとYoomを連携してください。
- トリガーは5分、10分、15分、30分、60分の間隔で起動間隔を選択できます。
- プランによって最短の起動間隔が異なりますので、ご注意ください。
- 分岐はパーソナルプラン以上のプランでご利用いただける機能(オペレーション)となっております。フリープランの場合は設定しているフローボットのオペレーションはエラーとなりますので、ご注意ください。
- パーソナルプランなどの有料プランは、2週間の無料トライアルを行うことが可能です。無料トライアル中には制限対象のアプリや機能(オペレーション)を使用することができます。
■このテンプレートをおすすめする方
- NotionとGoogle スプレッドシートを併用し、見積書作成を手作業で行っている方
- 見積書の作成から顧客へのメール送信までの一連のタスクを効率化したいと考えている方
- 手作業による見積書の宛先や金額の入力ミスをなくし、業務の正確性を高めたい方
■このテンプレートを使うメリット
- Notionの情報をもとに、Google スプレッドシートでの書類作成からメール送信までを自動化できるため、これまで手作業に費やしていた時間を削減します。
- 手作業によるデータの転記が不要になるため、見積書の金額や宛名の間違いといったヒューマンエラーの発生を防ぎ、業務の品質向上に繋がります。
■フローボットの流れ
- はじめに、Gmail、Google スプレッドシート、NotionをYoomと連携します。
- 次に、トリガーでNotionを選択し、「データベース上でページを選択して起動」するよう設定します。
- オペレーションでは、トリガーで選択したページの情報を取得するために、Notionの「レコードを取得する」アクションを設定します。
- 次に、取得した情報をもとにGoogle スプレッドシートで見積書を発行するため、「書類を発行する」アクションを設定します。
- 最後に、オペレーションでGmailの「メールを送る」アクションを設定し、作成した見積書を添付して顧客に自動でメールを送信します。
■このワークフローのカスタムポイント
- Notionでレコードを取得する際に、対象のデータベースや検索条件などを任意で設定してください。
- 書類発行機能では、テンプレートとして使用するGoogle スプレッドシートの雛形を任意で設定でき、Notionから取得した情報をどのセルに反映させるかを指定できます。
- Gmailの設定では、宛先や件名、本文を自由に設定することが可能です。Notionから取得した顧客名や会社名などの情報を変数として件名や本文に差し込むこともできます。
■注意事項
- Gmail、Google スプレッドシート、NotionのそれぞれとYoomを連携してください。
- Chrome拡張機能を使用したトリガーを使用することで、Notion上から直接トリガーを起動させることができます。
- Chrome拡張機能を使ったトリガーの設定方法は「Chrome拡張機能を使ったトリガーの設定方法」をご参照ください。
- 「書類を発行する」アクションでは、任意のGoogle Driveの格納先を設定可能です。
■概要
Notionに新しいページを作成するたび、その情報を手作業でGoogle スプレッドシートに転記するのは手間がかかり、入力ミスも発生しがちではないでしょうか。
このワークフローを活用すれば、Notionでページが作成された際に、その内容をGoogle スプレッドシートへ自動で入力することが可能になり、こうした課題をスムーズに解消できます。
■このテンプレートをおすすめする方
- NotionとGoogle スプレッドシート間で日常的に情報連携を手作業で行っている方
- データ入力作業におけるヒューマンエラーを削減し、業務の正確性を高めたい方
- 定型的な転記作業から解放され、より創造的な業務に時間を割きたい方
■このテンプレートを使うメリット
- Notionにページが作成されると、自動でGoogle スプレッドシートへデータが同期されるため、これまで手作業に費やしていた時間を短縮することができます。
- 手作業によるデータ転記が不要になるため、入力間違いや情報の連携漏れといったヒューマンエラーのリスク軽減に繋がります。
■フローボットの流れ
- はじめに、NotionとGoogle スプレッドシートをYoomと連携します。
- 次に、トリガーとしてNotionを選択し、「ページが作成されたら(Webhook)」というアクションを設定します。これにより、Notionで新しいページが作成されるとフローが起動します。
- 続いて、オペレーションでNotionの「レコードを取得する(ID検索)」アクションを設定し、トリガーで検知した作成されたページの詳細情報を取得します。
- 最後に、オペレーションでGoogle スプレッドシートの「レコードを追加する」アクションを設定し、取得したNotionのページ情報を指定のスプレッドシートの新しい行に自動で追加します。
※「トリガー」:フロー起動のきっかけとなるアクション、「オペレーション」:トリガー起動後、フロー内で処理を行うアクション
■このワークフローのカスタムポイント
- Google スプレッドシートの「レコードを追加する」アクションでは、Notionのページ情報を追加したい対象のGoogle スプレッドシートのファイルIDやシート名を任意で設定してください。
- Google スプレッドシートに追加する各項目(列)には、固定のテキスト値を入力したり、前のステップで取得したNotionのページ情報(例:ページタイトル、作成日時、特定のプロパティなど)を変数として動的に埋め込むことが可能です。これにより、必要な情報を柔軟に整理できます。
■注意事項
- Notion、Google スプレッドシートのそれぞれとYoomを連携してください。
- フォームで受け付けた情報をNotionで管理しており、手入力の手間を省きたいと考えている方
- Notionを情報集約のハブとして利用し、入力作業の自動化を検討しているチームリーダーの方
- 手作業によるデータ転記での入力漏れやミスをなくし、業務の正確性を高めたい担当者の方
- フォームに回答があると自動でNotionにデータが登録されるため、これまで手作業に費やしていた時間を短縮できます。
- 手作業でのデータ転記による、入力間違いや登録漏れといったヒューマンエラーのリスク軽減に繋がります。
- はじめに、NotionをYoomと連携します。
- 次に、トリガーでフォームトリガーを選択し、「フォームに回答が送信されたら」というアクションを設定します。
- 最後に、オペレーションでNotionを選択し、「レコードを追加する」アクションを設定し、フォームの回答内容をNotionの各項目に紐付けます。
■このワークフローのカスタムポイント
- Yoomのフォームトリガーでは、問い合わせフォームやアンケートなど、用途に合わせて回答項目を自由に設定することが可能です。
- Notionのオペレーションでは、レコードを追加したいデータベースのIDを任意で設定してください。
- NotionとYoomを連携してください。
- Google スプレッドシートとNotionを併用し、情報転記に手間を感じている方
- 手作業によるデータ入力ミスをなくし、情報管理の正確性を高めたいチームの方
- タスクやプロジェクト管理のプロセスを自動化し、効率化したいと考えている方
- Google スプレッドシートに行を追加するだけでNotionのページが自動で作成されるため、これまで転記作業に費やしていた時間を削減できます
- 手作業でのデータ移行がなくなることで、コピー&ペーストのミスや入力漏れといったヒューマンエラーを防ぐことに繋がります
- はじめに、Google スプレッドシートとNotionをYoomと連携します
- 次に、トリガーでGoogle スプレッドシートを選択し、「行が追加されたら」というアクションを設定します
- 続いて、オペレーションでNotionを選択し、「ページを作成」アクションを設定します
- 最後に、オペレーションでGoogle スプレッドシートの「レコードを更新する」アクションを設定し、処理済みの行にステータスを反映させます
■このワークフローのカスタムポイント
- Notionでページを作成するオペレーションでは、ページタイトルやプロパティに任意の内容を設定できます
- Google スプレッドシートの各列から取得した値をページ内容に変数として埋め込んだり、特定のテキストを固定値として入力したりと柔軟なカスタマイズが可能です
- Google スプレッドシート、NotionのそれぞれとYoomを連携してください
- トリガーは5分、10分、15分、30分、60分の間隔で起動間隔を選択できます
- プランによって最短の起動間隔が異なりますので、ご注意ください
- Google スプレッドシートをアプリトリガーとして使用する際の注意事項は「【アプリトリガー】Google スプレッドシートのトリガーにおける注意事項」を参照してください
■このテンプレートをおすすめする方
- TypeformとNotion間のデータ転記作業を効率化したいと考えている方
- アンケートや問い合わせの回答をNotionで一元管理し、チームの情報共有を円滑にしたい方
- 手作業による入力ミスや対応漏れを防ぎ、業務の正確性を高めたいと考えている方
■このテンプレートを使うメリット
- Typeformのフォーム送信をトリガーに、自動でNotionへデータが追加されるため、これまで手作業に費やしていた転記作業の時間を短縮できます。
- 人の手によるコピー&ペースト作業が不要になるため、入力間違いや転記漏れといったヒューマンエラーのリスク軽減に繋がります。
■フローボットの流れ
- はじめに、TypeformとNotionをYoomと連携します。
- 次に、トリガーでTypeformを選択し、「フォームが送信されたら」というアクションを設定します。
- 最後に、オペレーションでNotionの「レコードを追加する」アクションを設定し、Typeformの回答内容をNotionの各項目に紐付けます。
■このワークフローのカスタムポイント
- Notionの「レコードを追加する」アクションにて、データを追加したいデータベースを任意で設定してください。
- Notionデータベースの各プロパティ(項目)に対して、Typeformから取得したどの回答情報を割り当てるかを柔軟に設定可能です。また、固定のテキストなどを設定することもできます。
■注意事項
- Typeform、NotionのそれぞれとYoomを連携してください。
- TypeformのアウトプットはJSONPathから取得可能です。
■このテンプレートをおすすめする方
- Jotformで集めた回答を手作業でNotionに転記している方
- フォームからの問い合わせや申し込みをNotionで管理しているチームの方
- データ入力の自動化によって、ヒューマンエラーをなくし業務効率を改善したい方
■このテンプレートを使うメリット
- Jotformに回答が送信されるたびに自動でNotionにデータが追加されるため、これまで手作業で行っていた転記業務の時間を削減できます
- 手作業でのデータ転記がなくなることで、入力間違いや項目漏れといったヒューマンエラーの発生を防ぎ、データの正確性を保ちます
■フローボットの流れ
- はじめに、JotformとNotionをYoomと連携します
- 次に、トリガーでJotformを選択し、「フォームが送信されたら」というアクションを設定することで、特定のフォームに回答があった際にフローが起動するようにします
- 続いて、オペレーションでJotformの「最新の回答を取得する」アクションを設定し、トリガーで検知したフォームの回答内容を取得します
- 最後に、オペレーションでNotionの「レコードを追加する」アクションを設定し、前のステップで取得した回答内容をNotionのデータベースに追加します
■このワークフローのカスタムポイント
- Jotformのトリガー設定では、連携の対象としたい任意のフォームIDを設定してください。
- Notionのオペレーションでは、レコードを追加したいデータベースIDを任意に指定します。また、データベースの各項目に登録する内容は、Jotformから取得した値を埋め込んだり、固定のテキストを入力したりと柔軟に設定が可能です。
■注意事項
- Jotform、NotionのそれぞれとYoomを連携してください。
- JotformのWebhook設定および回答取得の方法は「JotformのWebhook設定と最新回答取得方法について」をご参照ください。
Misocaを使った自動化例
請求書の作成や新規取引先が登録されたら、通知したり顧客管理システムへ情報を自動登録します。
逆に、他ツールの情報をトリガーに請求書や見積を自動作成することも可能です。
定型作業がなくなり、コア業務に集中する時間を増やすことができるでしょう。
- Misocaでの請求書発行後、Slackでの手動通知に手間を感じている経理や営業担当者の方
- 請求書の発行状況をスムーズに把握し、チーム内の連携を円滑にしたいと考えている方
- 請求書発行に関する手作業での連絡業務を自動化し、業務の効率化を目指している方
- Misocaでの請求書作成をトリガーに、関連するSlackチャンネルへ自動で通知されるため、これまで情報共有に費やしていた時間を短縮できます。
- 手動での連絡による通知漏れや共有の遅延といったヒューマンエラーを防ぎ、確実な情報共有の仕組みを構築できます。
- はじめに、MisocaとSlackをYoomと連携します。
- 次に、トリガーでMisocaを選択し、「請求書が新たに作成されたら」というアクションを設定します。
- 最後に、オペレーションでSlackを選択し、「チャンネルにメッセージを送る」アクションを設定します。
■このワークフローのカスタムポイント
- Slackで通知を送るチャンネルは、お使いの環境に合わせて任意で設定することが可能です。
- 通知するメッセージの本文も自由にカスタマイズできるため、伝えたい内容に合わせて設定してください。
- Misoca、SlackのそれぞれとYoomを連携してください。
- トリガーは5分、10分、15分、30分、60分の間隔で起動間隔を選択できます。
- プランによって最短の起動間隔が異なりますので、ご注意ください。
■概要
Misocaで請求書を作成した後、その情報をSalesforceに手入力する作業は、手間がかかり、入力ミスも起こりやすいのではないでしょうか。特に請求業務と顧客管理を別々のSaaSで行っている場合、二重入力の手間やデータの不整合は業務効率を低下させる要因となります。このワークフローを活用すれば、Misocaで請求書が作成されると同時にSalesforceへレコードが自動で作成され、こうした課題をスムーズに解消できます。
■このテンプレートをおすすめする方
- MisocaとSalesforceを利用し、請求情報と顧客情報管理を手作業で行っている方
- 請求書発行から顧客情報更新までのリードタイム短縮と効率化を目指す営業担当
- 手作業によるデータ入力ミスを減らし、業務の正確性を高めたいと考えている経理担当
■このテンプレートを使うメリット
- Misocaでの請求書作成をトリガーに、Salesforceへ関連情報が自動で記録されるため、これまで手作業に費やしていたデータ入力時間を短縮できます。
- 手作業による転記ミスや入力漏れといったヒューマンエラーのリスクを軽減し、顧客情報の正確性を保つことに繋がります。
■フローボットの流れ
- はじめに、MisocaとSalesforceをYoomと連携します。
- 次に、トリガーでMisocaを選択し、「請求書が新たに作成されたら」というアクションを設定します。これにより、Misocaで新しい請求書が作成されるとフローボットが起動します。
- 最後に、オペレーションでSalesforceを選択し、「カスタムオブジェクトのレコードを作成」アクションを設定します。Misocaから取得した請求書情報を元に、Salesforce内に新しいレコードが作成されます。
※「トリガー」:フロー起動のきっかけとなるアクション、「オペレーション」:トリガー起動後、フロー内で処理を行うアクション
■このワークフローのカスタムポイント
- Salesforceの「カスタムオブジェクトのレコードを作成」アクションでは、どのオブジェクトにレコードを作成するかを指定できます。
- Salesforceに作成するレコードの各項目に対して、Misocaの請求書情報から取得したどの値を割り当てるか、または固定値を設定するかなどを任意でカスタマイズすることが可能です。例えば、請求金額や顧客名、請求日といった情報を連携できます。
■注意事項
- Misoca、SalesforceのそれぞれとYoomを連携してください。
- トリガーは5分、10分、15分、30分、60分の間隔で起動間隔を選択できます。
- プランによって最短の起動間隔が異なりますので、ご注意ください。
- 【Salesforce】はチームプラン・サクセスプランでのみご利用いただけるアプリとなっております。フリープラン・ミニプランの場合は設定しているフローボットのオペレーションやデータコネクトはエラーとなりますので、ご注意ください。
- チームプランやサクセスプランなどの有料プランは、2週間の無料トライアルを行うことが可能です。無料トライアル中には制限対象のアプリを使用することができます。
- Misocaで作成した見積書情報を、手作業でMicrosoft Teamsに共有している方
- 見積書の作成や更新に関する情報の、チーム内での共有漏れや遅延を防ぎたい方
- 営業部門と関連部署間での情報連携を、より迅速かつ正確に行いたいと考えている方
- Misocaで見積書が作成されると、自動でMicrosoft Teamsに通知が飛ぶため、手動での共有作業に費やしていた時間を短縮することができます。
- システムが自動で通知を行うことで、共有漏れや宛先間違いといったヒューマンエラーを防ぎ、情報連携を実現します。
- はじめに、MisocaとMicrosoft TeamsをYoomに連携します。
- 次に、トリガーでMisocaを選択し、「見積書が作成または更新されたら」というアクションを設定します。
- 続けて、オペレーションで分岐機能を設定し、特定の条件に合致した場合のみ後続のアクションが実行されるようにします。
- 最後に、オペレーションでMicrosoft Teamsを選択し、「チャネルにメッセージを送る」アクションを設定して、任意のチャネルへ通知を送信します。
■このワークフローのカスタムポイント
- 分岐機能では、特定の金額以上の見積書のみ通知するなど、後続のアクションを実行するための条件を任意で設定してください。
- Microsoft Teamsの通知設定では、メッセージを送付するチャネルや、見積書の内容を差し込んだ通知本文を任意で設定することが可能です。
- Misoca、Microsoft TeamsのそれぞれとYoomを連携してください。
- トリガーは5分、10分、15分、30分、60分の間隔で起動間隔を選択できます。
- プランによって最短の起動間隔が異なりますので、ご注意ください。
- Microsoft365(旧Office365)には、家庭向けプランと一般法人向けプラン(Microsoft365 Business)があり、一般法人向けプランに加入していない場合には認証に失敗する可能性があります。
- 分岐はパーソナルプラン以上のプランでご利用いただける機能(オペレーション)となっております。フリープランの場合は設定しているフローボットのオペレーションはエラーとなりますので、ご注意ください。
- パーソナルプランなどの有料プランは、2週間の無料トライアルを行うことが可能です。無料トライアル中には制限対象のアプリや機能(オペレーション)を使用することができます。
■概要
Misocaで請求書を作成するたびに、freee会計へ手動で取引情報を入力する作業は、手間がかかるだけでなく、入力ミスも起こりがちではないでしょうか。このワークフローを活用すれば、Misocaで請求書が作成された際に、その情報を基にしてfreee会計へ未決済取引を自動で登録するため、これらの課題をスムーズに解消し、経理業務の効率化に貢献します。
■このテンプレートをおすすめする方
- Misocaとfreee会計間で請求情報を手作業で連携している経理担当の方
- 請求書発行後の会計処理における入力漏れやミスを削減したい方
- 月次決算業務の効率化を目指し、定型業務の自動化を推進したい方
■このテンプレートを使うメリット
- Misocaで請求書が作成されると、freee会計へ自動で未決済取引が登録されるため、手作業による転記時間を短縮できます。
- 手入力に伴う金額や取引先の入力間違い、登録漏れといったヒューマンエラーの発生を防ぎ、正確な会計処理を実現します。
■フローボットの流れ
- はじめに、Misocaとfreee会計をYoomと連携します。
- 次に、トリガーでMisocaを選択し、「請求書が新たに作成されたら」というアクションを設定します。
- 続いて、オペレーションでAI機能を選択し、「正規表現によるデータの置換」アクションを設定し、Misocaから取得した請求書情報から特定のテキストデータを抽出し、freee会計に登録する情報として整形します。
- 次に、オペレーションでfreee会計を選択し、「取引先の検索」アクションを設定し、Misocaの請求先情報などを基にfreee会計に登録されている取引先を検索します。
- 最後に、オペレーションで再度freee会計を選択し、「未決済取引の登録」アクションを設定し、整形および検索した情報を基に未決済取引を登録します。
※「トリガー」:フロー起動のきっかけとなるアクション、「オペレーション」:トリガー起動後、フロー内で処理を行うアクション
■このワークフローのカスタムポイント
- Misocaをトリガーとして設定する際、Yoomが新しい請求書の作成を検知するポーリング間隔(起動間隔)を、業務の頻度やリアルタイム性の要求度に応じて任意で調整することが可能です。
- AI機能の「正規表現によるデータの置換」オペレーションでは、Misocaから取得した請求書データの中から、具体的にどの文字列パターンを対象に置換処理を行うか、また置換後の文字列をどのようにするかを、ユーザーの具体的なデータ形式や整形ルールに合わせて詳細に設定できます。
■注意事項
- Misoca、freee会計のそれぞれとYoomを連携してください。
- トリガーは5分、10分、15分、30分、60分の間隔で起動間隔を選択できます。
- プランによって最短の起動間隔が異なりますので、ご注意ください。
■概要
Misocaでの請求書発行後、入金確認を経てfreee会計へ取引登録する作業は、正確性が求められるものの、手作業では時間もかかり入力ミスのリスクも伴うのではないでしょうか。 このワークフローを活用すれば、Misocaで請求書が入金済みに更新されたタイミングで、自動的にfreee会計に決済済み取引として登録処理を行うため、経理業務の負担を軽減し、よりスムーズな月次処理に貢献します。
■このテンプレートをおすすめする方
- Misocaとfreee会計間で、請求・入金情報を手作業で連携している経理担当者の方
- 請求書の入金ステータス変更から会計処理までの一連の流れを自動化したい方
- 日々の定型業務の時間を削減し、コア業務へ集中できる環境を整えたい方
■このテンプレートを使うメリット
- Misocaで請求書が入金済みに更新されると、freee会計へ自動で情報が連携されるため、これまで手作業に費やしていたデータ入力の時間を短縮できます。
- システム間で情報が直接連携されることで、手作業による転記ミスや計上漏れといったヒューマンエラーの発生リスクを抑えることに繋がります。
■フローボットの流れ
- はじめに、Misocaおよびfreee会計をYoomと連携します。
- 次に、トリガーとしてMisocaを選択し、「請求書が更新されたら(請求済みステータスの場合のみ起動)」アクションを設定します。これにより、Misoca上の請求書ステータスが「入金済み」などに更新されたことを検知してフローが自動で開始されます。
- 続いてオペレーションで、分岐機能を設定し、例えば特定の請求金額以上の場合のみ処理を進めるなど、任意の条件で処理の流れをコントロールできるようにします。
- 必要に応じて、オペレーションでAI機能の「正規表現によるデータの置換」アクションを追加し、Misocaから取得したデータの中から、freee会計への登録に必要な情報のみを抽出したり、特定の形式に整形したりします。
- 次に、オペレーションでfreee会計の「取引先の検索」アクションを設定し、Misocaの請求情報に含まれる取引先名などをもとに、freee会計に登録済みの取引先情報を検索します。
- 最後に、オペレーションでfreee会計の「決済済みの取引の登録」アクションを設定し、Misocaから連携された情報と、検索した取引先情報をもとに、決済済みの取引としてfreee会計へ自動で登録します。
※「トリガー」:フロー起動のきっかけとなるアクション、「オペレーション」:トリガー起動後、フロー内で処理を行うアクション
■このワークフローのカスタムポイント
- フローの途中に組み込まれている分岐機能では、Misocaから取得する請求書の金額、特定の取引先、あるいは請求書に含まれる品目など、ユーザーの業務運用に合わせた柔軟な条件設定が可能です。これにより、特定の条件に合致する請求情報のみを自動処理の対象とすることができます。
■注意事項
- Misoca、freee会計のそれぞれとYoomを連携してください。
- トリガーは5分、10分、15分、30分、60分の間隔で起動間隔を選択できます。
- プランによって最短の起動間隔が異なりますので、ご注意ください。
- 分岐はミニプラン以上のプランでご利用いただける機能(オペレーション)となっております。フリープランの場合は設定しているフローボットのオペレーションはエラーとなりますので、ご注意ください。
- ミニプランなどの有料プランは、2週間の無料トライアルを行うことが可能です。無料トライアル中には制限対象のアプリや機能(オペレーション)を使用することができます。
■概要
Misocaで納品書を発行した後、手動でPDFをダウンロードしてGoogle Driveに保存する作業に手間を感じていませんか。
この定型的な作業は、多忙な際にはつい後回しになったり、保存漏れが発生したりする可能性もあります。
このワークフローを活用すれば、Misocaで納品書が作成されると自動でPDFを取得し、指定のGoogle Driveフォルダに保存するため、納品書のPDF管理に関する手作業をなくし、業務を効率化します。
■このテンプレートをおすすめする方
- MisocaとGoogle Driveを利用して納品書を管理している経理や営業担当の方
- Misocaで発行した納品書のPDF化と共有を手作業で行い、非効率を感じている方
- 請求や納品に関する一連のバックオフィス業務の自動化を検討している方
■このテンプレートを使うメリット
- Misocaで納品書が作成されると自動でPDFがGoogle Driveに保存されるため、これまで手作業に費やしていた時間を短縮できます
- 手作業によるファイルの保存漏れや、誤ったフォルダへの格納といったヒューマンエラーのリスクを軽減し、ファイル管理の正確性を高めます
■フローボットの流れ
- はじめに、MisocaとGoogle DriveをYoomと連携します
- 次に、トリガーでMisocaを選択し、「納品書が新たに作成されたら」というアクションを設定します
- 次に、オペレーションでMisocaの「納品書PDFを取得」アクションを設定し、トリガーで取得した納品書情報を紐付けます
- 最後に、オペレーションでGoogle Driveの「ファイルをアップロードする」アクションを設定し、3で取得したPDFファイルを指定のフォルダにアップロードします
※「トリガー」:フロー起動のきっかけとなるアクション、「オペレーション」:トリガー起動後、フロー内で処理を行うアクション
■このワークフローのカスタムポイント
- Google Driveの「ファイルをアップロードする」設定で、納品書のPDFを格納したいフォルダを任意で指定してください
■注意事項
- Misoca、Google DriveのそれぞれとYoomを連携してください。
- トリガーは5分、10分、15分、30分、60分の間隔で起動間隔を選択できます。
- プランによって最短の起動間隔が異なりますので、ご注意ください。
ダウンロード可能なファイル容量は最大300MBまでです。アプリの仕様によっては300MB未満になる可能性があるので、ご注意ください。 - トリガー、各オペレーションでの取り扱い可能なファイル容量の詳細は下記をご参照ください。
https://intercom.help/yoom/ja/articles/9413924
- Misocaとfreee会計を利用し、請求から入金管理までを担当している経理担当者の方
- 請求書発行後の会計ソフトへのデータ転記作業に、手間や二重入力のリスクを感じている方
- 手作業による定型業務を自動化し、よりコアな業務に集中したいと考えている方
- Misocaのステータス変更をトリガーにfreee会計へ自動で取引登録されるため、これまで手作業で行っていたデータ入力の時間を削減できます
- システム間でデータが直接連携されるため、手作業による転記ミスや計上漏れといったヒューマンエラーの防止に繋がります
- はじめに、Misocaとfreee会計をYoomと連携します
- 次に、トリガーでMisocaを選択し、「請求書ステータスが請求済みとなったら」というアクションを設定します
- オペレーションで計算機能を設定し、Misocaの請求書から取得した金額の小数点以下を切り捨てます
- 次に、freee会計で請求先の取引先が存在するかを検索し、その結果に応じて処理を分岐させます
- 取引先が存在しない場合は、freee会計で取引先を新規作成するアクションを設定します
- 最後に、freee会計の「未決済取引の登録」アクションを設定し、取引情報を登録します
■このワークフローのカスタムポイント
- freee会計で取引先を検索した後、ヒットしなかった場合の分岐条件は、運用に合わせて任意で設定が可能です
- freee会計に登録する未決済取引の各種情報(勘定科目、品目、部門など)は、Misocaから取得した情報をもとに任意で設定できます
- Misoca、freee会計のそれぞれとYoomを連携してください
- トリガーは5分、10分、15分、30分、60分の間隔で起動間隔を選択できます
- プランによって最短の起動間隔が異なりますので、ご注意ください
- 分岐はミニプラン以上のプランでご利用いただける機能(オペレーション)となっております。フリープランの場合は設定しているフローボットのオペレーションはエラーとなりますので、ご注意ください
- ミニプランなどの有料プランは、2週間の無料トライアルを行うことが可能です。無料トライアル中には制限対象のアプリや機能(オペレーション)を使用することができます
- Misocaを使った見積書作成を手作業で行っており、効率化したい方
- Yoomデータベースで顧客管理を行い、Misocaとの連携を検討している方
- 手作業による見積書作成の入力ミスや作成漏れを防ぎたいと考えている方
- Yoomデータベースのレコードを選択するだけでMisocaの見積書が自動で作成されるため、これまで手作業に費やしていた時間を短縮できます。
- 手作業による情報の転記が減ることで、入力間違いや項目漏れといったヒューマンエラーのリスク軽減に繋がります。
- はじめに、お使いのMisocaアカウントをYoomと連携します。
- 次に、トリガーでYoomデータベースを選択し、「データベースから対象のレコードを選択する」アクションを設定します。
- 次に、オペレーションでMisocaの「取引先を作成」アクションを設定し、データベースの情報をマッピングします。
- 次に、オペレーションでMisocaの「送り先を作成」アクションを設定します。
- 最後に、オペレーションでMisocaの「見積書を作成」アクションを設定し、見積書の詳細情報を指定します。
■このワークフローのカスタムポイント
- トリガーで設定するYoomデータベースは、見積書作成の元データとしたいデータベースを任意で設定してください。
- Misocaの各オペレーションで設定する連携情報は、Yoomデータベースのどの情報を反映させるか任意で設定が可能です。
- MisocaのそれぞれとYoomを連携してください。
- Google DriveとMisocaを用いて、手作業で見積書を作成している営業担当者や経理担当者の方
- 見積書作成時の転記作業に時間がかかり、入力ミスなどのヒューマンエラーを減らしたいと考えている方
- 見積書作成業務の属人化を防ぎ、チーム全体の業務効率を改善したいと考えているマネージャーの方
- Google Driveにファイルが追加されると自動で見積書が作成されるため、これまで手作業で行っていたデータ転記の時間を短縮できます。
- 手作業による転記が減ることで、入力間違いや項目漏れといったヒューマンエラーのリスクを軽減し、スムーズな見積書作成に繋がります。
- はじめに、Google DriveとMisocaをYoomと連携します
- 次に、トリガーでGoogle Driveを選択し、「新しくファイル・フォルダが作成されたら」というアクションを設定します
- 続いて、オペレーションでGoogle Driveの「画像ファイル・PDFファイルをダウンロードする」アクションを設定し、トリガーで検知したファイルを指定します
- 次に、OCR機能の「画像・PDFから文字を読み取る」アクションを設定し、ダウンロードしたファイルからテキスト情報を抽出します
- 次に、Misocaの「特定の取引先に紐づく送り先IDを取得」アクションを設定し、見積書の送付先を特定します
- 最後に、Misocaの「見積書を作成」アクションを設定し、OCRで読み取った情報などを連携して見積書を作成します
■このワークフローのカスタムポイント
- OCR機能で読み取るテキストの対象範囲は、アップロードするファイルのフォーマットに応じて任意で設定してください。
- Misocaで見積書を作成する際に連携する情報は、OCRで読み取ったどの情報をどの項目に反映させるかなど、任意で設定することが可能です。
- Google Drive、MisocaのそれぞれとYoomを連携してください。
- トリガーは5分、10分、15分、30分、60分の間隔で起動間隔を選択できます。
- プランによって最短の起動間隔が異なりますので、ご注意ください。
- ダウンロード可能なファイル容量は最大300MBまでです。アプリの仕様によっては300MB未満になる可能性があるので、ご注意ください。
- トリガー、各オペレーションでの取り扱い可能なファイル容量の詳細は「ファイルの容量制限について」をご参照ください。
■このテンプレートをおすすめする方
- Google スプレッドシートとMisocaを併用し、取引先登録を手作業で行っている方
- 取引先情報の転記作業に時間がかかり、コア業務に集中できていないと感じる方
- 手作業による入力ミスをなくし、請求書発行業務の正確性を高めたいと考えている方
■このテンプレートを使うメリット
- Google スプレッドシートに行が追加されると自動でMisocaに取引先が登録されるため、これまで手作業に費やしていた時間を短縮できます。
- 手作業でのデータ転記がなくなることで、会社名や住所などの入力間違いや登録漏れといったヒューマンエラーの発生を防ぎます。
■フローボットの流れ
- はじめに、Google スプレッドシートとMisocaをYoomと連携します。
- 次に、トリガーでGoogle スプレッドシートを選択し、「行が追加されたら」というアクションを設定します。
- 続いて、オペレーションでMisocaの「取引先を作成」アクションを設定し、トリガーで取得したスプレッドシートの情報を各項目に紐付けます。
- 最後に、オペレーションでGoogle スプレッドシートの「レコードを更新する」アクションを設定し、Misocaへの登録が完了したことを示すステータスなどを書き込みます。
■このワークフローのカスタムポイント
- Google スプレッドシートのトリガー設定では、連携の対象となるスプレッドシート、シート、そして情報を取得したいテーブルの範囲を任意で設定してください。
- Misocaで取引先を作成するアクションでは、会社名や住所などの各項目に、固定値やスプレッドシートから取得した情報を自由にマッピングできます。
- Google スプレッドシートのレコードを更新するアクションでは、どのスプレッドシートやシートの、更新をしたい特定のセルなどを任意で指定可能です。
■注意事項
- Google スプレッドシート、MisocaのそれぞれとYoomを連携してください。
- Google スプレッドシートをアプリトリガーとして使用する際の注意事項は「【アプリトリガー】Google スプレッドシートのトリガーにおける注意事項」を参照してください。
- トリガーは5分、10分、15分、30分、60分の間隔で起動間隔を選択できます。
- プランによって最短の起動間隔が異なりますので、ご注意ください。
まとめ
NotionとMisocaの連携を自動化することで、作業時間を短縮し、ヒューマンエラーも防止できます。
これにより、アプリケーションを立ち上げることなく、簡単に見積書を作成できるので、作業の簡素化が見込めるでしょう!
Yoomを使えば、プログラミングの知識がなくても、この連携を簡単に実現できます。
初心者でも安心して取り組めるので、ぜひこの記事を参考に2週間の無料トライアルを体験してみてください。
また、Yoomでは、今回紹介したフロー以外にも多数のフローテンプレートが用意されています。
あなたの業務フローにぴったりのものが見つかるはずです。
もし自動化に少しでも興味を持っていただけたなら、ぜひこちらから無料登録して、Yoomによる業務効率化を体験してみてください!
よくあるご質問
Q:作成後の見積書を自動でメール送信できる?
A:
今回紹介したフローボットの後に、「見積書PDFを取得」アクションを追加した後、「メールを送る」アクションを追加してお試しください。
メールに見積書PDFのデータを添付することが可能です。
Q:見積書を作成する前に承認フローを挟める?
A:
可能です。その場合は見積書を作成するアクションの前に、「担当者へ対応を依頼する」か「承認を依頼する」アクションを追加してお試しください。
Q:連携が失敗した場合の対処法は?
A:
連携に失敗した場合は、フローボット内でエラーとして記録されます。
通知設定をしておけばチャットツールなどに自動通知されます。
なお、自動での再実行は行われないため、エラー発生時は手動で再実行が必要です。
認証切れなどが原因の場合は、マイアプリから再連携を試み、上書きすることで復旧可能です。
ヘルプページで解決しない場合は、サポート窓口を利用することもできます。
プログラミング知識なしで手軽に構築できます。