How to Integrate Applications

2024/10/10

How to integrate Airtable with WooCommerce to automatically add product information to WooCommerce when registered in Airtable

y.matsumoto

Using WooCommerce allows you to build an e-commerce site tailored to your business needs, making it very convenient.
However, if you have a large number of products, manually adding product information to WooCommerce each time can be cumbersome.
By integrating Airtable with WooCommerce, we will introduce a method to automatically add product information to WooCommerce once it is registered in Airtable.
Utilizing this method enables centralized data management and can improve operational efficiency.
Let's use the no-code tool Yoom to integrate applications and easily automate your operations.

Benefits of Integrating Airtable with WooCommerce

Benefit 1: Improve Operational Efficiency!

After registering product information in Airtable, manually adding the product information to WooCommerce is very labor-intensive.
Especially when there are many products to register, errors are more likely to occur when transcribing each product's information.
By integrating Airtable with WooCommerce, you can automatically reflect product information in WooCommerce once it is registered in Airtable, reducing manual input tasks.
This eliminates the need for staff to input product data manually, reducing the risk of human error.

Benefit 2: Enhance Data Consistency!

When managing product information in Airtable, having a system that automatically adds product information to WooCommerce is crucial, especially in e-commerce site operations.
If the registered product information differs between Airtable and WooCommerce, customers may purchase products based on incorrect information, leading to complaints or returns.
Integrating Airtable with WooCommerce resolves the issue of double management of product information, ensuring that the product information registered in Airtable is directly reflected in WooCommerce, reducing discrepancies.
This enhances data consistency and reduces input errors during registration, improving business reliability.
Additionally, since Airtable and WooCommerce data are always synchronized, it reduces the risk of delays or omissions in information that can occur with manual tasks.

[What is Yoom]

How to Create an Integration Flow Between Airtable and WooCommerce Using Yoom

Now, let's introduce how to integrate Airtable and WooCommerce using Yoom!
We will clearly explain the steps to create a flow bot that achieves the above benefits, specifically "adding products to WooCommerce when they are registered in Airtable."
Anyone can easily create it using a pre-configured template, so please give it a try.

〈Preparation: Register with Yoom〉
1. Click on "View Details" on the template banner below.
2. Click the "Try This Template" button on the redirected page.
3. Register with Yoom. (If you are already registered, please log in.)

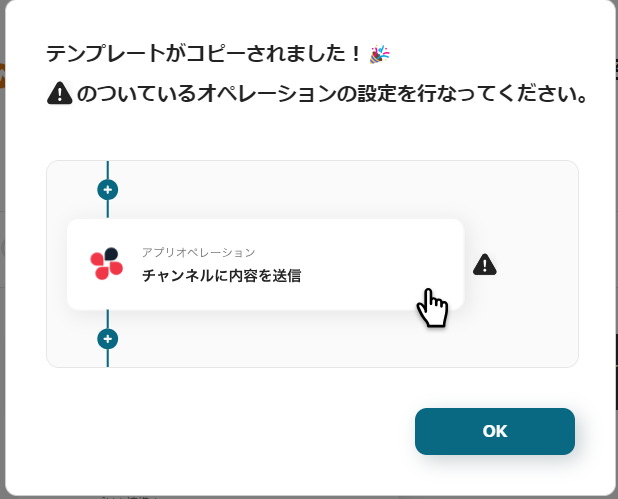
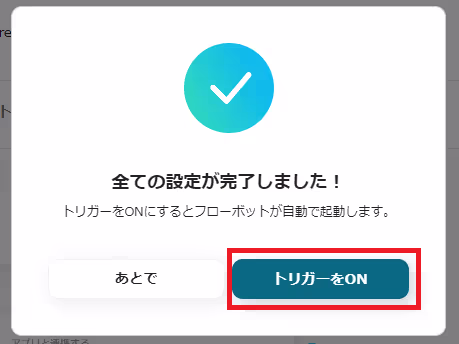
Once the template is copied, this screen will be displayed!
Click "OK" to start editing.

Step 1: Connect Airtable and WooCommerce to My Apps

First, register Airtable and WooCommerce in Yoom's My Apps.

1. How to register Airtable


Click "My Apps" on the left column and search for Airtable from "New Connection".

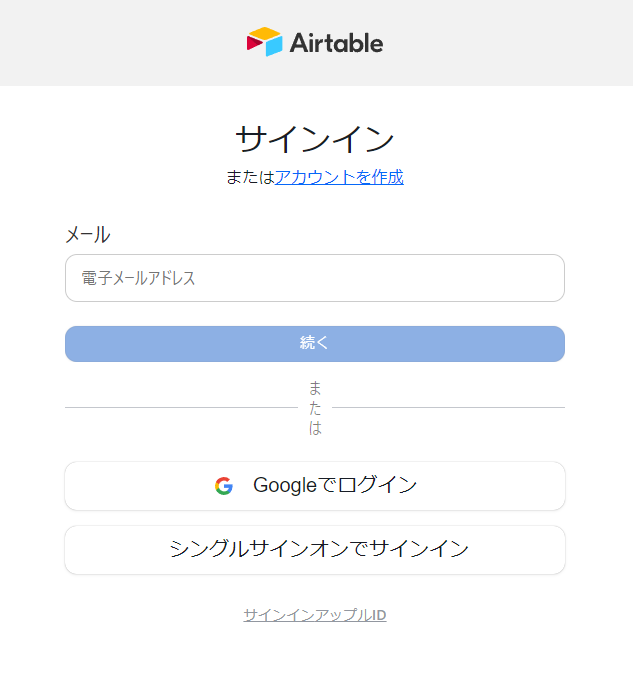
The above screen will be displayed, so please sign in with the account you want to use.

After signing in, you will transition to the above screen.

Click "Add Base" and select the base you want to use this time.

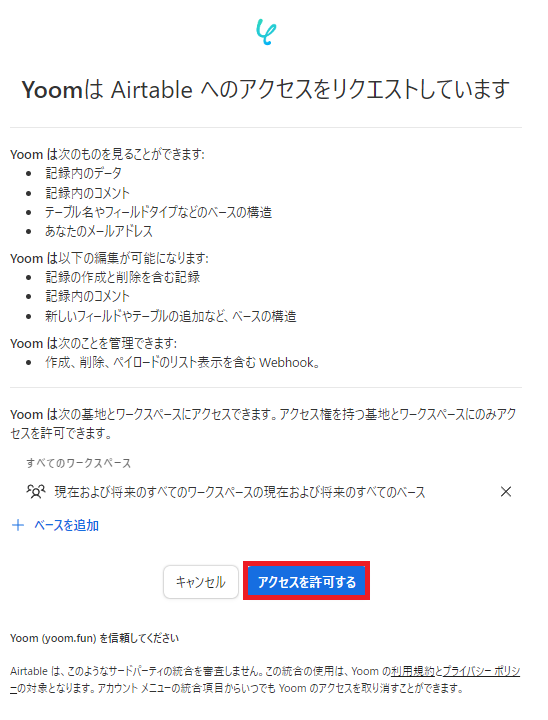
Click "Allow Access".

This completes the registration of Airtable in My Apps.

2. How to register WooCommerce
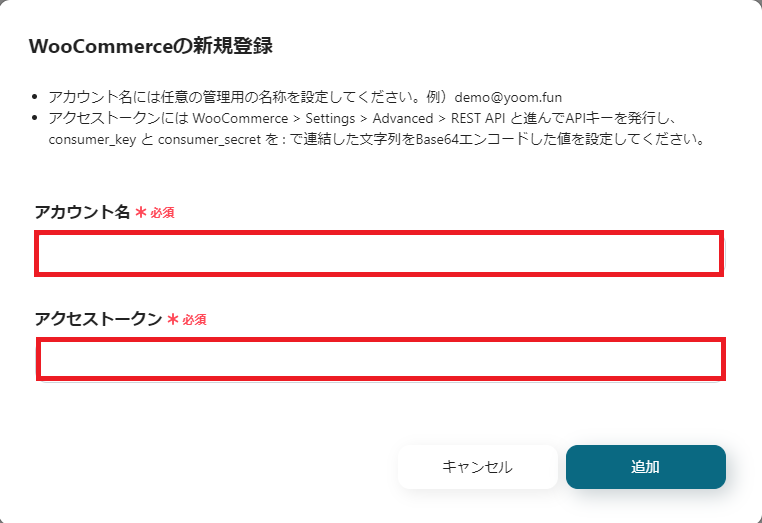
Next, search for WooCommerce from "New Connection".

※Reference: How to register kintone My Apps

Enter your account and access token, and click "Add".
If you are unsure about Base64 encoding, please refer to this article.

This completes the registration of WooCommerce in My Apps as well.

The icons for Airtable and WooCommerce will be displayed in My Apps, so please check them.

Next, copy the template to My Project and create a Flowbot.
If you haven't copied it yet, please copy the Flowbot template from below.

1.バナーにカーソルを合わせ「詳細を見る」をクリック
2.移行したページの「このテンプレートを試す」をクリック
3.Yoomの登録を行う
※既に登録が完了している場合はログイン画面が表示されるので、ログインしましょう。

ステップ2:Airtableにレコードが追加されたら起動するトリガーの設定

まずは、「レコードが登録されたら」という項目を編集します。

このページは、すでに設定されています。
連携するアカウント情報に問題がなければ、そのまま「次へ」をクリックして進んでください。

トリガーの起動間隔は5分、10分、15分、30分、60分の間隔から任意で選択できます。
※注意事項)プランによって最短の起動間隔が異なりますので、ご注意ください。
ベースID・テーブルID・Created Timeのフィールド名は、画面の注釈を参考に入力してください。

全ての項目の入力が完了したら、Airtableにサンプルのレコードを追加してください。
テストが成功すると、先ほど追加したAirtableのレコード情報がアウトプットとして反映されます。
アウトプットを確認したら、「保存する」をクリックしてください。

ステップ3:WooCommerceに商品を作成する

次に、「商品を作成」という項目を編集しましょう。

このページは、すでに設定されています。
連携するアカウント情報に問題がなければ、そのまま「次へ」をクリックしてください。

商品名は、以下の手順で設定してください。
※設定方法)枠内をクリックし「レコードが登録されたら」の中にある「商品名」をクリックしてください。{{商品名}}と入力されます。
※解説)上記のように設定することで、Airtableに新しいレコードが登録されたら「商品名」を自動で取得することができます。

商品タイプと通常価格も、先ほど同様に設定してください。

設定が完了したら、テストを行い「保存する」をクリックしてください。

最後に、上記画面が表示されたら「トリガーをON」にし、フローボットを起動させてください。

これで、「Airtableで商品情報が登録されたらWooCommerceにも追加する」フローボットの完成です。

Introduction to Other Automation Examples Using Airtable and WooCommerce

At Yoom, we offer numerous automation examples using Airtable and WooCommerce, in addition to the flow created this time.
Here, we will introduce three recommended flows, so please give them a try!

1. A flow that creates a folder in Google Drive when a client is registered in Airtable.
By utilizing this flow, you can prevent missing folder creations and improve the accuracy of information management, which is expected to enhance work efficiency.

2. This is a flow for adding to Airtable once an invoice is issued with Money Forward Kessai.
By utilizing this flow, you can eliminate the hassle of manual input and quickly share information, enabling smooth business operations.
Additionally, it is expected to improve the accuracy of information by preventing human errors in advance.

3. This is a flow that automatically adds product information registered in Notion to WooCommerce.
By utilizing this flow, you can eliminate the hassle of manual input and quickly reflect it in WooCommerce, which is expected to improve operational efficiency.

Summary

In this article, we introduced a method to automatically add product information to WooCommerce when it is registered in Airtable by integrating Airtable with WooCommerce.
Using this flow, centralized data management becomes possible, and an improvement in operational efficiency can be expected.
At Yoom, we can integrate with various tools besides Airtable and WooCommerce!
Please check out our Flowbot Template List to see what kind of operations can be automated.

The person who wrote this article
y.matsumoto
Until now, I have experienced sales and sales office work in the human resources industry. Based on my experience in my previous job, I feel that the problems faced by various companies can be reduced by “automating operations.” Through Yoom, we will continue to send out information on a daily basis so that we can solve your problems even a little bit!
Tags
Airtable
WooCommerce
Automation
Integration
App integration
No items found.
What is Yoom hyperautomation?
Conventional RPA can only automate simple repetitive tasks, and the setup process was very complicated.
With “hyperautomation,” which combines various technologies such as AI, API, RPA, and OCR, it is possible to automate many tasks that could not be realized until now more easily than before.
Don't Just Connect Apps—Automate Everything
Most tools simply connect one app to another, leaving the complex tasks to you. Yoom goes much further: From document creation and browser automation to OCR and generative AI, Yoom handles it all seamlessly in one platform.

Why settle for basic integrations? Streamline your entire workflow with Yoom’s powerful hyperautomation.
Learn more about Yoom
Helpful Materials
I understand Yoom! 3-piece set of materials
Download materials
Understand in 3 minutes! Yoom service introduction materials
Download materials
Find out by Before After! Yoom Case Study Collection
Download materials
See a list of useful materials