How to link Google Sheets with board to automatically register customer information in board when it is registered in Google Sheets
How to Integrate Applications
・
2025-02-03
How to link Google Sheets with board to automatically register customer information in board when it is registered in Google Sheets
m.wadazumi
The customer support and sales teams managing customer information require accurate data management. However, manually entering data into different tools increases the risk of input errors. This article introduces a method to automatically register customer information by integrating Google Sheets with board. This eliminates the need to manually transfer customer information, thereby enhancing data accuracy. We will explain in detail the specific automation setup and the benefits of automation.
Benefits of Integrating Google Sheets with board
Benefit 1: Reduces the burden on staff
When managing customer information manually using Google Sheets and board, it requires the effort of transferring data. However, by automating the integration of these apps, this effort can be eliminated. For example, simply registering customer information in Google Sheets will automatically reflect it in board. This means that even when registering multiple customer information, the staff only needs to enter data into Google Sheets. <span class="mark-yellow">Especially for sales and customer teams, they no longer need to spend time on data transfer tasks, allowing them to focus on sales activities and customer support.</span>
Benefit 2: Improves the accuracy of customer information
Automating the synchronization of customer information helps prevent data inconsistencies. Manually entering customer information increases the risk of omissions and errors. Therefore, <span class="mark-yellow">by leveraging automation, you can reduce errors during manual input and maintain accurate data.</span> This ensures that estimates and invoices can be created based on accurate customer information. Accurate data management is crucial as it involves important information for future operations.
[About Yoom]
How to Create a Google Sheets and board Integration Flow
This time, we will introduce the setup method for the following template: "Register a customer in board when a row is added to Google Sheets." Using this template is convenient as it eliminates the need to set up automation from scratch.
The process consists of only 5 steps, so you can set it up in 10-15 minutes.
Register Google Sheets and board as My Apps
Set a trigger to activate when a row is added in Google Sheets
Set an action to register a customer on the board
Set an action to update records in Google Sheets
Verify the automation settings between Google Sheets and the board
If you are not using Yoom, please register for free from here. If you are already using Yoom, please log in.
Step 1: Register Google Sheets and board as My Apps
Please register Google Sheets and board as My Apps to connect them to Yoom. Completing the My Apps registration first will make the automation setup smoother.
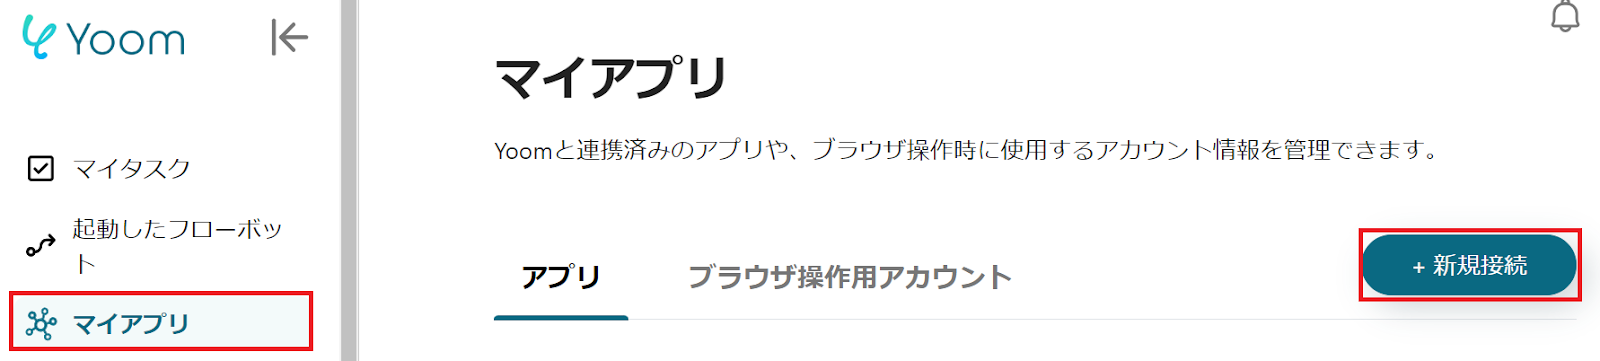
Let's register Google Sheets as My Apps. Click "My Apps" → "New Connection" on the left side of the Yoom screen. Search for Google Sheets from "Search by App Name" or find it from the app list.
The following screen will be displayed, so please log in to Google Sheets.
Next, register the board as My Apps. Refer to the Yoom Help Page for instructions on how to register.
If Google Sheets and board are displayed in My Apps, the registration is complete.
Step 2: Set a trigger to activate when a row is added in Google Sheets
To set up automation, click "Try it" on the banner below.
Read the following screen display and click "OK".
When the following screen is displayed, check the "Title" and "Description". If changes are necessary, you can make them from the screen below. First, click "When a row is added" from the Google Sheets settings.
The following screen will be displayed, so check the settings.
"Title" → Can be changed if necessary
"Account information linked with Google Sheets" → Check for discrepancies
"Trigger Action" → When a row is added
When the following screen is displayed, check the configuration method.
Move to Google Sheets and set up customer information for testing. As an example, it was set up as follows.
Return to Yoom and configure the settings on the following screen.
"Trigger Interval" → Choose from 5 minutes, 10 minutes, 15 minutes, 30 minutes, 60 minutes * The trigger interval varies depending on the plan, so please be careful.
"Spreadsheet ID", "Sheet ID" → Select from candidates or check the description to set
"Table Range (Start)" → In this case, A
"Table Range (End)" → In this case, C * Specify the alphabet of the column where the items end
"Column with Unique Values" → Specify the column where values do not duplicate * Make sure to have a column with unique values. If values are duplicated, it may not work correctly. In this case, column A for customer names was specified. Which column to specify is optional.
Once the settings are complete, click "Test" → "Test Successful" → "Save".
Step 3: Set up an action to register a customer on the board
Next, click "Register Customer" to set up the board. When the following screen is displayed, check the settings.
"Title" → Can be changed if necessary
"Account information linked with the board" → Check for discrepancies
"Action" → Register Customer
When the following screen is displayed, enter the API key obtained here.
Scroll and use the output from Google Sheets to set "Customer Name" and "Customer Abbreviation". Click the arrow in the red frame to display the output set in Google Sheets earlier.
Scroll to check the description and set the "Default Payment Terms ID". If there are other necessary items, set them. Once the settings are complete, click "Test" → "Test Successful" → "Save".
Step 4: Set up an action to update records in Google Sheets
Next, click "Update Records" to set up updating records in Google Sheets. When the following screen is displayed, check the settings.
"Title" → Can be changed if necessary
"Account information linked with Google Sheets" → Check for discrepancies
"Execution Action" → Update Records
Scroll to check the description and set up "Database Integration".
When the following screen is displayed, check the configuration method.
The following screen will be displayed, so set the "Conditions for the record you want to update". Here, use the unique value entered at the time of the trigger to search for the target record. As an example, it was set up as follows.
Scroll to check the description and set the "Values of the record after update". Since the customer ID obtained from the board will be updated, use the board's output for "Customer ID". Once the settings are complete, click "Test" → "Test Successful" → "Save".
Step 5: Verify the automation settings between Google Sheets and the board
Finally, click "Turn on Trigger" to complete the automation settings. Check if the flowbot starts correctly.
Other examples of automation using Google Sheets and the board
1. This is a flow that automatically adds a sheet to Google Sheets when a new project is registered on the board. By automatically adding sheets to Google Sheets, you can save the trouble of manually creating sheets. You can create a sheet for each new project, making it easier to manage project information.
2. This is a flow where a new project registered on the board is automatically recorded in a Google Spreadsheet. This is similar to the previous template, but it allows you to automatically transfer project information. It is recommended for those who manage project information using the board and Google Spreadsheet.
3. This is a flow where kintone records are automatically updated when a row is updated in Google Sheets. When data is updated in Google Sheets, the data in kintone is automatically updated as well. This saves the trouble of updating tasks and reduces the workload.
Summary
By integrating Google Sheets with the board, customer information registration will be automated, improving operational efficiency. Additionally, manual data entry will no longer be necessary, reducing human errors. This will help maintain data accuracy.
No special skills are required to integrate apps with Yoom. Anyone can easily operate it, so please give it a try. You can register for Yoom for free here.
The person who wrote this article
m.wadazumi
I've been working as a writer since my job in child welfare, and I'm currently writing a blog on Yoom.
While being surprised by the work efficiency improvements that can be made with Yoom, I would like to share that excitement with everyone and contribute to society.
I'll tell you about application integration and automation that even I, who has zero programming knowledge, can do.
Conventional RPA can only automate simple repetitive tasks, and the setup process was very complicated. With “hyperautomation,” which combines various technologies such as AI, API, RPA, and OCR, it is possible to automate many tasks that could not be realized until now more easily than before.
Most tools simply connect one app to another, leaving the complex tasks to you. Yoom goes much further: From document creation and browser automation to OCR and generative AI, Yoom handles it all seamlessly in one platform.
Why settle for basic integrations? Streamline your entire workflow with Yoom’s powerful hyperautomation.


.avif)
.png)
.png)


