Integrate CollaboFlow with CloudSign to send contracts via CloudSign once a request is approved in CollaboFlow.
How to Integrate Applications
・
2024/12/19
Integrate CollaboFlow with CloudSign to send contracts via CloudSign once a request is approved in CollaboFlow.
k.ueno
After reviewing the approval documents and application forms, creating a new contract and sending it to the other party involves many steps and can waste the time of the person in charge. By integrating Yoom's collaborative flow with CloudSign, you can seamlessly handle everything from contract creation to sending with just the approval of the application content. This helps prevent mistakes in contract procedures and speeds up operations. This article explains how to set up an automated flow that sends a contract via CloudSign when an application is approved in the collaborative flow, as well as the benefits of implementing it.
Recommended for:
- Those using collaborative flow and CloudSign
- Administrative staff who want to prevent omissions or input errors in contract document sending
- Sales staff who want to shorten the time spent on tasks after approval
- Those who want to improve management accuracy
- DX promotion staff considering the automation of contract administration
Benefits and examples of integrating collaborative flow and CloudSign:
1. Prevention of input errors and sending omissions
By incorporating an automated flow, the application content on the collaborative flow side is directly reflected in the contract using CloudSign. This eliminates concerns about manual input errors or sending omissions, allowing smooth contract procedures. For example, after a sales representative submits a document and the administrative staff approves it, a contract is automatically created and sent based on the application content, preventing risks such as incorrect entries in important documents. Additionally, documents are created based on accurate information, eliminating the need for double-checking.
2. Reduction of manual work
By using the approval in the collaborative flow as a trigger to automatically create and send contracts via CloudSign, the workload on the person in charge can be reduced. Previously, accounting staff had to manually perform several processes, such as verifying the application content and entering data into a new contract, and selecting the appropriate recipient. By introducing this flow, the entire process from contract creation to sending is automated with just the approval on the collaborative flow side, reducing the burden of daily tasks on the person in charge.
3. Shortening of work time
With the introduction of an automated flow, you can centrally manage everything from application approval to contract conclusion, making it easier for sales staff to understand which contracts are progressing. Additionally, by making it easier to manage contract status, the risk of business delays or contract omissions is reduced. For example, when a new employee joins, the department head sends an application related to the joining to the HR department, and once the HR staff approves it, a contract is automatically created and sent to the relevant employee. This consistent process allows for quick completion of onboarding procedures.
Now, let's create a flow bot using the "Send a contract via CloudSign when an application is approved in the collaborative flow" template.
[About Yoom]
How to send a contract via CloudSign when an application is approved in the collaborative flow:
After approving an application in the collaborative flow, receive the information via the collaborative flow API, and automatically create a contract using the Google Docs API based on that content. Then, automatically send the contract via the CloudSign API. Generally, programming knowledge is required to achieve this, but with the no-code tool Yoom, it can be easily achieved without programming knowledge.
The work until the flow is completed proceeds as follows:
- Integrate collaborative flow, Google Docs, and CloudSign with My Apps
- Copy the template
- Set the trigger in the collaborative flow and configure Google Docs, followed by setting each operation in CloudSign
- Turn on the trigger
If you are not using Yoom, please register for free from here. If you are already using Yoom, please log in.
・Integrate CollaboFlow, Google Docs, and CloudSign with My Apps
(1) First, connect CollaboFlow to My Apps. After logging into your Yoom account, click on "My Apps" on the left panel and search for CollaboFlow from "New Connection".
(2) The app icon for CollaboFlow will appear, click on it.
(3) Enter "Account Name" and "Access Token", then click [Add]. The connection to CollaboFlow is now complete.
(4) Next, search for and click on the app icon for Google Docs.
(5) Click "Sign in with Google", and you will be taken to a screen to select an account. Choose the account you want to link from the management account on the right. After selection, proceed to the sign-in screen and complete the authentication. The second connection to Google Docs is now complete.
(6) Next, let's connect CloudSign. Search for and click on the app icon for CloudSign in the same way as before.
(7) Enter "Account Name" and "Client ID", then click [Add]. For instructions on registering CloudSign with My Apps, please check this page.
After clicking, you will be taken to the My Apps screen of your Yoom account with the three apps added. Now, the three apps are connected to your Yoom account.
・Copy the Template
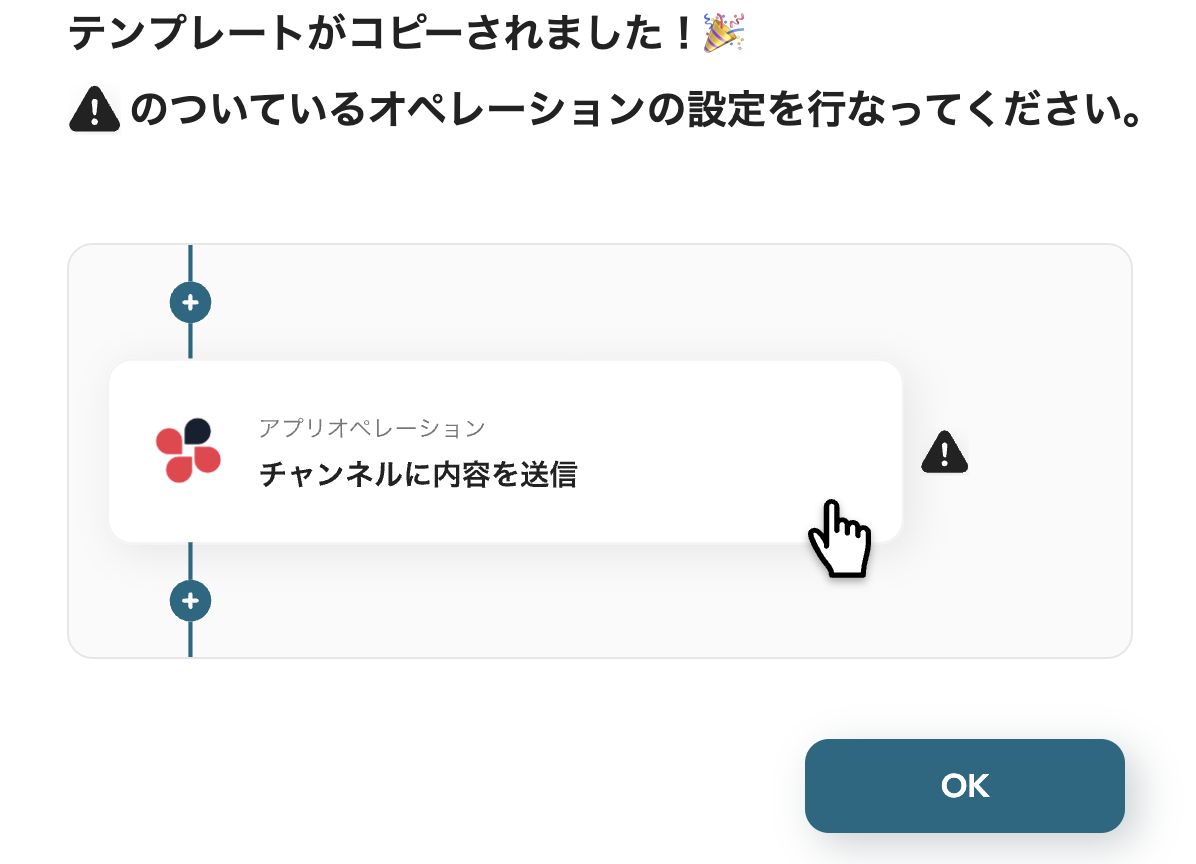
After confirming that the new connection of the target app to your Yoom account is complete, click on the icon for "Try this template" below.
The template will be copied, so click the "OK" button.
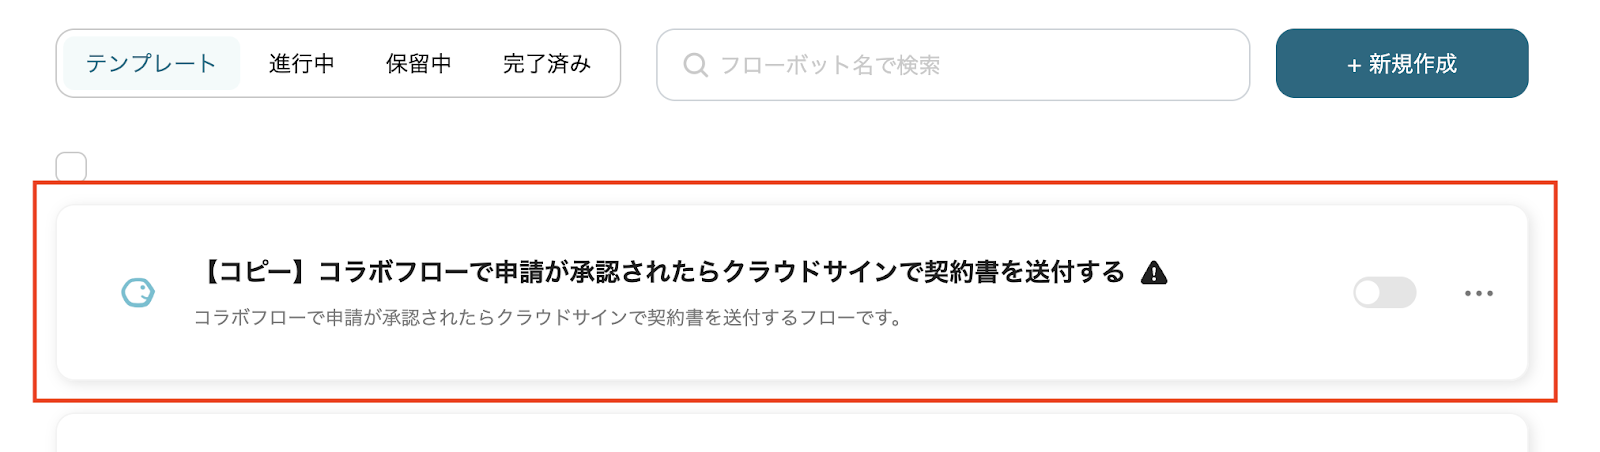
Please move to the "My Projects" screen of your Yoom account and check the template contents.
There are 7 setup flows.
・Collabo Flow Trigger Settings
(1) First, set the app trigger for the Collabo Flow.
From the My Projects on the left side of your Yoom account screen, click "【Copy】Send contract via CloudSign when application is approved in Collabo Flow".
After clicking, the template contents will be displayed as shown in the screen below.
(2) First, click the trigger "Receive Webhook from Route (Webhook Activation)". (3) Enter the account information to link with Collabo Flow and click [Next].
(4) On the next screen, you need to copy the Webhook URL and configure it in the management screen. For how to set up Webhooks in Collabo Flow, please refer to this article.
(5) After sending the Webhook event or executing the trigger event, click [Test], and if there are no issues, click [Save]. In this step, you can obtain the following information as output. The output information can be quoted and utilized in subsequent steps, as noted "This value can be used in other operations."
(6) Next, click the second action "Get Application Details".
(7) Confirm that the account information to be linked is entered and click [Next].
(8) On the next screen, enter information such as "Instance Name" and "Application Code". Clicking the input bar allows you to set it by quoting the output obtained in the previous step, as shown in the image below.
(9) After entering the information, click [Test], and if there are no issues, click [Save].
・Google Document Settings
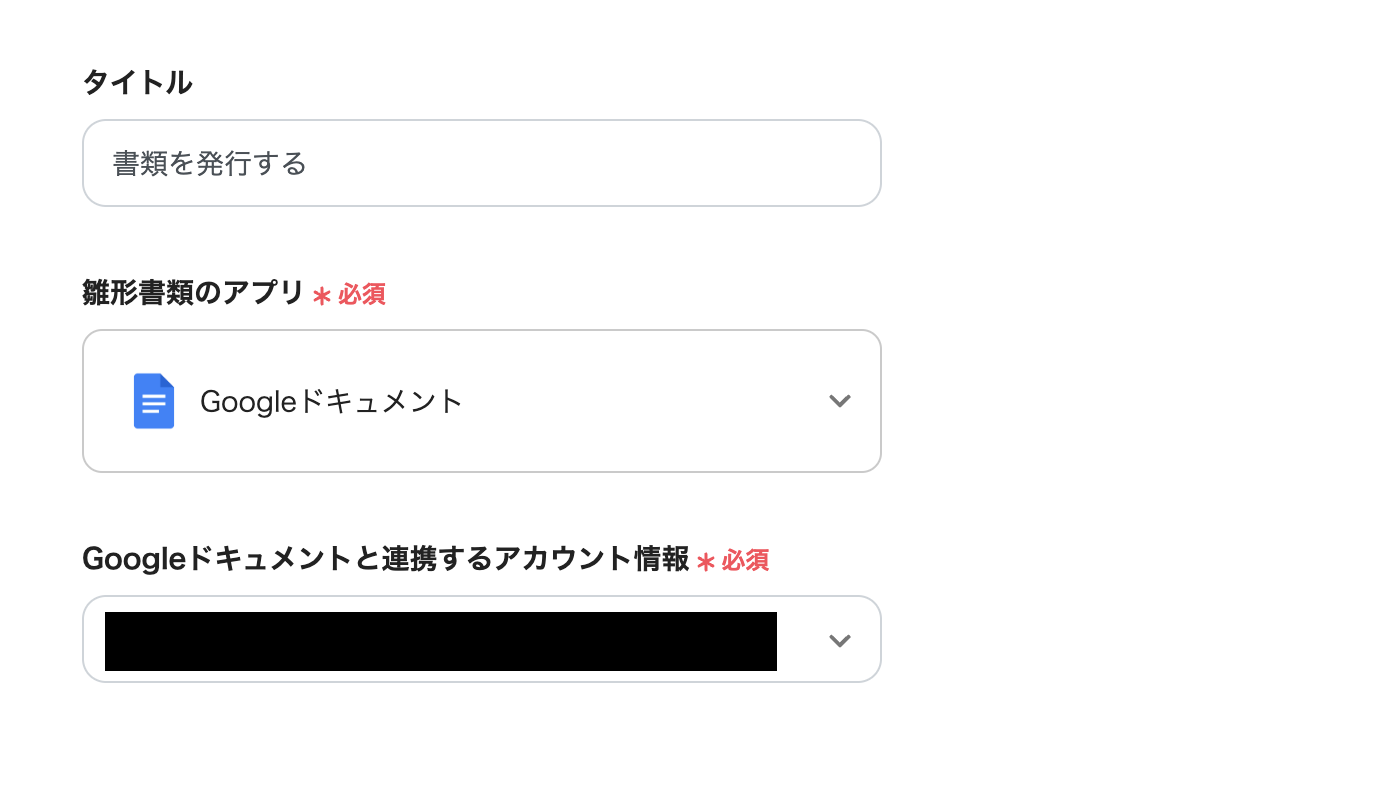
(1) Next, click the third action "Issue Document".
(2) Enter the account information to be linked and click [Next].
(3) In the "Template Document Linkage" item, clicking the input bar will expand the content obtained from the account as "candidates" as shown in the screen below, and you can select the relevant information from them.
(4) Enter information in the "Issued Document" item and click [Next].
(5) To use "Issue Document", you need to create a template document in advance using "Google Docs" or "Google Sheets". Follow this setup method to create a template document. If the document issuance operation cannot be executed, please refer to this page to try to resolve the issue.
(6) Once the template document is created, click "Get Replacement Conditions".
(7) If you can obtain the replacement conditions without any issues, click [Save].
・CloudSign Settings
(1) Click the fourth action "Create Document".
(2) Enter the account information to be linked and click [Next].
(3) On the next screen, enter information such as "Document Title" and "Memo". Clicking the input bar allows you to select the output. As an example, the image below quotes the information of the output [Document Title] obtained from the previous step.
(4) "Allow Forwarding" and "Confidential Document Flag" can be selected from the dropdown. "Template ID" can be obtained from the CloudSign template page.
(5) After entering the necessary information, click [Test], and if there are no issues, click [Save]. For the entire flow of sending documents via CloudSign, please check here.
(6) Next, click the fifth action "Attach File to Document".
(7) Confirm that the account information to be linked is entered and click [Next].
(8) On the next screen, enter information such as "Document ID" and "File Name". Clicking the input bar allows you to select the output.
(9) The "File Attachment Method" is set to use the output for the issued document in this flow.
(10) After entering the information, click [Test], and if there are no issues, click [Save].
(11) Next, click the sixth action "Add Recipient".
(12) Confirm that the account information to be linked is entered and click [Next]. On the next screen, enter information such as "Document ID" and "Email Address". Clicking the input bar allows you to select the output.
(13) "Language Settings" can be set from the dropdown.
(14) After entering the information, click [Test], and if there are no issues, click [Save].
(15) Finally, click the seventh action "Send Document & Remind".
(16) Confirm that the account information to be linked is entered and click [Next]. On the next screen, enter the information for "Document ID". (Let's also utilize the output.) To set up this action, "Create Document", "Attach File to Document", and "Add Recipient" must be executed in advance. Let's conduct a final check to ensure that the previous steps are set up without any issues.
(17) After entering the information, click [Test], and if there are no issues, click [Save]. This completes the setup.
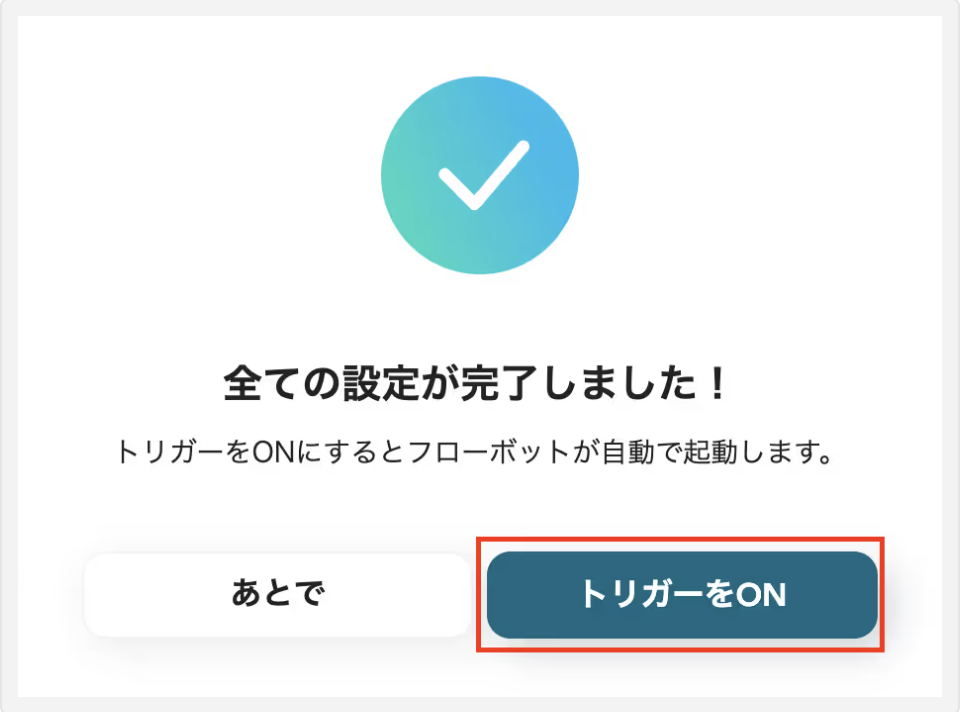
・Turn on the Trigger
By clicking the red frame part "Turn on Trigger" on the screen below, the flow bot will start automatically.
Here is the template used this time
Other Automation Examples Using Collaboflow
There are other examples of automation using Collaboflow on Yoom, so here are a few introductions.
Send Contracts with DocuSign When Requests are Approved in Collaboflow
This flow is recommended for those who use DocuSign for electronic signatures on contracts. It eliminates the need for manual email sending and contract verification, speeding up operations. Contracts are automatically sent at the time of approval, allowing for timely responses.
Send a contract with freee Sign when a request is approved in CollaboFlow
Since the contract can be sent immediately upon approval, the contract process progresses quickly and smoothly. This reduces the manual workload for the person in charge, contributing to improved work efficiency.
Send contracts with GMO Sign when the application is approved in CollaboFlow
By automating the process from application approval to contract sending, you can prevent missing contract deliveries and ensure a prompt response. This will likely reduce the workload of the staff in charge.
Summary
By automating tasks through the integration of the collaboration flow and CloudSign introduced this time, you can reduce the workload of contract procedures and achieve a swift process. This leads to more efficient contract approval and document sending operations. Additionally, it helps prevent mistakes during tasks and contributes to speeding up the work of the responsible department. Business improvements through automation will likely aid in further growth for the company.
Please make use of Yoom to experience automation through app integration.
The person who wrote this article
k.ueno
Until now, as customer support, we have made efforts to resolve users' questions and concerns.
I was moved to learn that by using Yoom, tasks that are becoming increasingly complicated on a daily basis will progress quickly!
From now on, we will continue to distribute content with easy-to-understand content so that people who aim to improve work efficiency can use the service smoothly.
Conventional RPA can only automate simple repetitive tasks, and the setup process was very complicated. With “hyperautomation,” which combines various technologies such as AI, API, RPA, and OCR, it is possible to automate many tasks that could not be realized until now more easily than before.
Most tools simply connect one app to another, leaving the complex tasks to you. Yoom goes much further: From document creation and browser automation to OCR and generative AI, Yoom handles it all seamlessly in one platform.
Why settle for basic integrations? Streamline your entire workflow with Yoom’s powerful hyperautomation.


.avif)


.avif)
.avif)
.avif)
.avif)


