How to integrate GMO Sign with Google Sheets to automatically update information in Google Sheets when a contract is completed in GMO Sign.
How to Integrate Applications
・
2024/10/16
How to integrate GMO Sign with Google Sheets to automatically update information in Google Sheets when a contract is completed in GMO Sign.
m.wadazumi
We will introduce how to integrate GMO Sign with Google Sheets to automate data updates upon contract completion. This will reduce the time spent on data updates, allowing you to use your time more effectively. Additionally, it will make it easier to grasp the contract status, thereby improving the transparency of data management. This time, we will convey the benefits of integrating GMO Sign with Google Sheets and the method of automation.
Benefits of Integrating GMO Sign with Google Sheets
Benefit 1: Improved Operational Efficiency
By integrating GMO Sign with Google Sheets, you can expect improved efficiency in data updates. For example, when a contract is completed in GMO Sign, the data can be automatically updated in Google Sheets. This will allow you to eliminate the manual effort previously required for data updates, thereby saving time. Furthermore, since human errors can be avoided, you can maintain highly reliable data.
Benefit 2: Ability to Visualize the Contract Process
Automating data updates upon contract completion can enhance the transparency of contract management. For instance, you can quickly grasp completed contract data, making it easier for the person in charge to manage the data. Especially when handling multiple contracts simultaneously, you can check the contract status in Google Sheets, preventing delays in response.
How to Create an Integration Flow between GMO Sign and Google Sheets
This time, we will introduce the method for setting up the following template: "Update Google Sheets information when a contract is completed in GMO Sign." By using this template, you don't need to set up automation from scratch, which is convenient.
The process consists of only 6 steps, so it can be set up in 10-15 minutes.
Register GMO Sign and Google Spreadsheet as My Apps
Set a trigger to activate when a contract is completed in GMO Sign
Set an action to generate an access token in GMO Sign
Set an action to retrieve document details in GMO Sign
Set an action to update records in Google Spreadsheet
Verify the automation between GMO Sign and Google Spreadsheet
If you are not using Yoom, please register for free here. If you are already using Yoom, please log in.
[About Yoom]
Step 1: Register GMO Sign and Google Spreadsheet as My Apps
To connect GMO Sign and Google Spreadsheet with Yoom, register them as My Apps. By registering as My Apps first, you can easily proceed with the automation settings.
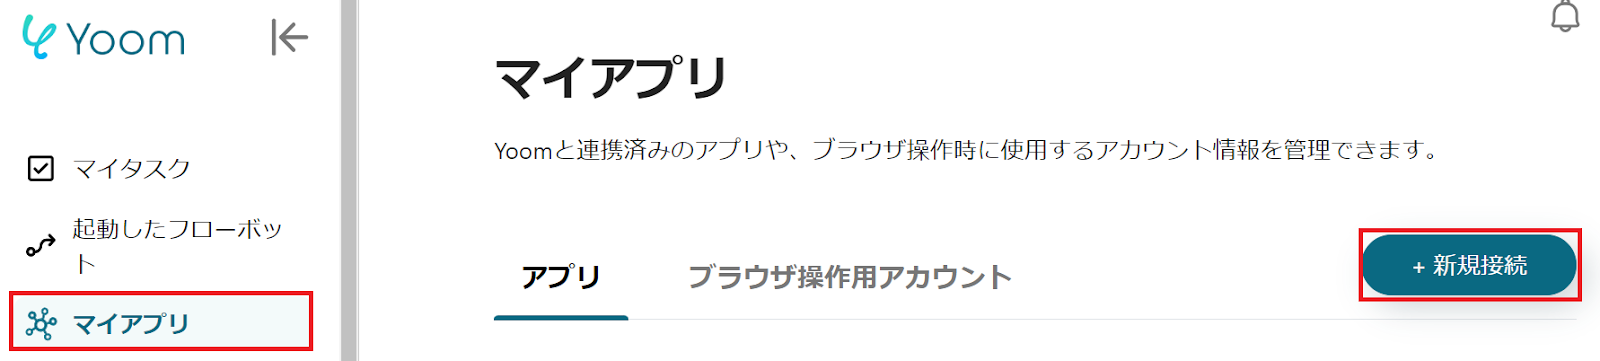
First, register GMO Sign as My App. Click "My Apps" → "New Connection" on the left side of the Yoom screen. Find GMO Sign from the app list or search from "Search by App Name".
The following screen will be displayed, so please check the explanation and set the "Account Name" and "Access Token".
Next, proceed to register Google Spreadsheet as My App. Select Google Spreadsheet in the same way as before. When the following screen is displayed, log in to Google Spreadsheet.
If GMO Sign and Google Spreadsheet are displayed in My Apps, registration is complete.
Step 2: Set a trigger to activate when a contract is completed in GMO Sign
To set up automation, click "Try it" on the banner below.
Read the following screen display and click "OK".
When the following screen is displayed, check the "Title" and "Description". If you want to make changes, you can do so from the screen below. To start with the GMO Sign settings, click "When the signature is completed".
When the following screen is displayed, check the settings.
"App Trigger Title" → Can be freely changed
"Account Information Linked with GMO Sign" → Check if correct
"Trigger Action" → When the signature is completed
When the following screen is displayed, click the red frame and copy the Webhook URL. Set it in the GMO Sign management screen. After sending a Webhook event or executing a trigger event, click "Test" → "Test Successful" → "Save".
Step 3: Set the Action to Generate an Access Token in GMO Sign
Next, to set up generating an access token in GMO Sign, click "Generate Access Token". When the following screen is displayed, check the settings.
"Title" → Can be freely changed
"Account Information Linked with GMO Sign" → Check if correct
"Action" → Generate Access Token
When the following screen is displayed, set the "Secret Key" and "Customer ID". Once set, click "Test" → "Test Successful" → "Save".
Step 4: Set the Action to Retrieve Document Details in GMO Sign
Next, to set up retrieving document details in GMO Sign, click "Retrieve Document Details". When the following screen is displayed, check the settings.
"Title" → Can be freely changed
"Account Information Linked with GMO Sign" → Check if correct
"Action" → Retrieve Document Details
When the following screen is displayed, set the "Secret Key" and "Customer ID".
Scroll and use the output from "Generate Access Token" to set the "Access Token". Click the arrow in the red frame to use the output from "Generate Access Token". Set the access token as follows.
Scroll and set the "Transaction ID" as before. Use the output from "When the signature is completed". If there are other necessary items, set them as well. Once set, click "Test" → "Test Successful" → "Save".
Step 5: Set the Action to Update Records in Google Sheets
Next, to set up Google Sheets, click "Update Records". When the following screen is displayed, check the settings.
"Title" → Can be freely changed
"Account Information Linked with Google Sheets" → Check if correct
"Execute Action" → Update Records
Move to the Google Sheets screen and enter contract information for testing. As an example, it was set as follows.
Return to the Yoom screen, check the description, and set up "Database Integration".
When the following screen is displayed, set the "Condition for the Record to be Updated". Search for the target record using a unique value. Select "Transaction ID" from the output of "When the signature is completed". This time, it was set as follows. * It is assumed that the ID on Google Sheets and the ID on GMO Sign are held in the same state.
Scroll and set the "Value of the Record After Update". The item names of the contract information set for testing in Google Sheets will be displayed. Set the items you want to update using the output from GMO Sign. Once set, click "Test" → "Test Successful" → "Save".
Step 6: Verify the Automation Between GMO Sign and Google Sheets
Finally, click "Turn ON Trigger" to complete the automation setup. Check if the flowbot is running correctly.
Flowbot Template Used This Time Update Google Sheets Information When a Contract is Completed with GMO Sign
Other Examples of Automation Using GMO Sign and Google Sheets
1. This flow automatically stores files in Google Drive once the document signing is completed with GMO Sign. Since files can be automatically stored, there is no worry about losing them. Manual storage is no longer necessary, preventing storage omissions and errors.
2. This is a flow where a notification is automatically sent to Slack once the contract is signed with GMO Sign. There is no need to check whether the signing is complete, reducing the workload for the person in charge. You can check the contents of the signed contract on Slack, reducing the need to switch between apps.
3. This is a flow where text is automatically added to a page in Notion when a row is added in Google Sheets. By automatically syncing data between Google Sheets and Notion, manual data entry is no longer necessary. Additionally, the speedy data entry process makes it easy to share information within the team.
Summary
The integration of GMO Sign and Google Sheets is expected to enhance efficient contract management and transparency. This automation eliminates the need for manual data updates, leading to time savings. Moreover, it helps avoid human errors, ensuring the maintenance of highly reliable data. By implementing automation, these benefits can be achieved.
App integration using Yoom requires no special skills. Anyone can easily use it, so if you're interested, please register for free here.
The person who wrote this article
m.wadazumi
I've been working as a writer since my job in child welfare, and I'm currently writing a blog on Yoom.
While being surprised by the work efficiency improvements that can be made with Yoom, I would like to share that excitement with everyone and contribute to society.
I'll tell you about application integration and automation that even I, who has zero programming knowledge, can do.
Conventional RPA can only automate simple repetitive tasks, and the setup process was very complicated. With “hyperautomation,” which combines various technologies such as AI, API, RPA, and OCR, it is possible to automate many tasks that could not be realized until now more easily than before.
Most tools simply connect one app to another, leaving the complex tasks to you. Yoom goes much further: From document creation and browser automation to OCR and generative AI, Yoom handles it all seamlessly in one platform.
Why settle for basic integrations? Streamline your entire workflow with Yoom’s powerful hyperautomation.


.avif)


