As businesses continue to digitize, contract management remains a challenge for many companies. After signing contracts with GMO Sign, many people manually save documents to OneDrive. In this article, we will introduce a method to integrate GMO Sign with OneDrive, send GMO Sign using contract documents when a form is answered, and automatically store them in OneDrive. This automation will improve work efficiency and reduce the hassle of document management.
Recommended for
People who manage files on OneDrive on a daily basis
Those who use GMO Sign and OneDrive and find contract management cumbersome
Those who use GMO Sign and OneDrive and are considering document management and work efficiency improvement
Now, let's explain how to use the no-code tool Yoom to send GMO Sign using contract documents when a form is answered and store those documents in OneDrive.
What is Yoom?
Yoom is a next-generation automation tool designed for those who want to streamline their daily administrative tasks and improve work efficiency!
API integrations can be challenging for non-engineers, but
Yoom eliminates the need for technical expertise or complex coding, allowing you to manage apps intuitively in one place with ease.
How to integrate GMO Sign with OneDrive to automatically store documents
It is possible to achieve this by receiving the document signing from GMO Sign using the GMO Sign API and using the API provided by OneDrive for storage in OneDrive. Generally, programming knowledge is required to achieve this, but it can be easily realized without programming knowledge by using the no-code tool Yoom.
This time, we will create it using the following process.
Integrate GMO Sign and OneDrive with My Apps
Copy the template
Set the trigger for GMO Sign, which is the starting point of the flow, and then set the operation for OneDrive
Turn on the trigger button and verify the operation of the integration flow between GMO Sign and OneDrive
If you are not using Yoom, register for free here. If you are already using Yoom, please log in.
Step 1: Connect GMO Sign and OneDrive with My Apps
Let's register My Apps to connect GMO Sign and OneDrive to Yoom. By registering My Apps first, you can proceed with the automation settings smoothly.
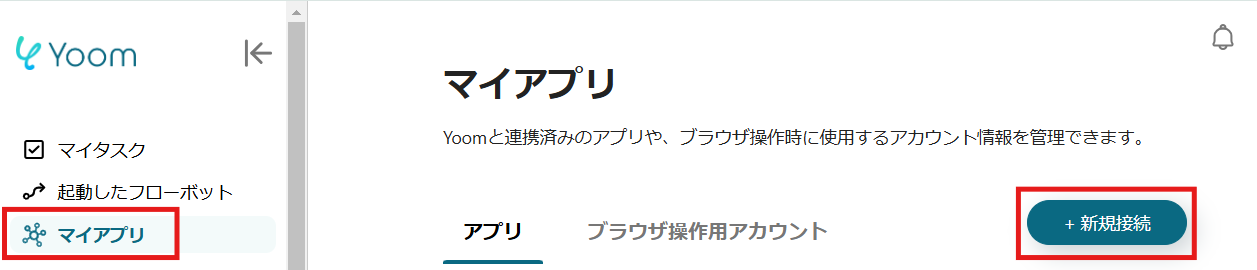
1. Click on My Apps on the left side of the Yoom page and select "New Connection". Enter "GMO Sign" in the search box at the top right and select GMO Sign from the search results.
2. On the displayed screen, enter the account name and access token, then click "Add".
3. Next, register OneDrive with My Apps. Similarly to the GMO Sign registration, click on My Apps on the left side of the Yoom page and select "New Connection". Enter "OneDrive" in the search box and select OneDrive from the search results. On the next screen, log in to your Microsoft account. Enter the account you want to connect. ※ OneDrive is a Microsoft service. ※ If you are not subscribed to a general business plan (Microsoft365 Business) for Microsoft365 (formerly Office365), authentication may fail.
Next, enter the password and click "Sign In".
If GMO Sign and OneDrive are displayed in My Apps, the registration is complete.
Step 2: Copy the Template
Open the template page below and click "Try This Template".
The template will be automatically copied to your workspace. Next, click "OK" on the displayed screen.
Step 3: Set the trigger for GMO Sign, which is the starting point of the flow, and then set the operation for OneDrive
After clicking "OK" on the previous screen, the following image will be displayed. ※This screen appears when you click "【Copy】Send GMO Sign using contract documents when the form is answered and store the documents in OneDrive" in the Flowbot under "My Projects" on the left side of the Yoom page.
1. Click the form trigger "Create Form". On the displayed screen, set the items required for the contract document. Once set, click "Next".
Let's also set the parts of the image below. ※This time, it was set as shown in the image below.
Next, confirm the display of the form and perform detailed settings. Enter sample values for the acquired values. Once entered, click "Save".
2. Click "Approval" to request approval. Select "Approver" from the dropdown that appears when you click the input field.
"Approval Details" can be selected from the output that appears when you click the input field. ※This time, it was set as shown in the image below.
"Approval Completion Condition" should be selected from the dropdown that appears when you click the input field.
"Operation to Return" should be selected from the dropdown that appears when you click the input field.
Once entered, click "Save".
3. Click "Generate Access Token" to integrate with the app. Enter the required fields on the displayed screen and click "Next".
4. Set up the API connection. Follow the instructions below the input fields to enter each item, execute "Test", and if successful, click "Save". ※The displayed output can be used in the next settings as indicated by "This value can be used in other operations".
5. Click "Register Document for Envelope" to integrate with the app. Enter the required fields on the displayed screen and click "Next".
6. Set up the API connection. Enter "Secret Key" and "Customer ID" following the instructions below the input fields. Select "Access Token" from the output that appears when you click the input field. Once entered, execute "Test", and if successful, click "Save".
7. Click "Request Signature for Envelope" to integrate with the app. Enter the required fields on the displayed screen and click "Next".
8. Set up the API connection. Enter "Secret Key" and "Customer ID" following the instructions below the input fields. Select "Access Token" from the output that appears when you click the input field.
Select "Envelope Name" from the output that appears when you click the input field.
Select "Document Code" and "Document Name" from the output that appears when you click the input field in the "Document List". Enter the email address in "Company Signer: Email Address".
Select "Document Code" from the output that appears when you click the input field in "Company Signature Information". Select "Request Details" from the dropdown that appears when you click the input field.
Select "Recipient Signer: Name" and "Recipient Signer: Email Address" from the output that appears when you click the input field.
Select "Document Code" from the output that appears when you click the input field in "Recipient Signature Information". Select "Request Details" from the dropdown that appears when you click the input field.
Enter "Company Signer: Approval Order" and "Recipient Signer: Approval Order". ※This time, it was set as shown in the image below.
Once entered, execute "Test", and if successful, click "Save".
9. Click "Store File in OneDrive" to integrate with the app. Enter the required fields on the displayed screen and click "Next".
10. Set up the API connection. Select "Drive ID" from the options that appear when you click the input field.
Select "Item ID of the Storage Folder" from the options that appear when you click the input field.
Enter "File Name" following the instructions below the input field. Select "File Attachment Method" and "File" from the dropdown that appears when you click the input field. ※This time, it was set as shown in the image below.
Once entered, execute "Test", and if successful, click "Save".
Step 4: Turn on the trigger button and check the operation of the integration flow between GMO Sign and OneDrive
Click the "Turn On Trigger" button in the red frame on the screen below to automatically start the Flowbot.
The template used this time is as follows.
Other Examples of Automation Using GMO Sign and OneDrive
In addition, Yoom offers templates using GMO Sign and OneDrive, so here are a few examples.
1. Automatically Notify Google Chat When a Contract is Completed with GMO Sign This flow automatically notifies Google Chat when a contract is completed with GMO Sign. By utilizing this flow, you will receive automatic notifications in Google Chat when a contract is completed with GMO Sign. This allows you to immediately recognize the completion of a contract and smoothly begin post-contract processes. Additionally, it saves you the trouble of logging into GMO Sign to check the contract status, allowing you to focus more on other tasks. As a result, it leads to increased productivity.
2. Update Google Spreadsheet Information Once the Contract is Completed with GMO Sign This flow updates the information in Google Spreadsheet once the contract is completed with GMO Sign. By utilizing this flow, you can automatically update the registration information in Google Spreadsheet once the contract is completed with GMO Sign, reducing the effort required for manual work. By eliminating the time spent on these tasks, the entire team can focus on core operations, leading to increased productivity. It will prevent human errors and maintain information accuracy.
3. Save Files Received in Gmail to OneDrive This flow saves files received in Gmail to OneDrive. By utilizing this flow, you can automatically save files received in Gmail to OneDrive, thereby improving work efficiency. Automatically saving files to OneDrive also helps prevent human errors.
Benefits and Examples of Integrating GMO Sign with OneDrive
Benefit 1: Improved Efficiency and Time Savings
After signing contracts with GMO Sign, automatically storing them in OneDrive significantly reduces manual workload. This eliminates the need for printing, scanning, and manually saving files, streamlining business processes. For example, the legal department handles a large number of contracts, and this automation allows immediate access to necessary documents, enabling them to focus on other important tasks.
Benefit 2: Enhanced Compliance
With automatic integration, contracts are securely stored in the appropriate location, reducing the risk of information leaks or loss. Documents with electronic signatures have legal validity, and when combined with OneDrive's security, it ensures compliance requirements are met. For instance, in the healthcare industry, where highly confidential information is handled, this system can ensure thorough regulatory compliance.
Benefit 3: Reduction of Human Errors
Manual file saving poses risks such as storing in the wrong folder or incorrect file naming. Automation prevents these human errors, ensuring accurate document management. For example, when the sales team searches for contracts, having them stored in the correct location allows for quick responses, leading to improved customer satisfaction.
Conclusion
This article introduced a method to integrate GMO Sign with OneDrive, where contracts are sent using GMO Sign upon form submission and stored in OneDrive. Integrating GMO Sign with OneDrive is expected to improve the efficiency and accuracy of contract management. By implementing automation, you can reduce manual effort, minimize human errors, and enhance compliance. This method offers significant benefits for companies aiming to optimize their business processes. No special skills or knowledge are required to implement automation with Yoom. Simply follow the instructions, and the operation is easy. We encourage you to try integrating GMO Sign with OneDrive by following the steps in this article!
The person who wrote this article
-
I have experience in a wide variety of jobs, such as an SE programmer, new graduate recruitment assistant, and theme park actor.
Among them, SE programmers built corporate systems and worked to improve work efficiency.
Using Yoom, we will carefully disseminate practical approaches to reduce the burden of work in an easy-to-understand manner.
Conventional RPA can only automate simple repetitive tasks, and the setup process was very complicated. With “hyperautomation,” which combines various technologies such as AI, API, RPA, and OCR, it is possible to automate many tasks that could not be realized until now more easily than before.
Most tools simply connect one app to another, leaving the complex tasks to you. Yoom goes much further: From document creation and browser automation to OCR and generative AI, Yoom handles it all seamlessly in one platform.
Why settle for basic integrations? Streamline your entire workflow with Yoom’s powerful hyperautomation.


.avif)


.avif)


.avif)


