How to link Google Sheets with the Billing Management Robot to register a billing address in the Billing Management Robot when a row is added to Google Sheets
How to Integrate Applications
・
2024/10/09
How to link Google Sheets with the Billing Management Robot to register a billing address in the Billing Management Robot when a row is added to Google Sheets
e.koyama
The billing management system helps streamline invoice issuance and payment management, but registering billing addresses into the system inevitably takes effort. Especially if you are focusing on acquiring new customers, could the registration process be squeezing the time available for other tasks?
In this article, we introduce a method to automatically register billing addresses in the billing management robot when information is added to Google Sheets. By automatically reflecting information from customer and billing information databases into the billing management robot, you can reduce manual effort and minimize errors. Streamline your billing operations and enhance trust with your customers.
Benefits of Integrating Google Sheets with the Billing Management Robot
Benefit 1: Time Savings
Automation eliminates the need for manual data entry. This allows accounting personnel to focus on important tasks such as journal entries and credit checks, using the time previously spent on entering billing information. Companies with many transactions with new customers can expect benefits such as reduced working hours, improved operational efficiency, and optimized resources.
Benefit 2: Error Reduction
Manual data entry is prone to human error. Automation ensures data consistency, reducing the risk of incorrect entries, omissions, or forgotten registrations. Accurate data management is crucial for building trust with customers and properly managing your company's cash flow. Incorrectly registering billing addresses can lead to sending invoices to the wrong customers or failing to deliver invoices, potentially resulting in uncollected receivables on the due date and causing issues. Automation helps minimize error risks and ensures smooth billing management.
[About Yoom]
How to Create a Workflow for Integrating Google Sheets with the Billing Management Robot
Let's set up the integration and automation workflow between Google Sheets and the billing management robot.
We will introduce the steps to create a workflow using a template: "Register billing addresses in the billing management robot when a row is added to Google Sheets".
Before You Begin
1. Please create a database in Google Sheets to manage customer or billing information. ※The diagram below is an example. The red frame part of the URL refers to the Spreadsheet ID and Sheet ID.
2. Please log in to Yoom.
3. Copy the template from Yoom using the "Try it" button below.
Step 1: Connect Google Sheets with Billing Management Robo in My Apps
*If you have already completed the app connection, please proceed to Step 2.
1. Select "My Apps" from the left menu and click "+ New Connection" on the right side of the screen.
2. From the list of new connections in My Apps, select Google Sheets and Billing Management Robo respectively, and connect the apps. *The image below shows the connection screen for Billing Management Robo. For information on issuing access keys, please refer to this official help article.
Next, copy the template to My Project and create a Flowbot. If you haven't copied it yet, please copy the Flowbot template from below.
1. Hover over the banner and click "View Details" 2. Click "Try This Template" on the redirected page 3. Register for Yoom ※ If you have already completed registration, the login screen will be displayed, so please log in.
Step 2: Setting up a trigger to activate when a row is added to Google Sheets
1. Open the copied template. ※ You can change it to any title from the red-framed section in the image below.
2. Click on the Flowbot's "App Trigger: When a Row is Added".
3. Select the linked account and action. Change the title if necessary and click "Next".
4. Set up the API connection for the app trigger. Refer to the notes below each field for input and selection, then click "Test". ※ The activation interval varies depending on the plan. Reference: List of feature restrictions and usage limits for each plan ※ The image below is an example of input.
5. If the test is successful, click "Save".
Step 3: Setting up an action to register the billing address in the Billing Management Bot
1. Click on the Flowbot's "Integrate with App: Register/Update Billing Address".
2. Select the linked account and action. Change the title if necessary and click "Next".
3. Set up the API connection. Refer to the notes below each field for input and selection. ※ You can use the output obtained in Step 2. ※ The image below shows some of the fields, and the entered output is an example of the setup.
※ The image below is an example of output reference.
4. If the test is successful, click "Save".
Step 4: Setting up an action to add information obtained from registration to Google Sheets
※ In this action, you can append information obtained during the registration of the Billing Management Bot and the registration date to Google Sheets.
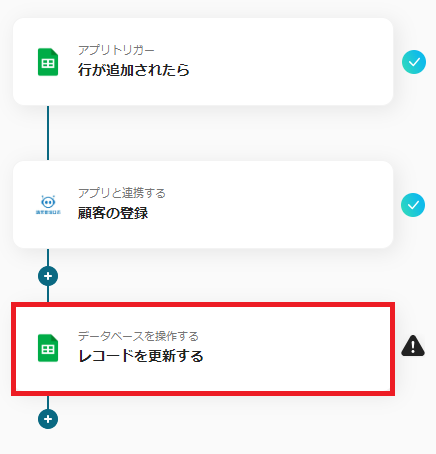
1. Select the Flowbot's "Operate Database Update Record".
2. Select the linked account and action. ・Title: Change if necessary. ・Each item in "Database Integration": Refer to the notes below each field for input and selection.
3. Click "Next".
4. Set up the details of the database operation. Use the output information obtained so far to input the conditions and updated values. ※ The image below is an example of input. Some fields are omitted.
※ The image below is an example of output reference.
※ If you want to append the registration date, please use the date variable. You can select the desired date (or date and time) and format from "Date" on the right side of the output.
5. If the test is successful, click "Save".
Finally, switch the trigger of the saved flow to "ON" to activate it.
This completes the flow of "Register the billing address in the Billing Management Bot when a row is added to Google Sheets".
Other Examples of Automation Using Google Sheets
There are many other examples of automation using Google Sheets in Yoom, so here are a few introductions.
1. A flow that notifies Google Chat when a row is added in Google Sheets. By automatically notifying additional database information through chat tools, quick and accurate information sharing becomes possible. This integration helps prevent missing important information.
2. This is a flow to add vendor information to Jobkan Expense Reimbursement and Workflow when a row is added in Google Sheets. By automatically reflecting the information from the customer information database in the workflow system, applications related to customers, such as stamp requests for contracts and quotations, can be processed smoothly.
3. This is a flow for creating an account in Zoho CRM when a row is added in Google Sheets. The customer information database is automatically synced with Zoho CRM, eliminating the need for manual entry and allowing you to smoothly start managing cases for the target customers.
Summary
By integrating Google Sheets with the billing management robot, you can automate the registration of billing addresses. Synchronizing the information registered in the database once can reduce the hassle of manual entry and minimize the risk of errors. Register information accurately and quickly to streamline your billing operations. With Yoom, you can easily set up the integration, so take this opportunity to give it a try.
The person who wrote this article
e.koyama
Until now, I have experienced office work at specialized trading companies and in the EC industry.
The work I was in charge of covered a wide range of tasks, such as sales office work, accounting, general affairs, human resources, and legal affairs.
We worked to improve the efficiency of individual tasks, but I think the work could proceed more conveniently by using various support tools and Yoom...
I would be happy if I could send out an introduction article on Yoom that makes use of my work experience and help everyone proceed smoothly with their work.
Conventional RPA can only automate simple repetitive tasks, and the setup process was very complicated. With “hyperautomation,” which combines various technologies such as AI, API, RPA, and OCR, it is possible to automate many tasks that could not be realized until now more easily than before.
Most tools simply connect one app to another, leaving the complex tasks to you. Yoom goes much further: From document creation and browser automation to OCR and generative AI, Yoom handles it all seamlessly in one platform.
Why settle for basic integrations? Streamline your entire workflow with Yoom’s powerful hyperautomation.


.avif)


.avif)


