Google スプレッドシートとXeroの連携イメージ
How to Integrate Applications

2025/01/06

How to integrate Google Sheets with Xero to create an invoice in Xero when a row is added in Google Sheets

n.fukuoka

Google Sheets is a collaborative tool that is convenient for team work. It allows you to edit and share data in real-time from anywhere, enabling efficient work with members who are in different locations.
However, manually reflecting the content entered in Google Sheets into Xero each time can increase the workload and may not be efficient.
This article explains the benefits and setup methods when integrating Google Sheets with Xero.

Recommended for

The content introduced this time is recommended for the following people!

  • Those who use Google Sheets and Xero in their work
  • Those who have a lot of invoice creation tasks and feel the burden of input errors or manual work
  • Those who face challenges in information integration between different tools and aim for operational efficiency

Benefits and Examples of Integrating Google Sheets with Xero

Benefit 1: Reduction of Human Errors

Manual data entry inherently carries the risk of human error.
Especially when entering the same information multiple times across different systems, input errors are more likely to occur.
For example, when a sales representative enters customer information into Google Sheets and an accounting representative manually transfers it to Xero to create an invoice, there is a possibility of incorrectly entering customer names or amounts.
This can lead to incorrect billing amounts, causing inquiries or correction requests from customers.
By integrating Google Sheets with Xero, invoices are automatically created, helping to prevent errors due to manual input.
Maintaining highly accurate data reduces the risk of being overwhelmed by correction work later, and strengthens the trust relationship with customers.

Benefit 2: Reduction of Data Entry Workload

Manual data entry can waste time and effort, becoming a significant burden for those responsible.
Especially when entering the same data repeatedly across multiple systems, it takes away time from the person responsible, making it difficult to focus on tasks that should be prioritized.
For example, if you manage customer information and sales data in Google Sheets and issue invoices in Xero based on that information, a large amount of data can result in the person responsible spending a lot of time on data entry. This may make it difficult to secure enough time for other important tasks.
By automating, the person responsible can be freed from monotonous input tasks and focus on tasks such as analyzing sales data and creating materials useful for future business strategies.
As a result, the workload related to data entry is reduced, and an improvement in operational efficiency can be expected.

Benefit 3: Acceleration of Billing Operations

Manual billing operations are prone to issuance delays due to various factors such as communication delays and input errors.
For example, if it takes time for the accounting department to confirm updates in the spreadsheet and create and issue invoices in Xero, the payment cycle may be delayed, affecting cash flow.
By integrating applications, invoices are automatically created in Xero, shortening the time lag associated with communication and manual input.
Furthermore, streamlining billing operations not only shortens work time but also leads to a review of the workflow. This allows the accounting staff to spend more time on tasks that require more focus.

In this article, we will proceed with integration using Yoom.
If you haven't used it yet, please take a look at Getting Started with Yoom.

Now, let's explain how to use the no-code tool Yoom to create an invoice in Xero when a row is added in Google Sheets.

[What is Yoom]

How to Create a Google Sheets and Xero Integration Flow

It is possible to achieve this by receiving the addition of a row in Google Sheets using the Google Sheets API and creating an invoice in Xero using the API provided by Xero.
Generally, programming knowledge is required to achieve this, but with the no-code tool Yoom, it can be easily achieved without programming knowledge.

The integration flow is broadly created through the following processes.

  • Register Google Sheets and Xero as My Apps
  • Set up a trigger to activate when a row is added in Google Sheets
  • Configure settings to create an invoice in Xero
  • Test and verify

Step 1: Integrate Google Sheets and Xero as My Apps

First, log in to your Yoom account.
If you do not have an account, please create one on the Yoom account creation page.

1. Click on My Apps and then click on New Connection.

2. You can search by app name in the input field.
This time, search for and register both Google Sheets and Xero.

Register Google Sheets as My App

First, let's register from Google Sheets. Enter Google Sheets in the input field, and the Google Sheets icon will appear, so click the icon.

1. The following screen will appear.
Click "Sign in with Google".

2. Select the account to integrate.

3. Review the content and click "Next".
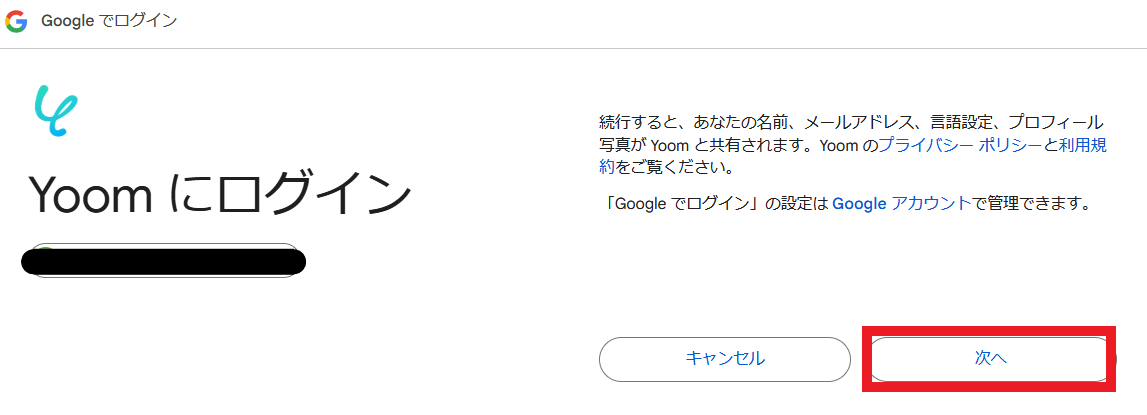
4. Review the content and click "Continue".
This completes the registration of Google Sheets as My App.

Register Xero as My App

Similarly, search for Xero and click the icon.

1. The Xero login screen will appear. Log in with the account you want to integrate.

This completes the registration of Google Sheets and Xero as My Apps.

Once the registration is successful, the following screen will appear.
Check if the icons for Google Sheets and Xero are displayed on the My Apps screen.

For more detailed information about Yoom, please check the Yoom Help Center.

Select a Template and Prepare the Storage Location

Click "Try it" from the link below.

If the following message appears, the template copy was successful.

Step 2: Setting up a trigger to activate when a row is added in Google Sheets

This time, since we are using Google Sheets as an app trigger, please refer to the following link.

Notes on using Google Sheets as an app trigger

1. First, click on "When a row is added" at the top.

2. Set the title as you like.
Enter the account information to connect with Google Sheets.
Select "When a row is added" as the trigger.
Once you have finished entering, click "Next".

3. Set each item.
You can select the trigger activation time interval from 5 minutes, 10 minutes, 15 minutes, 30 minutes, or 60 minutes.
*Please check as the shortest activation interval varies depending on the plan.
Click on the input field for Spreadsheet ID and Sheet ID to display suggestions, and select from them.
Once the setup is complete, click "Test" and if there are no issues, click "Save".

Step 3: Setting up invoice creation in Xero

1. Return to the flow. Next, click on the "Create Invoice" icon.

2. Enter the account information to connect with Xero.
Select "Create Invoice" as the action.
Once you have finished entering, click "Next".

3. Set each item. Be sure to enter the required fields.
Click on the input field to display the output or suggestions obtained earlier.
Select the Tenant ID from the suggestions.
By setting it as follows, you can add the Contact ID by referencing the information from Google Sheets.
Once the setup is complete, click "Test" and if there are no issues, click "Save".

4. Finally, click on the "Update Record" icon.

5. Enter the account information to connect with Google Sheets.
Select "Update Record" as the action.

6. Set up the database connection.
Click on the input field for Spreadsheet ID and the tab name of the spreadsheet to display suggestions, and select from them.
Once the setup is complete, click "Next".

7. Set the values for the record you want to update.
Click on the input field to display the output, and use it as needed.
In the following case, the Contact ID obtained from Google Sheets is inserted.

8. Set the values for the record after the update.
In the following case, the Invoice ID obtained from Xero is inserted into Google Sheets.
Once the setup is complete, click "Test" and if there are no issues, click "Save".

9. With this, the flow of [When a row is added in Google Sheets, create an invoice in Xero] is complete.

Step 4: Testing and Confirmation

Once the setup is complete, the following screen will be displayed.
Click the "Turn on Trigger" button to activate the flow bot.


With Yoom, even IT beginners can easily complete the setup.
Try this convenient flow from the link below.

Other Automation Examples Using Google Sheets and Xero

There are many other examples of automation using Google Sheets and Xero on Yoom, so let me introduce a few.

1. A flow that updates a Xero invoice when a row is updated in Google Sheets.
In the flow introduced this time, an invoice was created in Xero, but by using this template, you can update Xero invoices.
For example, when the sales team updates customer information, that information is automatically reflected in the invoice, which can reduce the workload of the accounting department.

2. This is a flow where a purchase order is created in Xero when a row is added in Google Sheets.
By utilizing this template, a purchase order is automatically created just by adding a row in Google Sheets.
This will reduce working time and make it easier to focus on project progress and the realization of new ideas.

3. This is a flow to update Xero items when a row is updated in Google Sheets.
By utilizing this template, you can automatically update Xero items when a row in Google Sheets is updated.
This will reduce the hassle of manual updates, allowing the person in charge to focus on more important tasks.

Summary

By integrating Google Sheets with Xero, you can now automatically create invoices in Xero whenever a new row is added to Google Sheets.
This will reduce the time spent on daily invoicing tasks, allowing you to focus on other important tasks.
Yoom is a tool that requires no programming skills, making it easy for beginners to start using it with confidence.
It allows you to efficiently automate repetitive tasks like monthly invoice processing and schedule management using the provided templates.
Why not try Yoom as a first step towards improving your business efficiency?

The person who wrote this article
n.fukuoka
In this day and age where there are more and more tools, it's often hard to know what to use. I would like to deliver useful information that is easy to understand so that everyone's work can be made even a little easier!
Tags
Google Sheets
Integration
Automation
Xero
Related Apps
App integration
No items found.
What is Yoom hyperautomation?
Conventional RPA can only automate simple repetitive tasks, and the setup process was very complicated.
With “hyperautomation,” which combines various technologies such as AI, API, RPA, and OCR, it is possible to automate many tasks that could not be realized until now more easily than before.
Don't Just Connect Apps—Automate Everything
Most tools simply connect one app to another, leaving the complex tasks to you. Yoom goes much further: From document creation and browser automation to OCR and generative AI, Yoom handles it all seamlessly in one platform.

Why settle for basic integrations? Streamline your entire workflow with Yoom’s powerful hyperautomation.
Learn more about Yoom
Helpful Materials
I understand Yoom! 3-piece set of materials
Download materials
Understand in 3 minutes! Yoom service introduction materials
Download materials
Find out by Before After! Yoom Case Study Collection
Download materials
See a list of useful materials