How to Create a Deal in Zendesk Sell When Transaction Information is Added to Google Sheets
How to Integrate Applications
・
2024/12/26
How to Create a Deal in Zendesk Sell When Transaction Information is Added to Google Sheets
m.wadazumi
Sales representatives find managing and entering transaction data essential, but manual entry increases the risk of omissions and errors. By integrating Google Sheets with Zendesk Sell, you might solve this issue by automatically reflecting transaction data. This automation can reduce human error and facilitate smooth data management. Additionally, centralizing transaction data reduces the hassle of moving between systems.
Recommended for those who:
- Feel that transferring data from Google Sheets to Zendesk Sell is cumbersome
- Want to streamline massive data entry and prevent human errors
- Wish to manage transaction data for strategic planning and analysis
Benefits and examples of integrating Google Sheets with Zendesk Sell:
Benefit 1: Prevent errors from manual entry
Manual data entry inevitably leads to human errors. To solve this, integrating Google Sheets with Zendesk Sell is recommended, allowing automation to create transactions in Zendesk Sell when new transaction information is added to Google Sheets. For example, simply adding new transaction information to Google Sheets will register it in Zendesk Sell, saving effort. This way, the effort of manual work is reduced, preventing omissions and errors.
Benefit 2: Reduce the hassle of moving between systems
Manually linking data between different systems requires enormous effort and time, but automation can eliminate this hassle. For instance, organizing transaction data in Google Sheets can automatically create transactions in Zendesk Sell, allowing sales representatives to proceed smoothly with subsequent tasks. This reduces the need to move between systems as data from Google Sheets is automatically reflected in Zendesk Sell. Additionally, maintaining consistent data and accurately registering transaction information leads to time savings.
Benefit 3: Utilize for visualizing transaction status and data analysis
Integrating Google Sheets with Zendesk Sell allows for visualizing transaction status. For example, entering new transaction information in Google Sheets enables transaction creation in Zendesk Sell, making it easier to check transaction data. This allows for strategic planning based on transaction data by checking only one set of data. Furthermore, visualizing sales activities can also be utilized for data analysis.
Now, let's explain how to create a transaction in Zendesk Sell when a row is added in Google Sheets using the no-code tool Yoom.
[About Yoom]
How to create an integration flow between Google Sheets and Zendesk Sell:
Automation can be achieved by receiving row additions in Google Sheets via API and creating transactions through Zendesk Sell's API. Generally, programming knowledge is required, but using the no-code tool Yoom allows easy implementation without programming knowledge.
The integration flow is created through the following major processes:
- Register Google Sheets and Zendesk Sell as My Apps
- Copy the template
- Set the trigger for Google Sheets, which serves as the starting point of the flow, and configure the subsequent Zendesk Sell operations
- Turn on the trigger button and verify the integration operation between Google Sheets and Zendesk Sell
For those not using Yoom, please register for free from [here](https://yoom.fun/members/sign_up?_gl=1*jrwzd7*_gcl_au*MTY3NDQ2MzE2MS4xNzE5MzgyMDY4*_ga*NTcxOTYyNzgyLjE3MTkzODIwNjg.*_ga_663H387CXM*MTcyMjQ4ODg2Ny4xNTEuMS4xNzIyNDkwMzk2LjYwLjAuNjYyMDU0NDY0). If you are already using Yoom, please log in.
Step 1: Register Google Sheets and Zendesk Sell as My Apps
Let's register Google Sheets and Zendesk Sell as My Apps in Yoom. By registering them in advance, automation settings become easier.
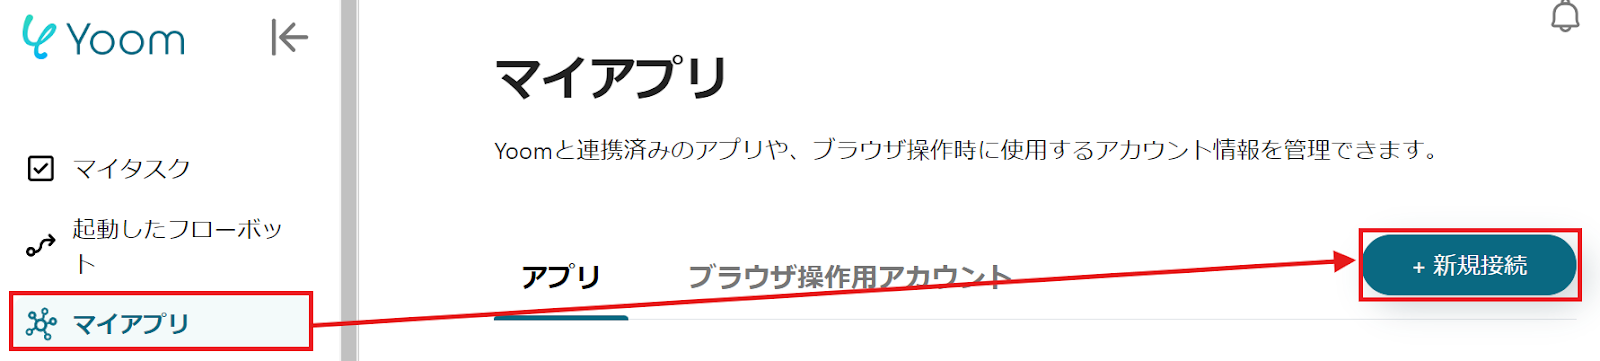
First, register Google Sheets as a My App. Click "My Apps" → "New Connection" on the left side of the Yoom screen.
When the following screen appears, search for Google Sheets in the search bar or find it from the list of apps.
The following screen will appear, so log in to Google Sheets.
Next, register Zendesk Sell as a My App. Similarly, search for Zendesk Sell in the search bar or find it from the list. When the following screen appears, check the description and set the "Account Name" and "Access Token".
If Google Sheets and Zendesk Sell are displayed in My Apps, the registration is complete.
Step 2: Copy the Template
To set up automation, click "Try it" on the banner below.
Read the following screen display and click "OK".
The following screen will be displayed, so check the "Title" and "Description". If you want to make changes, please do so from the following page. First, to set up Google Sheets, click "When a row is added".
Step 3: Set the Google Sheets trigger that starts the flow and the subsequent Zendesk Sell operation settings
When the following screen is displayed, check the settings.
"Title" → Can be changed as desired
"Account information linked with Google Sheets" → Verify if correct
"Trigger Action" → When a row is added
The method of setting will be displayed, so please check it.
Move to Google Sheets and set the item names for the transaction for testing. The following is an example, so please set it as desired. * Do not enter any values in the Transaction ID column yet.
The following screen will be displayed, so set the "Trigger Interval". Select from 5 minutes, 10 minutes, 15 minutes, 30 minutes, or 60 minutes. * The trigger interval varies depending on the plan, so please be careful.
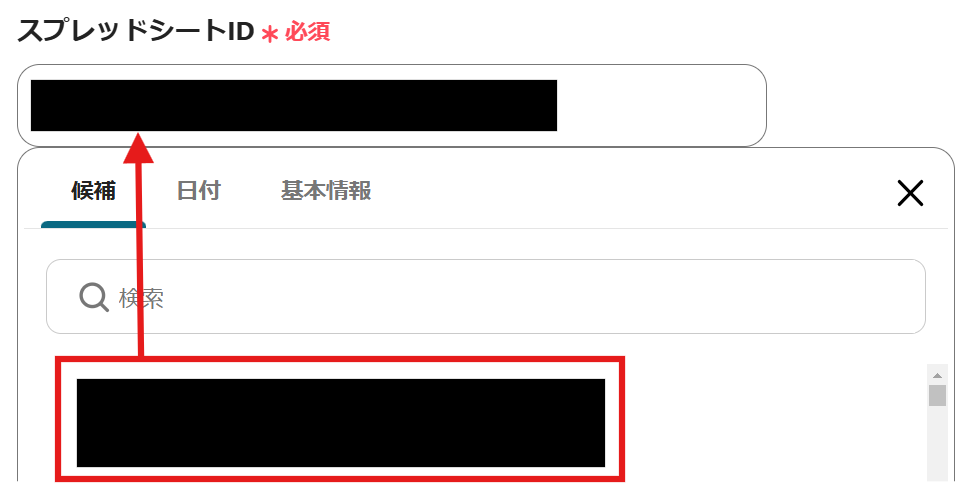
Next, set the "Spreadsheet ID" from the candidates. Click inside the frame to display the candidates and select the appropriate Spreadsheet ID.
Scroll and similarly select the "Sheet ID" from the candidates.
Next, make the following settings.
"Table Range (Start)" → In this case, A
"Table Range (End)" → In this case, I * Specify the alphabet of the last column of the item
"Column with Unique Values" → Specify the column where values do not duplicate within the column * Be sure to specify a column with unique values. If values are duplicated, it may not work correctly, so please be careful. In this case, we specified B for the Contact ID column, but which column to specify is optional.
Once the settings are complete, click "Test" → "Test Successful" → "Save".
Next, to set up Zendesk Sell, click "Create Deal".
"Title" → Can be changed as desired
"Account information linked with Zendesk Sell" → Verify if correct
"Action" → Create Deal
The following screen will be displayed, so set the "Deal Name". Select "Deal Name" from the output of "When a row is added". The output of "When a row is added" will display the items set in Google Sheets. By clicking the arrow in the red frame, the output will be displayed.
Scroll and similarly set the "Contact ID" using the output, just like the Deal Name. If there are other necessary items, set them and click "Test" → "Test Successful" → "Save".
Next, to set up updating the unique key (Deal ID) from Zendesk Sell on the Google Sheets side, click "Update Record". When the following screen is displayed, check the settings.
"Title" → Can be changed as desired
"Account information linked with Google Sheets" → Verify if correct
"Execution Action" → Update Record
The following screen will be displayed, so set the "Database Integration".
"Spreadsheet ID", "Spreadsheet Tab Name" → Select from candidates or set as described
"Table Range" → Set as desired
Check the following method of setting.
Scroll and set the "Condition for the Record to be Updated". Here, use the unique value that was present at the time of the trigger to search for the target record. In this case, we set it as follows.
Next, set the "Value of the Record After Update". Since we will update the Deal ID obtained from Zendesk Sell, use the output from Zendesk Sell to set it as follows.
Step 4: Turn on the trigger button and check the integration operation between Google Sheets and Zendesk Sell
Finally, click "Turn on Trigger" to complete the automation setup. Check if the flow bot starts correctly.
Here is the template used this time.
Examples of Other Automations Using Google Sheets and Zendesk Sell
Yoom offers many other examples of automations using Google Sheets and Zendesk Sell, and here are a few of them.
1. A flow that automatically creates a lead in Zendesk Sell when a row is added in Google Sheets. When you add lead information to Google Sheets, it is also reflected in Zendesk Sell, saving you the effort of manual entry. This automation is recommended for those who want to quickly add new lead information to Zendesk Sell and ensure smooth handling.
2. This is a flow that automatically updates contacts in Zendesk Sell when a row is updated in Google Sheets. It is recommended for those who add contacts to both Google Sheets and Zendesk Sell. Automating the update of contacts allows for accurate data updates.
3. This is a flow that automatically updates tasks in Zendesk Sell when a row is updated in Google Sheets. When data in Google Sheets is updated, tasks in Zendesk Sell can be automatically updated based on that data. This eliminates the need for manual task updates, reducing the burden on the person in charge.
Summary
By integrating Google Sheets with Zendesk Sell, you may reduce manual input and provide highly accurate operations. Automatically reflecting transaction data from Google Sheets into Zendesk Sell can prevent input errors and omissions. This will reduce movement between systems and enable speedy decision-making. Additionally, it allows for the visualization of transaction data, which can be useful for data analysis.
Let's make the transcription of transaction data easier with automation using Yoom.
The person who wrote this article
m.wadazumi
I've been working as a writer since my job in child welfare, and I'm currently writing a blog on Yoom.
While being surprised by the work efficiency improvements that can be made with Yoom, I would like to share that excitement with everyone and contribute to society.
I'll tell you about application integration and automation that even I, who has zero programming knowledge, can do.
Conventional RPA can only automate simple repetitive tasks, and the setup process was very complicated. With “hyperautomation,” which combines various technologies such as AI, API, RPA, and OCR, it is possible to automate many tasks that could not be realized until now more easily than before.
Most tools simply connect one app to another, leaving the complex tasks to you. Yoom goes much further: From document creation and browser automation to OCR and generative AI, Yoom handles it all seamlessly in one platform.
Why settle for basic integrations? Streamline your entire workflow with Yoom’s powerful hyperautomation.


.avif)


.avif)


