How to Integrate Applications

2025-04-16

How to update account information in Zoho CRM when a row is updated in Google Sheets

t.nakaya

When you receive a lot of emails every day, it can be quite a hassle to save files to Dropbox each time.
Moreover, many people might have experienced the struggle of missing a file save or saving a file in the wrong folder, making it difficult to find later.

In this article, we will introduce a method to automatically save files received in Gmail to Dropbox!

By using no-code tools, you can easily set up automation between Gmail and Dropbox.
You can start using it right away, so be sure to give it a try!

Recommended for

  • Those who want to automatically upload files attached to Gmail to Dropbox
  • Those who want to integrate Gmail and Dropbox to facilitate smooth file sharing within the team
  • Those who want to prevent the loss of attachments and ensure proper document storage

For those who want to try it immediately

In this article, we will introduce the integration method using the no-code tool "Yoom".

No complicated settings or operations are required, and even non-engineers can easily achieve it.

You can start right away using the template below, so please give it a try!

In this article, we will introduce how to automatically update Zoho CRM account information when a row is updated in Google Sheets using the no-code tool "Yoom".
This reduces the manual data entry effort and ensures data consistency.
We will explain the specific benefits and setup procedures of this method, which supports smooth business operations, so please read to the end.

Benefits of Integrating Google Sheets and Zoho CRM

Benefit 1: Reduction of Manual Entry Work

By automatically reflecting updates from the spreadsheet in Zoho CRM, manual data transfer is no longer necessary.
For example, when you update customer contact information or deal status in the spreadsheet, you no longer need to manually enter that information into Zoho CRM.
This significantly reduces work time and the risk of input errors.
Staff can focus on more important tasks and strategic activities, allowing overall operations to proceed smoothly.
Automation reduces the burden of manual work and allows for efficient business progress.

Benefit 2: Maintaining Data Consistency

By integrating Google Sheets and Zoho CRM, customer information and deal progress managed in the spreadsheet are automatically reflected in Zoho CRM, maintaining data consistency.
For example, every time the sales team updates the latest lead information in the spreadsheet, that information is automatically reflected in Zoho CRM as well.
This ensures that everyone can work based on the latest information, preventing data discrepancies and duplication. As a result, responses to clients become quicker and more accurate, and the precision of sales activities improves.

Integrating Google Sheets and Zoho CRM with Yoom

Simple Setup

Yoom is very convenient for integrating Google Sheets and Zoho CRM.
Yoom offers an intuitive interface and simple setup procedures, allowing you to configure it without specialized knowledge.
With Yoom, data transfer between spreadsheets and Zoho CRM can be done smoothly, making it easy for beginners to implement.

Flexible Customization

Yoom provides various templates that can be flexibly customized to meet user needs.
It can integrate with many apps, allowing easy integration with numerous applications.
This enables you to easily build integrations that perfectly fit your workflow.
Some might think, "Even if you say so, I won't know if it can really be done without code unless you show me the setup process." Therefore, next, we will introduce how to easily achieve this integration using Yoom without any code.

How to Create a Flow for Integrating Google Sheets and Zoho CRM

From here, we will introduce the setup for the flow "Update Zoho CRM account information when a row is updated in Google Sheets".
Even if you are worried about the operation, don't worry.
If you proceed step by step, you will surely be able to proceed without any problems.
If you do not have a Yoom account, please create one from the Yoom account issuance page.

Step 1: Log in to Yoom

(1) Access the banner below and click "Try this template!"

(2) Next, select any project from the workspace list.
The copied template is stored in "My Projects" in the project list, so please check there.
(3) When the following screen is displayed, let's proceed to Step 2.

Step 2: Setting Up Google Sheets

Next, we will move on to setting up Google Sheets. This will prepare you to integrate with Yoom.
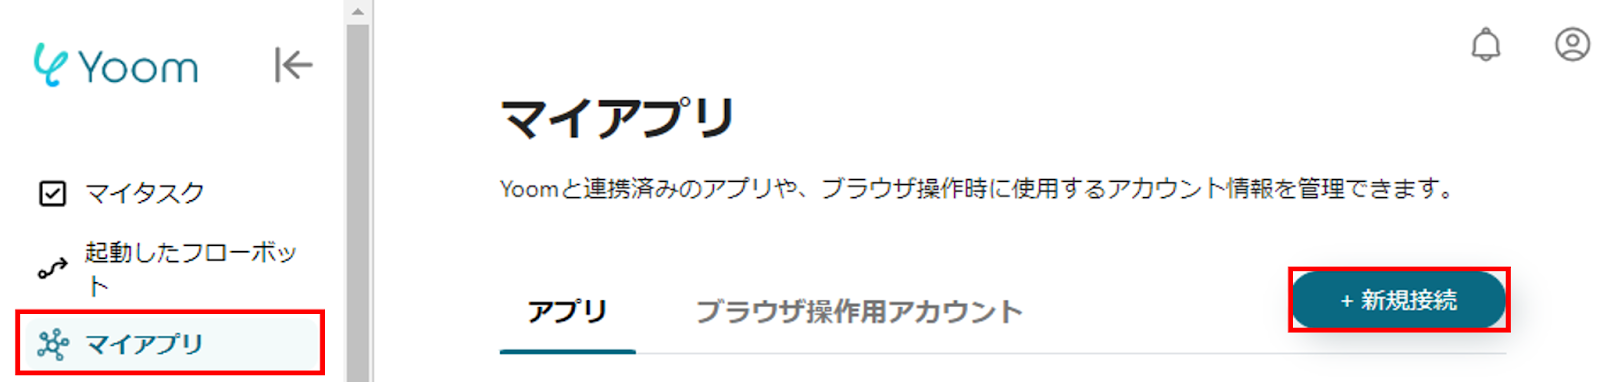
(1) Click "My Apps" on the left side of the screen.
(2) Next, click "+ New Connection" displayed on the right side of the screen.

(3) Select Google Sheets from the list of apps.
(4) Click Sign in with Google.

(5) Select and click the account you want to link on the account selection screen.
(6) On the Yoom login screen, check if the account information to be linked is correct and click "Next".
(7) Finally, on the "Yoom is requesting additional access to your Google Account" screen, click "Continue" to complete the setup of Google Sheets!

Step 3: Setting Up Zoho CRM

Next is the setup of Zoho CRM. This will also be registered in "My Apps".
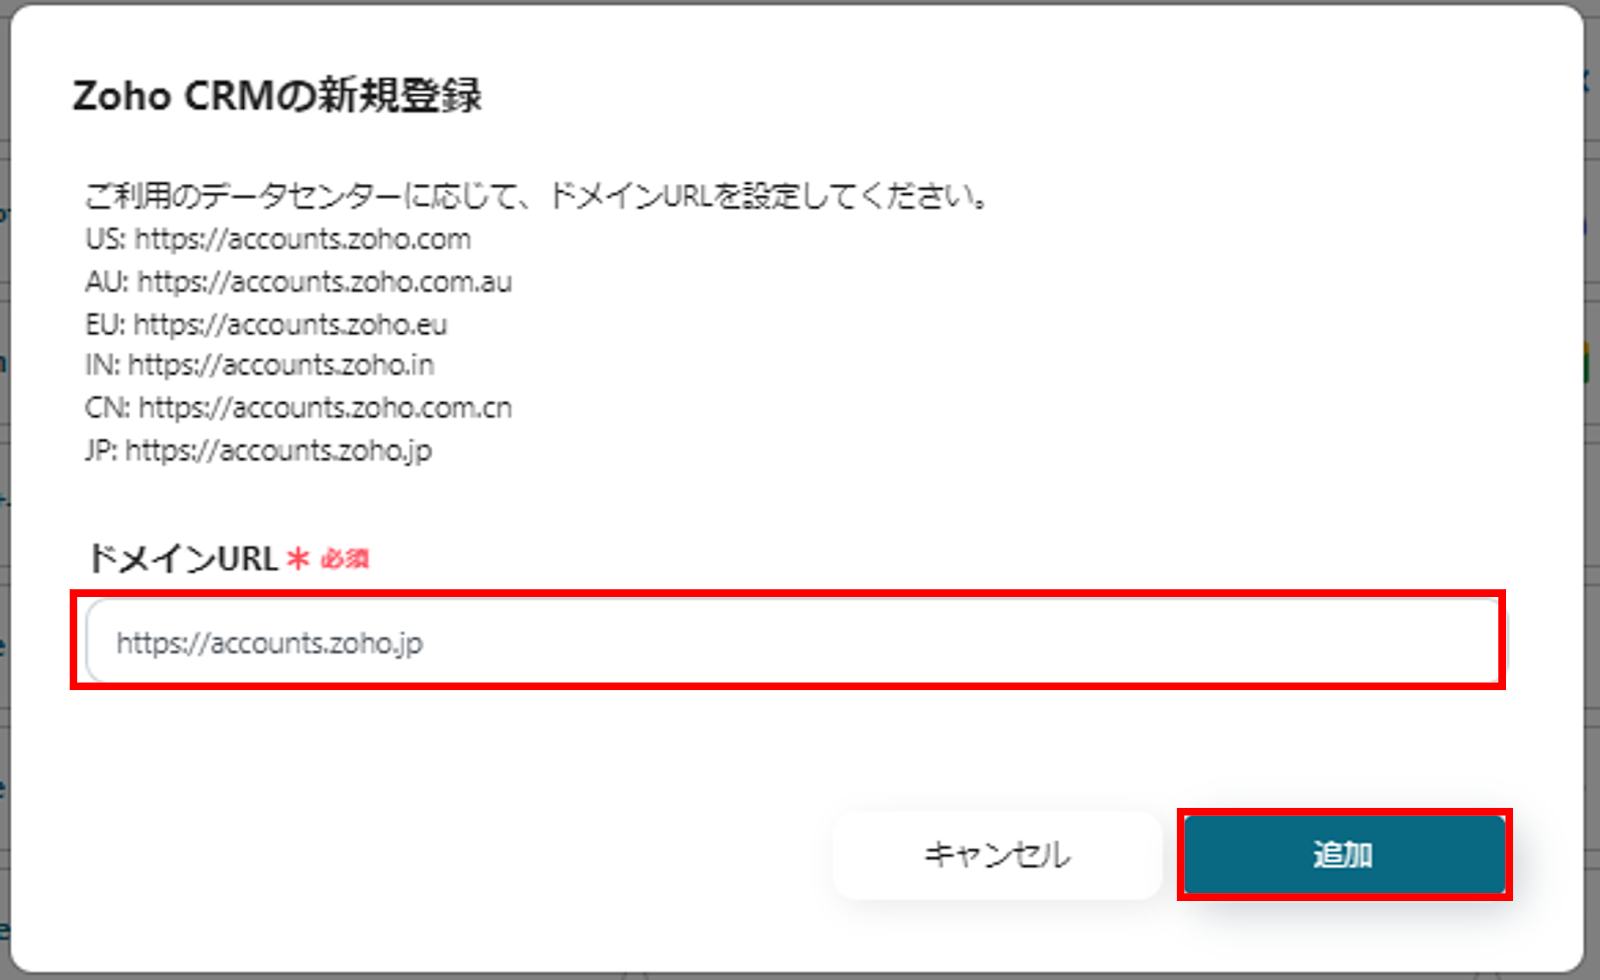
(1) Select Zoho CRM from the list of apps.
(2) On the Zoho CRM registration screen, set the domain URL and click "Add".

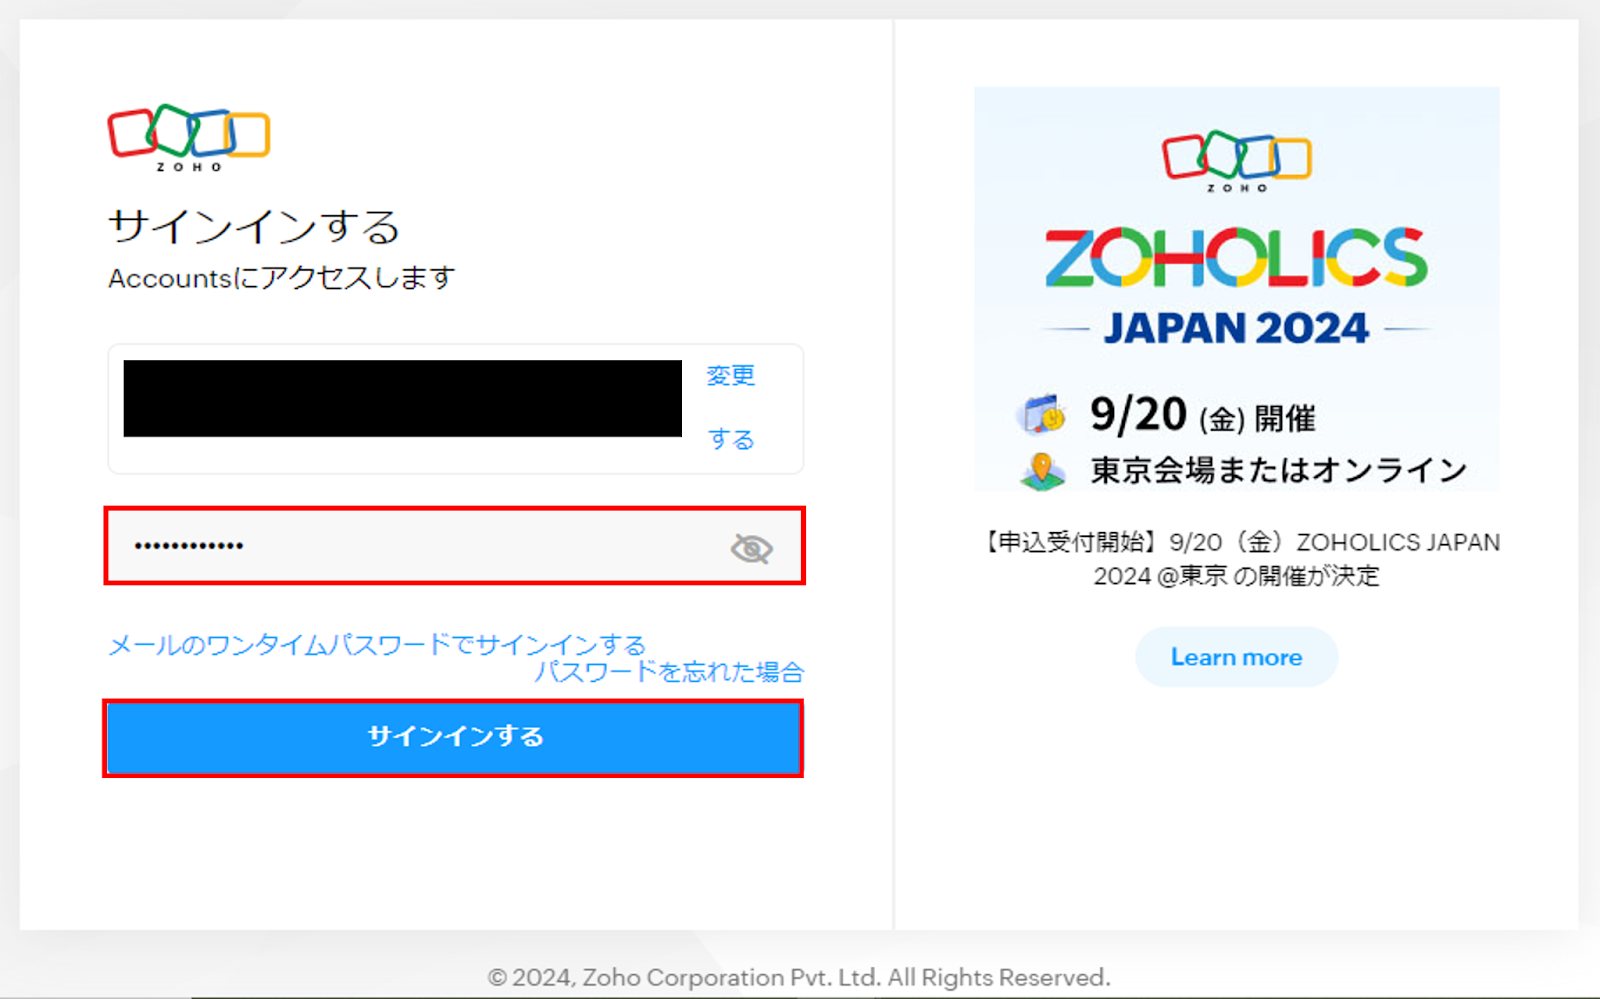
(3) Enter your Zoho account information on the sign-in screen and click "Next".

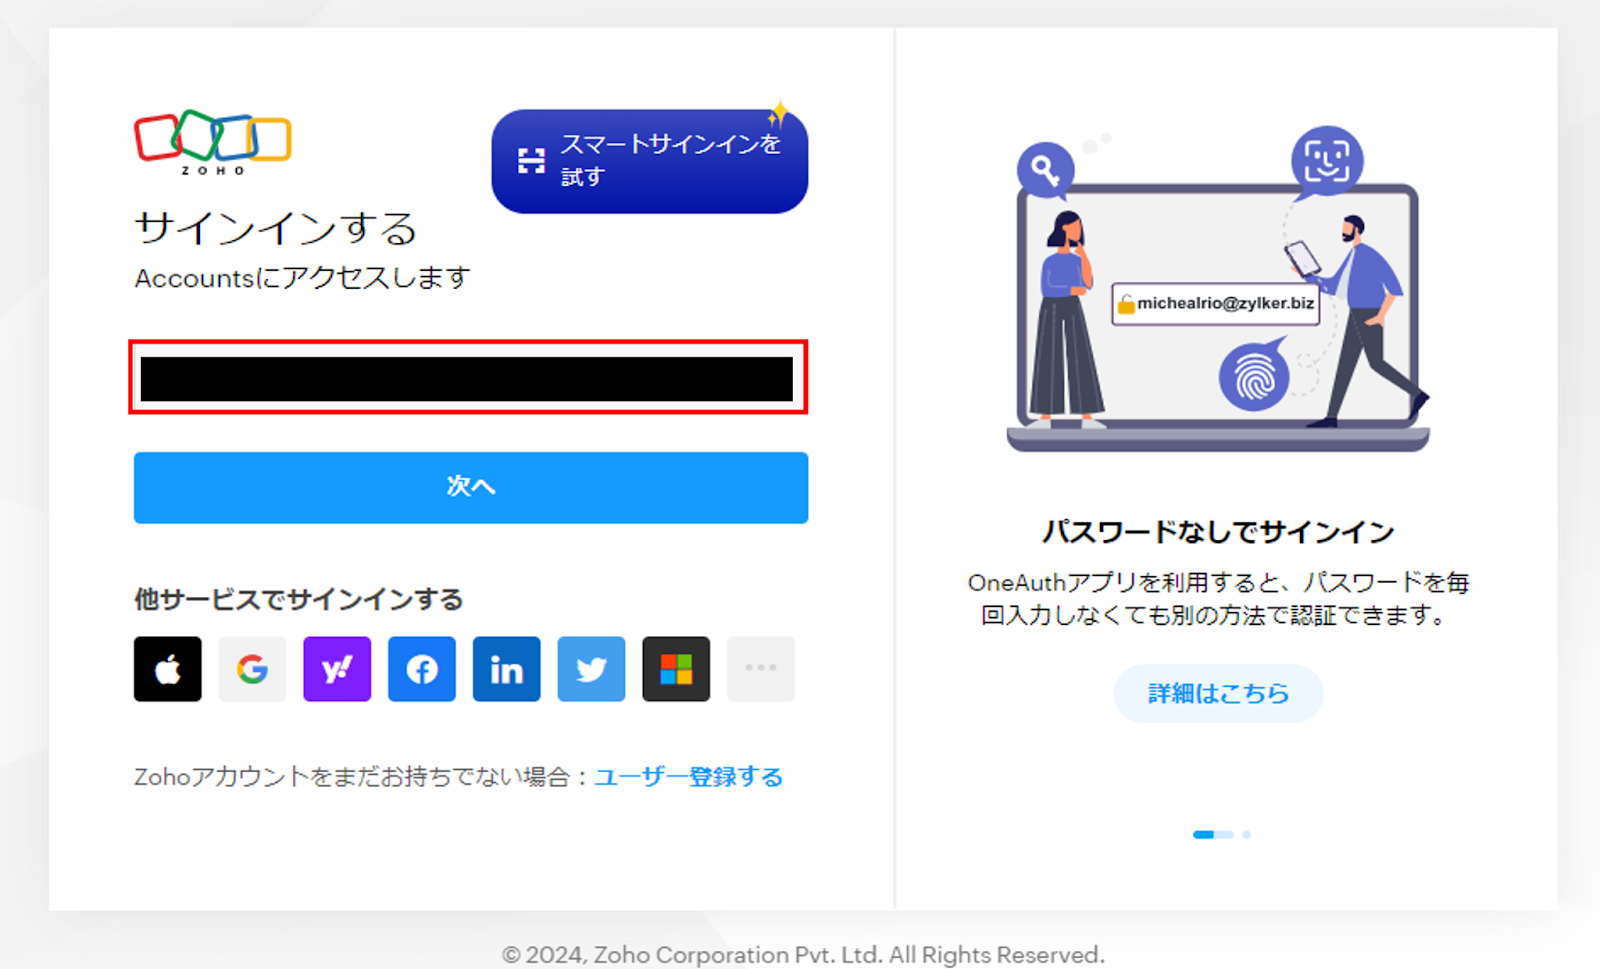
(4) Enter your password and click "Sign In".

(5) Click "Authorize" on the permissions screen.

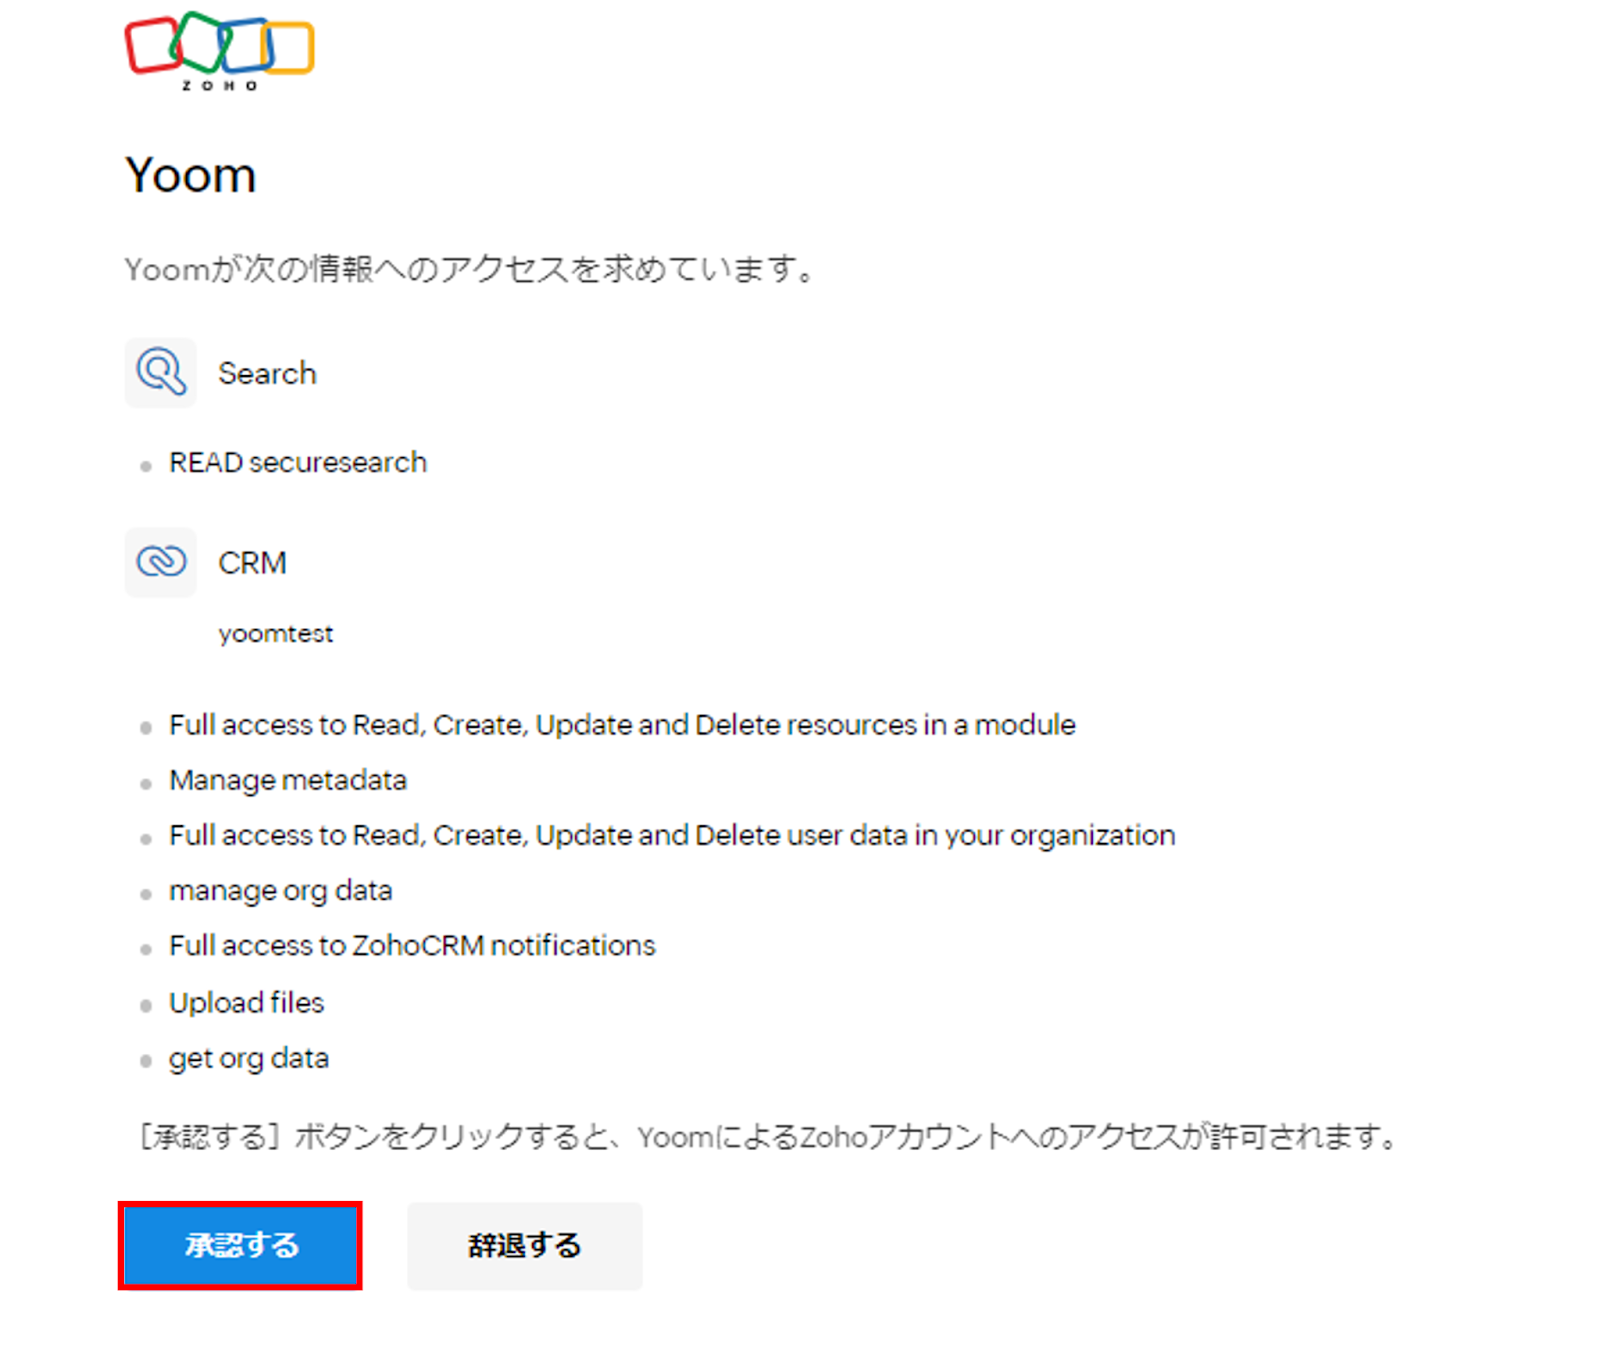
(6) This completes the setup of Zoho CRM!
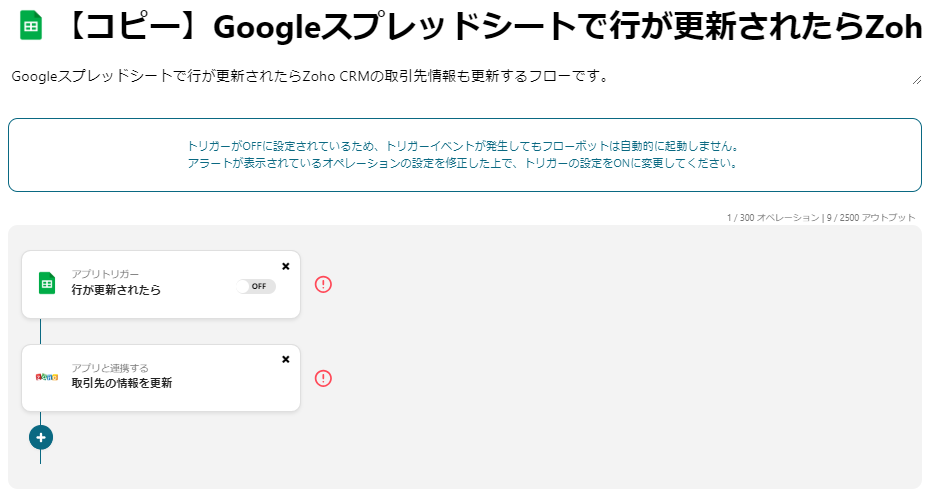
<span class="mark-yellow">Once you reach this point, let's return to the copied template!</span>
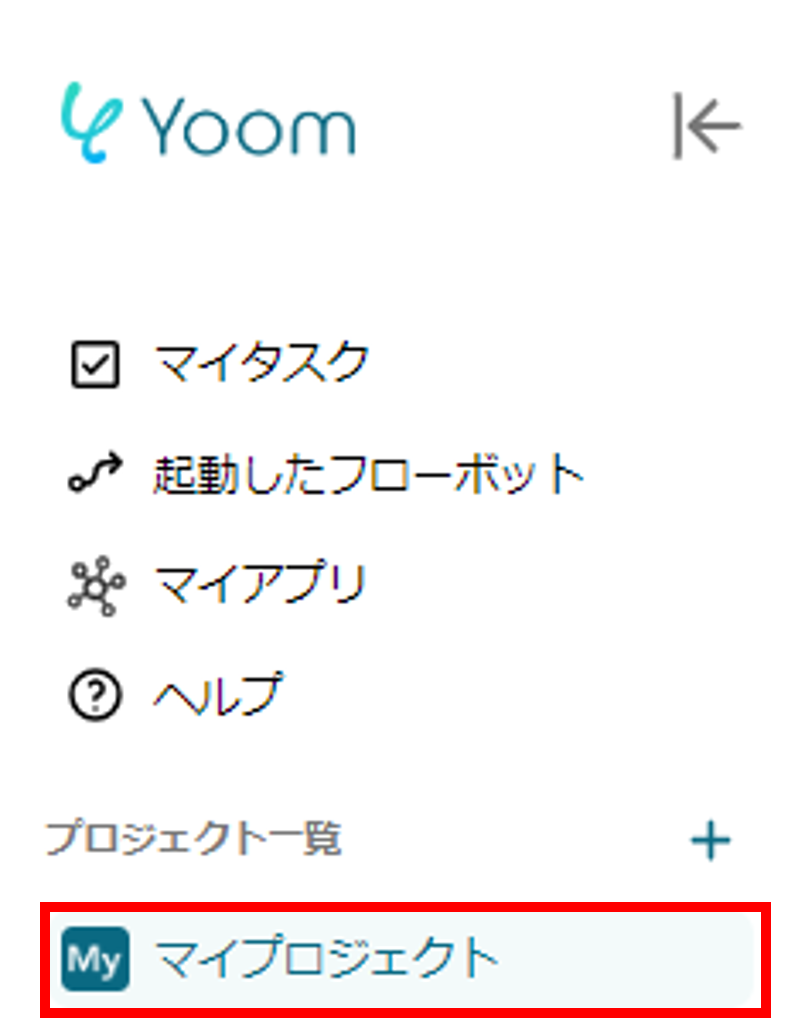
(7) Click "My Projects" from the project list.

(8) Click the copied template.
(9) Click "Edit" at the top right of the flow list screen and proceed to Step 4.

Step 4: Set Triggers and Actions

(1) Click "App Trigger" from the flow list screen

(2) Set the title of the app trigger
* You can use the already set title as it is.
(3) Verify that the account information linked with Google Sheets is correct
* If the information is not displayed, please click "+ Add Linked Account" to register.
(4) Select "When a row is updated" for the trigger action

(5) Click "Next"

■ API Connection Settings for App Trigger
(6) Set the trigger interval to 5 minutes
* The trigger interval you can set varies depending on the plan.
(7) Set each required item

  • Select the spreadsheet ID from the candidates as desired
  • Select the sheet ID from the candidates as desired
  • For the table range (start), specify "A" if you want the table range from A to H
  • For the table range (end), specify "H" if you want the table range from A to H
  • For the column with unique values, select the column name that contains unique values such as email addresses or IDs (the column that becomes the unique key)
  • For the column to detect updates, specify the column name to detect updates
    <span class="mark-yellow">The flow bot will be activated when the value of the column specified here is updated.</span>

(8) If there are no errors in the test, click "Save"
<span class="mark-yellow">Just a little more to go until completion!</span>
(9) Click "Integrate with App" displayed under the app trigger you just set

(10) Set the title
* You can use the already set title as it is.
(11) Verify that the account information linked with Zoho CRM is correct
* If the information is not displayed, please click "+ Add Linked Account" to register.
(12) Select "Update Account Information" for the action

(13) Click "Next"

■ API Connection Settings
(14) Set each required item

  • For the account ID, set ID from the output of "When a row is updated" this time
  • Select the update target item for the update content from the pull-down menu as desired
  • For the value of the update content, set Address from the output of "When a row is updated" this time
  • For the Zoho domain, set your Zoho domain from ".com", ".com.au", ".eu", ".in", ".com.cn", ".jp" as desired
    (This time, set ".jp")

(15) If there are no errors in the test, click "Save"
(16) Return to the flow list screen and change the app trigger to ON to complete the flow settings!
This completes the integration settings between Google Sheets and Zoho CRM. Thank you for your hard work!

Summary

Integrating Google Sheets with Zoho CRM is a powerful tool for reducing manual work and enabling real-time information sharing.
With Yoom, you can easily set up the integration without any coding, eliminating the need for engineers and reducing costs.
Use this article as a reference to help improve your business efficiency.

The person who wrote this article
t.nakaya
I changed my job from a dental hygienist to the IT industry, and in my previous job, I worked on web page replacement etc. as director support at a web company. Taking advantage of this experience, I am now putting all my energy into telling everyone about the appeal of Yoom. With an approach that combines technology and user perspectives, we sincerely want to help you improve your work efficiency through Yoom.
Tags
Automation
Integration
Google Sheets
Zoho CRM
App integration
No items found.
What is Yoom hyperautomation?
Conventional RPA can only automate simple repetitive tasks, and the setup process was very complicated.
With “hyperautomation,” which combines various technologies such as AI, API, RPA, and OCR, it is possible to automate many tasks that could not be realized until now more easily than before.
Don't Just Connect Apps—Automate Everything
Most tools simply connect one app to another, leaving the complex tasks to you. Yoom goes much further: From document creation and browser automation to OCR and generative AI, Yoom handles it all seamlessly in one platform.

Why settle for basic integrations? Streamline your entire workflow with Yoom’s powerful hyperautomation.
Learn more about Yoom
Helpful Materials
I understand Yoom! 3-piece set of materials
Download materials
Understand in 3 minutes! Yoom service introduction materials
Download materials
Find out by Before After! Yoom Case Study Collection
Download materials
See a list of useful materials