[No Programming Required] How to Automatically Write and Transfer Data to Google Sheets
How to Integrate Applications
・
2025-05-20
[No Programming Required] How to Automatically Write and Transfer Data to Google Sheets
k.hieda
When updating sales lists and organizing customer information using Google Sheets, do you ever worry about manual input errors or the hassle of the work involved?
However, when trying to automate such tasks, many people hesitate because they think programming or API knowledge is necessary.
In such cases, you can rely on the no-code tool Yoom. <span class="mark-yellow">You can easily achieve integration where data is automatically added to Google Sheets once an account is created in Apollo.</span> This reduces the tedious input work while making information organization and sharing smoother.
In this article, we introduce several methods to streamline writing tasks by integrating Google Sheets with other services. If you feel like you want to manage data accurately without hassle, please take a look.
For those who want to try it quickly
By using Yoom, you can easily integrate with Google Sheets without any code. Yoom provides templates for integrating with Google Sheets in advance, so you can achieve integration immediately just by registering, even without API knowledge.
Various Ways to Automatically Write to Google Sheets
There are several ways to automatically write to Google Sheets. We've picked out a few methods for you to check out!
Simply click "Try it out" on the automation example you're interested in and register an account to experience automatic writing to Google Sheets right away. Registration takes just 30 seconds, so feel free to give it a try!
Automatically Send/Transfer Data from Database/CRM Services to Google Sheets
As new accounts and deal information are constantly being generated in daily operations, organizing them in a way that everyone can easily manage and view can be surprisingly challenging. However, with the power of automation, these concerns become much more manageable.
For example, using a flow like "Add to Google Sheets when an account is created in Apollo" eliminates the need to manually enter data every time a user registers. When a new account is created in Apollo, the information is immediately sent to Google Sheets. It always stays up-to-date, making verification and sharing smooth. Since it doesn't involve manual input, errors are less likely to occur.
Additionally, the flow "Add to Google Sheets when a deal is closed in Salesforce" makes organizing and sharing sales information much easier. Since the order information is automatically reflected in Google Sheets, you won't be bogged down with data entry tasks, and decision-making speed increases. You can advance important steps reliably and smartly.
Automatically Send and Forward Form Data to Google Sheets
"What happens after you send the form?" — Automation provides a thoughtful answer to this question. It allows you to handle tasks effortlessly yet meticulously. Here, we introduce a template that makes this possible.
The flow of "sending a confirmation email to the respondent and appending the data to Google Sheets when a Google Form is submitted" is perfect for daily application tasks and survey management. The submitted content is automatically added to the spreadsheet, and a confirmation email is sent immediately. This ensures a prompt and careful response while preventing missed replies and input errors.
Another template, "store form submissions in Google Sheets when a form is sent to Hubspot," is recommended for those using Hubspot in marketing and sales activities. The form submission information is automatically added to the spreadsheet, enabling real-time data verification. As record visualization progresses, team collaboration is enhanced.
Automatically Send and Forward Email Content to Google Sheets
Your inbox can fill up in no time, and finding the necessary information can feel like searching for a needle in a haystack. But what if you could automate this task? You'd save time, reduce errors, and focus more on creative work.
First, there's the template for "Translating emails with a specific label in Gmail to English and adding them to Google Sheets." This is particularly useful for those who communicate internationally or work in environments where multilingual emails are common. Translation and recording are done simultaneously, significantly improving both speed and accuracy of your tasks.
Additionally, the flow for "Extracting information received in Outlook using AI and adding it to Google Sheets" uses AI to automatically read email content and pick out only the necessary information to reflect in the spreadsheet. No matter what emails you receive, you can effortlessly capture important information without missing a beat. This is especially a reliable ally for business people who handle a large volume of emails daily.
Let's Create a Flow to Automatically Write to Google Sheets
Let's get started with creating a flow to automatically write to Google Sheets! This time, we'll be using Yoom to proceed with the setup without any coding. If you don't have a Yoom account yet, please create one using this registration form.
[What is Yoom]
<span class="mark-yellow">In this article, we will explain the settings for the flow bot that “adds to Google Sheets when an account is created in Apollo”.</span>
Flow Bot Setup Process
Integrate Apollo and Google Sheets with My Apps
Copy the template
Set up actions for Apollo and Google Sheets
Turn on the trigger and complete the flow activation preparation
Step 1: Setting Up My App Integration
Here, you will configure the settings to register the app information to be integrated with Yoom. After logging into the Yoom workspace, click "+ Add" on the My Apps screen.
A list of apps available in Yoom will be displayed. Search for the app to be integrated using the search box and proceed with registering it to My Apps.
Apollo
Click on the app name from the search results. A screen will appear to enter the values linked to your Apollo account.
Account Name
Enter any value. It should be something that helps you identify the account.
A screen to create a new API key will pop up, so enter the information.
Check the name, description, and functions of this key (for this case, check all that seem applicable as it's for creating a new account).
Click Create API Key at the bottom right.
The created API key will be displayed in the list, and you can copy the value by clicking the copy button.
Paste it into the access token edit field on the Yoom screen.
Click the Add button to complete the registration of Apollo to My Apps.
Google Sheets
Clicking on the app name from the search results will display the integration confirmation screen between Google Sheets and Yoom.
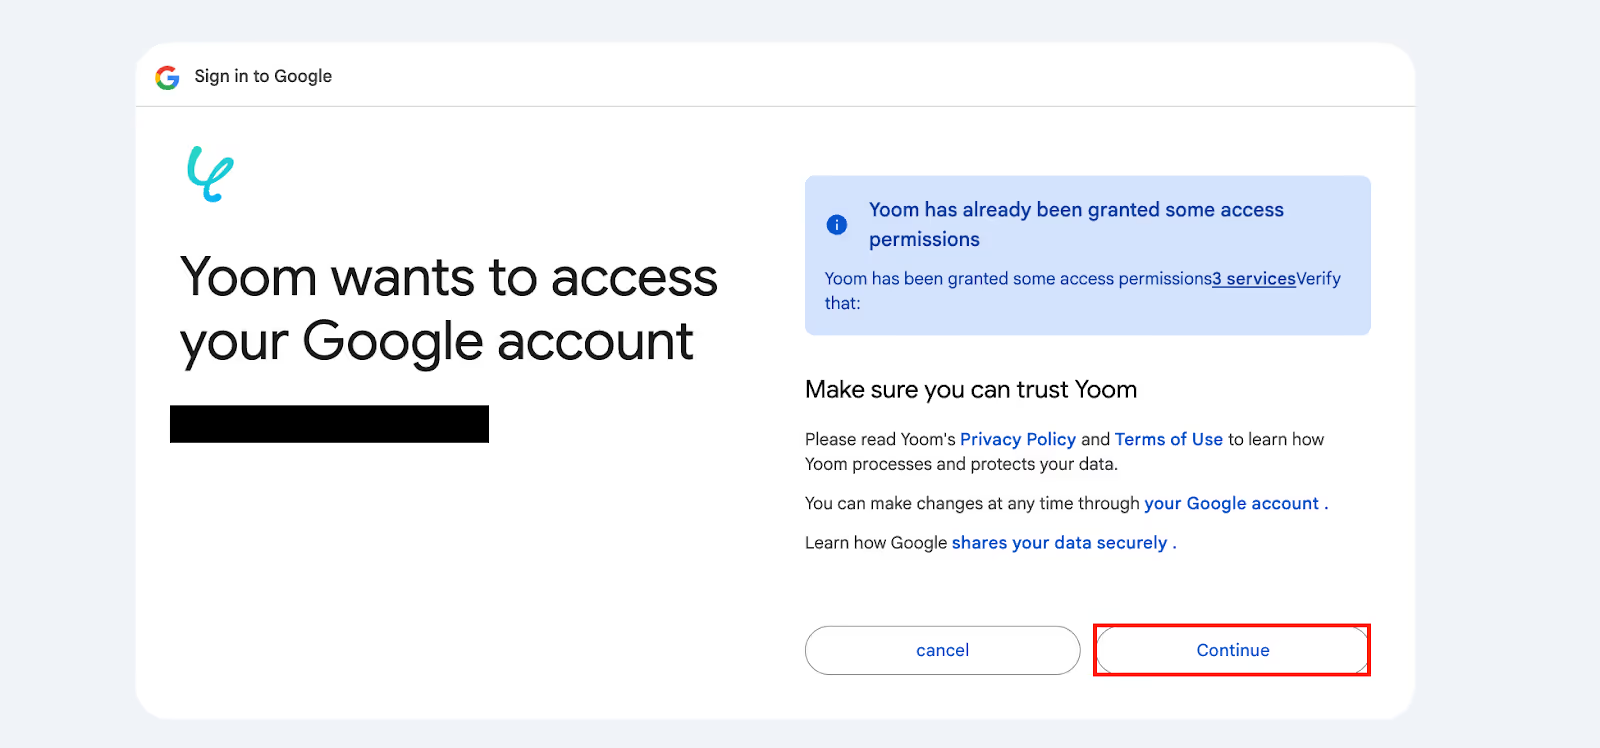
Click the "Sign in with Google" button to display the Google account login screen, and enter your email address and password.
Select the account to be integrated.
You will be asked to confirm Yoom's access permissions. Click "Continue".
Click "Continue".
This completes the integration of Google Sheets with My Apps.
Step 2: Copy the Template
Once the My App integration is complete, proceed to set up the Flowbot template. Please proceed to copy the template from the "Try it".
When the popup below appears, click "OK" to start the setup!
The copied template will be added to My Projects. You can access My Projects from the left menu bar.
Step 3: App Trigger "When Account is Created"
Click on the first step of the template and set the trigger (starting point) for the flow bot. In this step, you will set the flow's activation interval and configure it to retrieve information when a new account is registered.
(1/2) Select Linked Account and Action
The following items are already set on this screen:
Title
App
Account information linked with Apollo
Trigger Action
Click Next to proceed.
(2/2) API Connection Settings for App Trigger
Trigger Activation Interval
Select the activation interval for the flow. The shortest interval is 5 minutes. *The shortest activation interval may vary depending on your plan.
Once the activation interval is set, please create a new account in Apollo for testing purposes. (Event Occurrence)
After triggering the event, test if the flow bot can detect it correctly.
Click the Test button. If successful, you can retrieve the detected results' items and values. (The image below shows only the items, but actual values are reflected.)
In Yoom, these items and values are defined as "Output."
These values will be referenced in later steps. Click Save to proceed to the next step.
Step 4: Operate Database "Add Record"
Click on the second step of the template. In this step, you will configure the settings to accumulate data in a specified sheet of Google Sheets by referencing Apollo's information.
(1/2) Select Action
The following items are already set on this screen:
Title
App
Account information linked with Google Sheets
Action
Scroll down.
Database Integration
This time, we created a database to match the items that can be obtained in Apollo. Below is a sample.
Please set the items with unique values (unique keys). Errors will occur if there are duplicates.
Return to the Yoom screen.
Spreadsheet ID
Click the edit field to display a dropdown menu, showing sheets that the linked account has access to. Selecting one will allow you to reference the ID.
Spreadsheet Tab Name
Similarly, click the edit field to display candidates, and select one.
Table Range
If the header starts at A1 and ends at I, enter A1:I.
Click Next.
(2/2) Detailed Settings for Database Operation
The information from the linked spreadsheet is loaded and displayed as items. Sample item names should be reflected.
For each item, link the obtained value (output).
Click the edit field to display a dropdown menu, allowing you to select the output obtained in the previous operation. Choose the corresponding output for each item, and the reference code will be embedded in the edit field.
Once all inputs are complete, click the Test button. If successful, a row with the values obtained in Apollo will be added to the specified spreadsheet.
Click Save.
Step 5 (Final): Turn ON the App Trigger
Once all steps are configured, a completion screen will be displayed.
Turn ON the trigger to activate the flow bot.
You can toggle the trigger ON/OFF from the top left toggle. The flow bot setup is easily completed without programming.
Convenient Automation Examples Using Google Sheets
We have carefully selected 5 templates that can automate common input, notification, and file creation tasks in daily operations. Recommended for those who want to improve accuracy and speed while reducing effort.
Conclusion
If you can integrate with Google Sheets without coding, daily data entry and organization tasks become much easier. Especially flows like "automatically adding to a spreadsheet when an account is created in Apollo" reduce manual errors and enhance the speed and accuracy of operations.
With Yoom, you can easily set up such systems on your own without programming knowledge. Start with a free registration and take the first step towards convenient automation.
The person who wrote this article
k.hieda
With a decade of experience as a Web Planner and Director, my primary responsibilities at a web production company included proposing and managing revision and operation plans for clients. Currently, I am a parallel worker. In the Content Division at Yoom, I am involved in blog production, while also handling external PR projects for companies as an independent contractor. As I embark on a new venture in the vacation rental industry, I am committed to optimizing routine work efficiency.
Conventional RPA can only automate simple repetitive tasks, and the setup process was very complicated. With “hyperautomation,” which combines various technologies such as AI, API, RPA, and OCR, it is possible to automate many tasks that could not be realized until now more easily than before.
Most tools simply connect one app to another, leaving the complex tasks to you. Yoom goes much further: From document creation and browser automation to OCR and generative AI, Yoom handles it all seamlessly in one platform.
Why settle for basic integrations? Streamline your entire workflow with Yoom’s powerful hyperautomation.


.avif)
.avif)
.avif)


