ジョブカン経費精算・ワークフローとWordPressの連携イメージ
How to Integrate Applications

2024/12/23

How to integrate Jobcan Expense Management/Workflow with WordPress to add a user to WordPress when an ID is approved in Jobcan Expense Management/Workflow

m.wadazumi

Are you looking to streamline the process of adding users to WordPress?
Consider implementing automation that adds users to WordPress triggered by approvals in Jobcan Expense Management and Workflow.
This automation can save you manual effort and reduce your workload.
It is especially recommended for onboarding new employees or preparing for projects.

Recommended for

  • Those who use Jobcan Expense Management and Workflow and WordPress separately and want to reduce manual tasks
  • Those who find adding users to WordPress cumbersome
  • Those who want to smoothly onboard new employees

Benefits and Examples of Integrating Jobcan Expense Management and Workflow with WordPress

Benefit 1: Reduce Human Errors

Manually adding users to WordPress can lead to registration errors or omissions.
However, when a specific form ID is approved in Jobcan Expense Management and Workflow, users are automatically added to WordPress, reducing human errors.
For example, if you mistakenly register an email address or password when creating a WordPress user, it can lead to login issues or require correction tasks.
Integrating Jobcan Expense Management and Workflow with WordPress can effectively prevent this problem.

Benefit 2: New Employees Can Start Work Smoothly

Creating an environment where new employees can smoothly proceed with their tasks is crucial for improving team productivity.
For example, if a new employee submits a specific form ID in Jobcan Expense Management and Workflow and it is approved, a WordPress user can be automatically created, allowing them to start work from their first day.
This eliminates the need for employees to manually add users, minimizes time lags, and prevents last-minute preparations at the start of work.

Benefit 3: Eliminate Manual Work

For companies with frequent increases in employee numbers or new projects, manually creating WordPress users can be a significant burden.
For example, at the start of a new project, you can apply for the relevant user permissions in Jobcan Expense Management and Workflow, and once approved, create users in WordPress, reducing the workload for those in charge.
This allows for smooth permission granting without burdening HR personnel or project leaders.

Now, let's explain how to use the no-code tool Yoom to "add users to WordPress when approved in Jobcan Expense Management and Workflow."

[What is Yoom]

How to Create an Integration Flow Between Jobcan Expense Management and Workflow and WordPress

You can achieve automation by receiving approval for a specific form ID in Jobcan Expense Management and Workflow via API and using WordPress's API to add users.
Generally, programming knowledge is required to achieve this, but with the no-code tool Yoom, it can be easily accomplished without programming knowledge.

The integration flow is broadly created through the following processes.

  • Register Jobcan Expense Management and Workflow and WordPress as My Apps
  • Copy the template
  • Set the trigger in Jobcan Expense Management and Workflow that serves as the starting point of the flow and the subsequent WordPress operation settings
  • Turn on the trigger button and verify the integration operation between Jobcan Expense Management and Workflow and WordPress

If you haven't used Yoom yet, please register for free here.
If you are already using Yoom, please log in.

Step 1: Register Jobcan Expense Management & Workflow and WordPress as My Apps

Please register Jobcan Expense Management & Workflow and WordPress as My Apps to connect them to Yoom.
By registering My Apps in advance, automation settings become easier.

First, let's register Jobcan Expense Management & Workflow as My Apps.
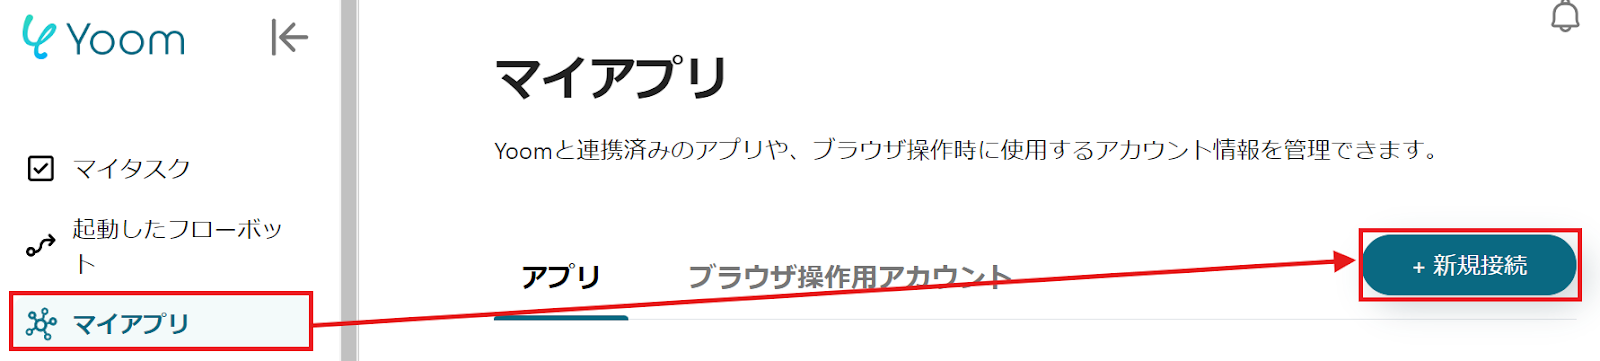
Click "My Apps" → "New Connection" on the left side of the Yoom screen.

When the following screen appears, search for Jobcan Expense Management & Workflow from the app list or use the search bar.

The following screen will appear, so set the "Account Name" as desired.
For instructions on registering Jobcan Expense Management & Workflow as My Apps, please check here.

Move to Jobcan Expense Management & Workflow and log in with administrator privileges.
Click "Account Name" → "Company Information Settings" → "Common ID Integration & API Management" in order, and you will be able to see the authentication code (API Token), so please copy it.
Return to the Yoom screen and enter the authentication code in the "Access Token".

Next, let's register WordPress as My Apps.
When the following screen appears, check the explanation and set the fields within the frame.

Once both My Apps registrations are complete, Jobcan Expense Management & Workflow and WordPress will be displayed.

Step 2: Copy the Template

To set up automation, click "Try it" on the banner below.

Read the following screen display and click "OK".

The following screen will be displayed, so check the "Title" and "Description".
If you want to make changes, please do so on the following screen.
First, to set up Jobcan Expense Reimbursement and Workflow, click "When a specific form ID application is approved".

Step 3: Set the trigger for Jobcan Expense Reimbursement and Workflow, which is the starting point of the flow, and then set the subsequent WordPress operations

When the following screen is displayed, check the settings.

  • "Title" → Set as desired
  • "Account information linked with Jobcan Expense Reimbursement and Workflow" → Verify correctness
  • "Trigger Action" → When a specific form ID application is approved

The following screen will be displayed, so set the "Trigger Interval".
Select from 5 minutes, 10 minutes, 15 minutes, 30 minutes, or 60 minutes.
※ Note that the trigger interval varies depending on the plan.

Scroll and select the "Form ID" from the candidates.
Click within the frame and select the relevant form ID.
Once the settings are complete, click "Test" → "Test Successful" → "Save".

Next, to set up the retrieval of detailed information applied in Jobcan, click "Retrieve Application Details (Generic Form)".
When the following screen is displayed, check the settings.

  • "Title" → Set as desired
  • "Account information linked with Jobcan Expense Reimbursement and Workflow" → Verify correctness
  • "Action" → Retrieve Application Details (Generic Form)

The following screen will be displayed, so set the "Application ID".
Select the application ID from the output of "When a specific form ID application is approved".
Click the arrow in the red frame to display the output.

Next, to set up WordPress, click "Create User".
When the following screen is displayed, check the settings.

  • "Title" → Set as desired
  • "Account information linked with WordPress" → Verify correctness
  • "Action" → Create User

Check the following precautions.
Install the plugin from here on WordPress.

Scroll and set the "Username".
Select "Username" from the output of "Retrieve Application Details (Generic Form)".

Similarly, use the output of "Retrieve Application Details (Generic Form)" to set other items.
Once the settings are complete, click "Test" → "Test Successful" → "Save".

Step 4: Turn ON the trigger button and verify the integration operation between Jobcan Expense Reimbursement and Workflow and WordPress

Finally, click "Turn ON Trigger" to complete the automation settings.
Check if the flow bot starts up correctly.

Here is the template used this time.

Other Automation Examples Using WordPress

1. This is a flow that automatically notifies Google Chat when an article is published on WordPress.
This automation is recommended for those who want to engage in promotional activities after an article is published on WordPress.
Notifying Google Chat facilitates smooth sharing among team members.

2. This is a flow to automatically add posts to kintone when they are published on WordPress.
By adding articles posted on WordPress to kintone, it will be easier to strategize and analyze.
Manual transcription is no longer necessary, reducing the burden on the person in charge.

3. This is a flow to automatically post new articles on WordPress using the content from Google Forms.
By utilizing the data submitted in Google Forms, you can automatically post articles on WordPress, making the posting process smoother.
It can significantly reduce working time and help in mass-producing articles.

Summary This time, we introduced a method to automatically add users to WordPress when an application with a specific form ID in Jobcan Expense Management and Workflow is approved. This helps prevent registration errors and omissions, ensuring accurate user registration. It is particularly effective in situations where user creation increases, such as at the start of a project or with an increase in the number of employees. Leverage Yoom's automation to improve the efficiency of administrative tasks. Incorporate the template introduced this time into your operations to reduce the burden.
The person who wrote this article
m.wadazumi
I've been working as a writer since my job in child welfare, and I'm currently writing a blog on Yoom. While being surprised by the work efficiency improvements that can be made with Yoom, I would like to share that excitement with everyone and contribute to society. I'll tell you about application integration and automation that even I, who has zero programming knowledge, can do.
Tags
Integration
Automatic
Automation
Jobkan Expense Management & Workflow
WordPress
App integration
No items found.
What is Yoom hyperautomation?
Conventional RPA can only automate simple repetitive tasks, and the setup process was very complicated.
With “hyperautomation,” which combines various technologies such as AI, API, RPA, and OCR, it is possible to automate many tasks that could not be realized until now more easily than before.
Don't Just Connect Apps—Automate Everything
Most tools simply connect one app to another, leaving the complex tasks to you. Yoom goes much further: From document creation and browser automation to OCR and generative AI, Yoom handles it all seamlessly in one platform.

Why settle for basic integrations? Streamline your entire workflow with Yoom’s powerful hyperautomation.
Learn more about Yoom
Helpful Materials
I understand Yoom! 3-piece set of materials
Download materials
Understand in 3 minutes! Yoom service introduction materials
Download materials
Find out by Before After! Yoom Case Study Collection
Download materials
See a list of useful materials