マネーフォワード 掛け払いとGoogle スプレッドシートの連携イメージ
How to Integrate Applications

2025-02-03

How to Add to Google Spreadsheet After Invoice Issuance is Completed with Money Forward Deferred Payment

a.ohta

Aren't you using various tools every day to reduce your workload and improve efficiency?
For example, if you want to collaboratively edit data managed by a specific tool in your preferred layout, you would need to manually transfer it to Google Sheets.
This improves visibility and makes sharing with team members easier, but it also involves the hassle of manual input.

To solve such issues, we have integrated Money Forward Kakebarai with Google Sheets!
<span class="mark-yellow">If you are manually transferring invoice information from Money Forward Kakebarai to Google Sheets, let's implement automation through app integration!</span>
First, let me introduce two benefits of automation!

Benefits of Integrating Money Forward Kakebarai with Google Sheets

1. Increased Work Efficiency

By integrating Money Forward Kakebarai with Google Sheets, the information from issued invoices is automatically added to Google Sheets.
This eliminates the need to input the same information repeatedly, reducing your workload. It also saves time.
Furthermore, since Google Sheets data is added in real-time, it may allow for quicker dissemination of information across the team than before.

2. Maintaining Data Accuracy

When manually transferring data, you must work carefully to ensure correct input. However, human errors inevitably occur. This is where automation is recommended to reduce such errors.
With automation, invoice information from Money Forward Kakebarai is transferred directly to Google Sheets, making it easier to manage data more accurately than manual input.

[About Yoom]

Next, I will introduce how to create a Flowbot with Yoom, which allows app integration without programming, to "add to Google Sheets when an invoice is issued with Money Forward Kakebarai."
After registering with Yoom, please try creating it!

The above Flowbot template can be copied from below.

1. Click on "View Details" on the top banner
2. Click on "Try this template" at the bottom of the transitioned screen
3. Register for Yoom

*If you have already completed registration, the login screen will be displayed, so please log in.

How to Create a Workflow for Integrating Money Forward Deferred Payment and Google Sheets

Step 1: My App Integration

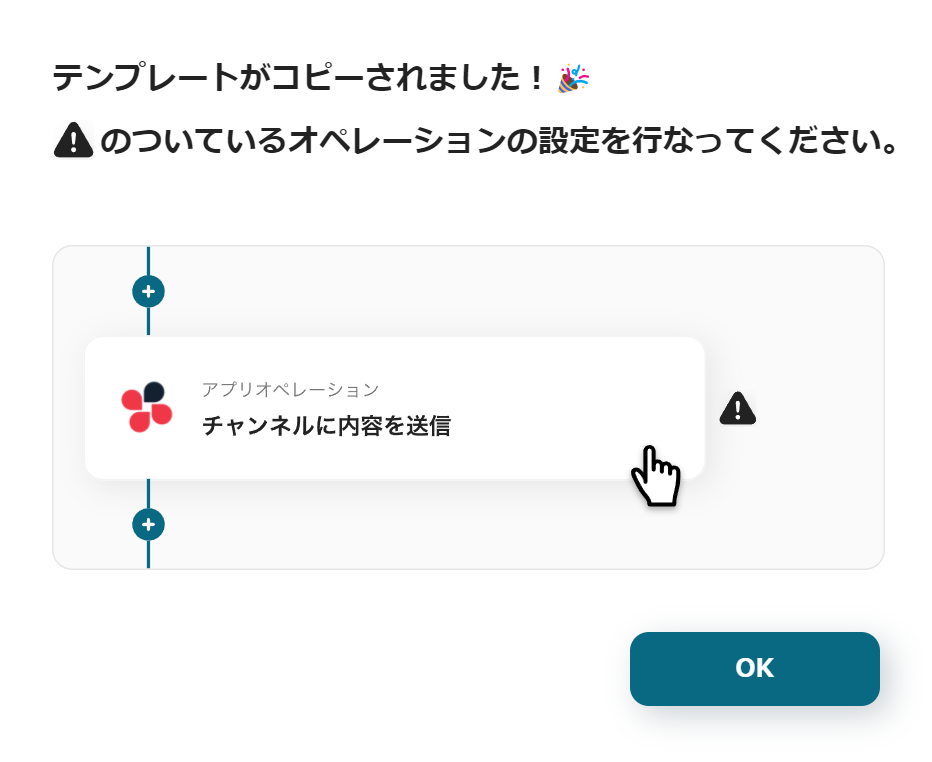
Once Yoom registration is complete, the Flowbot template will be copied to "My Projects".
If the display appears as shown in the image, please select "My Apps" from the menu on the left side of the screen.

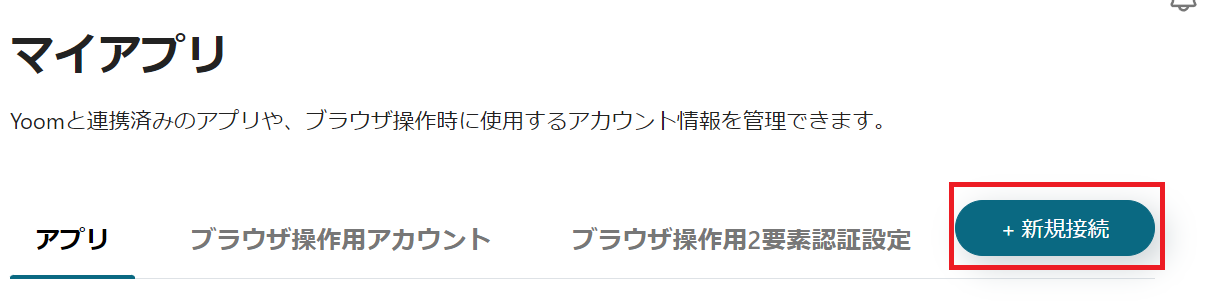
Click the new connection button at the top right and integrate Yoom with each app.

Integration of Money Forward Deferred Payment and Yoom

1. Search
Enter "Money Forward Deferred Payment" in the search box and click the Money Forward Deferred Payment icon.

2. Enter Required Fields

Click the red frame in the image and obtain the API key according to the content.
Paste the obtained API key into the access token.
The account name can be anything you like. It is recommended to use something easy to understand, such as a company name or person in charge.

3. Press Add
After entering the required fields, click Add at the bottom right.

If the above display appears, the integration is complete.

Integration of Google Sheets and Yoom

1. Search
Enter "Google Sheets" in the search box and click the Google Sheets icon.

2. Select Account
Select the Google account of the Gmail address to be integrated with Yoom.

3. Log in to Yoom

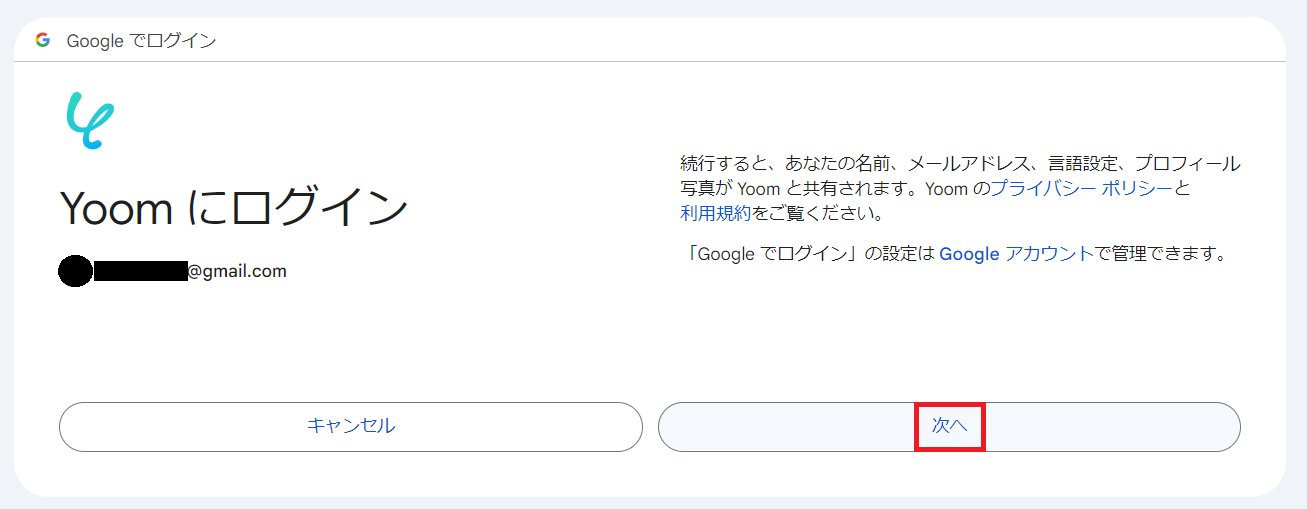
If the above display appears, check the terms and click Next.

4. Grant Permissions
"
When the message "Yoom is requesting additional access to your Google account" appears, click Continue.
Proceed to the authentication screen and select <span class="mark-yellow">Allow all permissions</span>.


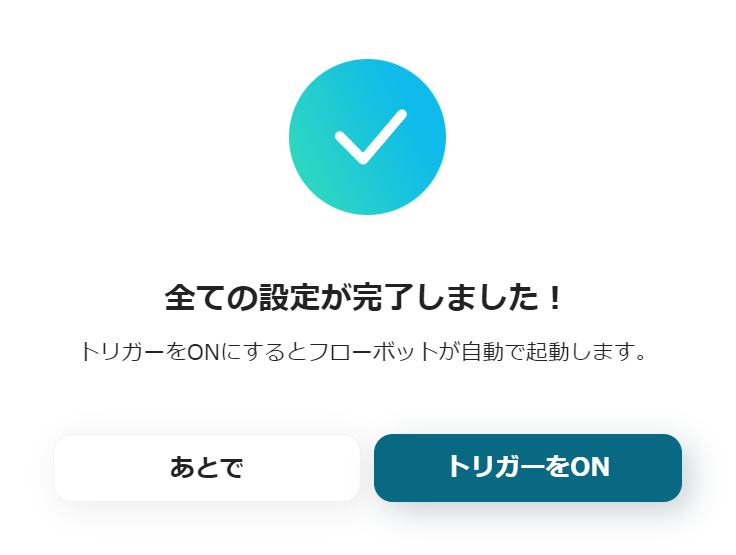
If the screen switches and the above display appears, the integration is complete.

This completes the integration of Money Forward Deferred Payment and Google Sheets with My Apps.
Next, use the template you copied earlier to configure the Flowbot.
If you haven't copied it yet, please copy the Flowbot template from below.

1. Hover over the banner and click "View Details"
2. Click "Try this template" on the redirected page
3. Register for Yoom
※ If you have already registered, the login screen will be displayed, so please log in.

Step 2: Set up triggers for Money Forward Deferred Payment

1. Open My Projects


Open "My Projects" from the menu on the left side of the screen.

2. Open the copied template
Click on "【Copy】Add to Google Spreadsheet when invoice issuance is completed with Money Forward Deferred Payment".

3. Select an app trigger
Click on the "When invoice issuance is completed" icon for Money Forward Deferred Payment.
The title and other settings are already completed, so click Next.

4. Set up Webhook


Set up the Webhook according to the contents in the red frame.
By setting up the Webhook, data will be added to Google Spreadsheet in real-time when an invoice is issued with Money Forward Deferred Payment.

5. Issue an invoice
Issue an invoice with Money Forward Deferred Payment for testing purposes.

6. Execute the test

Press the test button at the bottom of the screen.
If "Test Successful" is displayed, it is complete. Click Save.

Step 3: Retrieve Invoice Information

1. Integrate with the app
Click on the "Retrieve Invoice Information" icon for Money Forward Deferred Payment.
The title and other settings are already completed, so click Next.

2. Switch to the Sandbox environment

Since it is set as shown in the image, switch to the Sandbox environment.


You can change it from the dropdown.

3. Execute the test
Press the test button at the bottom of the screen.
If "Test Successful" is displayed, it is complete. Click Save.

Step 4: Retrieve Customer Information

1. Integrate with the app
Click on the "Retrieve Customer Information" icon for Money Forward Deferred Payment.
The title and other settings are already completed, so click Next.

2. Switch to the Sandbox environment

Switch to the Sandbox environment as before.

3. Execute the test
Press the test button at the bottom of the screen.
If "Test Successful" is displayed, it is complete. Click Save.

Step 5: Set up Google Spreadsheet

1. Prepare Google Spreadsheet

Prepare a Google Spreadsheet to manage the invoice information for Money Forward Deferred Payment.
This time, it was created as shown in the image.

2. Integrate the app
Click on the "Add Record" icon for Google Spreadsheet.
The title and other settings are already completed, so click Next.

3. Integrate the database

Integrate Google Spreadsheet with Money Forward Deferred Payment.


By clicking the box, you can select the integrated Google Spreadsheet.
Select the Google Spreadsheet where you want to transfer the invoice information from Money Forward Deferred Payment.

The setting method is the same for the tab name of the spreadsheet.

4. Set the table range

Set where in the Google Spreadsheet to add the data.
Since it depends on the prepared Google Spreadsheet, set it arbitrarily.
Click Next.

5. Set the values for the records to be added

Set each box. These item names are linked to the prepared Google Spreadsheet, so they may differ from the image display, but the setting method is the same.
Click inside the box.

Since the data from Money Forward Deferred Payment is displayed, click the dropdown linked to the box name.

As shown in the image, the data sent in the test earlier is now available.
Select the item linked to the box name.
For example, in the image, the box name is "Company Name", so the data to be retrieved is "Customer Name".

6. Execute the test

Select data for other items as well and fill in the boxes as shown in the image.
After completion, press the test button at the bottom of the screen. If the test is successful, click Save.

7. Turn on the trigger

When the creation of the flowbot is complete, the above display will appear.
The trigger is initially set to OFF, so turn it ON.

This completes the creation of the flowbot using Money Forward Deferred Payment and Google Spreadsheet.

Flowbot template used this time
Add to Google Spreadsheet when invoice issuance is completed with Money Forward Deferred Payment

Money Forward Deferred Payment and Other Automation Examples Using Google Sheets

There are many other examples of automation using Money Forward Deferred Payment and Google Sheets on Yoom, so here are a few.

1. Reflecting a list of unpaid invoices in Google Sheets using Money Forward Deferred Payment
By using this in conjunction with the current flow bot, it becomes easier to identify which invoice information is unpaid.

2. Add the list of bills after the next day from Money Forward Kakebarai to Google Spreadsheet
This allows you to manage a list of upcoming bills, which is recommended to prevent overlooking any.

3. Once the credit limit review is completed with Money Forward Deferred Payment, add it to Google Sheets
It is also possible to obtain information on the credit review. It is easy to manage in Google Sheets along with various data from Money Forward Deferred Payment.

Summary

By combining multiple tools to complete tasks, work efficiency can be improved and the workload can be reduced. On the other hand, there is a possibility that the number of apps to manage will increase, and the frequency of data entry may also rise.
This is precisely when the introduction of automation is recommended. In this case, you can check billing information using only Google Sheets without having to visit Money Forward Kakebarai. Furthermore, the hassle of manual entry can also be reduced.
Yoom offers a variety of templates. Please take this opportunity to try them out.

The person who wrote this article
a.ohta
After working as a general store manager, I started working from home as an SEO writer. Later, an outsourcing agreement was signed with a marketing startup for about 5 years. Surrounded by students at the University of Tokyo, I held a computer and spent my days studying various business terms and how to use SaaS tools. When I was a general store manager, time was taken over and over again by office work such as sales and inventory management, human resource management, and ordering, etc., and I was unable to serve customers and often missed sales times. Even when outsourcing, there are many detailed tasks such as input, etc., and “can't such monotonous tasks be automated?” I thought so, and I really sympathize with Yoom's vision!
Tags
Money Forward Kakebarai
Google Sheets
Automation
Integration
Automatic
App integration
No items found.
What is Yoom hyperautomation?
Conventional RPA can only automate simple repetitive tasks, and the setup process was very complicated.
With “hyperautomation,” which combines various technologies such as AI, API, RPA, and OCR, it is possible to automate many tasks that could not be realized until now more easily than before.
Don't Just Connect Apps—Automate Everything
Most tools simply connect one app to another, leaving the complex tasks to you. Yoom goes much further: From document creation and browser automation to OCR and generative AI, Yoom handles it all seamlessly in one platform.

Why settle for basic integrations? Streamline your entire workflow with Yoom’s powerful hyperautomation.
Learn more about Yoom
Helpful Materials
I understand Yoom! 3-piece set of materials
Download materials
Understand in 3 minutes! Yoom service introduction materials
Download materials
Find out by Before After! Yoom Case Study Collection
Download materials
See a list of useful materials