・
Google スプレッドシートとNinoxを連携して、Google スプレッドシートで行が追加されたらNinoxにレコードを作成する方法

リード情報の管理はどのように行っていますか?
複数のツールを活用している場合、手動業務を手間だと感じることがあるかもしれません。
この記事ではGoogle スプレッドシートとNinoxを連携して「Google スプレッドシートで行が追加されたら、Ninoxにレコードを作成する」方法をご紹介します。
この自動化によって、入力作業を軽減でき、正確な情報管理が期待できます。
さらにノーコードでアプリの連携ができるYoomを活用して、フローボットを作成する方法についても詳しくご紹介します。ぜひ、ご覧ください。
とにかく早く試したい方へ
YoomにはGoogle スプレッドシートとNinoxを連携するためのテンプレートが用意されています。
今すぐ試したい方は、以下のバナーから早速スタートできますよ!
■概要
Google スプレッドシートで管理している情報を、都度Ninoxに手入力する作業に手間を感じていませんか。単純な転記作業は時間がかかるだけでなく、入力ミスといったヒューマンエラーの原因にもなりがちです。このワークフローを活用すれば、Google スプレッドシートに行が追加されるだけで、Ninoxへのレコード作成が自動的に実行されるため、こうした課題をスムーズに解消できます。
■このテンプレートをおすすめする方
- Google スプレッドシートとNinox間で、手作業でのデータ転記に手間を感じている方
- データ入力のミスをなくし、データベースの正確性を維持したいと考えているチームリーダーの方
- 定型的な入力業務から解放され、より生産性の高い業務に時間を割きたいと考えている方
■このテンプレートを使うメリット
- Google スプレッドシートに行が追加されると自動でNinoxにレコードが作成されるため、これまで手作業に費やしていたデータ入力の時間を短縮できます。
- 手作業によるデータの転記がなくなるため、入力間違いや転記漏れといったヒューマンエラーの発生を防ぎ、データの正確性を保つことにつながります。
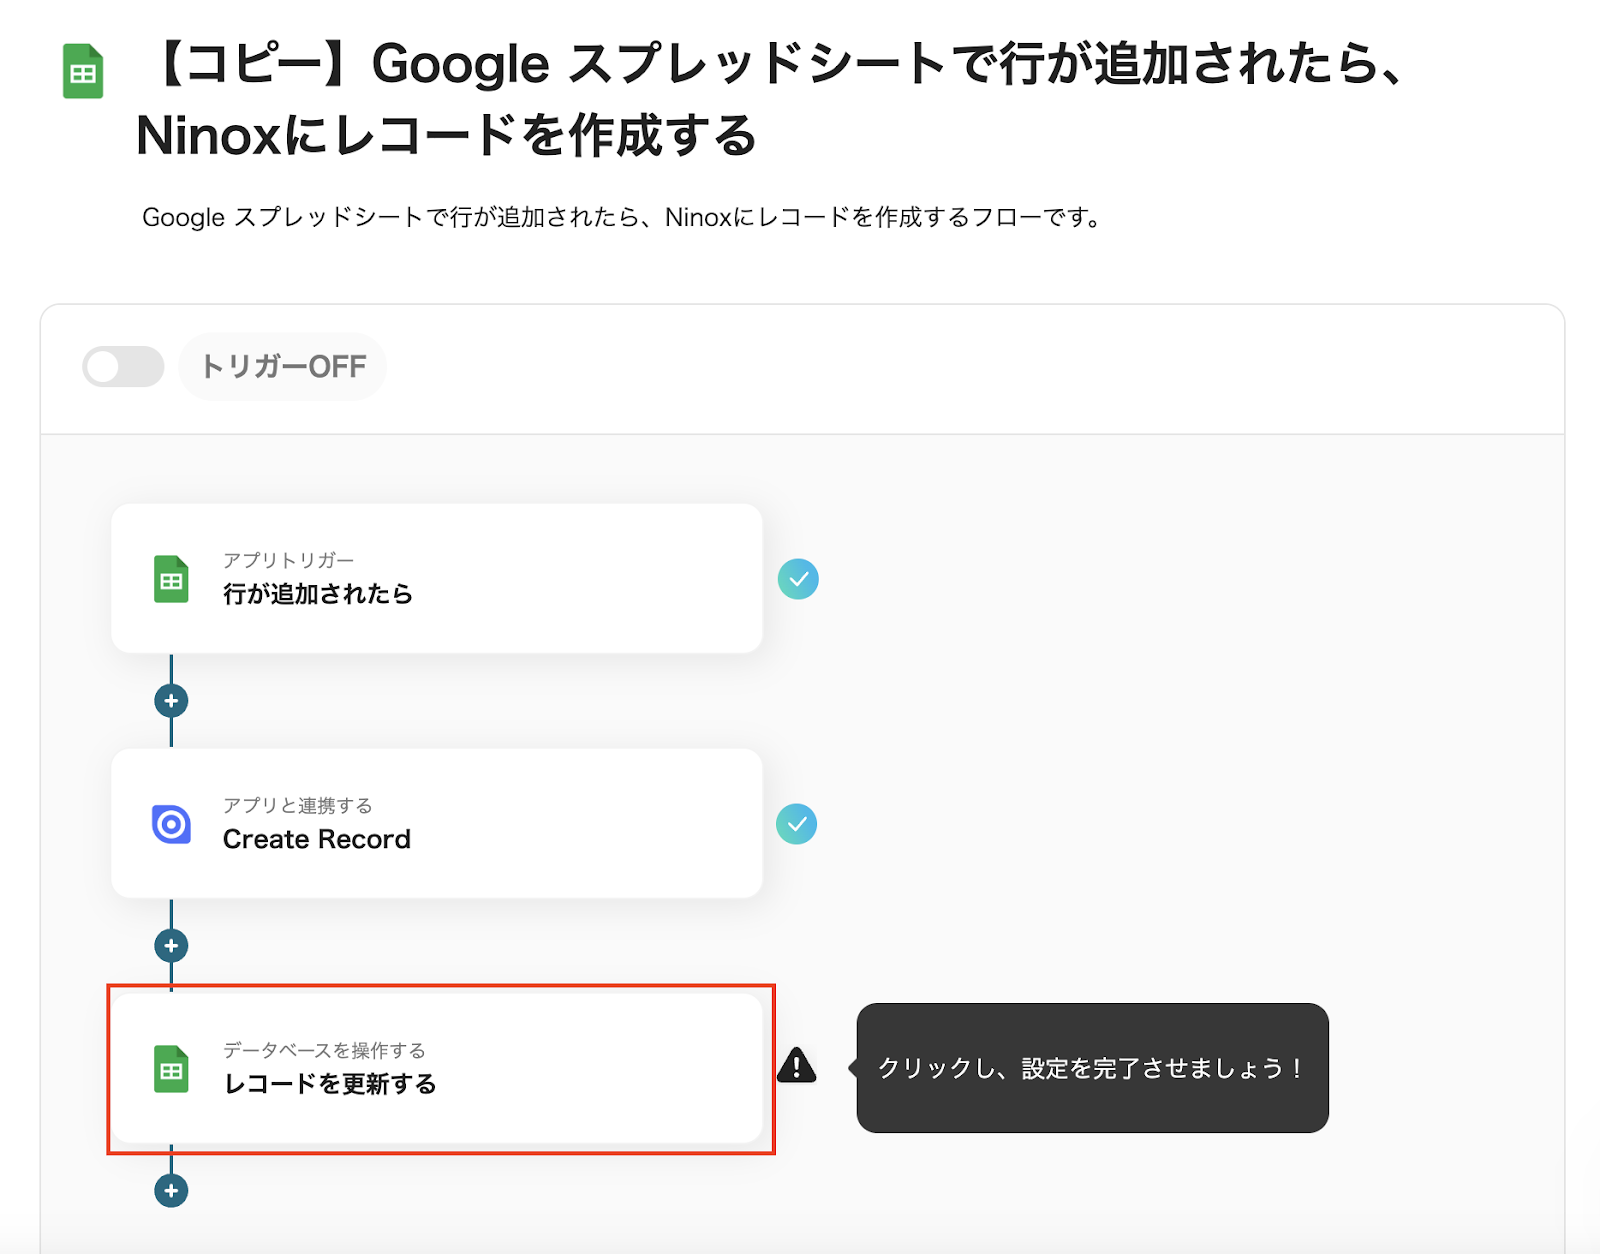
■フローボットの流れ
- はじめに、Google スプレッドシートとNinoxをYoomと連携します。
- 次に、トリガーでGoogle スプレッドシートを選択し、「行が追加されたら」というアクションを設定します。
- 次に、オペレーションでNinoxを選択し、「Create Record」のアクションを設定して、スプレッドシートの情報を基にレコードを作成します。
- 最後に、オペレーションでGoogle スプレッドシートの「レコードを更新する」アクションを設定し、Ninoxへの連携が完了したことを示すステータスなどを更新します。
※「トリガー」:フロー起動のきっかけとなるアクション、「オペレーション」:トリガー起動後、フロー内で処理を行うアクション
■このワークフローのカスタムポイント
- トリガーとなるGoogle スプレッドシートのファイルやシート、オペレーションでレコードを作成するNinoxの対象テーブルは、ご利用の環境に合わせて任意で設定してください。
- Ninoxにレコードを作成する際、Google スプレッドシートのどの列の情報をNinoxのどの項目に割り当てるか、自由にマッピングしてください。
- Google スプレッドシートのレコードを更新するオペレーションでは、更新対象の行を特定するための条件や、更新する列にどの情報を入力するかを任意で設定できます。
■注意事項
- Google スプレッドシート、NinoxのそれぞれとYoomを連携してください。
- トリガーは5分、10分、15分、30分、60分の間隔で起動間隔を選択できます。
- プランによって最短の起動間隔が異なりますので、ご注意ください。
Google スプレッドシートとNinoxを連携してできること
Google スプレッドシートとNinoxのAPIを連携させることで、これまで手動で行っていたアプリケーション間の情報伝達を自動化できます。
これにより、情報共有のスピードと正確性を向上させ、チームの連携を強化することができるでしょう。
以下の自動化例にご自身の業務に近いものや、解決したい課題に合致する内容があれば、ぜひクリックして詳細を確認してみてください!
Google スプレッドシートで行が追加されたら、Ninoxにレコードを作成する
Google スプレッドシートに行が追加されるだけで、Ninoxへのレコード作成が自動的に実行されるフローです。
これまで手作業に費やしていたデータ入力の時間を短縮でき、入力間違いや転記漏れといったヒューマンエラーの発生も防ぎます。
■概要
Google スプレッドシートで管理している情報を、都度Ninoxに手入力する作業に手間を感じていませんか。単純な転記作業は時間がかかるだけでなく、入力ミスといったヒューマンエラーの原因にもなりがちです。このワークフローを活用すれば、Google スプレッドシートに行が追加されるだけで、Ninoxへのレコード作成が自動的に実行されるため、こうした課題をスムーズに解消できます。
■このテンプレートをおすすめする方
- Google スプレッドシートとNinox間で、手作業でのデータ転記に手間を感じている方
- データ入力のミスをなくし、データベースの正確性を維持したいと考えているチームリーダーの方
- 定型的な入力業務から解放され、より生産性の高い業務に時間を割きたいと考えている方
■このテンプレートを使うメリット
- Google スプレッドシートに行が追加されると自動でNinoxにレコードが作成されるため、これまで手作業に費やしていたデータ入力の時間を短縮できます。
- 手作業によるデータの転記がなくなるため、入力間違いや転記漏れといったヒューマンエラーの発生を防ぎ、データの正確性を保つことにつながります。
■フローボットの流れ
- はじめに、Google スプレッドシートとNinoxをYoomと連携します。
- 次に、トリガーでGoogle スプレッドシートを選択し、「行が追加されたら」というアクションを設定します。
- 次に、オペレーションでNinoxを選択し、「Create Record」のアクションを設定して、スプレッドシートの情報を基にレコードを作成します。
- 最後に、オペレーションでGoogle スプレッドシートの「レコードを更新する」アクションを設定し、Ninoxへの連携が完了したことを示すステータスなどを更新します。
※「トリガー」:フロー起動のきっかけとなるアクション、「オペレーション」:トリガー起動後、フロー内で処理を行うアクション
■このワークフローのカスタムポイント
- トリガーとなるGoogle スプレッドシートのファイルやシート、オペレーションでレコードを作成するNinoxの対象テーブルは、ご利用の環境に合わせて任意で設定してください。
- Ninoxにレコードを作成する際、Google スプレッドシートのどの列の情報をNinoxのどの項目に割り当てるか、自由にマッピングしてください。
- Google スプレッドシートのレコードを更新するオペレーションでは、更新対象の行を特定するための条件や、更新する列にどの情報を入力するかを任意で設定できます。
■注意事項
- Google スプレッドシート、NinoxのそれぞれとYoomを連携してください。
- トリガーは5分、10分、15分、30分、60分の間隔で起動間隔を選択できます。
- プランによって最短の起動間隔が異なりますので、ご注意ください。
Google スプレッドシートで行が更新されたら、Ninoxのレコードを削除する
Google スプレッドシートの特定の行が更新されたことを検知して、Ninox上の該当するレコードを自動で削除することが可能です。
データメンテナンスの手間を省き、情報の正確性を保ちます。
■概要
Google スプレッドシートとNinoxでデータを管理している中で、ステータスが変更されたレコードなどを手作業で削除する業務は、手間がかかるうえに削除ミスなどのリスクも伴います。このワークフローを活用すれば、Google スプレッドシートの特定の行が更新されたことを検知して、Ninox上の該当するレコードを自動で削除することが可能です。データメンテナンスの手間を省き、情報の正確性を保ちます。
■このテンプレートをおすすめする方
- Google スプレッドシートとNinoxを用いてデータ管理を行っている方
- 手作業によるレコードの削除に手間やミスを感じており、業務を効率化したい方
- データベースの情報を常に最新の状態に保ち、データクレンジングを自動化したい方
■このテンプレートを使うメリット
- スプレッドシートの更新だけでNinoxのレコードが自動で削除されるため、これまで手作業で行っていた削除や確認の時間を短縮できます。
- 手作業によるレコードの削除漏れや、誤ったレコードを削除してしまうといったヒューマンエラーを防ぎ、データの整合性を維持します。
■フローボットの流れ
- はじめに、Google スプレッドシートとNinoxをYoomと連携します。
- 次に、トリガーでGoogle スプレッドシートを選択し、「行が更新されたら」というアクションを設定します。
- 最後に、オペレーションでNinoxを選択し、「Delete Record」アクションを設定し、トリガーで取得した情報をもとに削除対象のレコードを指定します。
※「トリガー」:フロー起動のきっかけとなるアクション、「オペレーション」:トリガー起動後、フロー内で処理を行うアクション
■このワークフローのカスタムポイント
- Google スプレッドシートのトリガー設定では、連携するスプレッドシートやシートを任意で選択してください。また、更新を検知したい特定の列を指定することも可能です。
- Ninoxでレコードを削除するアクションでは、トリガーとなったGoogle スプレッドシートの行情報をもとに、どのレコードを削除するかを紐付ける設定をしてください。
■注意事項
- Google スプレッドシート、NinoxのそれぞれとYoomを連携してください。
- トリガーは5分、10分、15分、30分、60分の間隔で起動間隔を選択できます。
- プランによって最短の起動間隔が異なりますので、ご注意ください。
Google スプレッドシートとNinoxの連携フローを作ってみよう
それでは、さっそくGoogle スプレッドシートとNinoxを連携したフローを作成してみましょう!
ここではYoomを使用してノーコードで設定をしていくので、もしまだYoomのアカウントをお持ちでない場合は、こちらの登録フォームからアカウントを発行しておきましょう。
※今回連携するアプリの公式サイト:Google スプレッドシート/Ninox
[Yoomとは]
フローの作成方法
今回は大きく分けて以下のプロセスで進めていきます。
- コラボフローとカオナビのマイアプリ登録
- テンプレートをコピー
- トリガー設定と各アクション設定
- トリガーをONにして動作をチェック
■概要
Google スプレッドシートで管理している情報を、都度Ninoxに手入力する作業に手間を感じていませんか。単純な転記作業は時間がかかるだけでなく、入力ミスといったヒューマンエラーの原因にもなりがちです。このワークフローを活用すれば、Google スプレッドシートに行が追加されるだけで、Ninoxへのレコード作成が自動的に実行されるため、こうした課題をスムーズに解消できます。
■このテンプレートをおすすめする方
- Google スプレッドシートとNinox間で、手作業でのデータ転記に手間を感じている方
- データ入力のミスをなくし、データベースの正確性を維持したいと考えているチームリーダーの方
- 定型的な入力業務から解放され、より生産性の高い業務に時間を割きたいと考えている方
■このテンプレートを使うメリット
- Google スプレッドシートに行が追加されると自動でNinoxにレコードが作成されるため、これまで手作業に費やしていたデータ入力の時間を短縮できます。
- 手作業によるデータの転記がなくなるため、入力間違いや転記漏れといったヒューマンエラーの発生を防ぎ、データの正確性を保つことにつながります。
■フローボットの流れ
- はじめに、Google スプレッドシートとNinoxをYoomと連携します。
- 次に、トリガーでGoogle スプレッドシートを選択し、「行が追加されたら」というアクションを設定します。
- 次に、オペレーションでNinoxを選択し、「Create Record」のアクションを設定して、スプレッドシートの情報を基にレコードを作成します。
- 最後に、オペレーションでGoogle スプレッドシートの「レコードを更新する」アクションを設定し、Ninoxへの連携が完了したことを示すステータスなどを更新します。
※「トリガー」:フロー起動のきっかけとなるアクション、「オペレーション」:トリガー起動後、フロー内で処理を行うアクション
■このワークフローのカスタムポイント
- トリガーとなるGoogle スプレッドシートのファイルやシート、オペレーションでレコードを作成するNinoxの対象テーブルは、ご利用の環境に合わせて任意で設定してください。
- Ninoxにレコードを作成する際、Google スプレッドシートのどの列の情報をNinoxのどの項目に割り当てるか、自由にマッピングしてください。
- Google スプレッドシートのレコードを更新するオペレーションでは、更新対象の行を特定するための条件や、更新する列にどの情報を入力するかを任意で設定できます。
■注意事項
- Google スプレッドシート、NinoxのそれぞれとYoomを連携してください。
- トリガーは5分、10分、15分、30分、60分の間隔で起動間隔を選択できます。
- プランによって最短の起動間隔が異なりますので、ご注意ください。
ステップ1:Google スプレッドシートとNinoxをマイアプリ連携
Yoomとそれぞれのアプリを連携して、操作が行えるようにしていきます。
まずは基本的な設定方法を解説しているナビをご覧ください!
それでは、ここから今回のフローで使用するアプリのマイアプリ登録方法を解説します。
Google スプレッドシートのマイアプリ連携
上記ナビの手順に沿って登録してください。
Ninoxのマイアプリ連携
マイアプリを選択後、新規接続→Ninoxの順でクリックしましょう。

アカウント名とAPI Keyを注意事項を確認しながら入力しましょう。
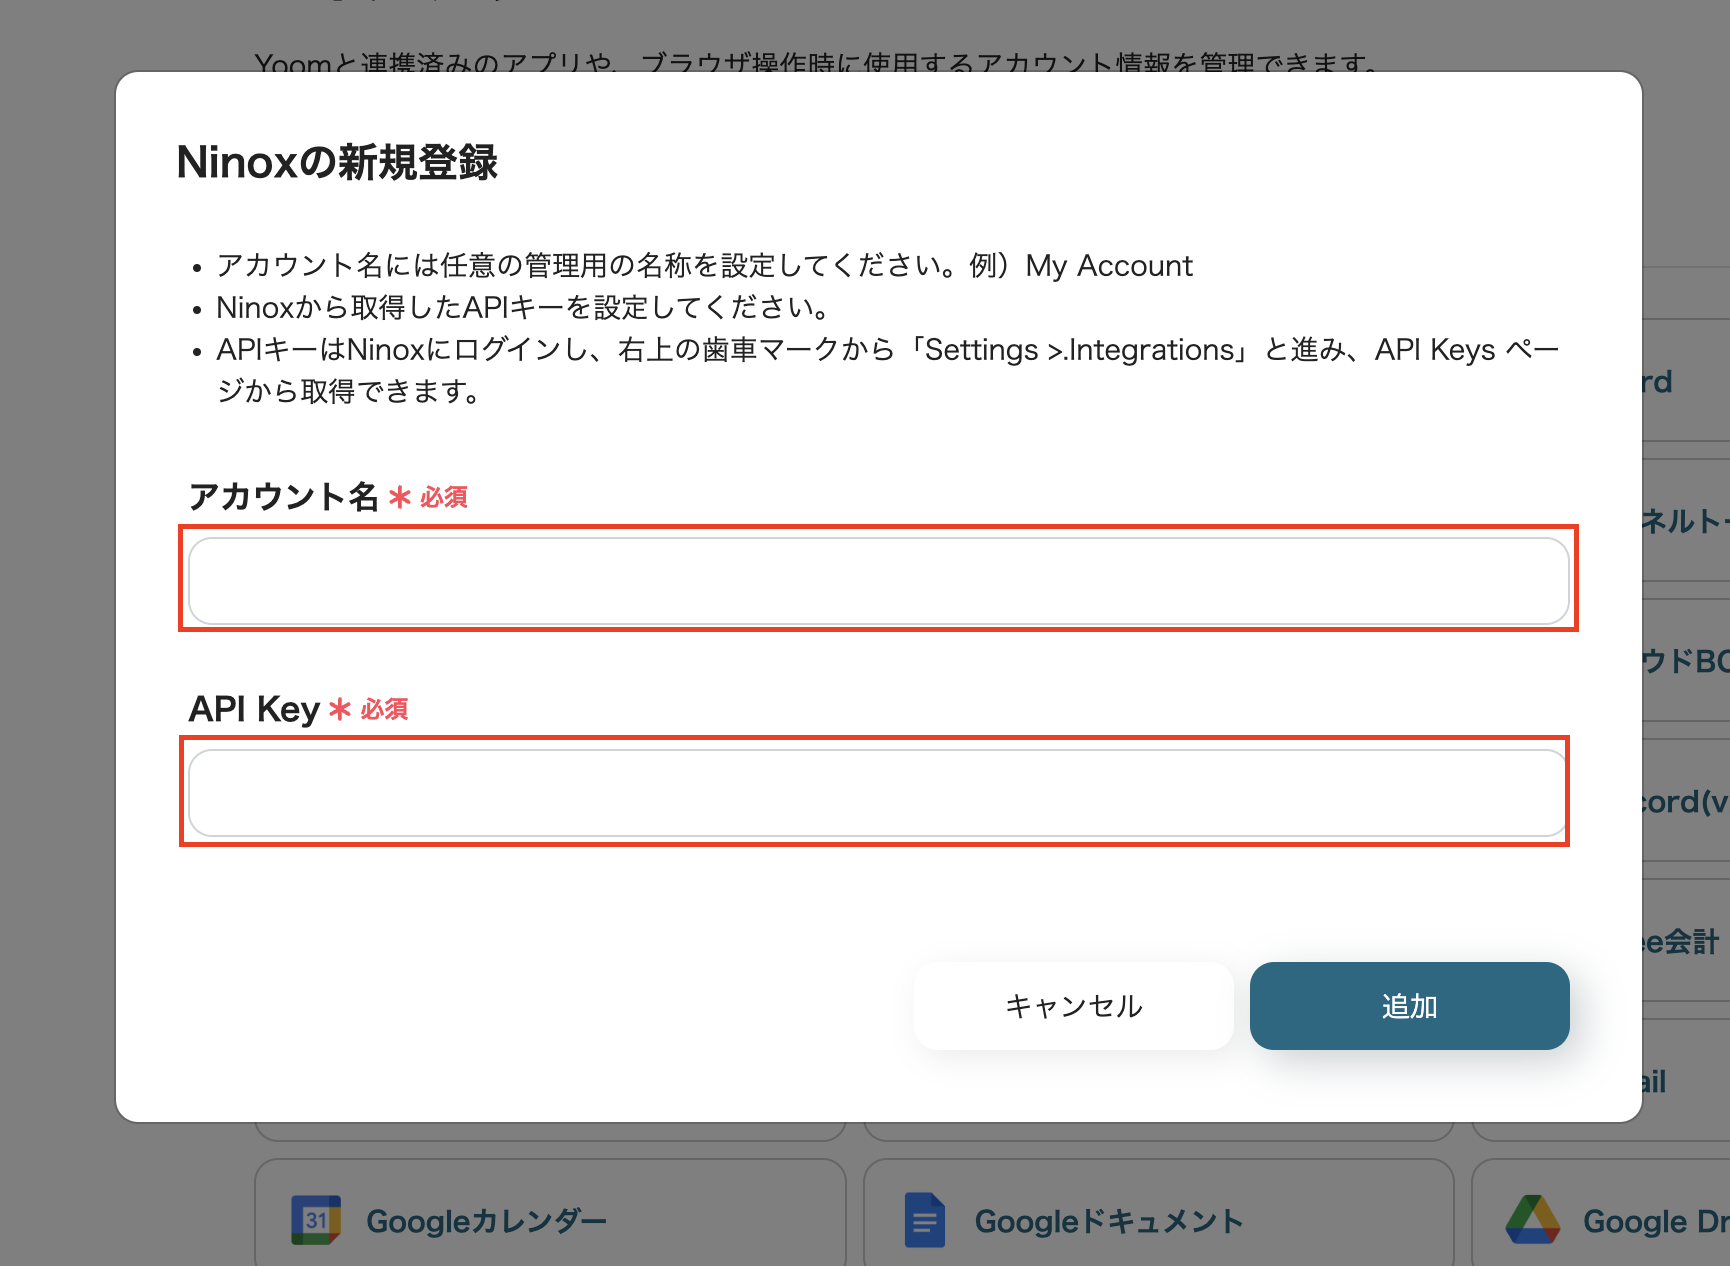
以上でNinoxのマイアプリ登録ができました。
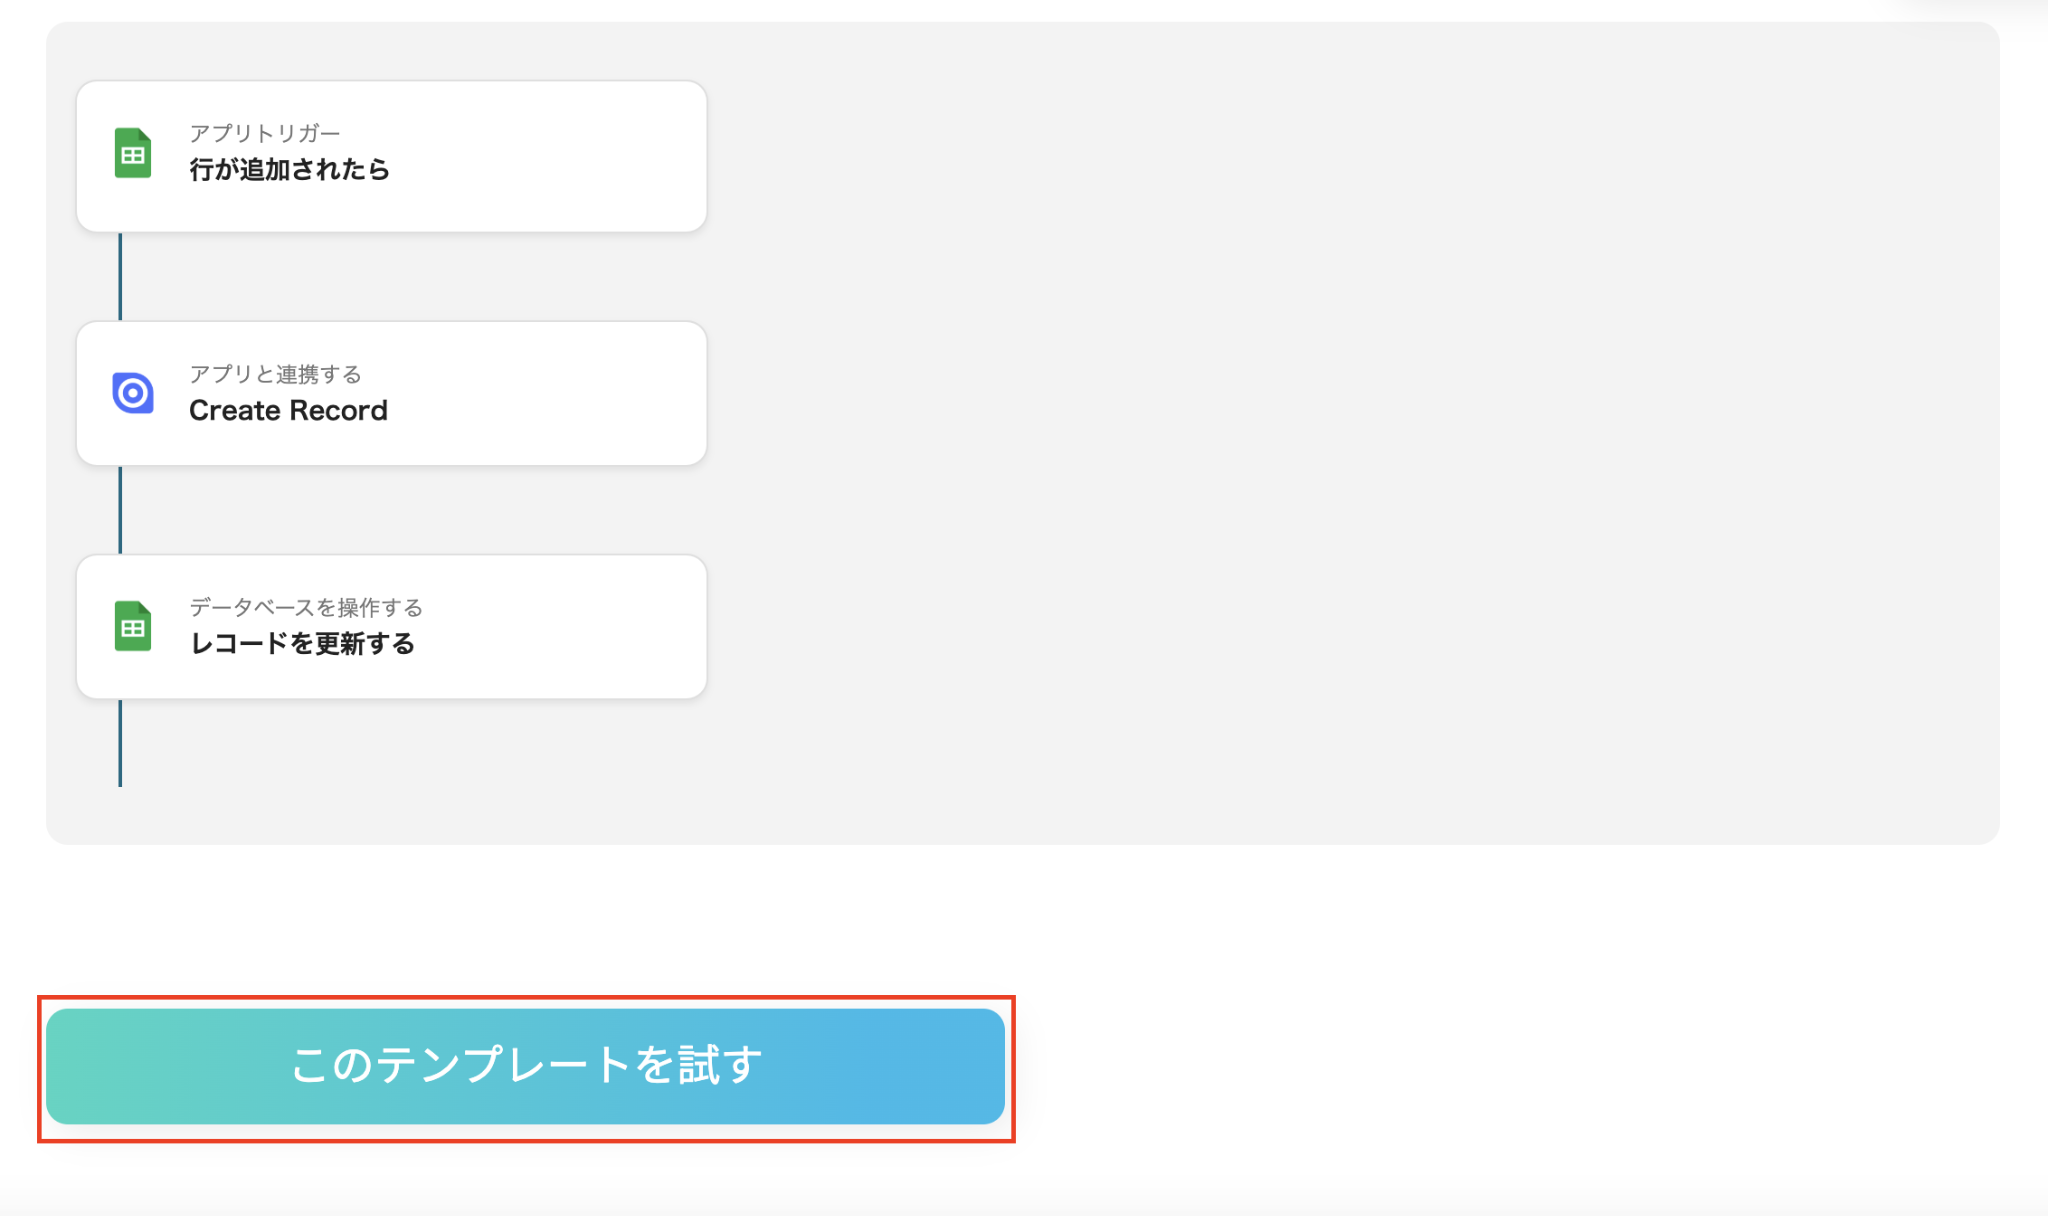
ステップ2:テンプレートをコピーする
次に、使用するテンプレートをコピーします。
コピーされたテンプレートはマイプロジェクトに保存されます。
それでは下に表示されているバナーをクリックしてください。
■概要
Google スプレッドシートで管理している情報を、都度Ninoxに手入力する作業に手間を感じていませんか。単純な転記作業は時間がかかるだけでなく、入力ミスといったヒューマンエラーの原因にもなりがちです。このワークフローを活用すれば、Google スプレッドシートに行が追加されるだけで、Ninoxへのレコード作成が自動的に実行されるため、こうした課題をスムーズに解消できます。
■このテンプレートをおすすめする方
- Google スプレッドシートとNinox間で、手作業でのデータ転記に手間を感じている方
- データ入力のミスをなくし、データベースの正確性を維持したいと考えているチームリーダーの方
- 定型的な入力業務から解放され、より生産性の高い業務に時間を割きたいと考えている方
■このテンプレートを使うメリット
- Google スプレッドシートに行が追加されると自動でNinoxにレコードが作成されるため、これまで手作業に費やしていたデータ入力の時間を短縮できます。
- 手作業によるデータの転記がなくなるため、入力間違いや転記漏れといったヒューマンエラーの発生を防ぎ、データの正確性を保つことにつながります。
■フローボットの流れ
- はじめに、Google スプレッドシートとNinoxをYoomと連携します。
- 次に、トリガーでGoogle スプレッドシートを選択し、「行が追加されたら」というアクションを設定します。
- 次に、オペレーションでNinoxを選択し、「Create Record」のアクションを設定して、スプレッドシートの情報を基にレコードを作成します。
- 最後に、オペレーションでGoogle スプレッドシートの「レコードを更新する」アクションを設定し、Ninoxへの連携が完了したことを示すステータスなどを更新します。
※「トリガー」:フロー起動のきっかけとなるアクション、「オペレーション」:トリガー起動後、フロー内で処理を行うアクション
■このワークフローのカスタムポイント
- トリガーとなるGoogle スプレッドシートのファイルやシート、オペレーションでレコードを作成するNinoxの対象テーブルは、ご利用の環境に合わせて任意で設定してください。
- Ninoxにレコードを作成する際、Google スプレッドシートのどの列の情報をNinoxのどの項目に割り当てるか、自由にマッピングしてください。
- Google スプレッドシートのレコードを更新するオペレーションでは、更新対象の行を特定するための条件や、更新する列にどの情報を入力するかを任意で設定できます。
■注意事項
- Google スプレッドシート、NinoxのそれぞれとYoomを連携してください。
- トリガーは5分、10分、15分、30分、60分の間隔で起動間隔を選択できます。
- プランによって最短の起動間隔が異なりますので、ご注意ください。
クリックすると、Yoomのテンプレートサイトに画面が切り替わります。
その画面の表示された「このテンプレートを試す」をクリックしましょう。
クリックすると、テンプレートのコピーが完了したという表示ができるので「OK」を選択しましょう。
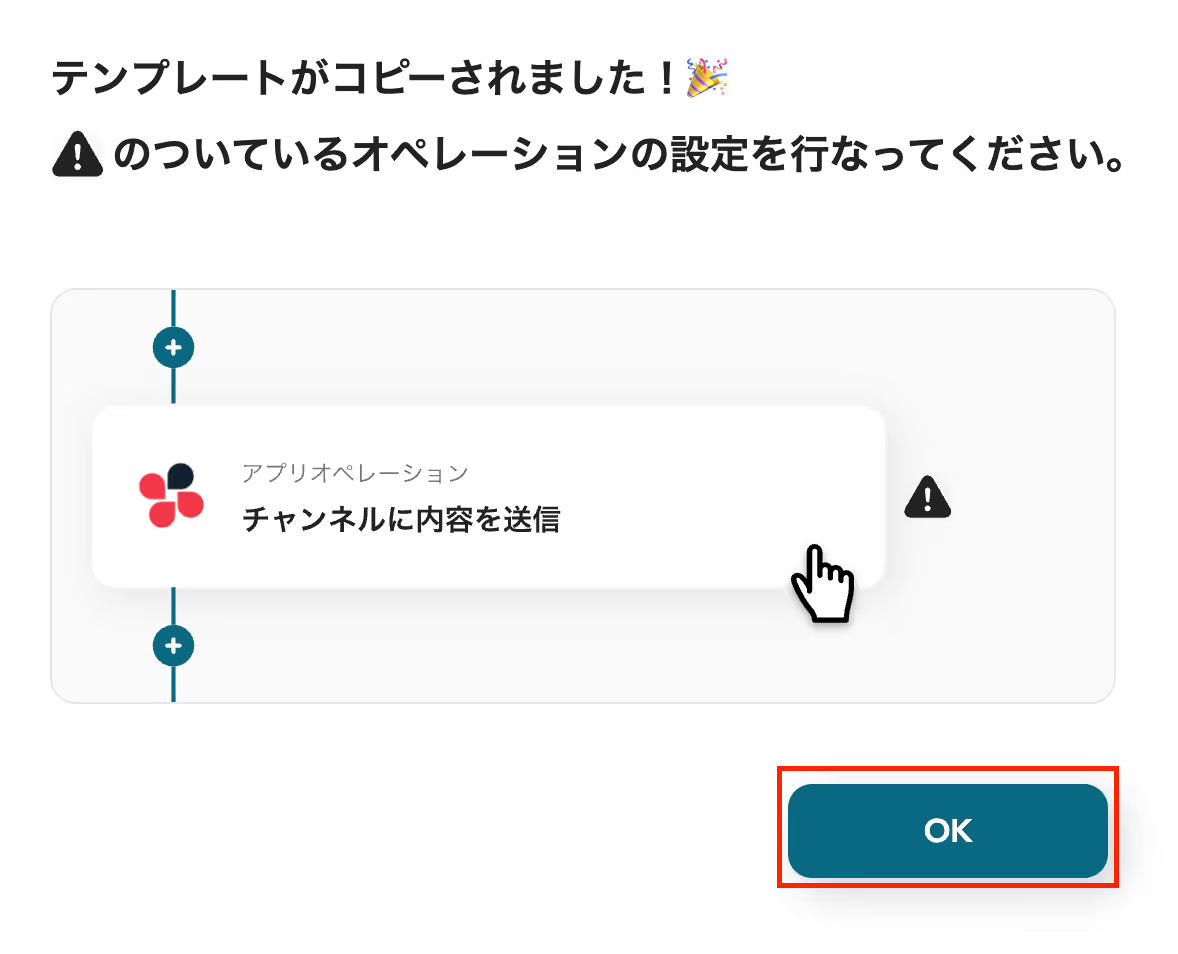
これでテンプレートをコピーできました。
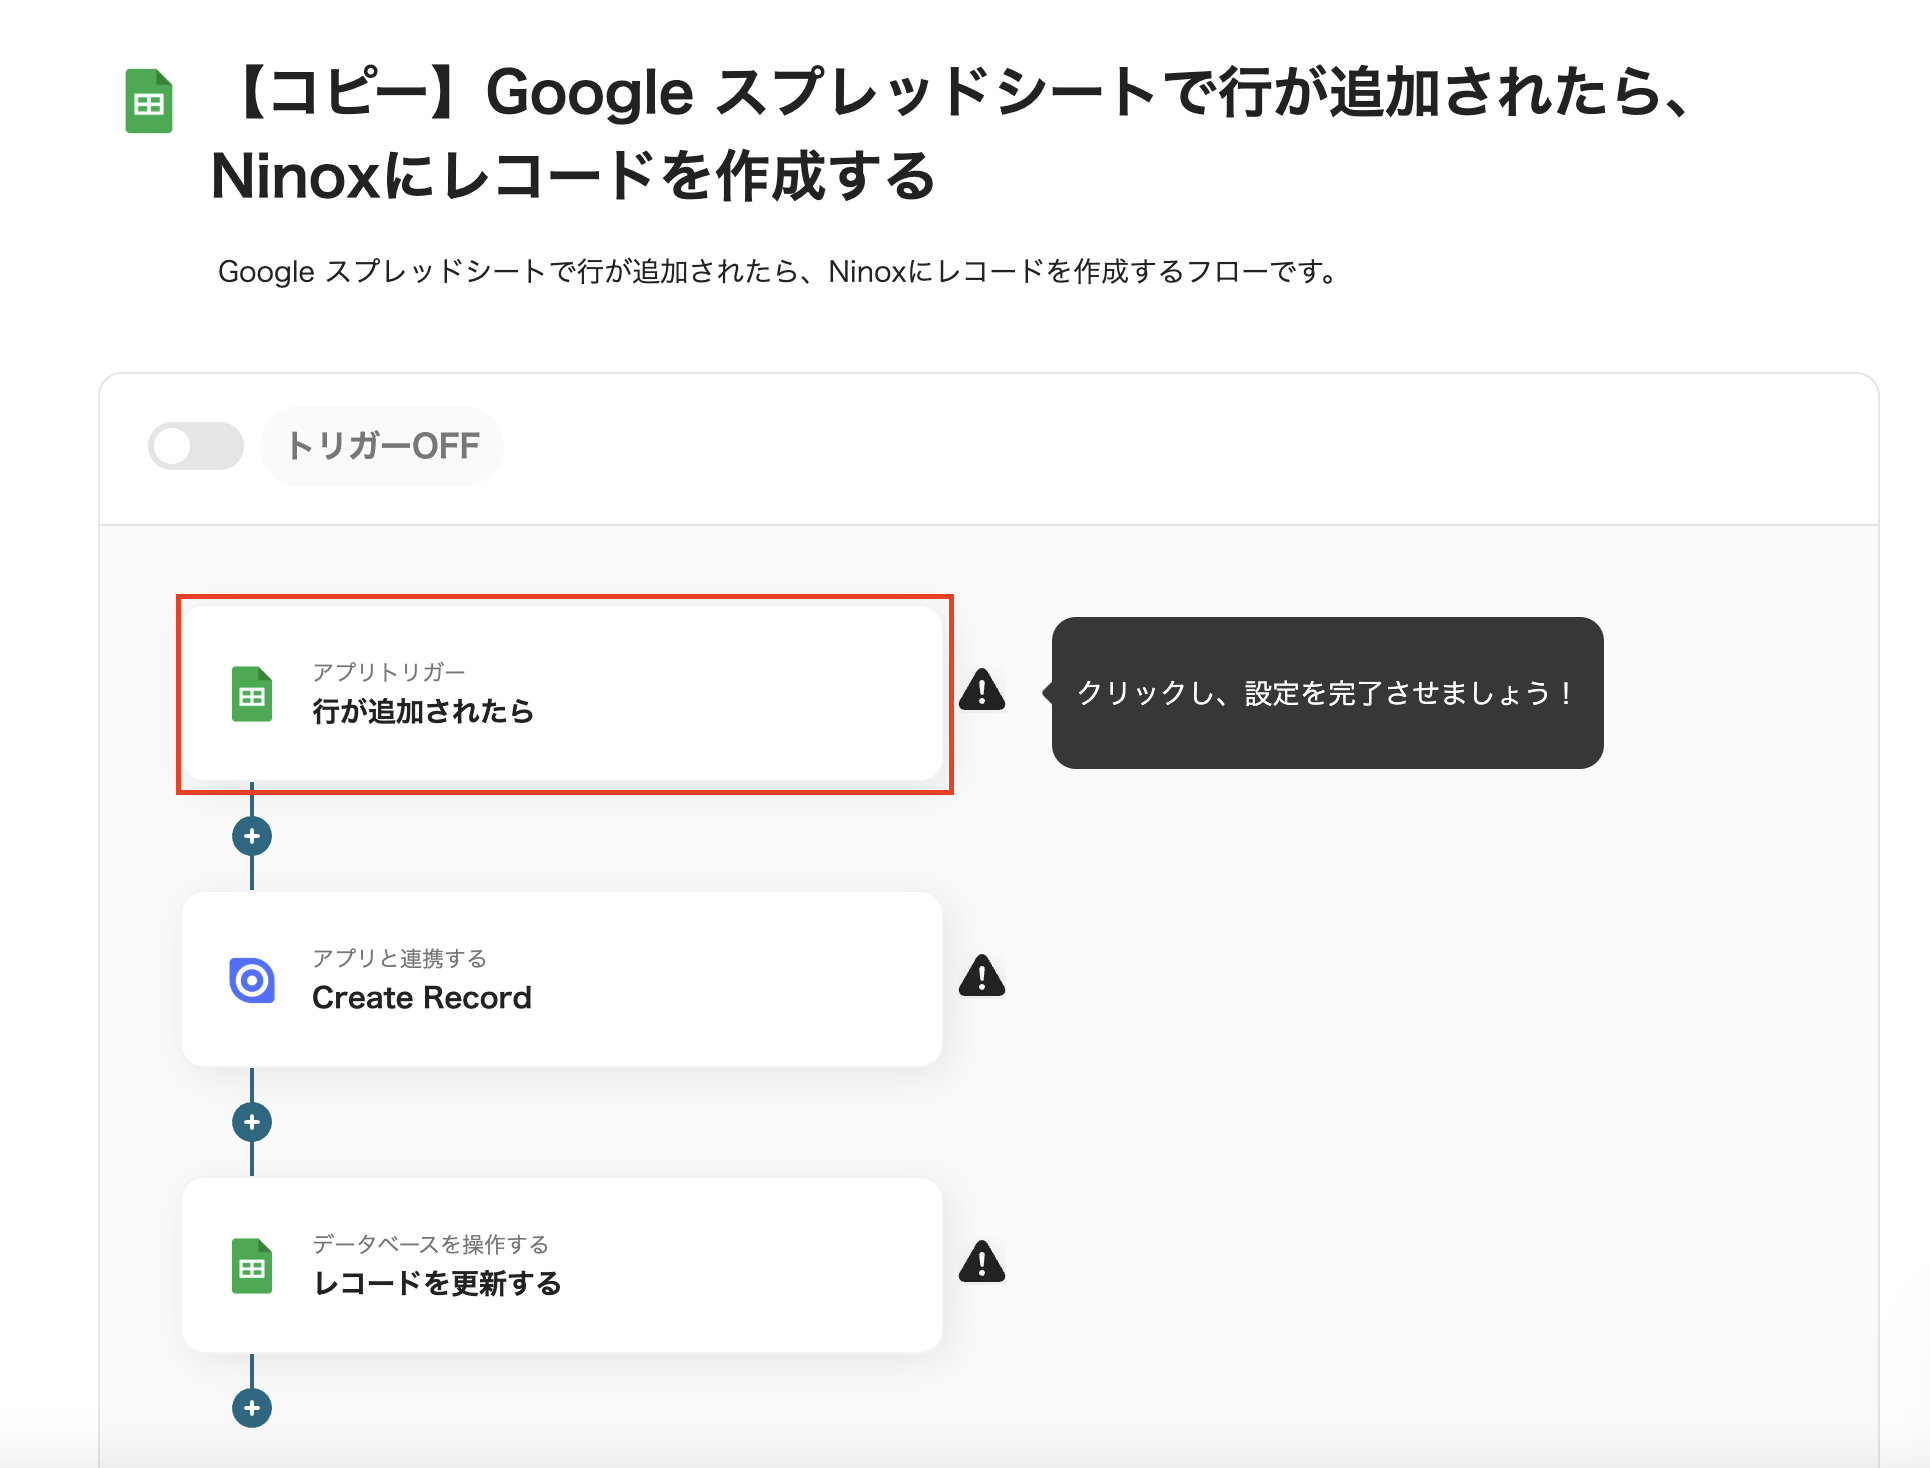
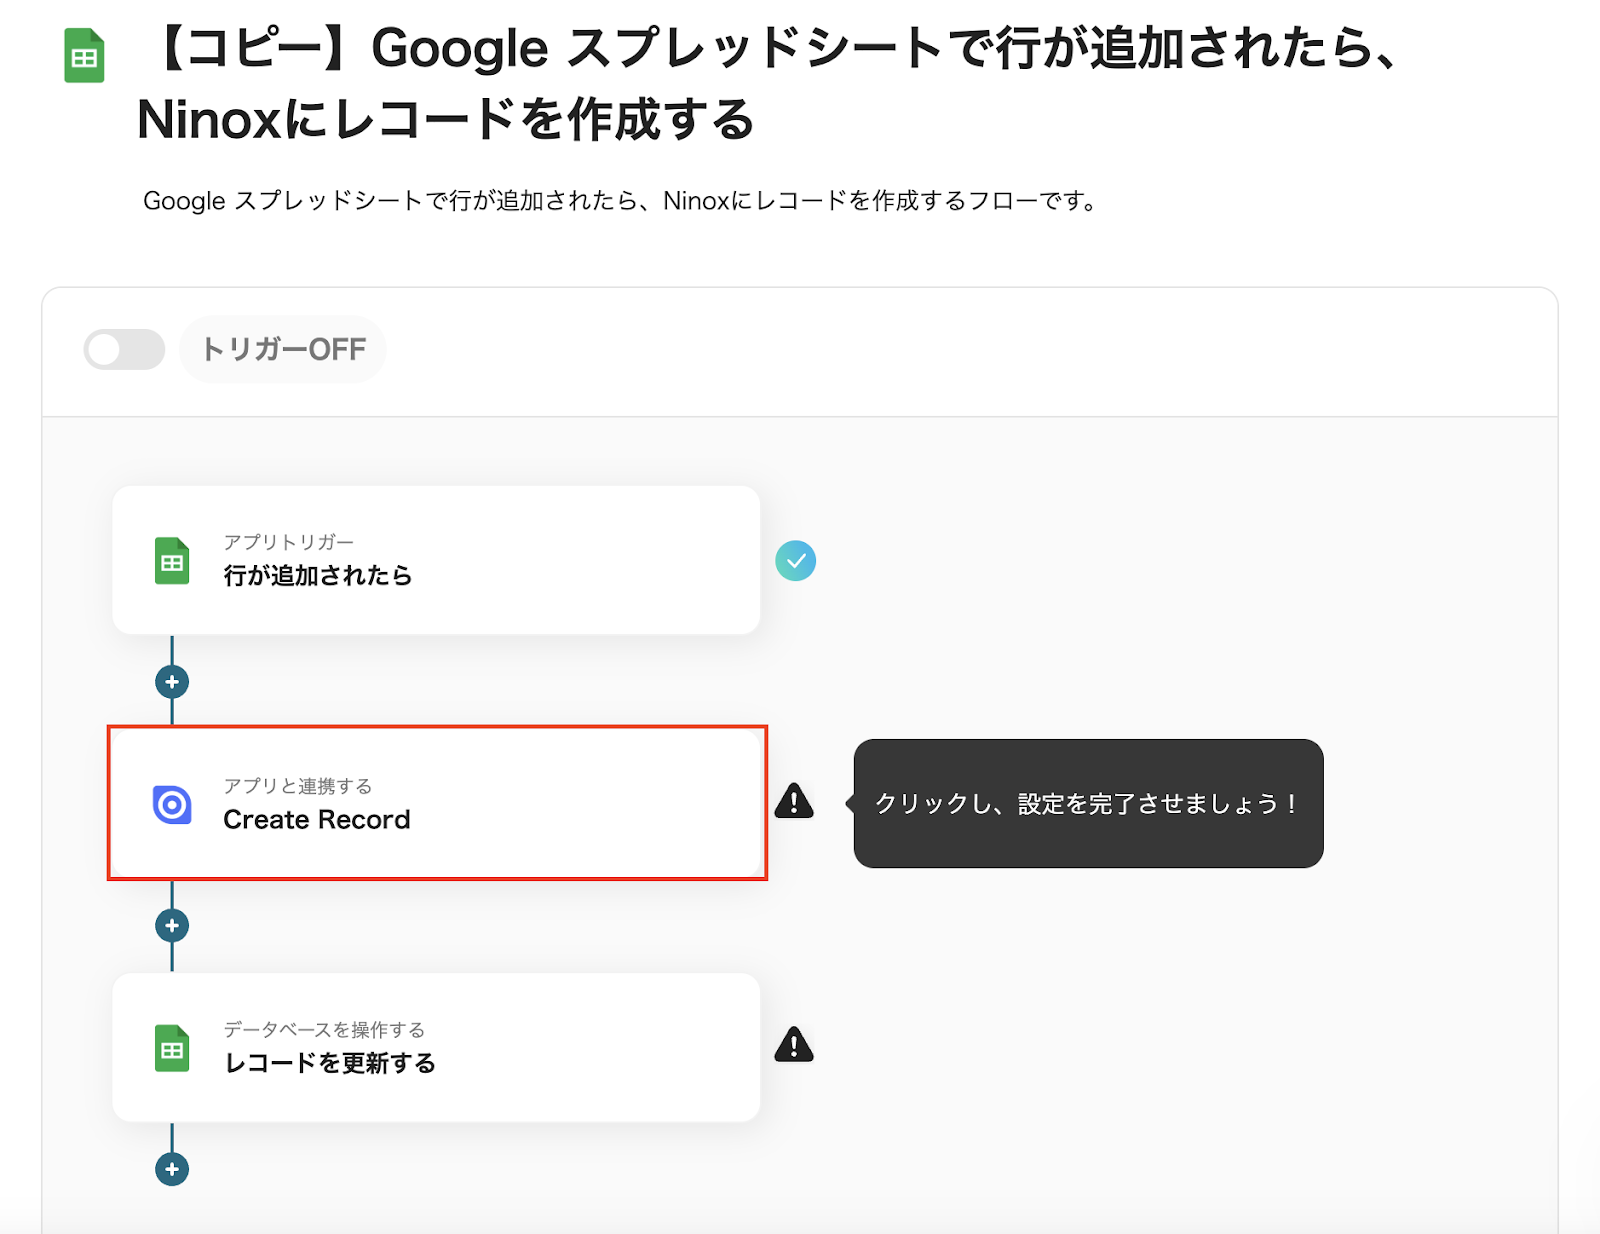
ステップ3:Google スプレッドシートのトリガーを設定
次にフローボットを設定していきましょう。
先ほどコピーしたテンプレートを選択して、「行が追加されたら」をクリックしましょう。
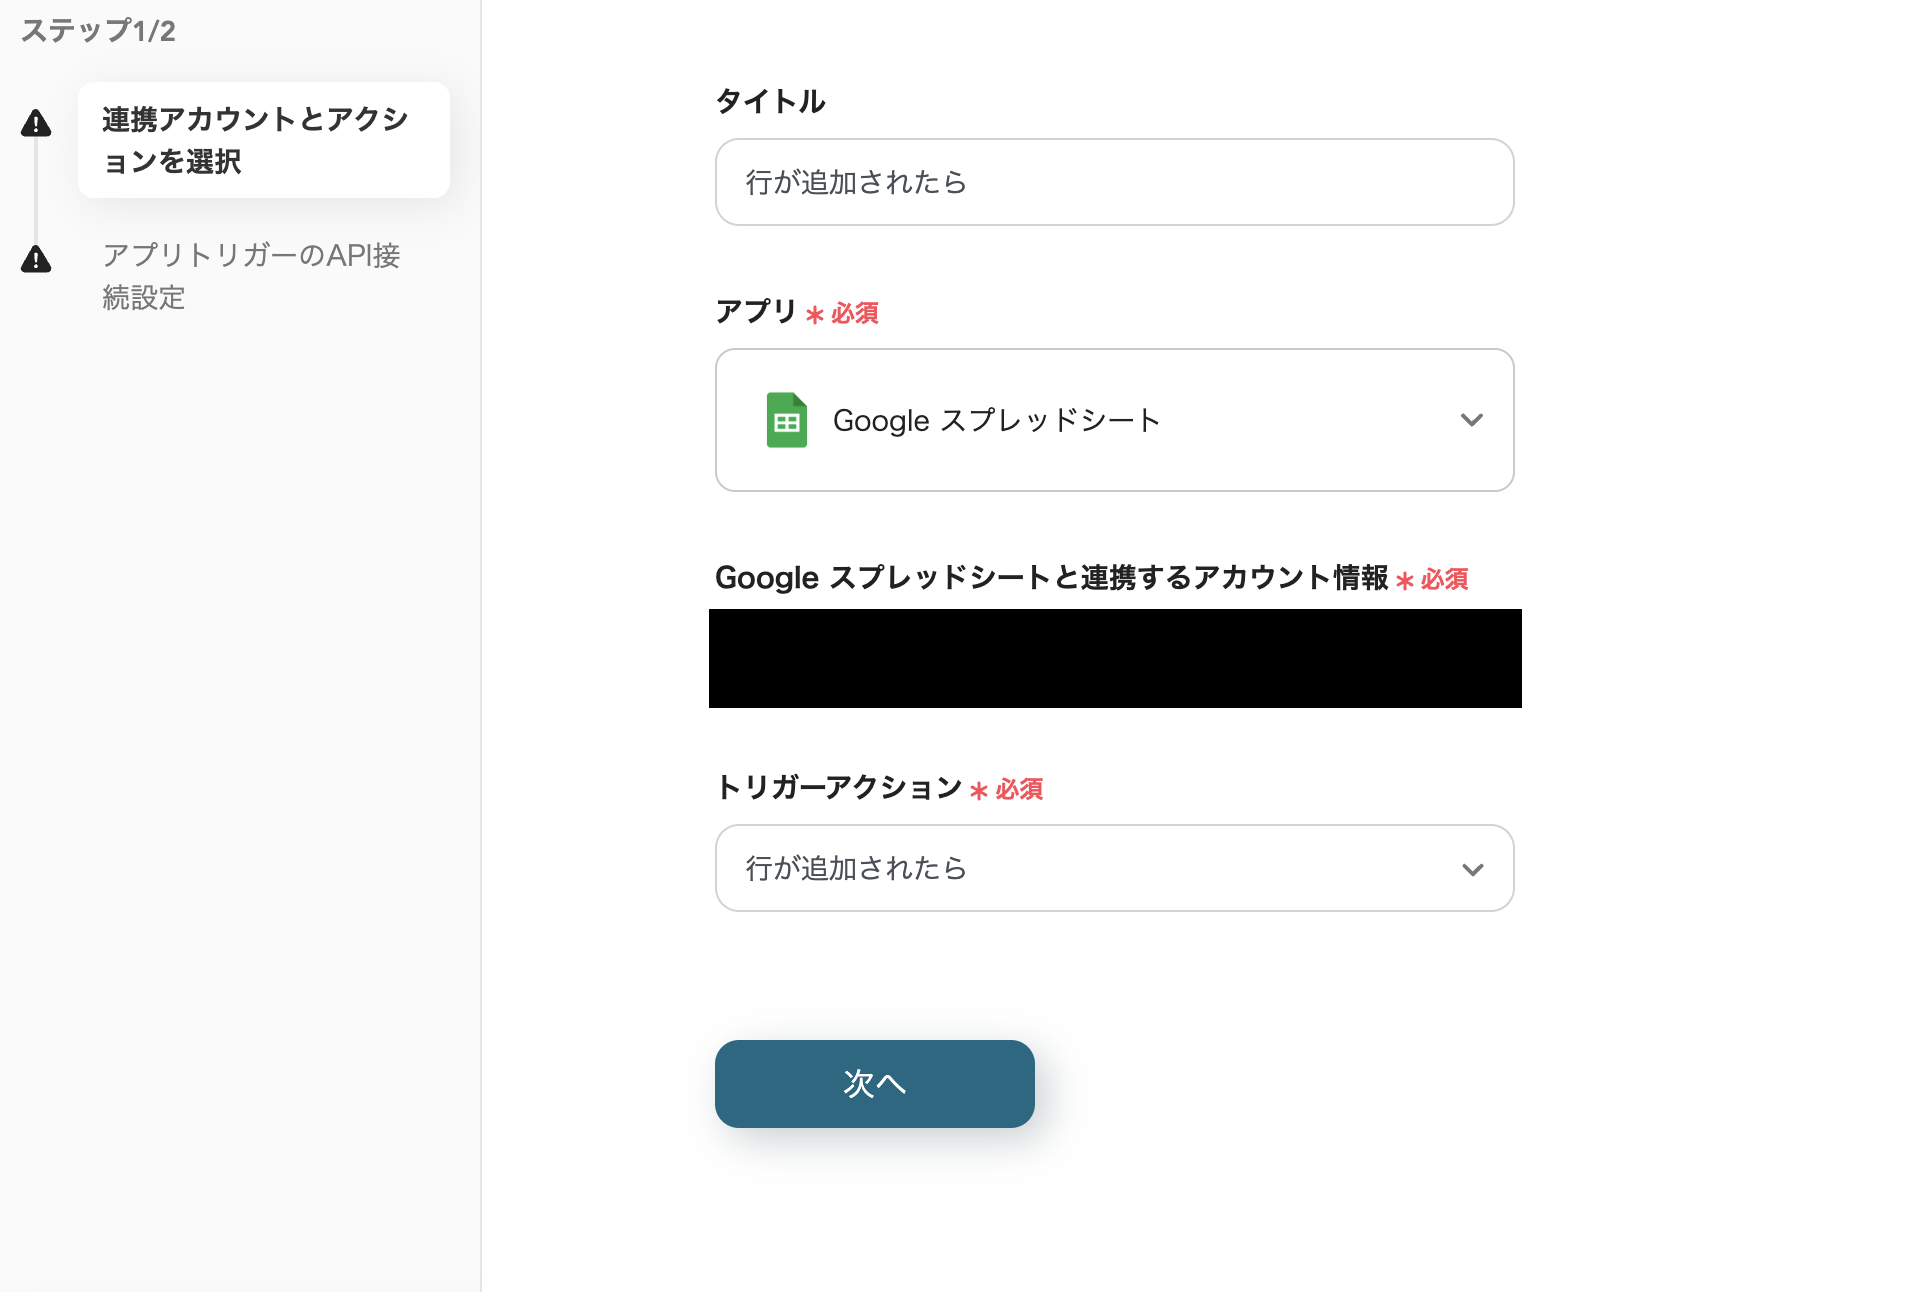
1.連携アカウントとアクションを選択
タイトルは、入力済みですが変更可能です。
Google スプレッドシートと連携するアカウント情報を確認しましょう。
トリガーアクションは、「行が追加されたら」を選択します。
設定したら「次へ」をクリックしてください。
2.アプリトリガーのAPI接続設定
トリガーの起動間隔を設定しましょう。
起動の間隔はトリガーは5分、10分、15分、30分、60分で選択できます。
ご利用プランによって最短の起動間隔が異なります。

「スプレッドID」:候補から選択するか、URLから取得し入力する
「 シートID」:注釈を確認し入力する
「テーブル範囲の始まりと終わり」:データが保存されているシートを参照しながら直接入力する
「一意の値」:必ず一意の値がある列を入力する
※ 値が重複していると、正しく動かない場合があります。
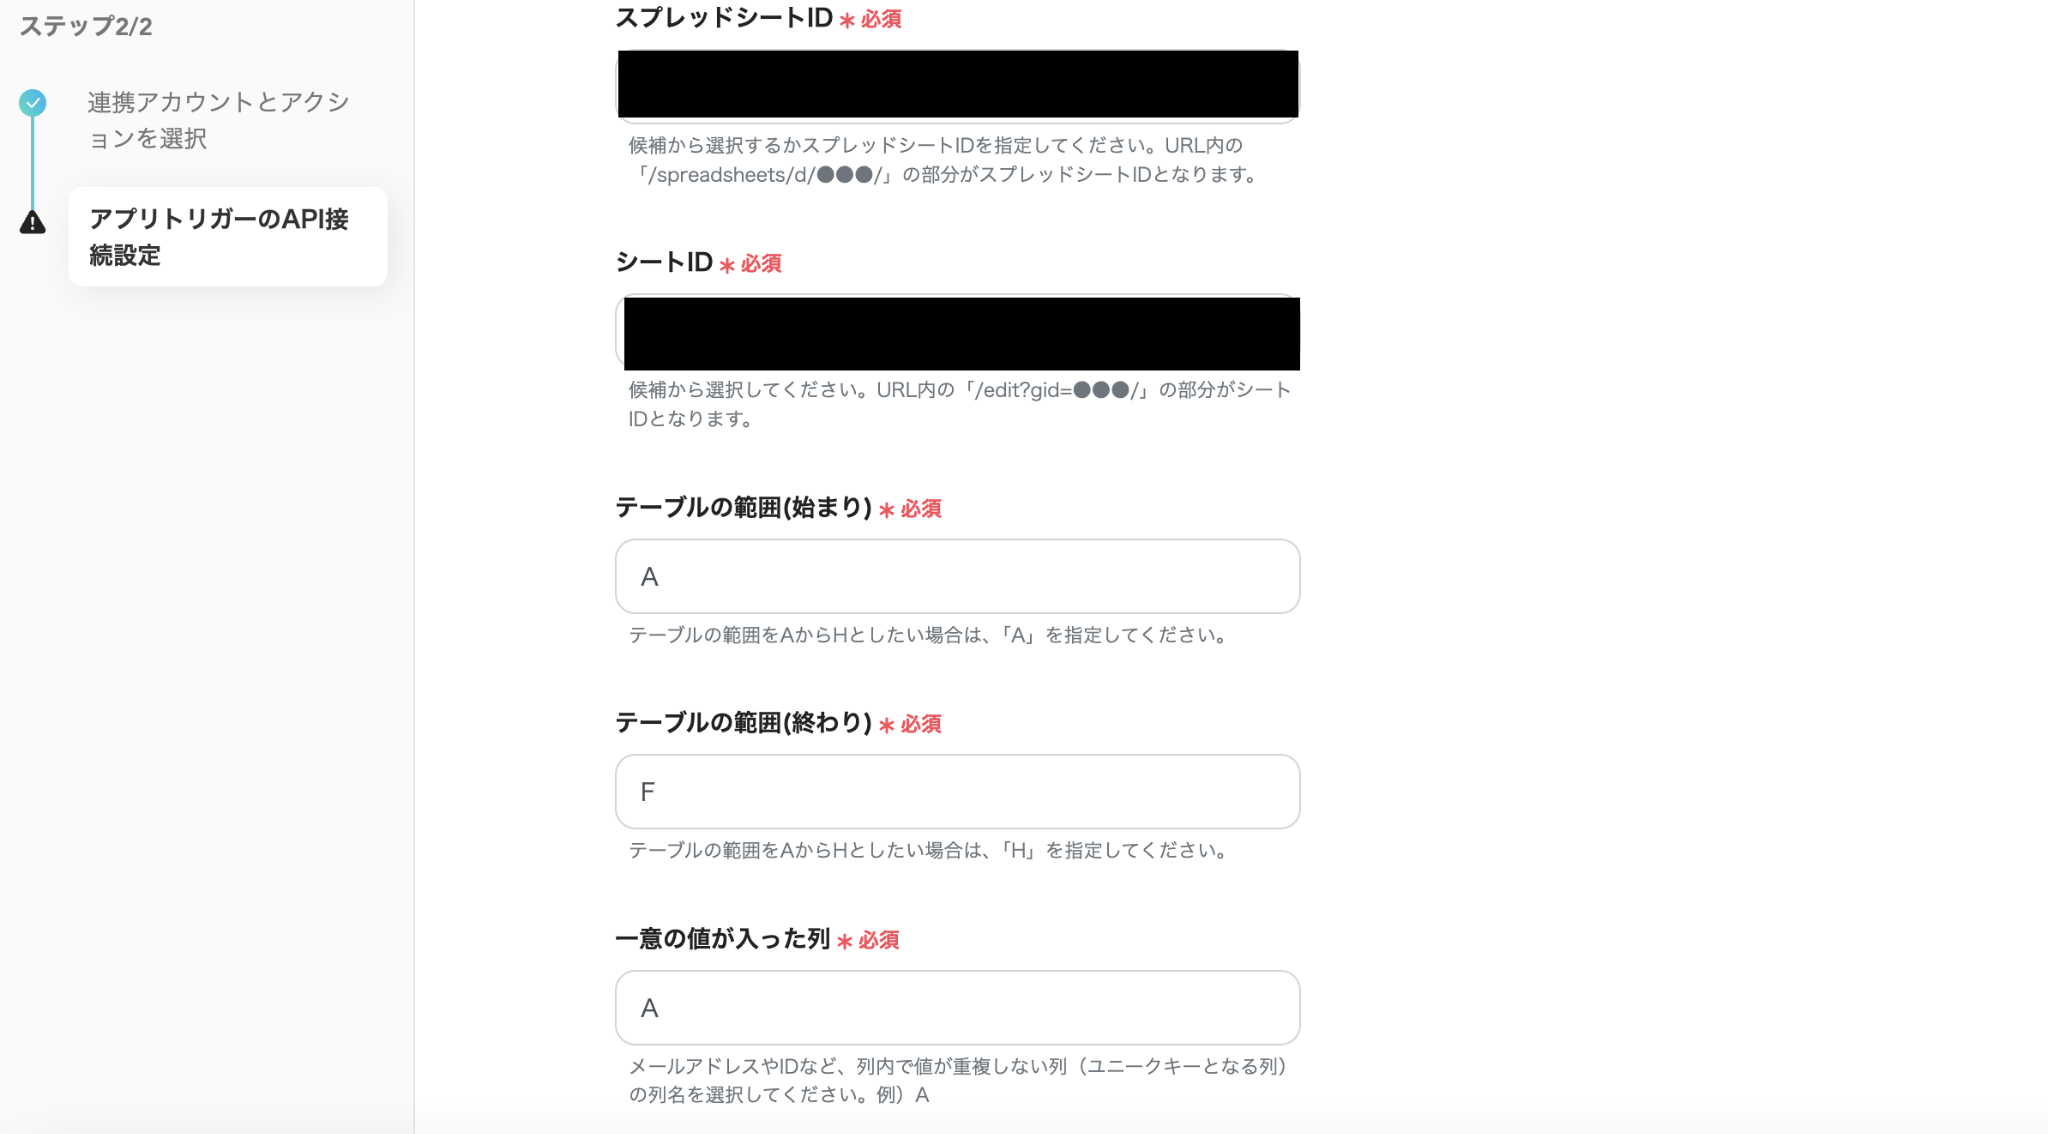
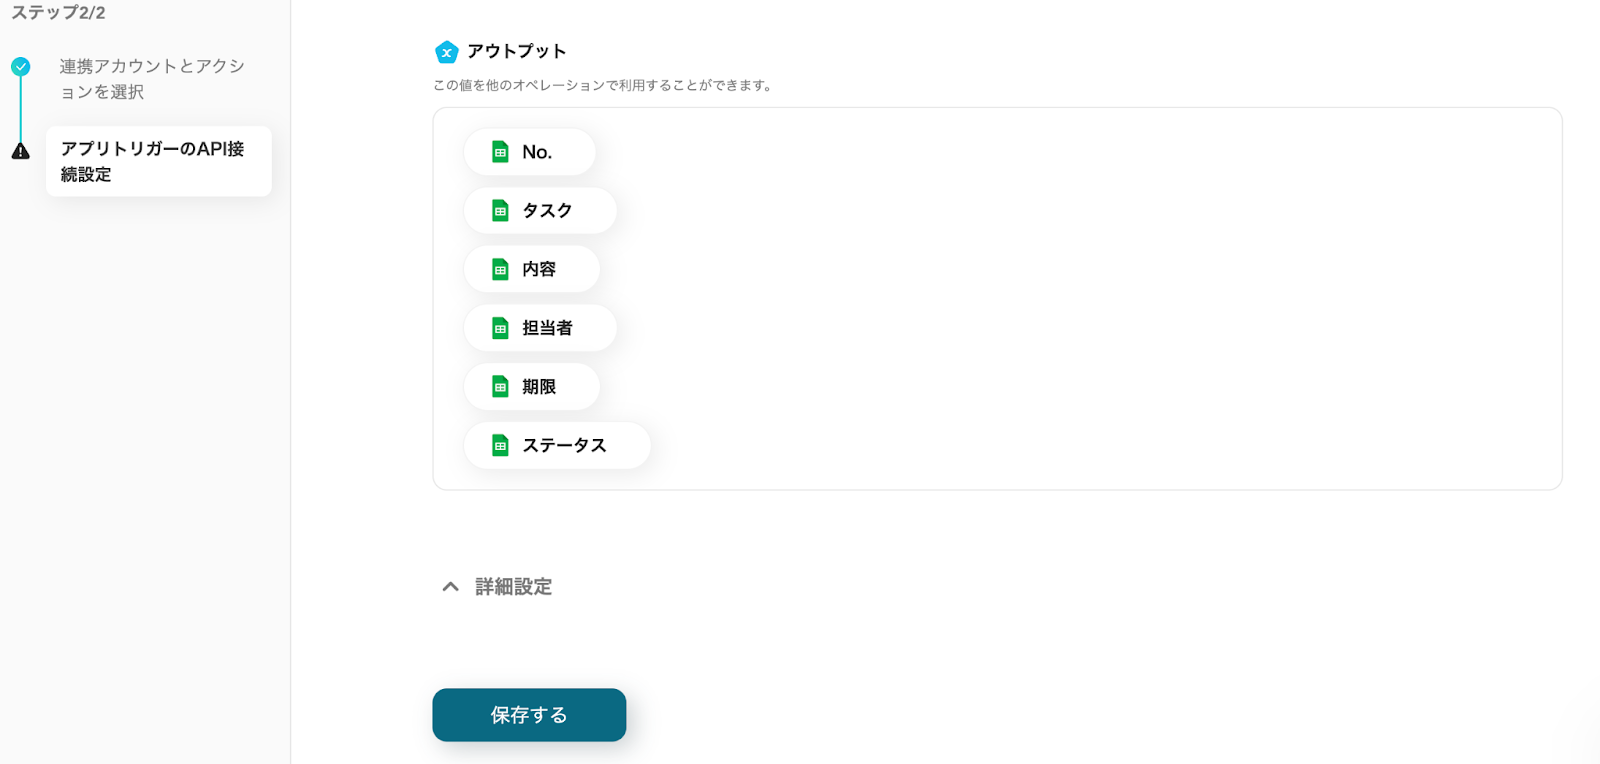
入力したらテストをクリックして、Google スプレッドシートのアウトプット(取得した値)を取得できたら保存しましょう。
ステップ4:Ninoxのアクション設定
次に、Ninoxの設定を進めていきましょう。
「Create Record」をクリックしてください。
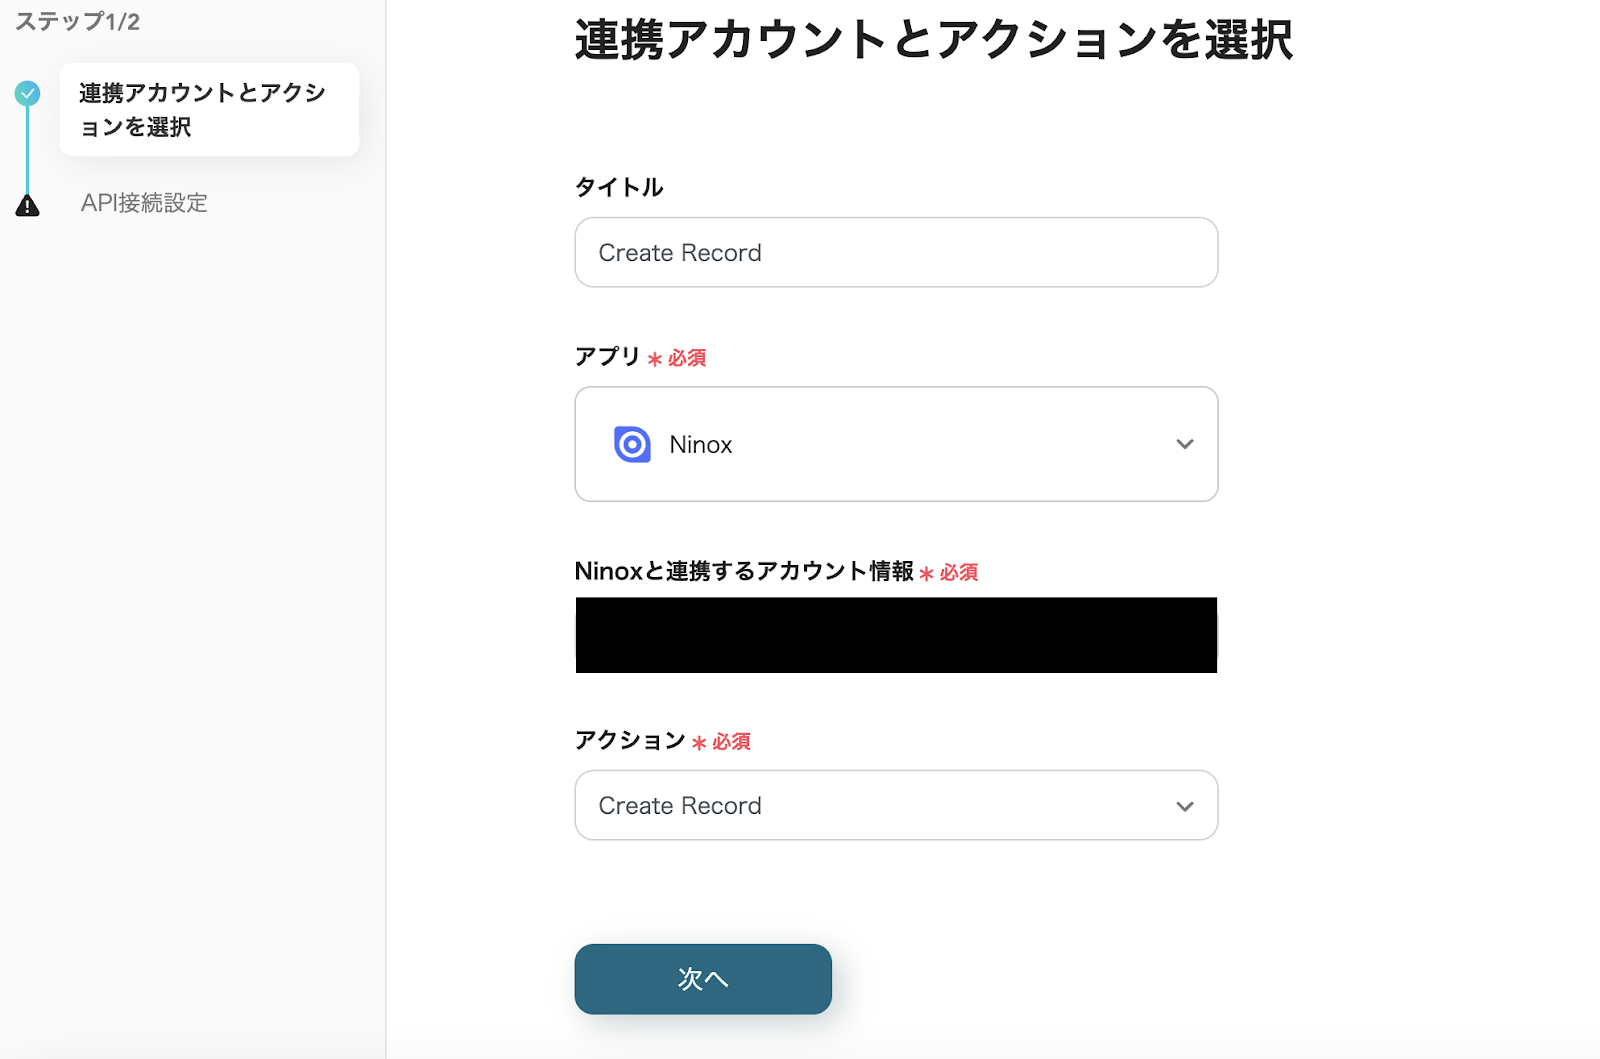
1.連携アカウントとアクションを選択
タイトルは変更できます。
Ninoxと連携するアカウント情報を確認しましょう。
アクションは「Create Record」を選択してください。
設定したら「次へ」をクリックします。
2.API接続
必須項目を入力してください。
入力欄をクリックして表示される「候補」から該当項目を選択できます。
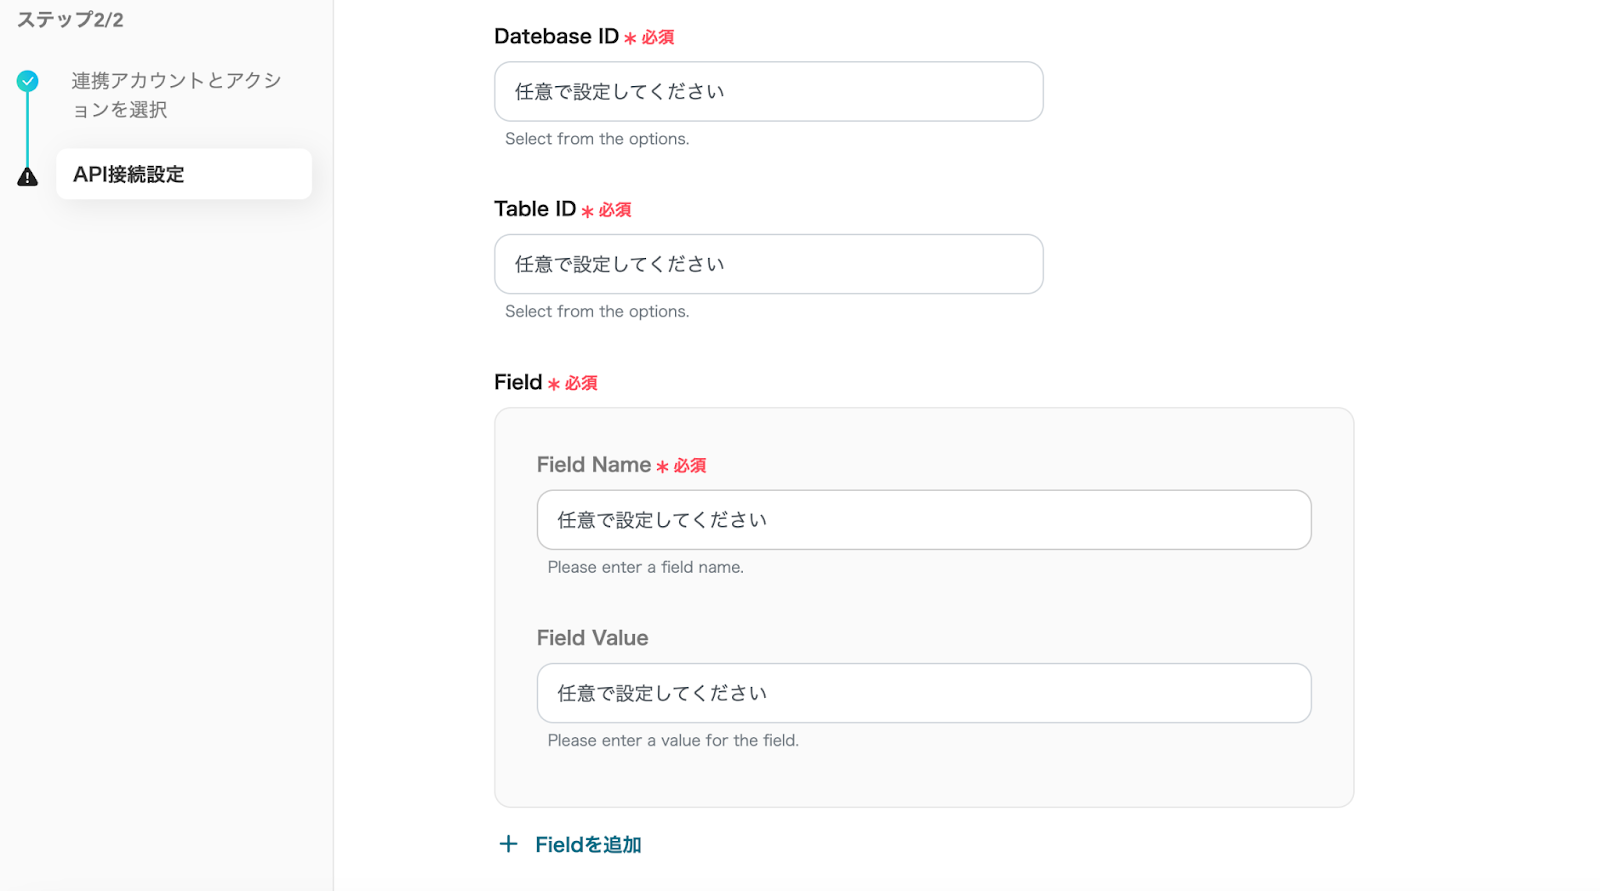
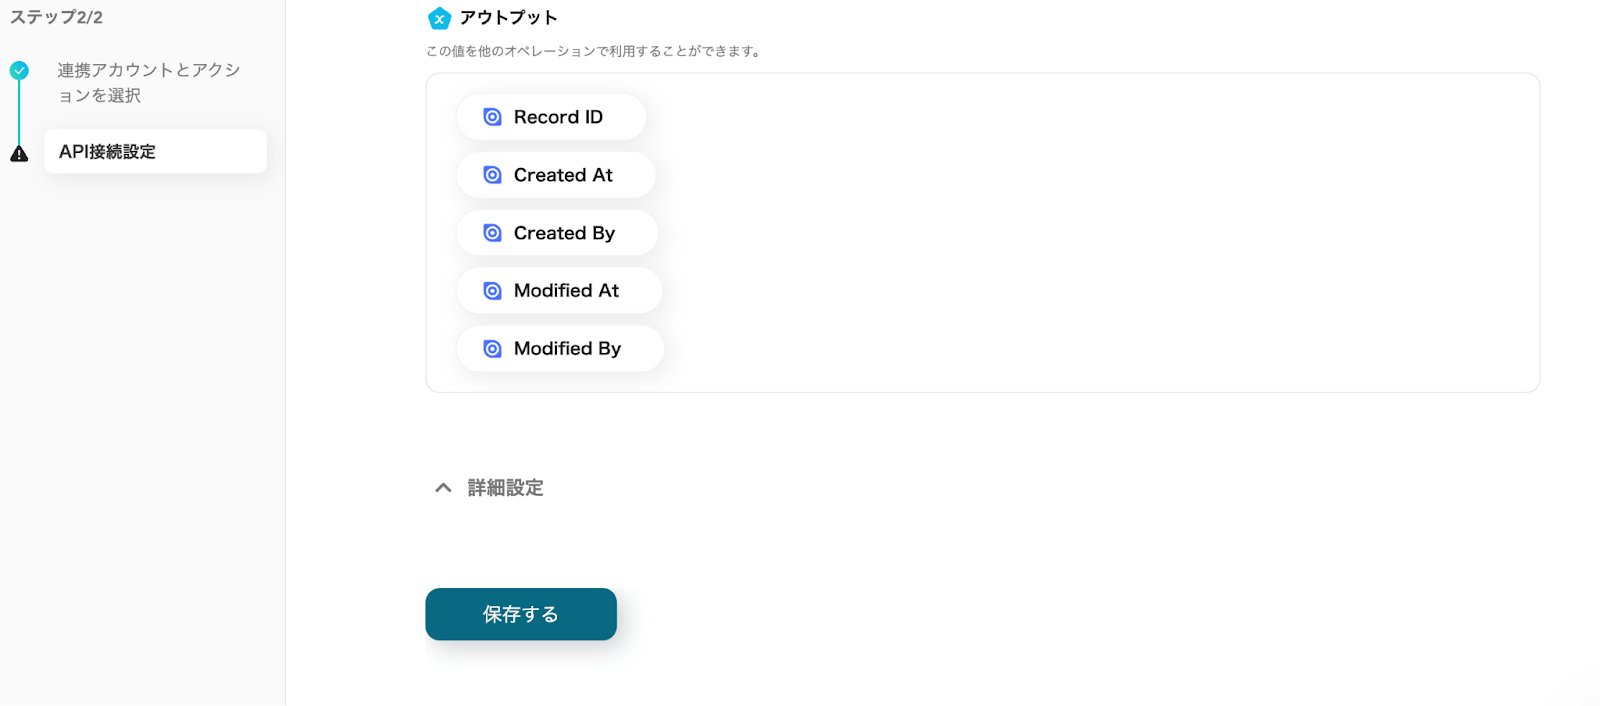
設定できたらテストをクリックして、Ninoxのアウトプット(取得した値)が取得できたら保存しましょう。
ステップ5:Google スプレッドシートのアクションを設定
これが最後のステップです。
「レコードを更新」をクリックして設定を進めましょう。
1.データベースの連携
タイトルは変更できます。
Google スプレッドシートと連携するアカウント情報を確認しましょう。
実行アクションは「レコードを更新する」を選択します。
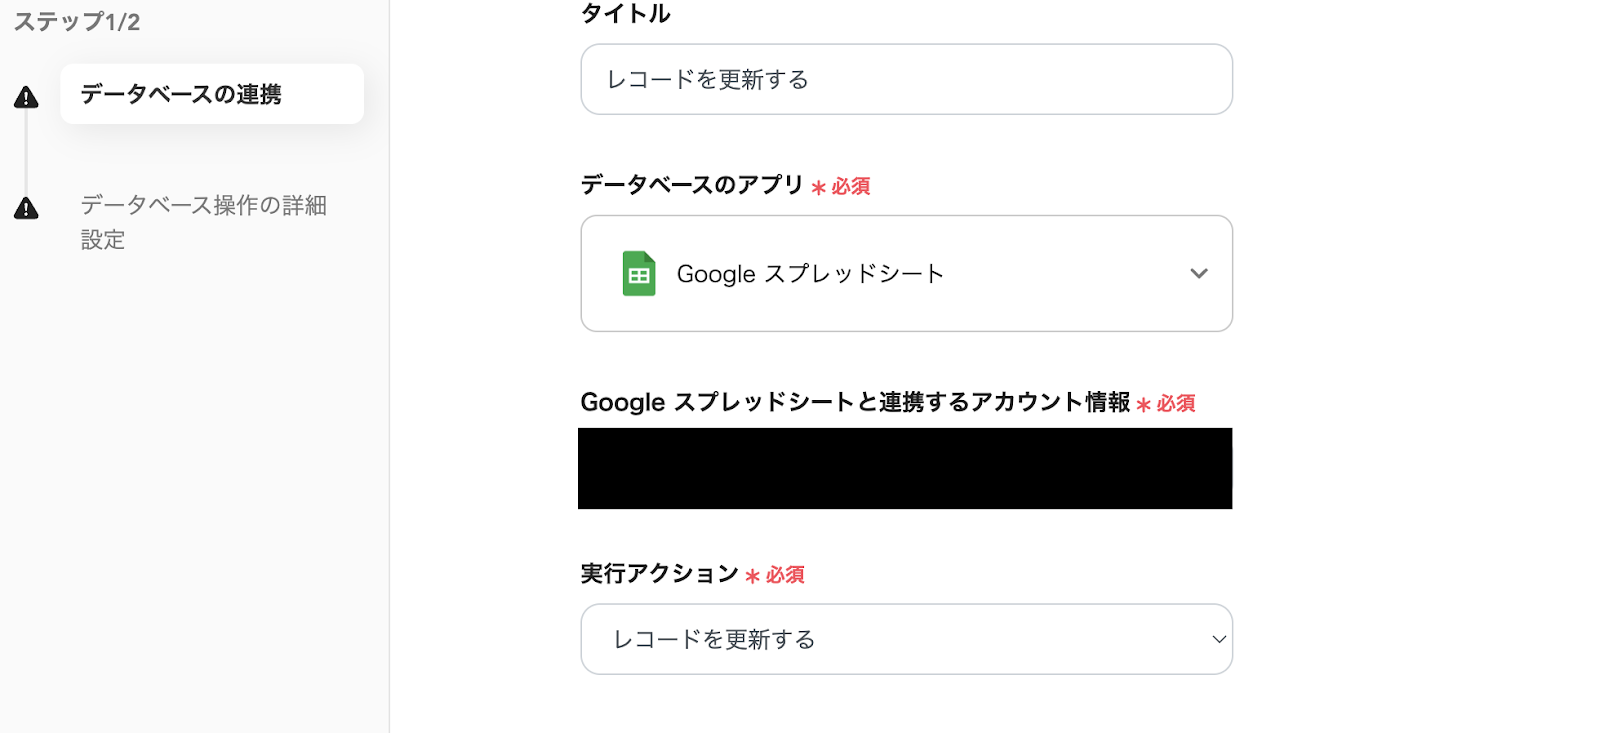
「スプレッドシートID」「スプレッドシートのタブ名」:入力欄をクリックして表示される候補から選択
「テーブル範囲」:該当するシートに合わせて直接入力する

2.データベース操作の詳細設定
更新したいレコードの条件には、レコードの更新条件を設定します。
添付した画像のように設定することで、No.が等しいレコードが更新されるようになります。
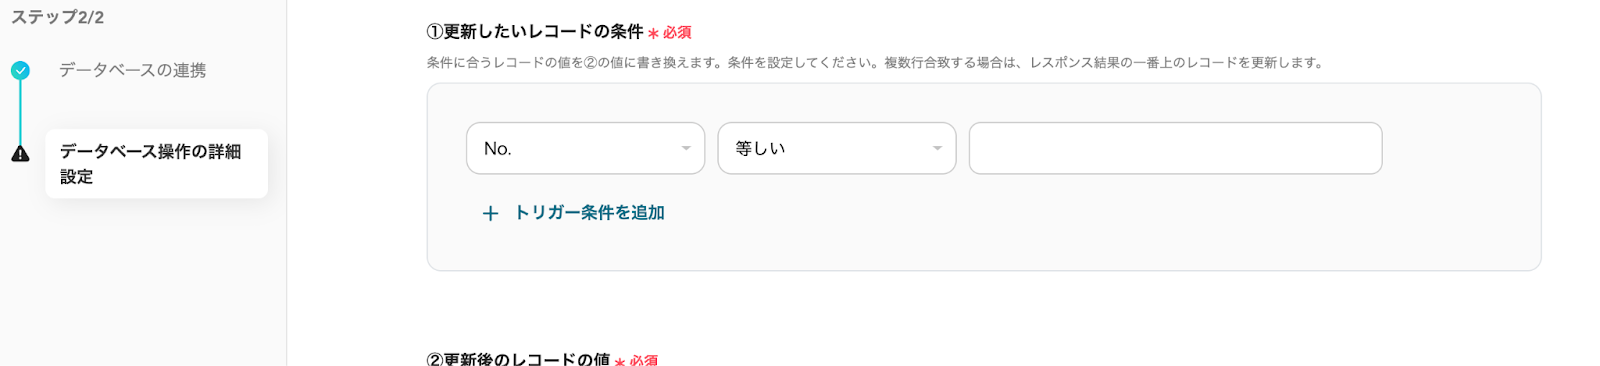
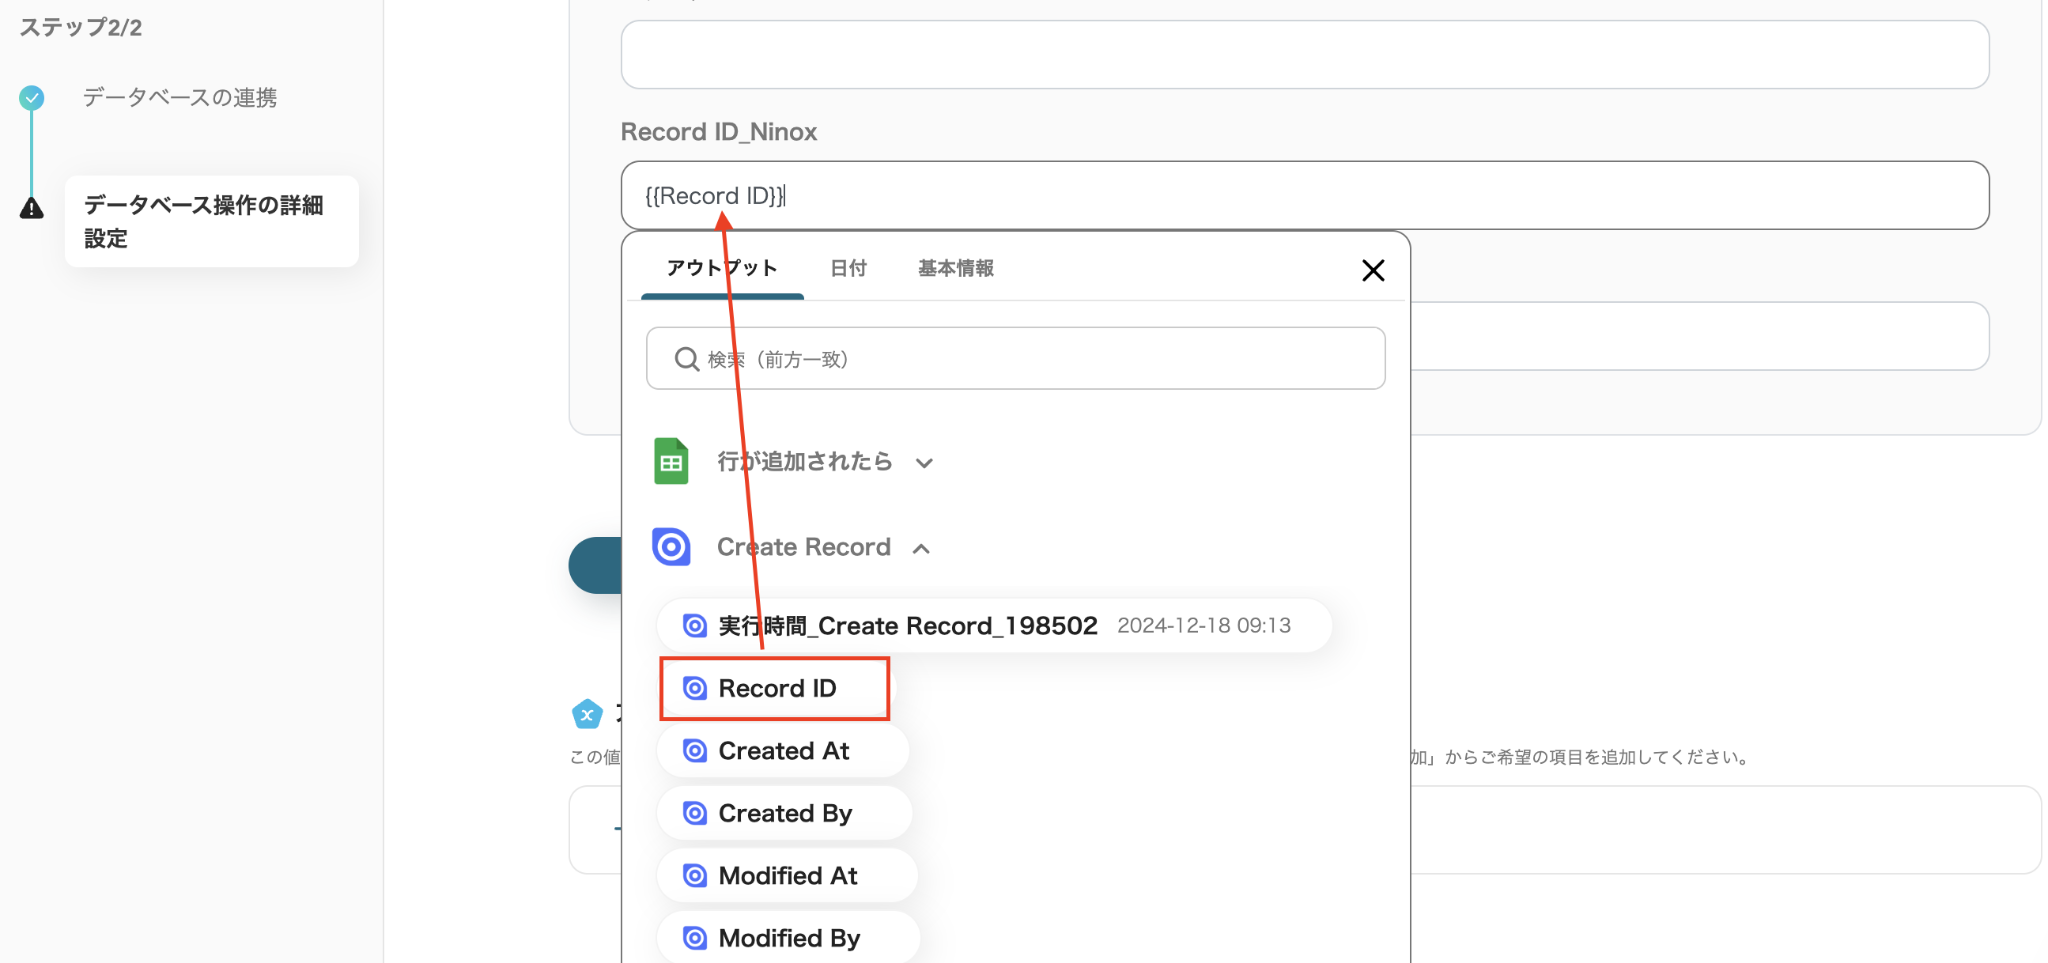
更新後のレコードの値を入力します。
「Record ID_Ninox」の項目に、Google スプレッドシートに対応するNinoxのレコードが分かるようにNinoxのレコードIDのアウトプット(取得した値)を入力します。
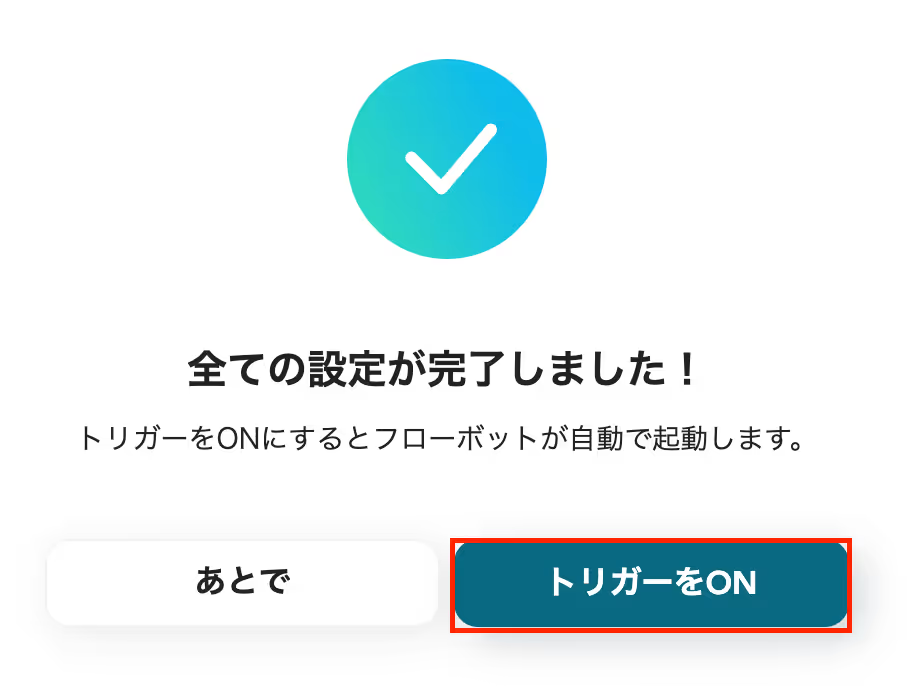
ここまでできたら、テストを実行して保存しましょう。
保存すると、すべての設定が完了したと表示が出るので「トリガーをON」をクリックしましょう。
以上でフローボットの設定が完成しました!
まとめ
Google スプレッドシートとNinoxを連携することで、入力作業やヒューマンエラーを軽減することができるでしょう。
また、情報を一元管理することが可能になり、業務をスムーズに行うことができそうです。
さらにYoomを活用すれば、プログラミングの知識がなくてもアプリ連携やフローボットを作成できます。
今回のようにテンプレートを使えば、初心者でも簡単に設定できます。
この機会にGoogle スプレッドシートとNinoxを連携して入力作業を自動化してみませんか?
よくあるご質問
Q:なぜNinoxのIDをスプレッドシートに書き戻すのですか?
A:
Ninoxで作成したレコードのIDをスプレッドシートに書き戻すことで、双方のデータを一意に紐づけられます。
これにより、更新時に同じレコードを正確に特定でき、重複登録を防ぎつつ、連携完了の確認もスムーズになります。
Q:特定の列のデータだけをNinoxに連携できますか?
A:
はい、Google スプレッドシートとNinoxを連携する際に、 任意の列(スプレッドシート上)を選んでNinoxの対応フィールドにマッピングできます。
そのため、「特定の列のデータだけを連携」することは可能です。
Q:連携がうまくいかない時の挙動は?
A:
連携が失敗した場合、Yoomに登録したメールアドレスに通知が届きます。
また、Yoom画面上に「認証に失敗しました」「設定内容に誤りがある」などのエラーメッセージが表示されます。
エラーが起きた際の対応方法については下記のサイトをご参照ください。
ヘルプページで解決しない場合は、サポート窓口を利用することもできます。
プログラミング知識なしで手軽に構築できます。