「Googleフォームの回答をMicrosoft Excelに転記する作業、もっと楽にならないかな…」
「問い合わせが増えるたびに手作業でコピペするのは時間がかかるし、入力ミスも心配…」
このように、Googleフォームで集めたデータを手作業でMicrosoft Excelにまとめる業務に手間や限界を感じていませんか?
もし、Googleフォームに新しい回答が送信されるたびに、その内容が自動でMicrosoft Excelの指定した行に追加される自動化の仕組みがあれば、面倒なデータ転記作業が削減できるはずです。
これなら、最新のデータに基づいた分析や後続作業に集中できる時間を生み出すことができそうですね!
今回ご紹介する自動化の設定は、ノーコードで簡単に設定できて、手間や時間もかからないので、ぜひ自動化を導入して作業をもっと楽にしましょう!
とにかく早く試したい方へ
YoomにはGoogleフォームの回答をMicrosoft Excelに連携する業務フロー自動化のテンプレートが用意されています。
「まずは試してみたい!」という方は、以下のバナーをクリックして、すぐに自動化を体験してみましょう!
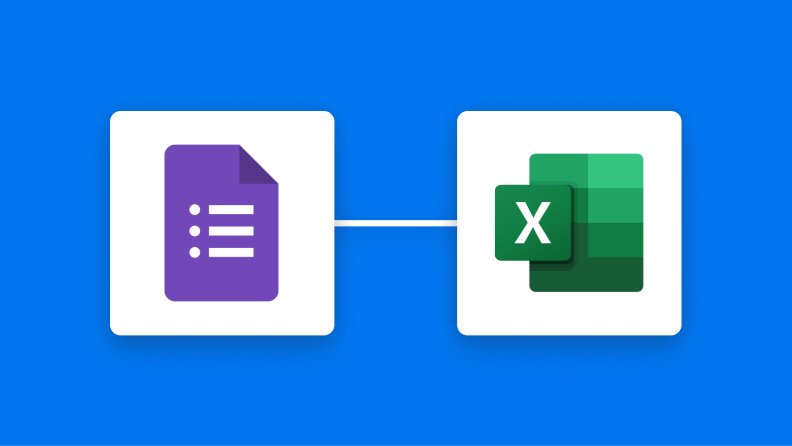
Googleフォームの回答をMicrosoft Excelに登録する
試してみる
■概要
Googleフォームで集めたアンケートや問い合わせの回答を、手作業でMicrosoft Excelに転記していませんか?この作業は単純ですが、件数が増えると時間がかかり、コピー&ペーストのミスも発生しがちです。このワークフローを活用すれば、Googleフォームに新しい回答が送信されると、自動でMicrosoft Excelの指定したシートに行が追加されるため、こうしたデータ入力の手間やヒューマンエラーを解消できます。
■このテンプレートをおすすめする方
- Googleフォームで得た回答を手作業でMicrosoft Excelに転記しているご担当者の方
- フォームからのリード情報などをチームで管理しており、入力業務を効率化したい方
- 手作業によるデータ転記での入力ミスや対応漏れなどの課題を解消したい方
■このテンプレートを使うメリット
- Googleフォームに回答が送信されると自動でMicrosoft Excelに情報が追加されるため、これまで手作業に費やしていた時間を短縮できます。
- 手作業によるデータ転記が不要になることで、入力間違いや項目漏れといったヒューマンエラーのリスク軽減に繋がります。
■フローボットの流れ
- はじめに、GoogleフォームとMicrosoft ExcelをYoomと連携します。
- 次に、トリガーでGoogleフォームを選択し、「フォームに回答が送信されたら」というアクションを設定して、対象のフォームを指定します。
- 最後に、オペレーションでMicrosoft Excelの「情報を追加する」アクションを設定し、トリガーで取得したフォームの回答内容を、指定したファイルやシートの各列にマッピングします。
※「トリガー」:フロー起動のきっかけとなるアクション、「オペレーション」:トリガー起動後、フロー内で処理を行うアクション
■このワークフローのカスタムポイント
- Googleフォームのトリガー設定では、自動化の対象としたいフォームを任意で指定してください。
- Microsoft Excelへの情報追加オペレーションでは、どの列にフォームのどの回答項目を割り当てるかなどを自由にカスタマイズできます。固定のテキストを追加することも可能です。
■注意事項
- Googleフォーム、Microsoft ExcelそれぞれとYoomを連携してください。
- Microsoft365(旧Office365)には、家庭向けプランと一般法人向けプラン(Microsoft365 Business)があり、一般法人向けプランに加入していない場合には認証に失敗する可能性があります。
- Microsoft Excelのデータベースを操作するオペレーションの設定に関しては「Microsoft Excelのデータベースを操作するオペレーションの設定」をご参照ください。
- Googleフォームをトリガーとして使用した際の回答内容を取得する方法は「Googleフォームトリガーで、回答内容を取得する方法」を参照ください。
- トリガーは5分、10分、15分、30分、60分の間隔で起動間隔を選択できます。
- プランによって最短の起動間隔が異なりますので、ご注意ください。
GoogleフォームとMicrosoft Excelを連携する自動化の方法
GoogleフォームとMicrosoft Excel間で発生する様々なデータ連携を自動化する方法を、具体的なテンプレートを使って紹介します!
データ入力の手間を削減できる他、情報共有を実現できるので、気になる内容があればぜひクリックしてみてください!
Googleフォームの回答をMicrosoft Excelに直接登録する
Googleフォームに新しい回答が送信された際に、その内容をMicrosoft Excelの指定した行に自動で追加する基本的な連携フローです。
手作業でのデータ転記の手間が減ることで、迅速かつ正確な情報連携が実現しそうです!
Googleフォームの回答をMicrosoft Excelに登録する
試してみる
■概要
Googleフォームで集めたアンケートや問い合わせの回答を、手作業でMicrosoft Excelに転記していませんか?この作業は単純ですが、件数が増えると時間がかかり、コピー&ペーストのミスも発生しがちです。このワークフローを活用すれば、Googleフォームに新しい回答が送信されると、自動でMicrosoft Excelの指定したシートに行が追加されるため、こうしたデータ入力の手間やヒューマンエラーを解消できます。
■このテンプレートをおすすめする方
- Googleフォームで得た回答を手作業でMicrosoft Excelに転記しているご担当者の方
- フォームからのリード情報などをチームで管理しており、入力業務を効率化したい方
- 手作業によるデータ転記での入力ミスや対応漏れなどの課題を解消したい方
■このテンプレートを使うメリット
- Googleフォームに回答が送信されると自動でMicrosoft Excelに情報が追加されるため、これまで手作業に費やしていた時間を短縮できます。
- 手作業によるデータ転記が不要になることで、入力間違いや項目漏れといったヒューマンエラーのリスク軽減に繋がります。
■フローボットの流れ
- はじめに、GoogleフォームとMicrosoft ExcelをYoomと連携します。
- 次に、トリガーでGoogleフォームを選択し、「フォームに回答が送信されたら」というアクションを設定して、対象のフォームを指定します。
- 最後に、オペレーションでMicrosoft Excelの「情報を追加する」アクションを設定し、トリガーで取得したフォームの回答内容を、指定したファイルやシートの各列にマッピングします。
※「トリガー」:フロー起動のきっかけとなるアクション、「オペレーション」:トリガー起動後、フロー内で処理を行うアクション
■このワークフローのカスタムポイント
- Googleフォームのトリガー設定では、自動化の対象としたいフォームを任意で指定してください。
- Microsoft Excelへの情報追加オペレーションでは、どの列にフォームのどの回答項目を割り当てるかなどを自由にカスタマイズできます。固定のテキストを追加することも可能です。
■注意事項
- Googleフォーム、Microsoft ExcelそれぞれとYoomを連携してください。
- Microsoft365(旧Office365)には、家庭向けプランと一般法人向けプラン(Microsoft365 Business)があり、一般法人向けプランに加入していない場合には認証に失敗する可能性があります。
- Microsoft Excelのデータベースを操作するオペレーションの設定に関しては「Microsoft Excelのデータベースを操作するオペレーションの設定」をご参照ください。
- Googleフォームをトリガーとして使用した際の回答内容を取得する方法は「Googleフォームトリガーで、回答内容を取得する方法」を参照ください。
- トリガーは5分、10分、15分、30分、60分の間隔で起動間隔を選択できます。
- プランによって最短の起動間隔が異なりますので、ご注意ください。
Googleフォームの添付ファイルを読み取りMicrosoft Excelに登録する
Googleフォームに添付された名刺画像などのファイルからOCR機能でテキスト情報を抽出し、そのデータをMicrosoft Excelに自動で登録するフローです。画像データの手入力作業の効率化が見込めるでしょう!
Googleフォームで送信された名刺画像をOCRで読み取り、Microsoft Excelにデータを追加する
試してみる
■概要
展示会や日々の営業活動で交換した名刺のデータ入力に、手間や時間を取られていないでしょうか。手作業での転記は時間がかかるだけでなく、入力ミスといったヒューマンエラーの原因にもなります。このワークフローを活用すれば、Googleフォームに名刺画像を送信するだけで、OCRが情報を自動で読み取り、Microsoft Excelの管理表へデータが追加されるため、こうした名刺管理にまつわる課題をスムーズに解消できます。
■このテンプレートをおすすめする方
- GoogleフォームとMicrosoft Excelで名刺情報を管理し、手入力に手間を感じている方
- OCRを活用して紙媒体からのデータ抽出を自動化し、入力業務を効率化したい方
- 手作業によるデータ転記での入力ミスや漏れを防ぎ、データ精度を高めたい方
■このテンプレートを使うメリット
- Googleフォームへの送信を起点に、名刺情報の読み取りからMicrosoft Excelへの記録までが自動化され、手作業での入力時間を短縮できます。
- 手作業によるデータ転記が不要になるため、入力ミスや項目漏れといったヒューマンエラーを防ぎ、データの正確性を向上させます。
■フローボットの流れ
- はじめに、Googleフォーム、Google Drive、Microsoft ExcelをYoomと連携します。
- 次に、トリガーでGoogleフォームを選択し、「フォームに回答が送信されたら」というアクションを設定します。
- 次に、オペレーションでGoogle Driveの「ファイルをダウンロードする」アクションを設定し、フォームの回答で送信された名刺画像ファイルを取得します。
- 次に、オペレーションでOCR機能を選択し、「任意の画像やPDFを読み取る」アクションでダウンロードしたファイルを指定して情報を抽出します。
- 最後に、オペレーションでMicrosoft Excelの「レコードを追加する」アクションを設定し、OCR機能で抽出した情報を指定の列に追加します。
※「トリガー」:フロー起動のきっかけとなるアクション、「オペレーション」:トリガー起動後、フロー内で処理を行うアクション
■このワークフローのカスタムポイント
- Googleフォームのトリガー設定では、連携の対象としたい任意のフォームを指定できます。
- OCR機能では、名刺から抽出したい項目(会社名、部署、役職、氏名など)を任意で設定し、読み取り精度を調整することが可能です。
- Microsoft Excelにデータを追加する際、OCRで取得した情報をどの列に登録するかを自由にマッピングでき、また特定の列に固定値を入力することも可能です。
■注意事項
- Googleフォーム、Google Drive、Microsoft ExcelのそれぞれとYoomを連携してください。
- AIオペレーションはチームプラン・サクセスプランでのみご利用いただける機能となっております。フリープラン・ミニプランの場合は設定しているフローボットのオペレーションはエラーとなりますので、ご注意ください。
- チームプランやサクセスプランなどの有料プランは、2週間の無料トライアルを行うことが可能です。無料トライアル中には制限対象のアプリやAI機能(オペレーション)を使用することができます。
- Microsoft365(旧Office365)には、家庭向けプランと一般法人向けプラン(Microsoft365 Business)があり、一般法人向けプランに加入していない場合には認証に失敗する可能性があります。
- トリガーは5分、10分、15分、30分、60分の間隔で起動間隔を選択できます。
- プランによって最短の起動間隔が異なりますので、ご注意ください。
- Googleフォームをトリガーとして使用した際の回答内容を取得する方法はこちらをご参照ください。
- Microsoft Excelのデータベースを操作するオペレーションの設定に関しては、こちらをご参照ください。
- OCRデータは6,500文字以上のデータや文字が小さい場合などは読み取れない場合があるので、ご注意ください。
Googleフォームの回答をもとにMicrosoft Excelで書類を作成する
Googleフォームで受け付けた回答内容を基に、あらかじめ用意したMicrosoft Excelのテンプレートで見積書や請求書などの書類を自動で作成するフローです。個別の書類作成にかかる時間を省略できるため、書類発行の迅速化が図れます!
Googleフォームに回答された内容をもとに、Microsoft Excelで書類を作成する
試してみる
■概要
Googleフォームに寄せられた回答をもとに、都度Microsoft Excelを開いて書類を作成する作業は、件数が増えると大きな負担になるのではないでしょうか。手作業での転記は、入力ミスや対応漏れといったヒューマンエラーの原因にもなりかねません。このワークフローを活用すれば、フォームへの回答をきっかけにMicrosoft Excelの書類作成を自動化でき、こうした課題をスムーズに解消できます。
■このテンプレートをおすすめする方
- Googleフォームの回答内容をMicrosoft Excelで書類化している方
- 手作業でのデータ転記によるミスや、対応の遅れに課題を感じている方
- 定型的な書類作成業務を自動化し、コア業務に集中したいと考えている方
■このテンプレートを使うメリット
- Googleフォームに回答があると自動で書類が作成されるため、これまで手作業で行っていた転記や作成の時間を短縮できます。
- 手作業でのデータ転記が不要になるため、入力間違いや項目漏れといったヒューマンエラーのリスクを軽減することに繋がります。
■フローボットの流れ
- はじめに、GoogleフォームとMicrosoft ExcelをYoomと連携します。
- 次に、トリガーでGoogleフォームを選択し、「フォームに回答が送信されたら」というアクションを設定します。
- 最後に、オペレーションで「書類を発行する」アクションを選択し、Microsoft Excelで書類を発行するよう設定します。この際、トリガーで取得したフォームの回答内容を書類の任意の箇所にマッピングします。
※「トリガー」:フロー起動のきっかけとなるアクション、「オペレーション」:トリガー起動後、フロー内で処理を行うアクション
■このワークフローのカスタムポイント
- Googleフォームのトリガー設定では、自動化の対象としたい任意のフォームを指定してください。
- 書類発行オペレーションでは、あらかじめ用意したMicrosoft Excelのテンプレートファイルを雛形として設定します。また、フォームの回答項目をExcelファイルのどのセルに出力するかを自由にマッピングすることが可能です。
■注意事項
- Googleフォーム、Microsoft ExcelのそれぞれとYoomを連携してください。
- Googleフォームをトリガーとして使用した際の回答内容を取得する方法は「Googleフォームトリガーで、回答内容を取得する方法」を参照ください。
- トリガーは5分、10分、15分、30分、60分の間隔で起動間隔を選択できます。
- プランによって最短の起動間隔が異なりますので、ご注意ください。
- Microsoft365(旧Office365)には、家庭向けプランと一般法人向けプラン(Microsoft365 Business)があり、一般法人向けプランに加入していない場合には認証に失敗する可能性があります。
- 「書類を発行する」アクションでは、任意のOneDriveの格納先を設定可能です。
Googleフォームの回答をMicrosoft Excelに自動連携するフローを作ってみよう
それではここから代表的な例として、Googleフォームに回答が送信された際に、その内容をMicrosoft Excelの行に自動で追加するフローを解説していきます!
ここではYoomを使用してノーコードで設定をしていくので、もしまだYoomのアカウントをお持ちでない場合は、こちらの登録フォームからアカウントを発行しておきましょう。
[Yoomとは]
フローの作成方法
今回は大きく分けて以下のプロセスで作成します。
- GoogleフォームとMicrosoft Excelのマイアプリ連携
- テンプレートをコピー
- Googleフォームのトリガー設定とMicrosoft Excelのアクション設定
- トリガーをONにし、フローが起動するかを確認
Yoomを利用していない方は、こちらから無料登録してください。
すでにYoomを利用している方はログインしましょう。
ステップ1:GoogleフォームとMicrosoft Excelをマイアプリ連携
ここでは、Yoomとそれぞれのアプリを連携して、操作が行えるようにしていきます。
まずは基本的な設定方法を解説しているナビをご覧ください!
それではここから今回のフローで使用するアプリのマイアプリ連携方法を解説します。
Googleフォームのマイアプリ連携
先ほどのナビのGoogle スプレッドシートと同様の手順でマイアプリ連携が可能です!
Microsoft Excelのマイアプリ連携
以下の手順をご参照ください。
※「Microsoft 365(旧Office 365)」には個人向けと法人向けプラン(Microsoft 365 Business)があります。法人向けプランを契約していない場合、Yoomからの認証がうまくいかない可能性があるのでご注意ください。
これで2つのアプリがYoomアカウントに接続できました。
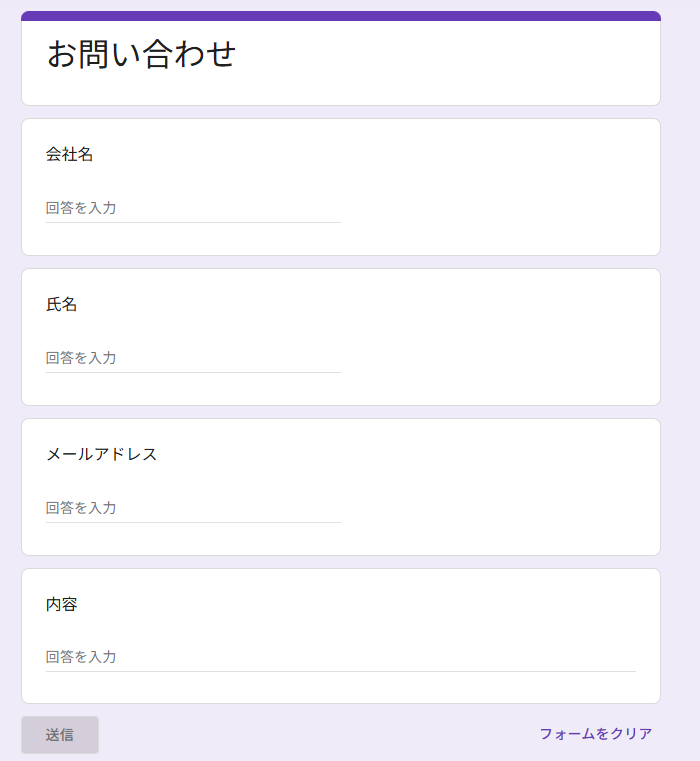
なお、今回は以下の画像のような回答フォームをGoogleフォームで事前に作成しています。
作成が終わったらテストとしてフォームに回答してみましょう。(このテスト回答は後ほどフローの設定で必要になります。)
ステップ2:テンプレートのコピー
Yoomアカウントに対象のアプリの新規接続が完了していることを確認後、Yoomにログインし、以下バナーの「試してみる」をクリックしてください。
Googleフォームの回答をMicrosoft Excelに登録する
試してみる
■概要
Googleフォームで集めたアンケートや問い合わせの回答を、手作業でMicrosoft Excelに転記していませんか?この作業は単純ですが、件数が増えると時間がかかり、コピー&ペーストのミスも発生しがちです。このワークフローを活用すれば、Googleフォームに新しい回答が送信されると、自動でMicrosoft Excelの指定したシートに行が追加されるため、こうしたデータ入力の手間やヒューマンエラーを解消できます。
■このテンプレートをおすすめする方
- Googleフォームで得た回答を手作業でMicrosoft Excelに転記しているご担当者の方
- フォームからのリード情報などをチームで管理しており、入力業務を効率化したい方
- 手作業によるデータ転記での入力ミスや対応漏れなどの課題を解消したい方
■このテンプレートを使うメリット
- Googleフォームに回答が送信されると自動でMicrosoft Excelに情報が追加されるため、これまで手作業に費やしていた時間を短縮できます。
- 手作業によるデータ転記が不要になることで、入力間違いや項目漏れといったヒューマンエラーのリスク軽減に繋がります。
■フローボットの流れ
- はじめに、GoogleフォームとMicrosoft ExcelをYoomと連携します。
- 次に、トリガーでGoogleフォームを選択し、「フォームに回答が送信されたら」というアクションを設定して、対象のフォームを指定します。
- 最後に、オペレーションでMicrosoft Excelの「情報を追加する」アクションを設定し、トリガーで取得したフォームの回答内容を、指定したファイルやシートの各列にマッピングします。
※「トリガー」:フロー起動のきっかけとなるアクション、「オペレーション」:トリガー起動後、フロー内で処理を行うアクション
■このワークフローのカスタムポイント
- Googleフォームのトリガー設定では、自動化の対象としたいフォームを任意で指定してください。
- Microsoft Excelへの情報追加オペレーションでは、どの列にフォームのどの回答項目を割り当てるかなどを自由にカスタマイズできます。固定のテキストを追加することも可能です。
■注意事項
- Googleフォーム、Microsoft ExcelそれぞれとYoomを連携してください。
- Microsoft365(旧Office365)には、家庭向けプランと一般法人向けプラン(Microsoft365 Business)があり、一般法人向けプランに加入していない場合には認証に失敗する可能性があります。
- Microsoft Excelのデータベースを操作するオペレーションの設定に関しては「Microsoft Excelのデータベースを操作するオペレーションの設定」をご参照ください。
- Googleフォームをトリガーとして使用した際の回答内容を取得する方法は「Googleフォームトリガーで、回答内容を取得する方法」を参照ください。
- トリガーは5分、10分、15分、30分、60分の間隔で起動間隔を選択できます。
- プランによって最短の起動間隔が異なりますので、ご注意ください。
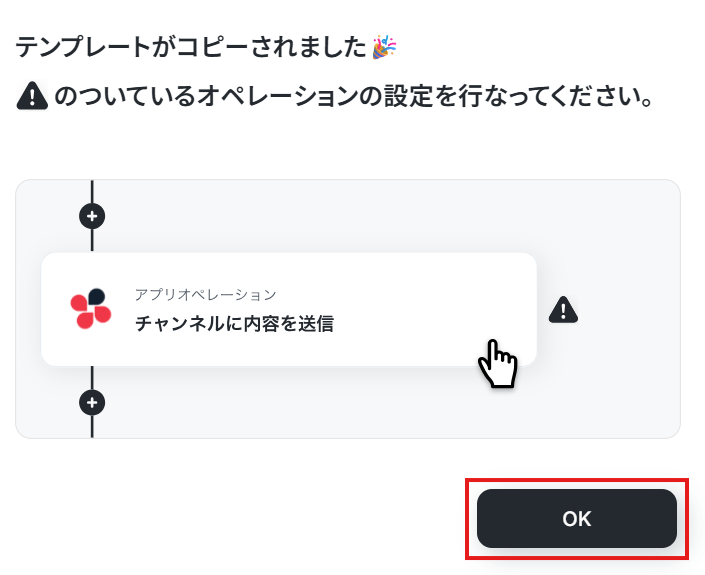
テンプレートがコピーされると、以下のように表示されます。
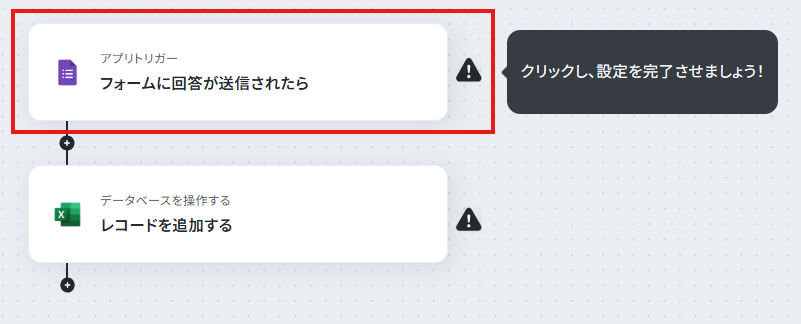
ステップ3:Googleフォームのトリガーアクション設定
さっそく、フローボットの設定を進めていきます!
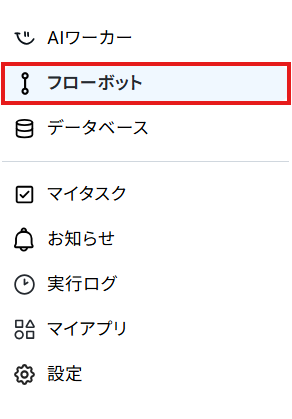
Yoomアカウントの画面左側のフローボットから「【コピー】Googleフォームの回答をMicrosoft Excelに登録する」をクリックしてください。
クリックした後、以下画面のようにテンプレート内容が表示されます。
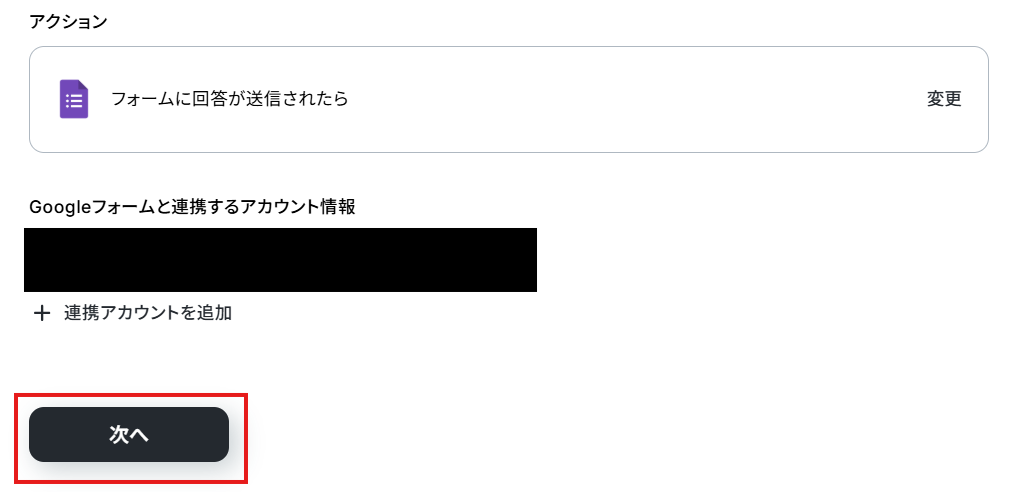
まずは、トリガーとなる「フォームに回答が送信されたら」をクリックして、連携するアカウント情報が入力されていることを確認してください。
確認後、[次へ]をクリックします。
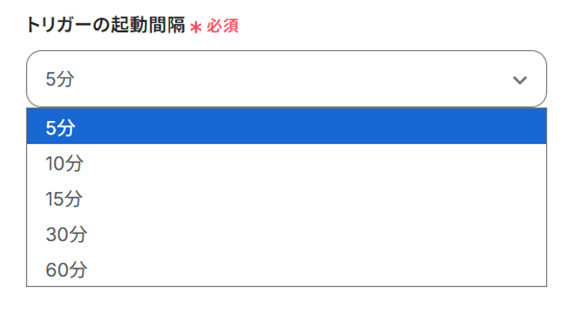
次の画面で「トリガーの起動間隔」を設定しましょう。
※トリガーの起動タイミングは、5分、10分、15分、30分、60分のいずれかで設定できます。
ご利用プランによって、設定できるトリガーの最短間隔が違うので、その点は要チェックです。
なお、基本的にはそのプランの最短の起動間隔にしてお使いいただくことをおすすめします。
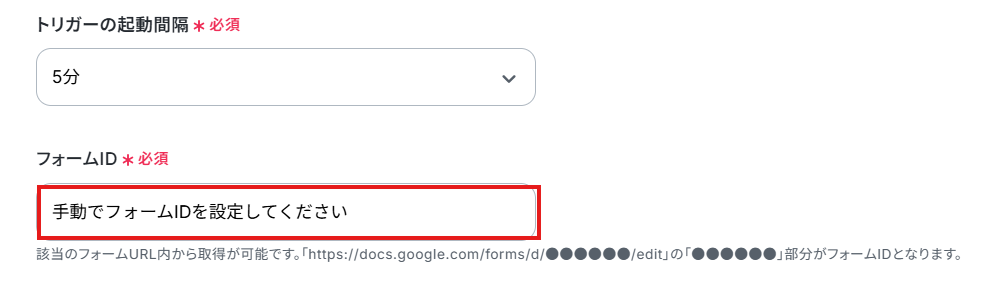
「フォームID」に、注釈に沿って情報を入力しましょう。
今回の場合はGoogleフォームのURL内にある赤枠の部分が該当します。
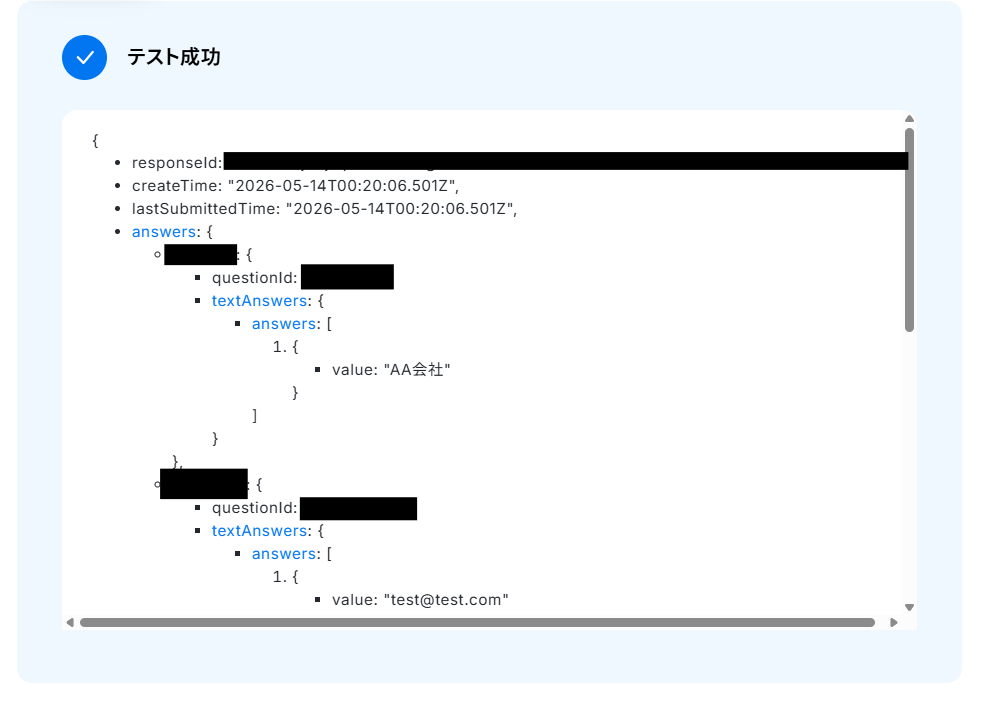
事前に作成したフォームにテスト回答を行っているので、項目設定後、[テスト]をクリックします。
テスト成功後は、以下のように表示されます。
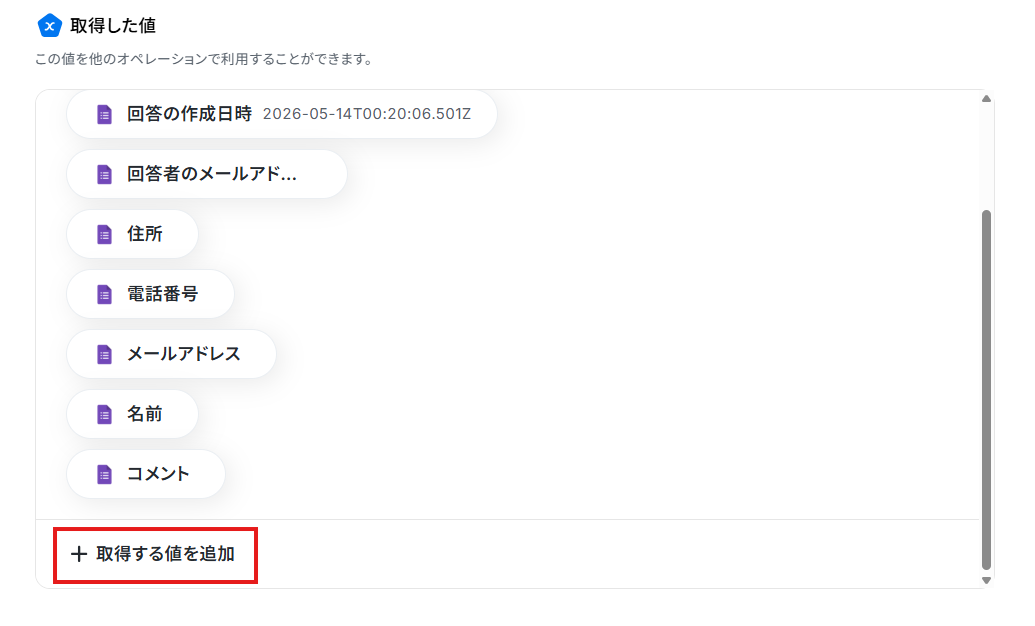
このステップで下記のような情報をアウトプットとして取得することができます。
取得したいアウトプットを増やしたい場合、『JsonPath』で取得するのがおすすめです。
JsonPathは、HTMLで用いるXPATHと近しいものとなります。
Yoomではアプリと連携するオペレーションで実行したAPIリクエストの結果はJSON形式のテキストで確認できるようになっており、特定のフォーマットでパスを記載することで、リクエスト結果のJSONテキストから任意の値を抽出することが可能です。
なお、JsonPathによるアウトプットの取得方法については、こちらのページをご確認ください。
また、JsonPathの記載方法については、こちらを確認しましょう。
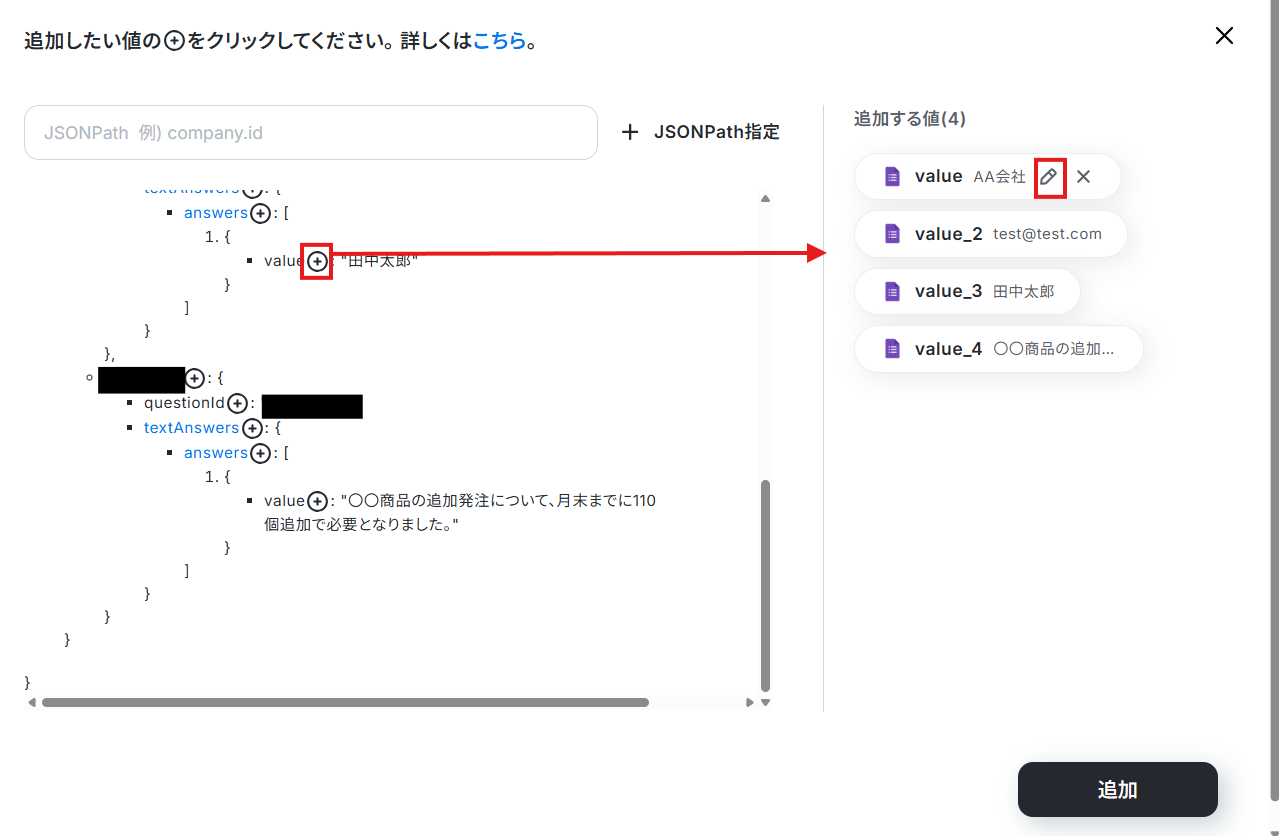
以下の画像は、値を追加する操作の一例です。
鉛筆マークをクリックすると、項目名を編集できます。
追加先のMicrosoft Excelのシートで設定されている項目名と統一するのがおすすめです。
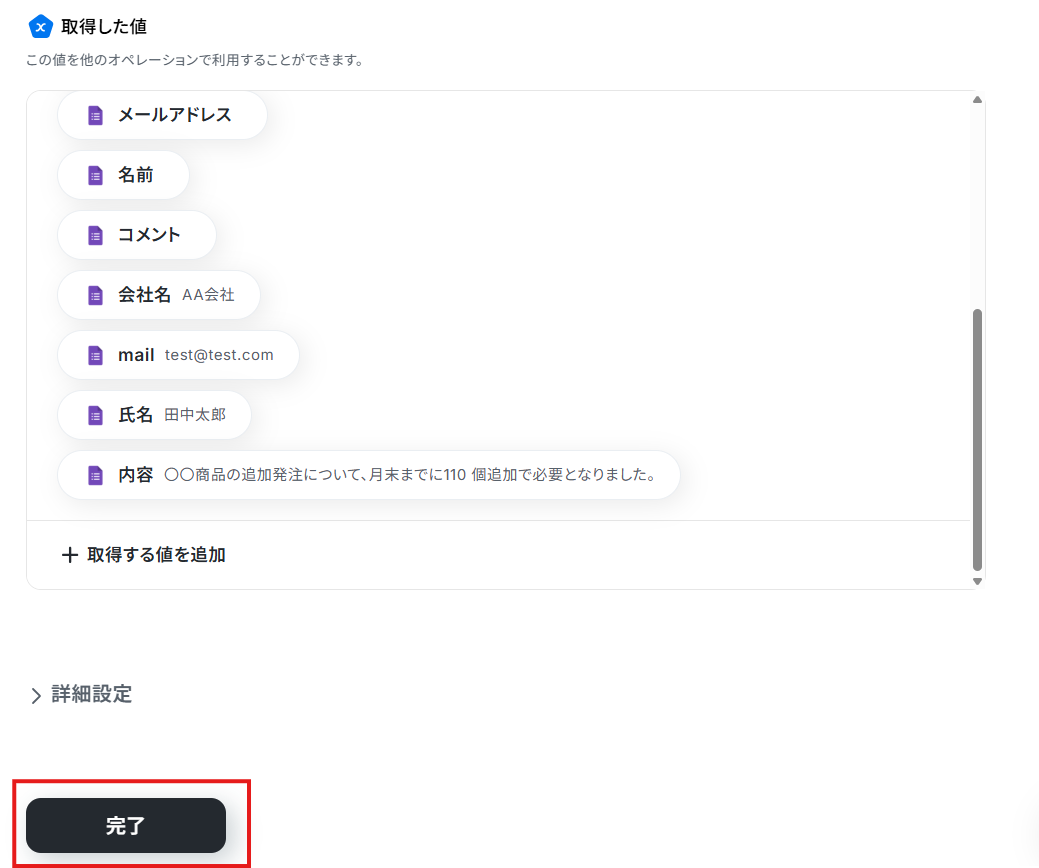
アウトプット情報は、この後のステップで引用・活用できるので、アウトプットを引用した項目に対し、情報をMicrosoft Excelの指定範囲にそのまま反映できます。
そのため、必ず取得したいデータ=Microsoft Excelに反映したいデータが表示されていることを確認して、『完了』をクリックします。
アプリトリガーのGoogleフォームを活用することで、Googleフォームの回答内容を起点にフローボットを起動させることができます。
詳しくはこちらのヘルプページをご確認の上、事前に設定を行なってください。
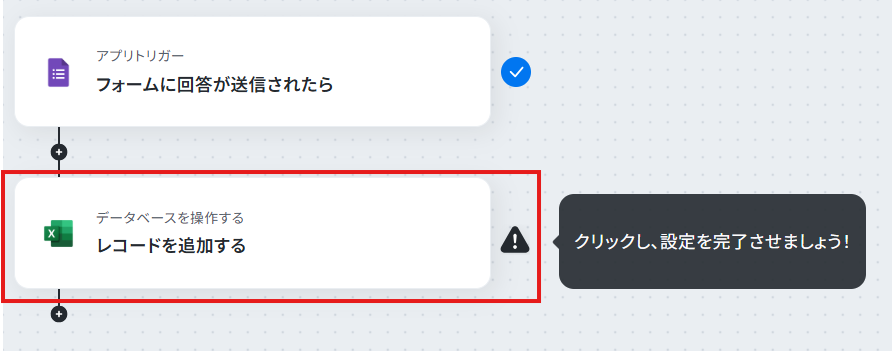
ステップ4:Microsoft Excelにレコードを追加する設定
最後に、「情報を追加する」をクリックしましょう。
情報を追加するMicrosoft Excelのシート情報を指定します。まずは、連携するアカウント情報が正しいかを確認しましょう。
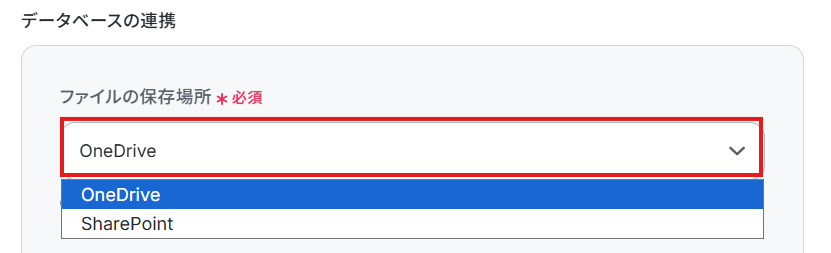
『データベースの連携』の各項目を設定していきます。
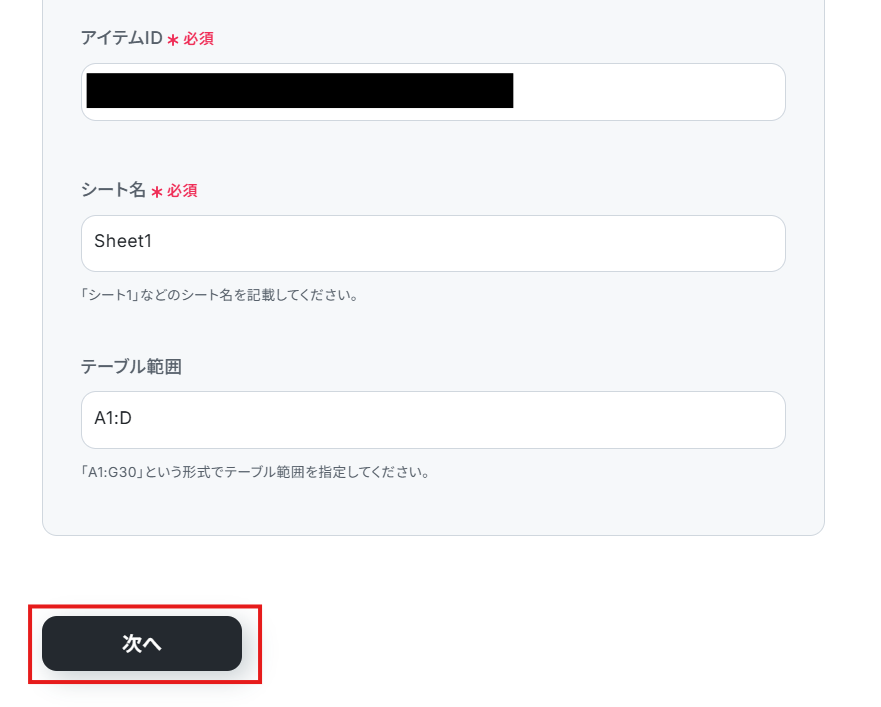
「ファイルの保存場所」はプルダウンから選択し、「ドライブID」は入力バーをクリック後の【候補】から選択しましょう。
「ファイル名」は任意で設定、「アイテムID」「シート名」は候補から選択しましょう。注釈に沿って「テーブル範囲」を設定したら、[次へ]を押します。
Microsoft Excelのデータベースを操作するオペレーションの設定詳細はこちらもチェックしてみてください。
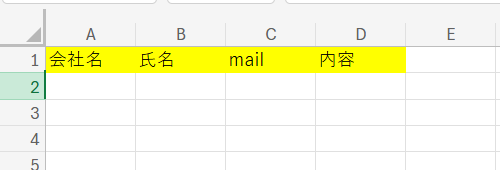
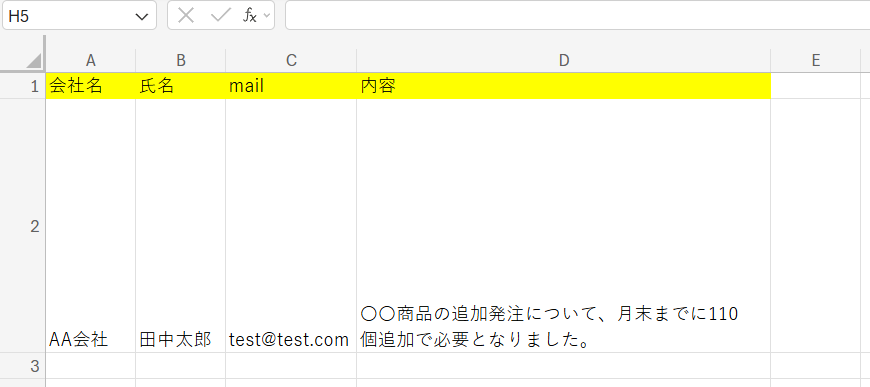
今回は、Microsoft Excel側で以下のようなシートを作成しています。
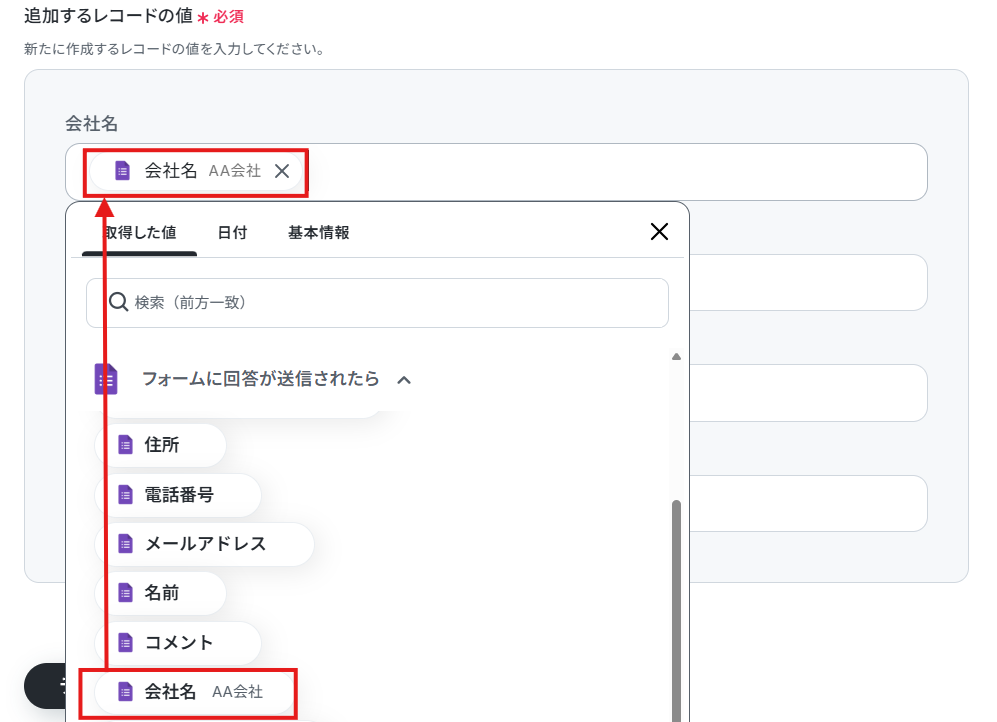
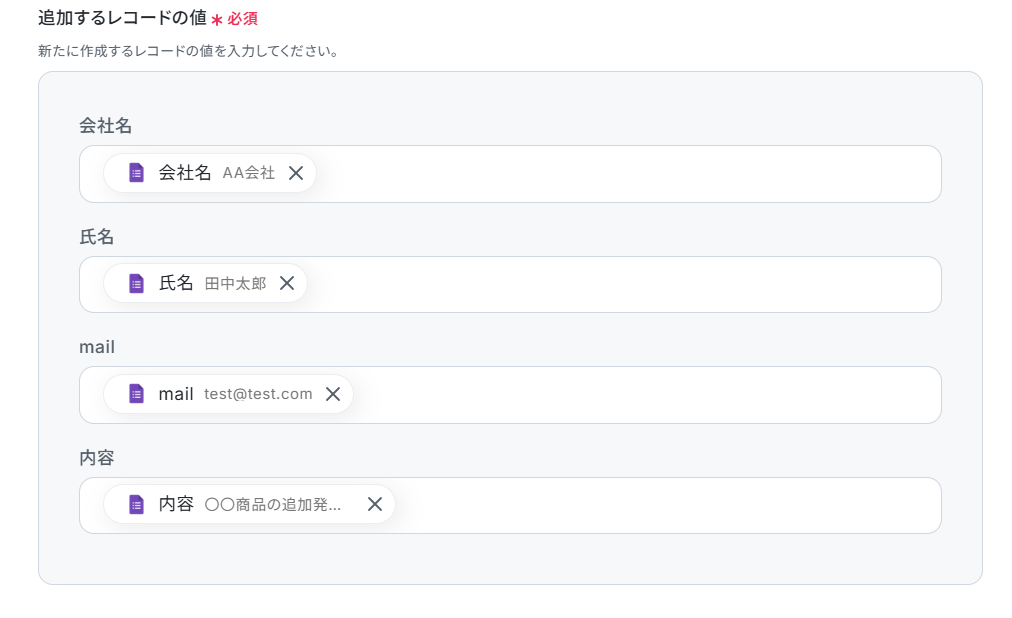
次の画面で、「追加するレコードの値」に情報を入力していきましょう。
以下の画像のように、各項目に前ステップで取得したアウトプットを引用することで、自動でフォームの回答データがMicrosoft Excelのシートに反映されます。
入力バーをクリックして、項目名に等しいアウトプットをどんどん設定していきましょう。反映したくない項目があれば、その部分は空欄のままにしてください。
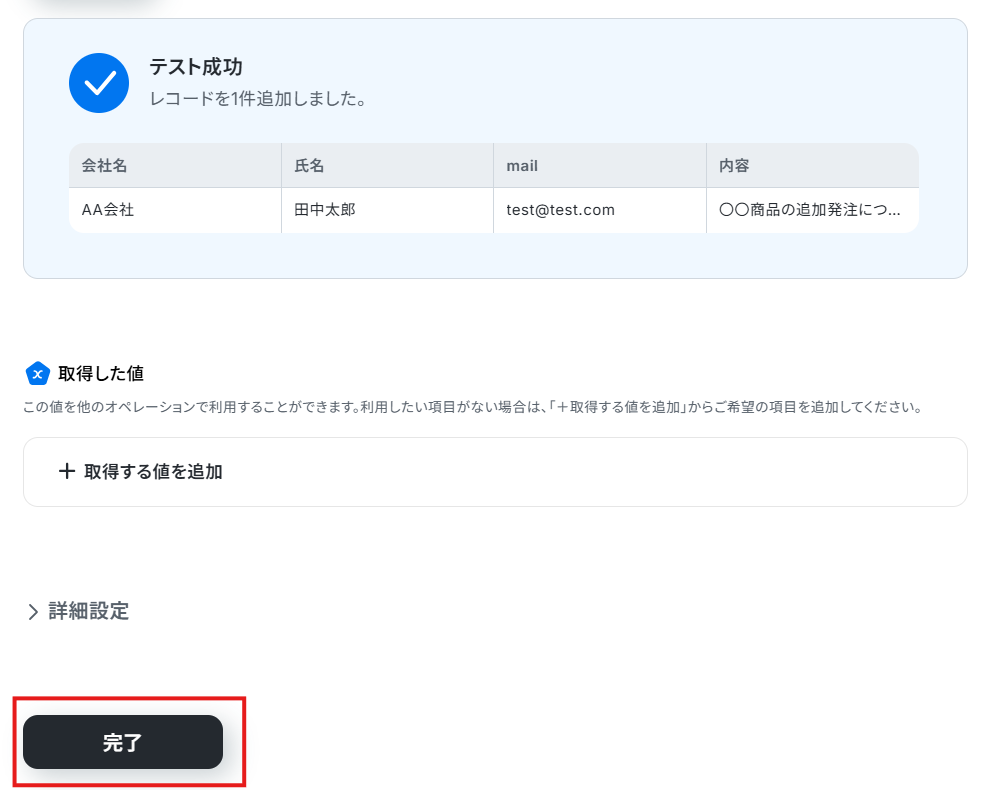
設定後、「テスト」をクリックします。テストが成功すると、以下の画像のようにMicrosoft Excelのシートに回答内容が反映されました!
内容に問題がなければ、『完了』をクリックします。
これで設定完了です!お疲れ様でした!
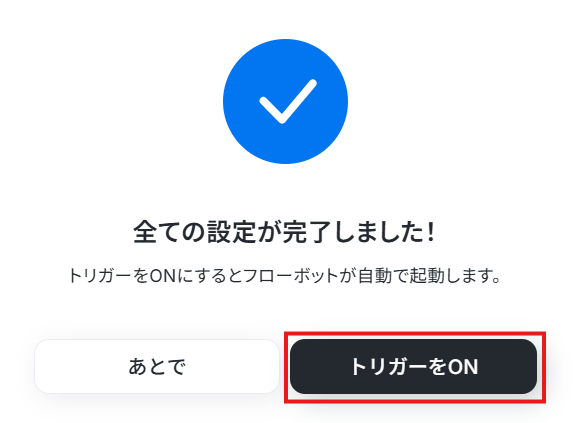
ステップ5:トリガーをONにして起動準備完了
以下の画面が表示されるので、赤枠部分「トリガーをON」をクリックすることで、フローボットが自動で起動します。
簡単に自動化フローボットが作成できましたね!作成お疲れ様でした。
Googleフォームの回答をMicrosoft Excelに登録する
試してみる
■概要
Googleフォームで集めたアンケートや問い合わせの回答を、手作業でMicrosoft Excelに転記していませんか?この作業は単純ですが、件数が増えると時間がかかり、コピー&ペーストのミスも発生しがちです。このワークフローを活用すれば、Googleフォームに新しい回答が送信されると、自動でMicrosoft Excelの指定したシートに行が追加されるため、こうしたデータ入力の手間やヒューマンエラーを解消できます。
■このテンプレートをおすすめする方
- Googleフォームで得た回答を手作業でMicrosoft Excelに転記しているご担当者の方
- フォームからのリード情報などをチームで管理しており、入力業務を効率化したい方
- 手作業によるデータ転記での入力ミスや対応漏れなどの課題を解消したい方
■このテンプレートを使うメリット
- Googleフォームに回答が送信されると自動でMicrosoft Excelに情報が追加されるため、これまで手作業に費やしていた時間を短縮できます。
- 手作業によるデータ転記が不要になることで、入力間違いや項目漏れといったヒューマンエラーのリスク軽減に繋がります。
■フローボットの流れ
- はじめに、GoogleフォームとMicrosoft ExcelをYoomと連携します。
- 次に、トリガーでGoogleフォームを選択し、「フォームに回答が送信されたら」というアクションを設定して、対象のフォームを指定します。
- 最後に、オペレーションでMicrosoft Excelの「情報を追加する」アクションを設定し、トリガーで取得したフォームの回答内容を、指定したファイルやシートの各列にマッピングします。
※「トリガー」:フロー起動のきっかけとなるアクション、「オペレーション」:トリガー起動後、フロー内で処理を行うアクション
■このワークフローのカスタムポイント
- Googleフォームのトリガー設定では、自動化の対象としたいフォームを任意で指定してください。
- Microsoft Excelへの情報追加オペレーションでは、どの列にフォームのどの回答項目を割り当てるかなどを自由にカスタマイズできます。固定のテキストを追加することも可能です。
■注意事項
- Googleフォーム、Microsoft ExcelそれぞれとYoomを連携してください。
- Microsoft365(旧Office365)には、家庭向けプランと一般法人向けプラン(Microsoft365 Business)があり、一般法人向けプランに加入していない場合には認証に失敗する可能性があります。
- Microsoft Excelのデータベースを操作するオペレーションの設定に関しては「Microsoft Excelのデータベースを操作するオペレーションの設定」をご参照ください。
- Googleフォームをトリガーとして使用した際の回答内容を取得する方法は「Googleフォームトリガーで、回答内容を取得する方法」を参照ください。
- トリガーは5分、10分、15分、30分、60分の間隔で起動間隔を選択できます。
- プランによって最短の起動間隔が異なりますので、ご注意ください。
GoogleフォームやMicrosoft Excelを使ったその他の自動化例
今回ご紹介した連携以外でも、GoogleフォームやMicrosoft Excelを活用してさまざまな業務を自動化することが可能です。
もし気になるものがあれば、ぜひ試してみてください!
Googleフォームを活用した自動化例
フォームへの回答をトリガーに別ツールに情報を反映したり、OCR(データ読み取り機能)を活用して効率的に情報を得ることもできます。
手動作業が減ることで、コア業務に充分にリソースを充てられるようになるでしょう。
Googleフォームが送信されたら回答者に自動でGmailを返信する
試してみる
■概要
Googleフォームでお問い合わせやアンケートを受け付けた後、回答者一人ひとりに手動でメールを返信するのは手間がかかり、対応漏れのリスクも気になりませんか?このワークフローを活用すれば、Googleフォームに新しい回答が送信されたタイミングで、Gmailから自動でサンクスメールなどを返信できます。これにより、手作業による返信業務を効率化し、顧客対応の質を高めることが可能です。
■このテンプレートをおすすめする方
- Googleフォームを使った問い合わせ対応で、返信作業の自動化を検討しているご担当者の方
- アンケート回答者へのサンクスメールなどをGmailで手動送信しており、効率化したい方
- 手作業によるメール返信での対応漏れや遅延をなくしたいと考えているチームリーダーの方
■このテンプレートを使うメリット
- Googleフォームへの回答送信をトリガーにGmailが自動送信されるため、手作業での返信対応に費やしていた時間を短縮し、他の業務に集中できます。
- 手作業でのメール送信で起こり得る、返信漏れや宛先間違いといったヒューマンエラーを防ぎ、安定した顧客対応を実現します。
■フローボットの流れ
- はじめに、GmailとGoogleフォームをYoomと連携します。
- 次に、トリガーでGoogleフォームを選択し、「フォームに回答が送信されたら」というアクションを設定します。
- 最後に、オペレーションでGmailの「メールを送る」アクションを設定し、トリガーで取得した回答者のメールアドレスなどを宛先にして、自動返信メールを送信します。
※「トリガー」:フロー起動のきっかけとなるアクション、「オペレーション」:トリガー起動後、フロー内で処理を行うアクション
■このワークフローのカスタムポイント
- Googleフォームのトリガー設定では、自動返信の対象としたいフォームを任意で指定してください。
- Gmailのメール送信設定では、宛先や件名、本文を自由にカスタマイズできます。Googleフォームで取得した回答者の氏名やメールアドレス、回答内容などを変数として本文に差し込むことで、パーソナライズされたメールの自動送信が可能です。
■注意事項
- Gmail、GoogleフォームのそれぞれとYoomを連携してください。
- Googleフォームをトリガーとして使用した際の回答内容を取得する方法は「Googleフォームトリガーで、回答内容を取得する方法」を参照ください。
- トリガーは5分、10分、15分、30分、60分の間隔で起動間隔を選択できます。
- プランによって最短の起動間隔が異なりますので、ご注意ください。
Googleフォームの情報をもとにHubspotのコンタクトを作成する
試してみる
■概要
Googleフォームで受け付けたお問い合わせやイベントの申込情報を、手作業でHubSpotに転記する作業に手間を感じていませんか?この作業は時間がかかるだけでなく、コピー&ペーストのミスで大切な顧客情報を誤って登録してしまうリスクも伴います。このワークフローを活用すれば、Googleフォームに新しい回答が送信されたタイミングで、その情報を基にHubSpotへコンタ-クトを自動で作成するため、こうした課題をスムーズに削減できます。
■このテンプレートをおすすめする方
- Googleフォームで獲得したリード情報をHubSpotへ手作業で転記しているマーケティング担当者の方
- フォームからの問い合わせ対応を効率化し、顧客へのアプローチを迅速化したい営業担当者の方
- HubSpotへのデータ入力作業を自動化し、ヒューマンエラーを防止したいと考えている方
■このテンプレートを使うメリット
- Googleフォームへの回答を基に、HubSpotへコンタクトが自動で作成されるため、これまで手作業で行っていたデータ入力の時間を短縮できます。
- 手作業でのデータ転記が減るため、入力間違いや登録漏れといったヒューマンエラーのリスク軽減に繋がります。
■フローボットの流れ
- はじめに、GoogleフォームとHubSpotをYoomと連携します。
- 次に、トリガーでGoogleフォームを選択し、「フォームに回答が送信されたら」というアクションを設定します。
- 最後に、オペレーションでHubSpotを選択し、「コンタクトの作成」アクションを設定し、フォームの回答内容をHubSpotの各項目に紐付けます。
※「トリガー」:フロー起動のきっかけとなるアクション、「オペレーション」:トリガー起動後、フロー内で処理を行うアクション
■このワークフローのカスタムポイント
- Googleフォームのトリガー設定では、自動化の対象としたいフォームを任意で設定してください。
- HubSpotのオペレーション設定では、フォームのどの回答をHubSpotのどの項目(氏名、メールアドレス、会社名など)に連携するかを任意で設定できます。
■注意事項
- Googleフォーム、HubSpotのそれぞれとYoomを連携してください。
- トリガーは5分、10分、15分、30分、60分の間隔で起動間隔を選択できます。
- プランによって最短の起動間隔が異なりますので、ご注意ください。
- Googleフォームをトリガーとして使用した際の回答内容を取得する方法は「Googleフォームトリガーで、回答内容を取得する方法」を参照ください。
Googleフォームで送信された名刺画像をOCRで読み取り、Salesforceの取引先責任者として登録する
試してみる
■概要
イベントや商談で受け取った大量の名刺情報を、都度Salesforceへ手入力する作業に手間を感じていませんか。手作業による入力では、転記ミスや登録漏れが発生しやすく、データの正確性を保つことも課題となります。このワークフローを活用すれば、Googleフォームに名刺画像をアップロードするだけで、OCR機能が情報を読み取り、Salesforceへ取引先責任者として自動で登録します。面倒なデータ入力作業から解放され、顧客情報の管理を円滑にします。
■このテンプレートをおすすめする方
- Salesforceへの名刺データの手入力作業に、手間や時間を取られている営業担当の方
- 獲得した名刺情報を素早くデータ化し、営業活動に活かしたいと考えているチームの方
- 手作業によるデータ入力ミスをなくし、顧客情報管理を効率化したいと考えている方
■このテンプレートを使うメリット
- 名刺情報の確認からSalesforceへの登録までが自動化され、これまで手作業に費やしていた時間を短縮し、コア業務に集中できます。
- 手入力で起こりがちな転記ミスや登録漏れといったヒューマンエラーを防ぎ、Salesforceに登録される顧客情報の正確性を向上させます。
■フローボットの流れ
- はじめに、Googleフォーム、Google Drive、SalesforceをYoomと連携します。
- 次に、トリガーでGoogleフォームを選択し、「フォームに回答が送信されたら」というアクションを設定します。
- オペレーションで、Google Driveの「ファイルをダウンロードする」アクションを設定し、フォームから送信された名刺画像をダウンロードします。
- 次に、OCR機能の「任意の画像やPDFを読み取る」アクションで、ダウンロードした画像から会社名や氏名、連絡先などの情報を抽出します。
- 続いて、Salesforceの「取引先責任者として登録」アクションを設定し、OCRで読み取った情報を基に新しい取引先責任者を作成します。
- 最後に、Salesforceの各種アクションを用いて、登録した取引先責任者レコードに元の名刺画像をアップロードし、関連付けを行います。
※「トリガー」:フロー起動のきっかけとなるアクション、「オペレーション」:トリガー起動後、フロー内で処理を行うアクション
■このワークフローのカスタムポイント
- Googleフォームでは、名刺画像のアップロード項目に加えて、リード獲得経路や担当者といった情報を補足するための質問項目を任意で設定できます。
- OCR機能では、名刺から会社名、氏名、メールアドレスなど、Salesforceに登録したい情報だけを正確に抽出するよう、読み取り項目を任意で設定してください。
- Salesforceへの登録アクションでは、OCRで読み取ったどの情報をSalesforceのどのフィールドに登録するかを自由にマッピングでき、独自の運用に合わせて設定が可能です。
■注意事項
- Googleフォーム、Google Drive、SalesforceのそれぞれとYoomを連携してください。
- SalesforceおよびAIオペレーションはチームプラン・サクセスプランでのみご利用いただけます。フリープラン・ミニプランの場合は設定しているフローボットのオペレーションはエラーとなりますので、ご注意ください。
- チームプランやサクセスプランなどの有料プランは、2週間の無料トライアルを行うことが可能です。無料トライアル中には制限対象のアプリやAI機能(オペレーション)を使用することができます。
- トリガーは5分、10分、15分、30分、60分の間隔で起動間隔を選択できます。
- プランによって最短の起動間隔が異なりますので、ご注意ください。
- Googleフォームをトリガーとして使用した際の回答内容を取得する方法は下記をご参照ください。
https://intercom.help/yoom/ja/articles/6807133 - OCRデータは6,500文字以上のデータや文字が小さい場合などは読み取れない場合があるので、ご注意ください。
Googleフォームで受け取った帳票をOCRで読み取り、Google スプレッドシートに追加する
試してみる
■概要
Googleフォームでファイル添付を受け付けているものの、その後のデータ入力は手作業で行っていませんか。帳票の内容を目で確認し、手でスプレッドシートに転記する作業は時間がかかるうえ、入力ミスも発生しがちです。このワークフローを活用すれば、Googleフォームに回答が送信された際に、添付された帳票ファイルをOCRで自動的に読み取り、Google スプレッドシートに内容を追加できるため、こうした一連の作業を効率化します。
■このテンプレートをおすすめする方
- Googleフォームで受け付けた帳票のデータ入力に手間を感じている業務ご担当者の方
- 手作業によるデータ転記での入力ミスや確認作業をなくしたいと考えている方
- OCR技術を活用して、紙やPDFの情報を効率的にデータ化したいDX推進担当者の方
■このテンプレートを使うメリット
- フォームへの回答からOCRでの読み取り、スプレッドシートへの追記までが自動化され、手作業による転記業務の時間を短縮できます。
- 手動でのデータ入力が不要になるため、転記ミスや入力漏れといったヒューマンエラーを防ぎ、データの正確性を高めることに繋がります。
■フローボットの流れ
- はじめに、Googleフォーム、Google Drive、Google スプレッドシートをYoomと連携します
- 次に、トリガーでGoogleフォームを選択し、「フォームに回答が送信されたら」というアクションを設定します
- 次に、オペレーションでGoogle Driveの「ファイルをダウンロードする」アクションを設定し、フォームに添付された帳票ファイルをダウンロードします
- 次に、オペレーションでAI機能の「画像・PDFから文字を読み取る」アクションを設定し、ダウンロードしたファイルからテキストを抽出します
- 最後に、オペレーションでGoogle スプレッドシートの「レコードを追加する」アクションを設定し、抽出したデータを指定のシートに追加します
※「トリガー」:フロー起動のきっかけとなるアクション、「オペレーション」:トリガー起動後、フロー内で処理を行うアクション
■このワークフローのカスタムポイント
- Googleフォームのトリガー設定では、自動化の対象としたいフォームのIDを正確に指定してください。
- OCR機能のアクションでは、読み取るファイルに応じて、抽出する項目、使用するAIモデルや言語などを任意で設定することが可能です。
■注意事項
- Googleフォーム、Google スプレッドシートとYoomを連携してください。
- トリガーは5分、10分、15分、30分、60分の間隔で起動間隔を選択できます。
- プランによって最短の起動間隔が異なりますので、ご注意ください。
- Googleフォームをトリガーとして使用した際の回答内容を取得する方法はこちらを参照ください。
- OCRまたは音声を文字起こしするAIオペレーションはチームプラン・サクセスプランでのみご利用いただける機能となっております。フリープラン・ミニプランの場合は設定しているフローボットのオペレーションはエラーとなりますので、ご注意ください。
- チームプランやサクセスプランなどの有料プランは、2週間の無料トライアルを行うことが可能です。無料トライアル中には制限対象のアプリやAI機能(オペレーション)を使用することができます。
Googleフォームが送信されたら、その内容で請求書を発行しGoogle Driveに保存する
試してみる
■概要
Googleフォームで受け付けた依頼や注文内容をもとに、手作業で請求書を作成・管理する業務に手間を感じていませんか?
転記作業には時間がかかるうえ、入力ミスなどのヒューマンエラーが発生するリスクも伴います。
このワークフローを活用すれば、Googleフォームへの回答送信をきっかけに、内容を反映した請求書を自動で発行し、指定のGoogle Driveフォルダへ保存までを完結させることができ、請求書発行業務の効率化を実現します。
■このテンプレートをおすすめする方
・Googleフォームで受けた注文を元に、手動で請求書を発行している担当者の方
・請求書作成時の転記ミスや確認作業に多くの時間を費やしている経理担当の方
・Google Drive上での請求書管理をよりスムーズに行いたいと考えている方
■このテンプレートを使うメリット
- Googleフォームが送信されると請求書の発行から保存までが自動で実行されるため、手作業の時間を削減できます。
- フォームの回答内容が直接反映されるので、金額や宛名などの転記ミスといったヒューマンエラーの防止に繋がります。
■フローボットの流れ
- はじめに、Googleフォーム、Google Drive、GoogleドキュメントをYoomと連携します。
- 次に、トリガーでGoogleフォームを選択し、「フォームに回答が送信されたら」というアクションを設定します。
- 次に、オペレーションでGoogle Driveを選択し、「特定フォルダ内のファイル・フォルダを検索」アクションで請求書の雛形となるファイルを指定します。
- 最後に、オペレーションでGoogleドキュメントの「書類を発行する」アクションを設定し、フォームの回答内容と雛形を元に請求書を発行し、Google Driveに保存します。
※「トリガー」:フロー起動のきっかけとなるアクション、「オペレーション」:トリガー起動後、フロー内で処理を行うアクション
■このワークフローのカスタムポイント
- Googleフォームのトリガー設定では、自動化の対象としたいフォームのIDを任意で設定してください。
- Google Driveのアクション設定では、請求書の雛形が格納されているフォルダのIDや、発行した請求書を保存するフォルダのID、ファイル名を任意で設定可能です。
- 書類を発行するオペレーションでは、使用する雛形書類や、発行後の書類のタイトルなどを任意で設定できます。
■注意事項
- Google スプレッドシート、Google Drive、GoogleドキュメントのそれぞれとYoomを連携してください。
- トリガーは5分、10分、15分、30分、60分の間隔で起動間隔を選択できます。
- プランによって最短の起動間隔が異なりますので、ご注意ください。
- 分岐はパーソナルプラン以上のプランでご利用いただける機能(オペレーション)となっております。フリープランの場合は設定しているフローボットのオペレーションはエラーとなりますので、ご注意ください。
- パーソナルプランなどの有料プランは、2週間の無料トライアルを行うことが可能です。無料トライアル中には制限対象のアプリや機能(オペレーション)を使用することができます。
- Google スプレッドシートをアプリトリガーとして使用する際の注意事項は「【アプリトリガー】Google スプレッドシートのトリガーにおける注意事項」を参照してください。
Microsoft Excelを活用した自動化例
受け取った情報を自動で集約できるため、何度もツールを行き来する必要がなくなるかもしれません!
また、スケジュールトリガー機能を活用することで、決まった日時にフローが起動するため、対応漏れが減ると予想されます。
Jotformに回答があったら、Microsoft Excelのレコードに追加する
試してみる
■概要
Jotformで収集したアンケートや申し込みフォームの回答を、手作業でMicrosoft Excelに転記する作業は手間がかかり、入力ミスも発生しやすいのではないでしょうか。こうした定型的なデータ入力作業は、本来の業務時間を圧迫する要因にもなります。このワークフローを活用すれば、Jotformにフォーム回答が送信されるたびに、Microsoft Excelの指定したシートへ自動でレコードを追加できます。手作業による転記作業をなくし、正確なデータ管理を実現します。
■このテンプレートをおすすめする方
- Jotformで集めた回答データを、手作業でMicrosoft Excelに転記している方
- フォームからのデータ入力を自動化し、入力ミスや対応漏れをなくしたいと考えている方
- JotformとMicrosoft Excelの連携で、顧客管理やデータ分析を効率化したい方
■このテンプレートを使うメリット
- Jotformに回答が送信されると自動でMicrosoft Excelにデータが追加されるため、これまで手作業に費やしていた時間を短縮できます。
- 手作業によるデータの転記が不要になるため、入力間違いや項目漏れといったヒューマンエラーの防止に繋がります。
■フローボットの流れ
- はじめに、JotformとMicrosoft ExcelをYoomと連携します。
- 次に、トリガーでJotformを選択し、「フォームが送信されたら」というアクションを設定します。
- 次に、オペレーションでJotformの「最新の回答を取得する」アクションを設定し、トリガーで反応したフォームの回答内容を取得します。
- 最後に、オペレーションでMicrosoft Excelの「レコードを追加する」アクションを設定し、取得した回答データを指定のシートに追加します。
※「トリガー」:フロー起動のきっかけとなるアクション、「オペレーション」:トリガー起動後、フロー内で処理を行うアクション
■このワークフローのカスタムポイント
- Jotformのトリガー設定では、連携の対象としたいフォームのIDを任意で設定してください。これにより、特定のフォームの回答のみを自動化の対象にできます。
- Microsoft Excelでレコードを追加するアクションを設定する際に、対象のファイルIDやシート名を任意で指定し、Jotformから取得した回答内容をどの列に追加するかを自由にマッピングしてください。
■注意事項
- Jotform、Microsoft ExcelのそれぞれとYoomを連携してください。
- JotformのWebhook設定および回答取得の方法は「JotformのWebhook設定と最新回答取得方法について」をご参照ください。
- Microsoft365(旧Office365)には、家庭向けプランと一般法人向けプラン(Microsoft365 Business)があり、一般法人向けプランに加入していない場合には認証に失敗する可能性があります。
Outlookにメールが届いたら、Microsoft Excelにレコードを追加する
試してみる
■概要
Outlookで受信する重要なメールの内容を、その都度Microsoft Excelに手作業で転記していませんか?この作業は手間がかかるだけでなく、転記ミスなどのヒューマンエラーも発生しがちです。このワークフローを活用すれば、特定のメールを受信した際に自動でMicrosoft Excelへレコードを追加できるため、こうした定型業務の効率化に繋がります。
■このテンプレートをおすすめする方
- Outlookで受信した問い合わせ内容などをMicrosoft Excelで管理している方
- 手作業によるデータ転記での入力漏れや、対応遅延などの課題を抱えている方
- メールで受信した情報を起点とした業務の自動化や、効率化を検討している方
■このテンプレートを使うメリット
- Outlookでのメール受信をトリガーに、自動でMicrosoft Excelへ情報が追加されるため、これまで手作業での転記に費やしていた時間を短縮できます。
- 手作業でのコピー&ペーストが不要になることで、入力ミスや転記漏れといったヒューマンエラーの発生を防ぎ、データの正確性を保ちます。
■フローボットの流れ
- はじめに、OutlookとMicrosoft ExcelをYoomと連携します。
- 次に、トリガーでOutlookを選択し、「メールを受信したら」というアクションを設定します。
- 最後に、オペレーションでMicrosoft Excelの「レコードを追加する」アクションを設定し、受信したメールの情報をもとにレコードを追加します。
※「トリガー」:フロー起動のきっかけとなるアクション、「オペレーション」:トリガー起動後、フロー内で処理を行うアクション
■このワークフローのカスタムポイント
- Outlookのトリガー設定では、フローボットを起動させたいメールフォルダをIDで指定し、特定のフォルダのみを監視対象とすることが可能です。
- Microsoft Excelでレコードを追加する際、対象のファイル(アイテムID)やシート名を任意で設定できます。また、Outlookで取得したメールの件名や本文などの情報を、どの列に登録するか自由にマッピングできます。
■注意事項
- Outlook、Microsoft ExcelのそれぞれとYoomを連携してください。
- トリガーは5分、10分、15分、30分、60分の間隔で起動間隔を選択できます。
- プランによって最短の起動間隔が異なりますので、ご注意ください。
- Microsoft365(旧Office365)には、家庭向けプランと一般法人向けプラン(Microsoft365 Business)があり、一般法人向けプランに加入していない場合には認証に失敗する可能性があります。
毎日Meta広告(Facebook)からレポートを取得してMicrosoft Excelに記載する
試してみる
■概要
毎日指定の時間に前日のMeta広告(Facebook)からレポート情報を取得して、自動的にMicrosoft Excelに記載するフローです。
Yoomを利用すると、プログラミング不要で簡単にアプリ同士を連携することができます。
■このテンプレートをおすすめする方
1.Meta広告(Facebook)を運用しているマーケティング担当者
- Meta広告(Facebook)を日常的に運用し、その効果を測定・分析しているマーケティング担当者
- 広告キャンペーンの効果を迅速に把握したいマーケティングマネージャー
2.データ分析やレポート作成を効率化したい方
- 毎日手動でレポートを作成しているマーケティングアナリスト
- データ入力の手間を省き、より戦略的な業務に時間を割きたいデータアナリスト
- 業務プロセスの自動化を推進しているビジネスマネージャー
3.Microsoft Excelを活用している企業やチーム
- Microsoft Officeを導入している企業
- 日常的にMicrosoft Excelを使ってデータ管理を行っているチームメンバー
■このテンプレートを使うメリット
・手動でのレポート作成の手間を省き、スピーディーで正確なデータを基にした意思決定が可能になります。
・広告効果の測定・分析がスムーズに行え、業務の効率を大幅に向上させることができます。
・データの一貫性と正確性が保たれるため、マーケティング戦略の改善にも寄与します。
■注意事項
・Meta広告(Facebook)、Microsoft ExcelそれぞれとYoomを連携してください。
・Microsoft365(旧Office365)には、家庭向けプランと一般法人向けプラン(Microsoft365 Business)があり、一般法人向けプランに加入していない場合には認証に失敗する可能性があります。
Microsoft Excelの雛形から納品書を作成してメールで送付
試してみる
■概要
毎月の納品書作成や送付業務に、手間や時間を取られていないでしょうか。特にMicrosoft Excelの雛形に手作業で情報を入力し、PDF化してメールに添付するという一連の作業は、件数が増えるほど大きな負担となり、入力ミスなどのヒューマンエラーも起こりやすくなります。このワークフローを活用すれば、フォームに情報を入力するだけでMicrosoft Excelの雛形から納品書を自動で作成し、Gmailで送付までを完結させ、これらの課題を解消します。
■このテンプレートをおすすめする方
- Microsoft Excelを使い、手作業で納品書を作成・送付している経理や営業担当者の方
- 納品書の作成業務における入力ミスや、メールの宛先間違い・添付漏れを防ぎたい方
- 書類作成のような定型業務を自動化し、より付加価値の高いコア業務に集中したい方
■このテンプレートを使うメリット
- フォーム入力から納品書の作成、メール送付までの一連の流れが自動化されるため、これまで手作業に費やしていた時間を短縮できます。
- 手作業による転記ミスやメールの添付漏れといったヒューマンエラーを防止し、業務の正確性を高めることに繋がります。
■フローボットの流れ
- はじめに、Microsoft ExcelとGmailをYoomに連携します。
- 次に、トリガーでフォームトリガーを選択し、納品書作成に必要な情報を入力するためのフォームを設定します。
- 次に、オペレーションでMicrosoft Excelの「書類を発行する」アクションを設定し、フォームの回答内容を元に雛形から納品書を作成します。
- 最後に、オペレーションでGmailの「メールを送る」アクションを設定し、作成された納品書を添付して指定の宛先にメールを送付します。
※「トリガー」:フロー起動のきっかけとなるアクション、「オペレーション」:トリガー起動後、フロー内で処理を行うアクション
■このワークフローのカスタムポイント
- フォームトリガーでは、納品先の会社名や担当者名、金額、品目など、納品書作成に必要な回答項目を自由に設定できます。
- Microsoft Excelの書類発行機能では、使用する納品書の雛形ファイルや、発行する書類のファイル名などを任意で設定可能です。
- Gmailのメール送信設定では、宛先(To, Cc, Bcc)や件名を自由に設定でき、本文にはフォームで受け取った会社名などを変数として埋め込むことも可能です。
■注意事項
- Microsoft Excel、GmailのそれぞれとYoomを連携してください。
- Microsoft365(旧Office365)には、家庭向けプランと一般法人向けプラン(Microsoft365 Business)があり、一般法人向けプランに加入していない場合には認証に失敗する可能性があります。
指定日時にMicrosoft Excelのデータを取得し、PDFに変換後Gmailで送信する
試してみる
■概要
定期的な報告業務などで、Microsoft Excelのデータを手作業でPDFに変換し、Gmailで送信する作業に手間を感じていませんか? この作業は定型的でありながらも、毎回同じ手順を繰り返す必要があり、担当者の負担になりがちです。 このワークフローを活用すれば、指定した日時にMicrosoft Excelのデータを自動で取得し、PDFに変換後、Gmailで関係者に送信する一連の流れを自動化し、こうした課題を円滑に解消します。
■このテンプレートをおすすめする方
- Microsoft Excelを使った定期報告書を、PDF化して手動でメール送信している方
- 定型的なレポート作成業務の時間を短縮し、コア業務に集中したいと考えている方
- Gmailでの定期的な情報共有における送信忘れなどのヒューマンエラーを防ぎたい方
■このテンプレートを使うメリット
- 指定日時に自動で処理が実行されるため、これまで手作業で行っていたデータ取得やPDF変換、メール送信にかかる時間を短縮できます。
- 手作業によるデータ転記ミスや添付ファイルの選択ミス、送信漏れといったヒューマンエラーを防ぎ、業務の正確性を高めます。
■フローボットの流れ
- はじめに、Microsoft Excel、Googleドキュメント、GmailをYoomと連携します。
- 次に、トリガーでスケジュールトリガーを選択し、フローボットを実行したい日時を設定します。
- 次に、オペレーションでMicrosoft Excelを選択し、「レコードを取得する」アクションでPDF化したいデータを取得します。
- 続けて、オペレーションでGoogleドキュメントを選択し、「書類を発行する」アクションで取得したデータを元にPDF書類を作成します。
- 最後に、オペレーションでGmailを選択し、「メールを送る」アクションで作成したPDFを添付して指定の宛先にメールを送信します。
※「トリガー」:フロー起動のきっかけとなるアクション、「オペレーション」:トリガー起動後、フロー内で処理を行うアクション
■このワークフローのカスタムポイント
- スケジュールトリガーでは、実行したい日時(毎時、毎日、毎週、毎月など)を任意で設定してください。
- Microsoft Excelでデータを取得する際に、対象のファイルやシート、取得するデータの範囲などを任意で設定してください。
- Googleドキュメントで書類を発行する際に、元となるテンプレート書類や、発行するPDFのファイル名などを任意で設定してください。
- Gmailでメールを送信する際に、宛先(To/Cc/Bcc)や件名、本文を任意で設定してください。本文にはMicrosoft Excelから取得した値を埋め込むことも可能です。
■注意事項
- Microsoft Excel、Googleドキュメント、GmailのそれぞれとYoomを連携してください。
- Microsoft365(旧Office365)には、家庭向けプランと一般法人向けプラン(Microsoft365 Business)があり、一般法人向けプランに加入していない場合には認証に失敗する可能性があります。
- Microsoft Excelのデータベースを操作するオペレーションの設定に関しては「【Excel】データベースを操作するオペレーションの設定に関して」をご参照ください。
- Googleドキュメントの報告書の雛形を準備しておいてください。詳細は下記の「「書類を発行する」の設定方法」をご参照ください。
まとめ
GoogleフォームとMicrosoft Excelの連携を自動化することで、これまで手作業で行っていた面倒なデータ転記作業が減り、入力ミスなどのヒューマンエラーも防ぐことにもつながるでしょう。
アンケート結果や問い合わせ内容をMicrosoft Excelに集約し、迅速なデータ分析や顧客対応といった本来注力すべきコア業務に集中できる環境が整います!
今回ご紹介したような業務自動化を実現できるノーコードツール「Yoom」を使えば、プログラミングの知識がない方でも、直感的な操作で簡単に業務フローを構築可能です。
もし自動化に少しでも興味を持っていただけたなら、ぜひこちらから無料登録して、Yoomによる業務効率化を体験してみてください!
よくあるご質問
Q:連携が途中で失敗したらどうなりますか?
A:
Yoomでは進行していたフローボットがエラーとなり、停止された場合にワークスペース発行時に登録したメールアドレス宛に通知が届きます。
また、アクション設定時の「テスト」ボタンでもエラーがあれば内容が表示されます。
詳しくはエラー時の対応方法についてをご確認ください。
それでも解決しない場合は、下記よりお問い合わせください。
Yoomお問い合わせ窓口
Q:回答内容によって書き込むシートを分けられますか?
A:
はい、可能です。
進行先の切り替え条件を追加することで可能です。例えばGoogleフォームで問い合わせ種別をラジオボタンで設定していた場合、その選択肢によって進行先を切り替えることができます。その後それぞれの切り替え先で別のシートを指定します。
詳しくは「進行先を切り替える」の設定方法を参考にしてください。
Q:連携時に遅延が発生することはありますか?
A:
トリガーは5分、10分、15分、30分、60分の間隔で選択できますが、リアルタイムで連携しているわけではありません。そのためWrikeでタスクが作成された後、最短5分はMicrosoft SharePointでフォルダが自動作成されるのを待つ必要があります。
設定できるトリガーの起動間隔はご利用プランによって異なるため、詳しくは料金プランのページをチェックしてみてください。