How to integrate Airtable, Stripe, and Gmail to create a Stripe payment link from Airtable billing information and automatically send it via Gmail
How to Integrate Applications
・
2025-04-16
How to integrate Airtable, Stripe, and Gmail to create a Stripe payment link from Airtable billing information and automatically send it via Gmail
m.wadazumi
When you receive a lot of emails every day, it can be quite a hassle to save files to Dropbox each time. Moreover, many people might have experienced the struggle of missing a file save or saving a file in the wrong folder, making it difficult to find later.
In this article, we will introduce a method to automatically save files received in Gmail to Dropbox!
By using no-code tools, you can easily set up automation between Gmail and Dropbox. You can start using it right away, so be sure to give it a try!
Recommended for
Those who want to automatically upload files attached to Gmail to Dropbox
Those who want to integrate Gmail and Dropbox to facilitate smooth file sharing within the team
Those who want to prevent the loss of attachments and ensure proper document storage
For those who want to try it immediately
In this article, we will introduce the integration method using the no-code tool "Yoom".
No complicated settings or operations are required, and even non-engineers can easily achieve it.
You can start right away using the template below, so please give it a try!
In daily payment operations, manual work can consume a lot of effort and time. However, by leveraging automation, you can significantly reduce the time spent on these tasks. This article introduces a method to automate the process from creating to sending payment links by integrating Airtable, Stripe, and Gmail. This will help prevent errors in the number of products or mistakes in sending links, allowing for accurate billing processing. Additionally, as the movement between each system is reduced, the hassle of launching apps will also be eliminated.
Recommended for
Those who want to automate the flow of creating payment links in Stripe based on billing information from Airtable and sending them via email
Those who want to create payment links accurately and provide them to customers
Those who want to prevent delays in sending links and conduct procedures smoothly
Benefits and Examples of Integrating Airtable, Stripe, and Gmail
Benefit 1: Reduce the time spent from creating to sending payment links
By automating the creation of payment links in Stripe based on billing information stored in Airtable and sending them via Gmail, you can eliminate the hassle of manual work. For example, if you perform these tasks manually, there are steps like creating links and sending emails, which can consume a lot of time. However, by automating the process from creating to sending payment links, you can greatly reduce the time and effort required for billing operations. Furthermore, as the movement between each system is reduced, the hassle of launching apps will also be eliminated.
Benefit 2: Send links accurately
Manual billing operations can lead to errors in the amount or omissions in sending links. To solve this problem, integrating Airtable, Stripe, and Gmail to automate the accurate sending of payment links will be effective. For example, when handling many invoices, you need to send links carefully to prevent human errors, but by utilizing this automation, you can smoothly create and send links. This will prevent providing incorrect billing information to customers and also lead to improved reliability of operations.
Benefit 3: Reduce the time taken to send links
If the sending of payment links is delayed, it can greatly affect transactions. Therefore, by automating the process from creating to sending payment links, you can perform tasks with a single click from Airtable's website, reducing the time taken to send them. For example, even when handling multiple billing operations simultaneously, you can reduce the time taken from link creation to sending, which will also help reduce the burden on the person in charge. This allows customers to complete payments smoothly without waiting.
Now, let's explain how to use the no-code tool Yoom to "create a payment link in Stripe from Airtable and send it via Gmail."
[What is Yoom]
How to Create an Integration Flow for Airtable, Stripe, and Gmail
By using Airtable's API to receive billing information and Stripe's provided API to create payment links, automation can be achieved. Additionally, by using Gmail's provided API, you can also send payment links via email. Generally, programming knowledge is required to achieve this, but by using the no-code tool Yoom, it can be easily achieved without programming knowledge.
The integration flow is broadly created in the following processes.
Register Airtable, Stripe, and Gmail as My Apps
Copy the template
Set up the trigger in Airtable that serves as the starting point of the flow and configure the subsequent operations in Stripe and Gmail
Turn on the trigger button and verify the integration operation of Airtable, Stripe, and Gmail
If you are not using Yoom, please register for free from here. If you are already using Yoom, please log in.
Step 1: Register My Apps for Airtable, Stripe, and Gmail
Please register your apps to connect Airtable, Stripe, and Gmail with Yoom. By registering your apps in advance, you can proceed with automation settings smoothly.
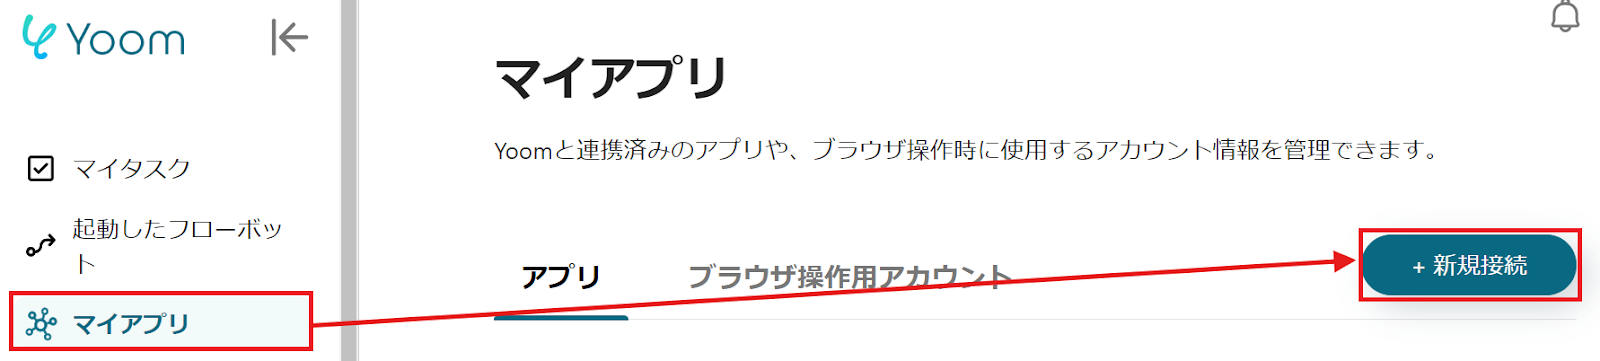
First, let's register Airtable as a My App. Click on "My Apps" → "New Connection" on the left side of the Yoom screen.
When the following screen appears, search for Airtable from the app list or use the search bar.
When the following screen appears, click "+ Add Base" and then click "Allow Access".
Next, register Stripe as a My App. Similarly, search for Stripe from the app list or use the search bar. When the following screen appears, set the "Account Name" and "Access Token". Check here for Stripe My App registration. You can check the "Access Token" from the Stripe management screen.
Next, register Gmail as a My App. Similarly, search for Gmail using the search bar or find it from the list. When the following screen appears, log in to Gmail.
If Airtable, Stripe, and Gmail appear in My Apps, the registration is complete.
Step 2: Copy the Template
To set up automation, click "Try It" on the banner below.
Read the following screen display and click "OK".
The following screen will be displayed, so check the "Title" and "Description". If you want to make changes, click the relevant part to edit. First, with the Airtable web page open, set up to launch Yoom's Flowbot from the extension, and click "Launch from Record Detail Page".
Step 3: Set up the Airtable trigger that initiates the flow and the subsequent Stripe and Gmail operations
When the following screen appears, check the settings. Here you can find detailed instructions on setting up the Chrome extension. If you haven't installed the Chrome extension, please install it from here.
Next, check the following settings. Assume that data has been pre-registered in Airtable for setting up.
"Title" → Can be changed as desired
"Account information linked with Airtable (OAuth)" → Verify if correct
"Action when launching from the extension" → Launch from Record Detail Page
Check the following setup method.
Scroll and set the "Base ID" and "Table ID" as described.
Next, set the "Launch Page URL Sample". After setting, click "Test" → "Test Successful" → "Save".
Next, to set up retrieving records in Airtable, click "Retrieve Records". The following screen will be displayed, so check the settings.
"Title" → Can be changed as desired
"Account information linked with Airtable (OAuth)" → Verify if correct
"Action" → Retrieve Records
Check the following precautions.
Next, set the "Base ID" and "Table ID or Name" as described.
Scroll and set the "Record ID". Select from the output of "Launch from Record Detail Page". After setting, click "Test" to display the Airtable values as results. If "Success" is displayed, refer to here to set the output. Use this value for the subsequent settings. After setting, click "Save".
Next, to set up retrieving a single record that meets the conditions from the specified table in Yoom, click "Retrieve Record". The following screen will be displayed, so check the settings.
"Title" → Can be changed as desired
"Execution Action" → Retrieve Record
Create billing information as a test in Yoom's database. If creating new, click "+" next to "Project List" → "Database".
Next, set up "Database Integration". Set the "Project" and "Database" where Yoom's database is stored.
When the following screen appears, set the "Conditions for the Record to Retrieve". Utilize Airtable's output and set it as follows. After setting, click "Test" → "Test Successful" → "Save".
Next, to set up Stripe, click "Create Payment Link". *Stripe is an app available on some paid plans. Operations and data connections of Flowbot set on other plans will result in errors, so be careful. Paid plans offer a 2-week free trial. During the free trial, you can use apps that are subject to restrictions.
When the following screen appears, check the settings.
"Title" → Can be changed as desired
"Account information linked with Stripe" → Verify if correct
"Action" → Create Payment Link
Next, set the "Product List". Select "Price ID" from the output of "Retrieve Record" and set it.
Scroll and set the "Quantity". Utilize Airtable's output and set it as follows. If there are other necessary items, set them, and click "Test" → "Test Successful" → "Save".
Next, to set up Gmail, click "Send Email". The following screen will be displayed, so check the settings.
"Title" → Can be changed as desired
"Account information linked with Gmail" → Verify if correct
Scroll and set the "Email Content". Set "To" as desired. *The email recipient is assumed to be a fixed value for purposes such as confirmation by the person in charge.
Next, set the "Subject" as desired.
Finally, set the "Body". Utilize Stripe's output and select "Payment Link". The following is an example, so set it as desired. After setting, click "Next".
When the following screen appears, check the "Email Sending Content". If there are no issues, click "Test" → "Test Successful" → "Save".
Step 4: Turn on the trigger button and verify the integration operation of Airtable, Stripe, and Gmail
Finally, click "Turn on Trigger" to complete the automation setup. Verify if the Flowbot starts correctly.
Here is the template used this time.
Other Examples of Automation Using Airtable, Stripe, and Gmail
There are many other examples of automation using Airtable, Stripe, and Gmail on Yoom, so here are a few to introduce.
1. This flow automatically sends a thank-you email via Gmail when a payment is made through Stripe. Every time a payment is made on Stripe, you can save the effort of creating a thank-you email multiple times in Gmail. By utilizing thank-you emails, you can also provide campaign or sale information.
2. This is a flow to automatically register inquiry details received in Gmail to Airtable. By automatically registering inquiry information from Gmail to Airtable, you can accurately record the inquiry details. This automation is especially recommended for companies with a high volume of inquiries.
3. This flow automatically searches Airtable records and sends emails via Gmail according to the specified schedule. You can automatically create emails in Gmail from Airtable record information, saving manual effort. Eliminating manual email creation helps prevent human error.
Summary
By automating the creation of payment links and sending emails, you can significantly reduce the time and effort spent on these tasks. This helps prevent incorrect amounts and email sending errors, ensuring accurate delivery of payment links. Additionally, it not only reduces the workload for staff but also allows for smoother interactions with customers.
Yoom's automation is easy to use, making it accessible to anyone. Start by using the template introduced here and rely on automation.
The person who wrote this article
m.wadazumi
I've been working as a writer since my job in child welfare, and I'm currently writing a blog on Yoom.
While being surprised by the work efficiency improvements that can be made with Yoom, I would like to share that excitement with everyone and contribute to society.
I'll tell you about application integration and automation that even I, who has zero programming knowledge, can do.
Conventional RPA can only automate simple repetitive tasks, and the setup process was very complicated. With “hyperautomation,” which combines various technologies such as AI, API, RPA, and OCR, it is possible to automate many tasks that could not be realized until now more easily than before.
Most tools simply connect one app to another, leaving the complex tasks to you. Yoom goes much further: From document creation and browser automation to OCR and generative AI, Yoom handles it all seamlessly in one platform.
Why settle for basic integrations? Streamline your entire workflow with Yoom’s powerful hyperautomation.


.png)


.avif)
.avif)


