How to integrate Airtable, Misoca, and Outlook to create an invoice in Misoca and send it via Outlook when Airtable is updated.
How to Integrate Applications
・
2024/10/31
How to integrate Airtable, Misoca, and Outlook to create an invoice in Misoca and send it via Outlook when Airtable is updated.
n.fukuoka
Misoca is a convenient tool specialized for billing operations. It also has features for saving client information and standard formats, making monthly invoice creation smooth. However, as the number of invoices increases, the risk of input errors and omissions increases with manual work, potentially increasing the workload. This article explains the benefits of integrating Airtable, Misoca, and Outlook, as well as specific automation setup procedures.
Recommended for
The content introduced this time is recommended for the following people!
・Those who are using Airtable and Misoca separately ・Those who find it cumbersome to manually send emails in Outlook after creating invoices ・Those who want to integrate the apps they usually use to make daily operations more efficient
Benefits and Examples of Integrating Airtable, Misoca, and Outlook
Benefit 1: Improved Accuracy of Billing Operations
When the status is updated in Airtable, invoices are automatically created in Misoca and then sent through Outlook, which is expected to reduce the occurrence of human errors. For example, if a sales department representative updates the order status in Airtable, the accounting department representative will have less manual data entry work, reducing the risk of data transcription errors. Additionally, by accurately reflecting information necessary for invoice creation, such as amounts, deadlines, and customer information, it may help prevent risks and troubles that could damage trust with clients.
Benefit 2: Speeding Up the Billing Process
By automating the billing process, the entire flow from issuing to sending invoices to customers can be streamlined, reducing the time required for sending. Automation can make the entire procedure from project completion to actual billing smoother, potentially reducing the burden of billing tasks. Moreover, prompt billing can promote early fund collection, contributing to cash flow stabilization. Furthermore, faster fund collection can make it easier to prepare the necessary funds for business activities, facilitating new investments and growth plans. By speeding up the billing process, customers can also plan their payments earlier, creating a highly convenient environment for both parties.
Benefit 3: Improved Transparency in Billing Management
The billing process is visualized overall, improving transparency for internal and external stakeholders. From order information in Airtable to invoice creation in Misoca and invoice sending in Outlook, each step is centrally managed, eliminating concerns about scattered information. This allows sales representatives to quickly and accurately answer questions from customers like "When was the invoice sent?" or "What is the payment status?" Additionally, as the sales and accounting departments can communicate smoothly based on common information, their communication becomes more seamless.
In this article, we will proceed with integration using Yoom. If you haven't used it yet, please take a look at First Time with Yoom.
[What is Yoom]
How to Create an Integration Flow for Airtable, Misoca, and Outlook
This time, we will create a flow where [When the status is updated in Airtable, an invoice is created in Misoca and sent via Outlook]. By utilizing this template, you can automate invoice creation and sending according to the status in Airtable, reducing the effort of billing operations.
The integration flow is broadly divided into the following processes.
・Register Airtable, Misoca, and Outlook as My Apps ・Set up a trigger that activates when a record is updated in Airtable ・Configure settings to create an invoice in Misoca and send an email via Outlook ・Testing and verification
Step 1: Integration of Airtable, Misoca, and Outlook as My Apps
First, log in to your Yoom account. If you do not have an account, please create one on the Yoom account creation page.
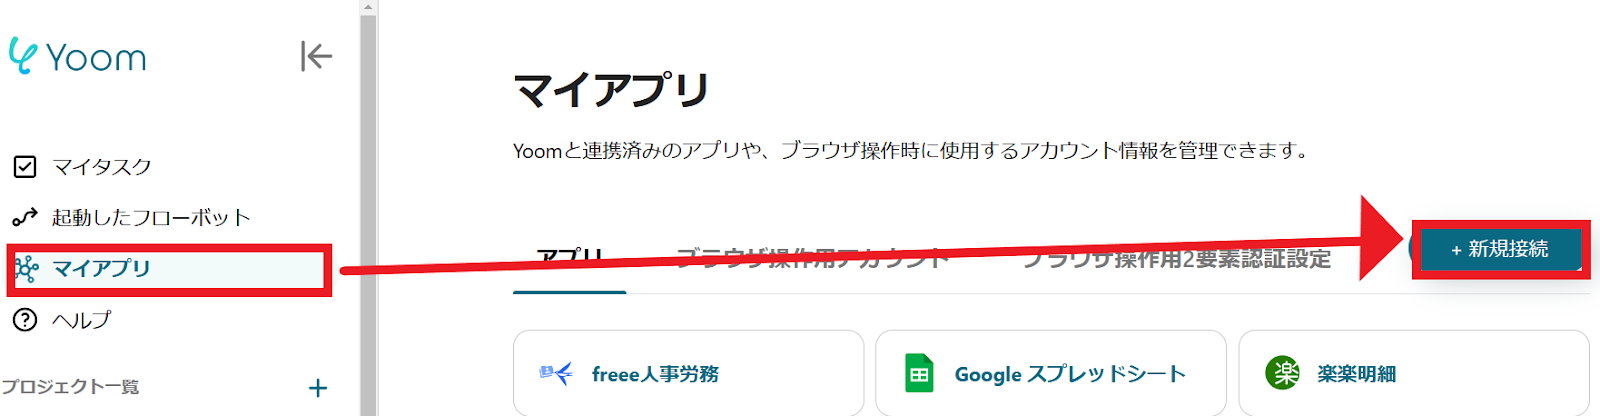
1. After logging in, click on My Apps and then click on New Connection.
2. You can search by app name in the input field. Search for and register Airtable, Misoca, and Outlook respectively.
3. Once registration is complete, a message saying "My Apps have been registered" will appear. Check that the icons for Airtable, Misoca, and Outlook are displayed.
Note that Microsoft365 (formerly Office365) has a home plan and a general business plan (Microsoft365 Business), and if you are not subscribed to the general business plan, authentication may fail.
For more detailed information about Yoom, please check the Yoom Help Center.
Selecting a Template and Preparing the Storage Location
Click "Try it" from the link below.
If the following display appears, the template copy was successful.
Step 2: Set up a trigger to activate when a record is updated in Airtable
1. First, click on "When a record is updated" at the top.
2. Set the title freely. Enter the account information to connect with Airtable. Select "When a record is updated" as the trigger. Once the input is complete, click "Next".
3. Set the required items. You can select the trigger activation interval from 5 minutes, 10 minutes, 15 minutes, 30 minutes, or 60 minutes. Please note that the shortest activation interval varies depending on the plan, so please check. Once the setup is complete, test it and save it if there are no issues.
4. Next, click on the "Command Operation" icon. ※ The branching feature is available with the Mini Plan or higher (Operation). For the Free Plan, the operation of the flow bot set will result in an error, so please be careful. Some paid plans like the Mini Plan offer a 2-week free trial. During the free trial, you can use restricted apps and AI features (Operations).
5. By default, as shown in the image below, the branching condition is set to branch when the Airtable status is complete. You can change the settings as desired, so please adjust accordingly. Once the setup is complete, click "Save".
Step 3: Set up to create an invoice in Misoca and send an email with Outlook
1. Return to the flow. Next, click on the icon for "Get recipient ID linked to a specific client".
2. Enter the account information to connect with Misoca. Select "Get recipient ID linked to a specific client" as the action. Once the input is complete, click "Next".
3. Enter the client ID. When you click on the input field, the previously obtained output will be displayed. Please use it as needed. Once the setup is complete, test it and save it if there are no issues.
4. Next, click on the "Create Invoice" icon.
5. Enter the account information to connect with Misoca. Select "Create Invoice" as the action. Once the input is complete, click "Next".
6. Enter each item. Please be sure to enter the required items. As before, when you click on the input field, the output will be displayed, so please use it. Once the setup is complete, test it and save it if there are no issues.
7. Next, click on the "Get Invoice PDF" icon.
8. Enter the account information to connect with Misoca. Select "Get Invoice PDF" as the action. Once the input is complete, click "Next".
9. Set the invoice ID. When you click on the input field, the output will be displayed, so please use it as needed. After input, test it and save it if there are no issues.
10. Click on the "Send Email" icon.
11. Enter the account information to connect with Outlook.
12. Set the email content. When you click on each item, the output will be displayed. Use it as needed while entering the email text. Once the setup is complete, click "Next".
13. Check the email content. If there are no issues with the content, test it and save it if there are no issues.
14. This completes the flow of [Create an invoice in Misoca and send it via Outlook when the status is updated in Airtable].
Step 4: Test and Confirm
Once the setup is complete, the following screen will be displayed. Click the "Turn on Trigger" button to activate the flow bot.
With Yoom's template, even beginners who are not good at programming can set it up smoothly. Try this convenient flow from the link below.
Other Automation Examples Using Misoca
There are many other examples of automation using Misoca in Yoom, so here are a few to introduce.
1. This is a flow where an invoice is created in Misoca and sent via Outlook when the status is updated in kintone. In the flow introduced this time, an email is sent via Outlook when the status in Airtable is updated, but in this template, an email is sent when the status in kintone is updated.
2. This is a flow for creating a quotation in Misoca based on files uploaded to Google Drive. By using this template, you can automatically generate quotations in Misoca based on files uploaded to Google Drive, which is expected to improve work efficiency. Since manual creation of quotations is no longer necessary, you can allocate time to other important tasks.
3. This is a flow where a message is sent to a Slack channel when a new invoice is created in Misoca. By using this template, you can automatically send a message to a specific Slack channel whenever a new invoice is created in Misoca. Automating notifications in Slack will help reduce human errors such as missing recipients or incorrect message entries.
Summary
By integrating Airtable, Misoca, and Outlook, it is now possible to create invoices in Misoca and send them via Outlook whenever the status is updated in Airtable. This automation of the process from invoice creation to sending is expected to reduce the workload. Yoom is designed to allow you to start automation without any special knowledge. Simply follow the guide and input the necessary information to complete the setup smoothly. By combining the apps you use daily, you can expect improved work efficiency. Utilize Yoom's templates to help improve the complex invoicing tasks.
The person who wrote this article
n.fukuoka
In this day and age where there are more and more tools, it's often hard to know what to use.
I would like to deliver useful information that is easy to understand so that everyone's work can be made even a little easier!
Conventional RPA can only automate simple repetitive tasks, and the setup process was very complicated. With “hyperautomation,” which combines various technologies such as AI, API, RPA, and OCR, it is possible to automate many tasks that could not be realized until now more easily than before.
Most tools simply connect one app to another, leaving the complex tasks to you. Yoom goes much further: From document creation and browser automation to OCR and generative AI, Yoom handles it all seamlessly in one platform.
Why settle for basic integrations? Streamline your entire workflow with Yoom’s powerful hyperautomation.


.avif)


.avif)
.avif)

.avif)


