Integrate CloudSign with Google Drive to automatically store files in Google Drive when an employment contract is signed in CloudSign.
How to Integrate Applications
・
2024-12-23
Integrate CloudSign with Google Drive to automatically store files in Google Drive when an employment contract is signed in CloudSign.
m.wadazumi
It would be convenient if, after signing an employment contract with CloudSign, documents could be automatically stored in Google Drive. By implementing this automation, you can manage documents and prevent data loss. By using Yoom, you can smoothly achieve app integration and automation. This article introduces "How to store files in Google Drive after signing a CloudSign employment contract."
Benefits and Automation Examples of Integrating CloudSign with Google Drive
The benefits of integrating CloudSign with Google Drive include time-saving through automatic contract storage and enhanced security. Below is a summary of the benefits of app integration and automation examples, so please take a look.
Benefit 1: Time-saving through automatic contract storage
By integrating CloudSign with Google Drive, you can save time through automatic contract storage. For example, it is possible to store files in Google Drive after signing a CloudSign employment contract. This eliminates the need to manually save monthly employment contract documents. By implementing this automation, you can reduce the time spent managing contract documents.
Benefit 2: Decide file storage based on contract status
A benefit of integrating CloudSign with Google Drive is the ability to decide file storage based on contract status. For example, you can determine whether to store files based on the contract status in CloudSign. File management becomes easier, making data verification simpler. Additionally, since data is managed in Google Drive, it is convenient for searching data.
Benefit 3: Enhanced security
By integrating CloudSign with Google Drive, you can enhance security. The security and backup features of Google Drive increase the safety of contracts. This ensures that you won't lose contracts or forget where they are stored. It is recommended for IT departments that prioritize contract security and backup.
We have introduced the benefits and automation examples of CloudSign and Google Drive, but this time we will introduce the flow of "Storing files in Google Drive after signing a CloudSign employment contract."
How to Create a Flow for Integrating CloudSign with Google Drive
This time, we will use the following template for "Storing files in Google Drive after signing a CloudSign employment contract."
The process is as follows.
Are you thinking, "I understand the benefits and automation, but you need programming knowledge to actually automate, right?" No-code tool Yoom is recommended for app integration and automation. You can create automation without any specialized knowledge. Yoom offers templates, so it doesn't take much effort.
If you haven't used Yoom yet, register for free here. If you are using Yoom, please log in.
How to connect CloudSign and Google Drive with Yoom
Let's register your app to connect CloudSign and Google Drive with Yoom. Once you have registered your app, future automation will be easier.
First, register your CloudSign app, which is available on Yoom's help page, so please register while referring to it.
Next, register your Google Drive app. Click "My Apps" → "New Connection" on the left side of the Yoom screen. When the app list appears, search for Google Drive or search by "App Name".
When the following screen appears, log in to Google Drive.
Once the app registration is complete, CloudSign and Google Drive will be displayed in your My Apps section.
How to store files in Google Drive after signing a CloudSign employment contract
To set up automation, click "Try it" on the banner below.
The following screen will be displayed, so if you want to change the "Title" and "Description", please do so on the following page. Next, we will set up CloudSign, so let's click on "When the document signing is completed".
The following screen will be displayed, so please check the settings.
"App Trigger Title" → Set as desired
"Account Information to Link with CloudSign" → Check if correct
"Trigger Action" → When the document signing is completed
When the following screen is displayed, set the "Trigger Activation Interval" as desired. "Test" → "Test Successful" → "Save".
Next, we will set up branching for when the document title includes or does not include the employment contract. Click on the section "When the document title includes the employment contract". Please check the following settings.
"Title" → Set as desired
Branch Target Output
"Operation" → When the document signing is completed
Next, we will set up CloudSign for when the document title includes the employment contract, so click on "Get the list of files attached to the document". Please check the following settings.
"Title" → Set as desired
"Account Information to Link with CloudSign" → Check if correct
"Action" → Get the list of files attached to the document
We will set up to obtain a list of file IDs attached to the document, so please check if "Document ID" is {{Document ID}}. * By using the file ID obtained in this action, you can execute the "Get Document Attachment" action to obtain the PDF file attached to the document. "Test" → "Test Successful" → "Save".
Next, we will set up to obtain the document attachment file from CloudSign, so please click on "Get Document Attachment". Please check the following settings.
"Title" → Set as desired
"Account Information to Link with CloudSign" → Check if correct
"Action" → Get Document Attachment
The following screen will be displayed, so please check the settings.
"Document ID" → {{Document ID}}
"File ID" → {{List of File IDs}} * Please specify the file ID obtained from the "Get the list of files attached to the document" action.
Click "Test" → "Test Successful" → "Save".
Next, we will set up to search for files or folders within a specific folder in Google Drive, so click on "Search for files/folders within a specific folder". Please check the following settings.
"Title" → Set as desired
"Account Information to Link with Google Drive" → Check if correct
"Action" → Search for files/folders within a specific folder
When the following screen is displayed, please set it up.
"Folder ID" → The part of the Google Drive URL that says "/folders/●●●●"
"File Name" → {{Document ID}} Click the red frame to use the CloudSign output. {{Document ID}} ← This is the output.
Click "Test" → "Test Successful" → "Save".
Next, we will set up to upload a file to Google Drive, so click on "Upload a File". Please check the following settings.
"Title" → Set as desired
"Account Information to Link with Google Drive" → Check if correct
"Action" → Upload a File
When the following screen is displayed, please check the settings.
Next, we will set up to update a record in the Yoom database, so click on "Update Record". Please perform the following settings.
"Title" → Set as desired
"Execution Action" → Update Record
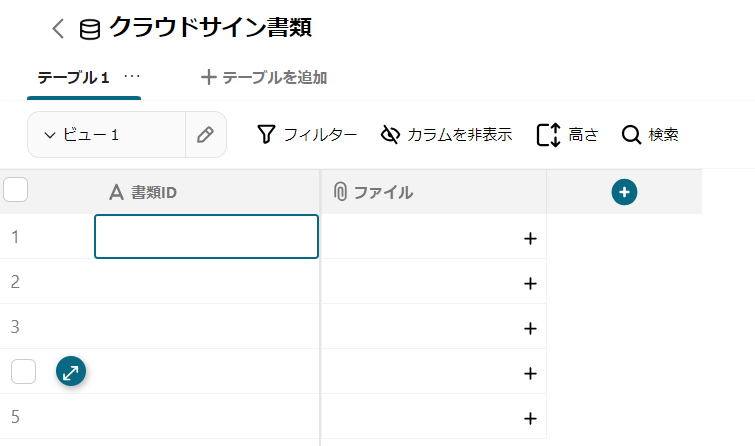
Since we will be using the Yoom database, please prepare a database to update the CloudSign document ID and file. If you are creating a new one, select any project on the left side of the screen and click "Database". We will set up to update data in the database, so click "+", and set the "Title" as desired. Click "A Text 1" and set it as follows.
"Edit Column"
"Column Name" → Document ID
"Data Type" → Text
Set "A Text 2" in the same way, set "Column Name" to File, and select File for "Data Type". Delete unnecessary columns.
Once the above settings are complete, it will look like this.
Return to the screen of the flow bot you created earlier and set up "Database Integration". "Project", "Database", "Table" → Set as desired The following screen is an example, so please set the items of the database you set yourself.
The following screen will be displayed, so let's proceed with the settings.
1. Conditions for the record you want to update
"Document ID", "Equal", "{{Document ID}}" Select "Document ID" from the CloudSign output as shown in the image below.
2. Values of the record after update
"Document ID" → {{Document ID}}
"Method for Updating Existing Files" → Set as desired
"File Output Name" → Obtained File
Click "Test" → "Test Successful" → "Save".
If you turn the app trigger "ON", the setup is complete.
Advanced Integration Flow of CloudSign and Google Drive
This time, we explained the flow of "storing files in Google Drive" after "concluding a CloudSign employment contract." At Yoom, we have templates that use CloudSign and Google Drive, so we will introduce two of them.
The first is the following template: "Update HubSpot deal stage when document signing is completed in CloudSign."
By using this template, HubSpot deal stages are automatically updated, eliminating the need for manual input.
The second template is "How to store forms received via email in Google Drive and notify on Slack."
When an email is received, the file is automatically stored in Google Drive, making information sharing easier.
Summary
In this article, we introduced "How to store files in Google Drive after signing a cloud sign employment contract." The benefits of integrating CloudSign with Google Drive include time savings through automatic contract storage and enhanced security. By using Yoom, you can be freed from previous tasks and comfortably focus on other work. Please use the flow introduced this time and the advanced flow to improve efficiency.
The person who wrote this article
m.wadazumi
I've been working as a writer since my job in child welfare, and I'm currently writing a blog on Yoom.
While being surprised by the work efficiency improvements that can be made with Yoom, I would like to share that excitement with everyone and contribute to society.
I'll tell you about application integration and automation that even I, who has zero programming knowledge, can do.
Conventional RPA can only automate simple repetitive tasks, and the setup process was very complicated. With “hyperautomation,” which combines various technologies such as AI, API, RPA, and OCR, it is possible to automate many tasks that could not be realized until now more easily than before.
Most tools simply connect one app to another, leaving the complex tasks to you. Yoom goes much further: From document creation and browser automation to OCR and generative AI, Yoom handles it all seamlessly in one platform.
Why settle for basic integrations? Streamline your entire workflow with Yoom’s powerful hyperautomation.


.avif)

.avif)
.avif)


