


The template will be copied to my project. Click on the title within the red frame to navigate to the settings screen.

Step 3: Schedule Trigger "Every Day at 10 AM"

Click on the first process of the template. Here, you can set the frequency and timing for posting to Microsoft Excel.
(1/1) Specify Execution Time

The following items are pre-configured:
- Title of the schedule trigger
- Schedule settings
This time, it is set to start at 10 AM every day. You can change this timing according to your convenience. If you need detailed timing settings, you can use Cron.
>Learn more: How to set up Cron
→ Click Save
Step 4: Integrate with Apps "Get Account Report"

Click on the second process of the template! Here, you will set the information to be obtained from Google Ads.
(1/2) Select Linked Account and Action
The items displayed here are pre-configured.
- Title of the app trigger
- App
- Account information linked with Google Ads
- Trigger action
→ Click Next
(2/2) Select Linked Account and Action

- Ad account ID
- Displayed at the top right of the Google Ads management screen.

- Start of period
- Set the beginning of the measurement period. The format is "YYYY-MM-DD".
- Click the edit field to open a dropdown. Embed the date reference code from the date tab. This time, it is set to extract data from yesterday to today.

- End of period
- In this setting, the last day is set to today. Specify the date from the dropdown, just like the start of the period, and embed today's reference code.
→ Click Test → Success, the relevant data has been extracted in the output.

→ Click Save
Step 5: Perform Calculation "Convert Costs to Standard Currency Units"

Click on the third template. It is pre-configured, but let's check the content.
(1/1) Set Operation Conditions

Google Ads reports usually record costs in "micro currency units". For Japanese yen, the advertising cost is converted to yen by dividing by 1,000,000.
This process is performed to notify in "yen". The formula is pre-configured, so proceed to the test as it is.
→ Test → Success, the result converted to yen is displayed in the output.

→ Save
Step 6: Integrate with Apps "Send Message"

Click on the fourth template. In this process, you will set the content to be posted to Microsoft Excel.
(1/2) Select Linked Account and Action
These items are pre-configured.
- Title of the app trigger
- App
- Account information linked with Microsoft Excel
- Trigger action
Database integration requires configuration.

- File storage location
- This time, we use Microsoft SharePoint, so open the dropdown and select SharePoint.
- Site ID
- Click the edit field, and the sites linked to the account will appear as candidates. Selecting one will quote the ID.
- File name
- The setting is optional.
- Item ID
- Click the edit field to open a dropdown, and the file names of Microsoft Excel within the selected site will be displayed. Selecting one will quote the ID.
- Table range
- Set in the format "column row:column row". This time, the table range is A to H, so enter A1:G1.
Once the database integration is complete, proceed to the next step.
→ Click Next
(2/2) Detailed Settings for Database Operations

The headers of the sheet linked in the previous screen are extracted and displayed as input items.

Fill in each edit field. Click the edit field to open a dropdown, and the output extracted from Google Ads will be displayed.

When you select the item to link to the sheet column, the reference code is embedded in the edit field. Embed the output in all items.
→ Click Test → Success
→ Save
Step 6: Turn the App Trigger 【ON】
Once all processes are configured, a complete screen will pop up.
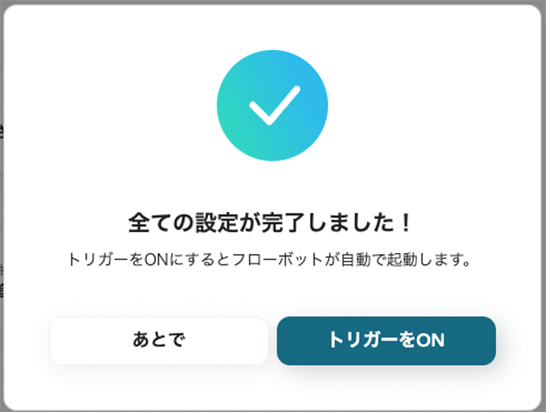
Turn the trigger 【ON】 to start the flow bot.

<span class="mark-yellow">Automation was easily implemented without using programming.</span> You can confirm that the report obtained is recorded in the Microsoft Excel sheet.

This time, I tried quoting all the outputs for notification. In actual operation, please extract items as needed. Here is the template for this time.


.avif)


