Google スプレッドシートとXの連携イメージ
How to Integrate Applications

2025-04-18

How to Automatically Post to X When Updating Google Sheets

a.ohta

If you're using X (formerly Twitter) for marketing or public relations and storing your post content in Google Sheets, why not connect the two apps?
By integrating with Google Sheets, you can automate the process of posting to X after reviewing the content.
This can help strengthen collaboration between content creators and reviewers, while ensuring smooth, timely posts to X.

If you're looking to make the most of social media marketing in today’s digital world, now’s the perfect time to consider automation!

Recommended for

  • Companies using X for marketing or PR
  • Those who create and manage post content for X in Google Sheets
  • Team members responsible for reviewing and posting content to X
  • Anyone looking to streamline X posts by integrating Google Sheets

For those who want to try it right away

This article introduces an integration method using the no-code tool Yoom.
No complicated setup or technical knowledge is required—non-engineers can easily get started.
You can start using the template below right away, so give it a try!

[What is Yoom]

Now, let's introduce the flow of using Yoom to connect apps with each other.
First, let's register for Yoom.
Yoom offers a 2-week trial. You can actually operate it and check the usability.

This time, we will automate the process of "posting on X (Twitter) when the status is updated in Google Sheets" using a template.

How to Create a Connection Flow between Google Sheets and X

The connection flow this time is broadly divided into the following processes.

  • Connect Google Sheets and X to My Apps
  • Set up to launch Google Sheets
  • Set up posting to X
  • Turn on the trigger button and check the connection operation between Google Sheets and X

Step 1: Connect Google Sheets and X to My Apps

After completing the registration for Yoom, please select "My Apps" from the menu on the left.

Next, click the new connection button in the upper right corner.

Connecting Google Sheets and Yoom

1. Search

Click the Google Sheets icon.

2. Select Account
Press the Google account of the Gmail address to connect with Yoom.

3. Log in to Yoom

You will be taken to the page with the image, read the terms and click Next.

4. Yoom is requesting additional access to your Google account
Press Continue.
When you move to the authentication screen, select <span class="mark-yellow">Allow all permissions</span>.

5. Connection Complete

The screen will switch, and if the above display appears, the connection is complete.

6. Prepare Google Sheets
Prepare the Google Sheets where the post text for X is saved.

This time, assuming "post to X when the status is updated," a dropdown status was set up.

In this case, <span class="mark-yellow">if you create other statuses, it will be updated every time the status changes, so only create the "Posted" status.</span>

Connecting X and Yoom

1. Search

Click the X icon.

2. Authorize the App

You will be asked for authorization from X.
Be sure to check if it's the account you want to post the text created in Google Sheets, and if there are no issues, click the red frame.

3. Add
Once the required fields are set, press Add in the lower right corner.

If the above display appears, the connection is complete.

Step 2: Copy the Template

Next, please copy the template to be used this time.

3. If you haven't registered with Yoom yet, please register

* If you have already registered, the login screen will be displayed, so please log in.

When the Flowbot template is copied to "My Projects", the above display will appear.

Let's proceed to detailed settings as you transition to a page like the image.

Step 3: Google Spreadsheet Launch Settings

1. Open My Projects

Open "My Projects" from the menu on the left side of the screen.

2. Open the copied template

Click "【Copy】Post to X (Twitter) when status is updated in Google Spreadsheet".

3. Select App Trigger

Click "When status is updated" on the Google Spreadsheet icon. Since the title and other settings are complete, press Next.

4. Set Trigger Launch Interval

Set the launch interval. Triggers can be set to launch at intervals of 5 minutes, 10 minutes, 15 minutes, 30 minutes, or 60 minutes. Please note that the shortest launch interval varies depending on the plan.

5. Enter ID

Follow the supplement at the bottom of the box and set it from the candidates. Click the box.

Since the data from Google Spreadsheet will be listed, click and insert the one you want to link with X. Similarly, set the sheet ID.

6. Enter Table Range, etc.

Specify the table range, etc.

This time, the table range of the prepared Google Spreadsheet is A to D.

The unique value that does not overlap with others is set as the post text in column A.

The column to detect updates is checked in column D.

Therefore, the settings this time were made as shown in the image.

7. Execute Test

Once the settings are complete, press the test button. If "Test Successful" is displayed, it is complete. Click Save.

Step 4: Setting to Post to X

1. Link with App

Click "Post" on the X icon. Since the title and other settings are complete, press Next.

2. Set Required Items
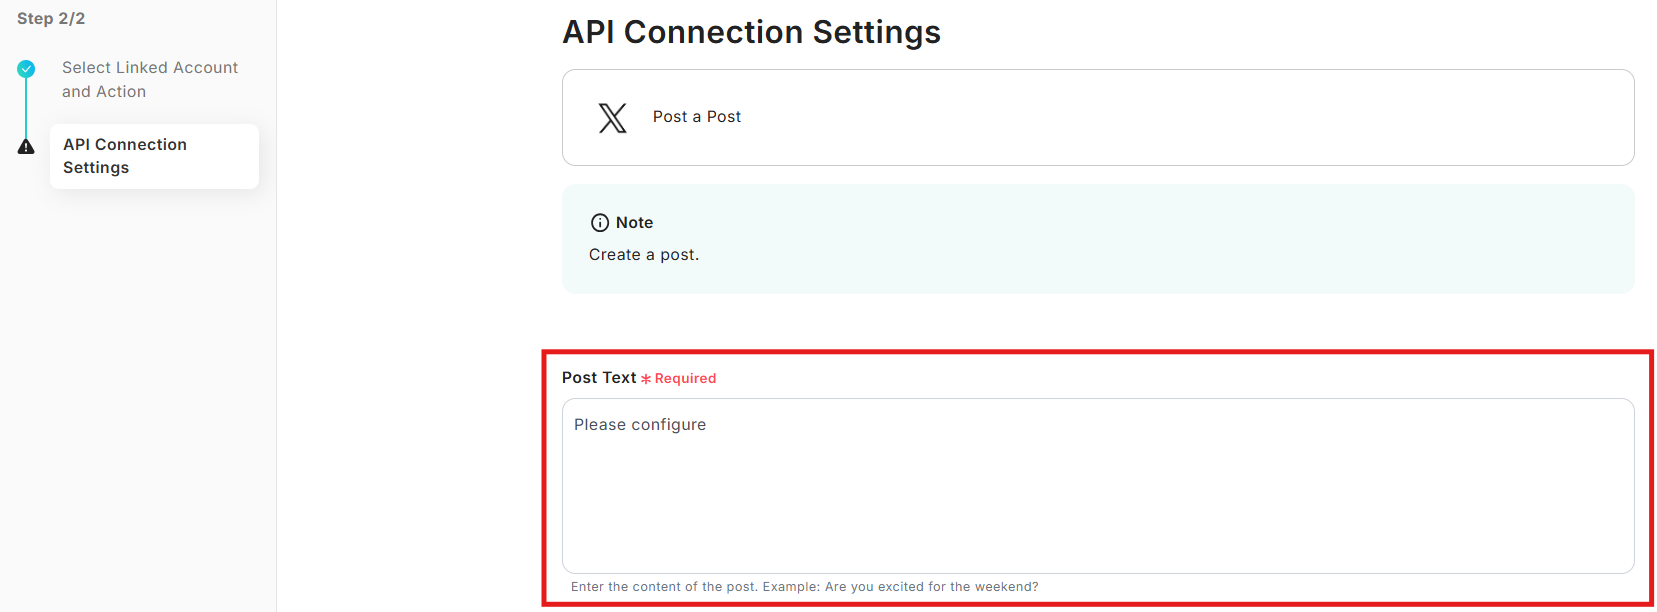
Link the post content with the data from Google Spreadsheet. Click the box with the red frame.

Select the Google Spreadsheet icon.

The data from the Google Spreadsheet that was test-sent earlier will be listed. From there, select the text data you want to actually post to X.

Once inserted, it will look like the image.

4. Execute Test

Once the data insertion is complete, press the test button. If "Test Successful" is displayed, the settings are complete. Please press Save.

5. Turn ON the Trigger

When the creation of the Flowbot is complete, the above display will appear. The trigger is initially set to OFF, so turn it ON. This completes the app integration.

Flowbot Template Used This Time

Post to X (Twitter) when status is updated in Google Spreadsheet

Other Automation Examples Using Google Sheets and X

In addition to the integrations introduced today, it is possible to achieve various automations by utilizing the APIs of Google Sheets and X.

If you find something interesting, please give it a try!

Automation Examples Integrating Google Sheets and X

You can post on X based on the posting schedule list in Google Sheets, or automatically post on X by retrieving information from Google Sheets every week.
Additionally, it is possible to retrieve information from Google Sheets weekly, organize it with Gemini, and automatically post it on X.

Automation Example Using Google Sheets

Retrieve tasks with today's deadline from Google Sheets and notify chat tools in bulk daily

Automatically retrieve tasks with today's deadline from Google Sheets and notify tools like Slack or Discord in bulk every day.

Create a folder in cloud storage when a row is added in Google Sheets

Automatically create a folder in Google Drive, OneDrive, etc., when a row is added in Google Sheets.

Register Survey Results Received by Email into Google Sheets

Automatically register survey results received via Gmail or Outlook into Google Sheets.

Automation Example Using X

Post on X When a Video is Published

Automatically post on X when a video is published on YouTube.

Post to X when a message is posted in the chat tool

Automatically post messages posted on Slack, Discord, etc. to X.

Post form responses to X

Automatically post responses submitted to Google Forms, etc., to X.

Benefits and Examples of Integrating Google Sheets with X

Benefit 1: Smooth Post Management

By implementing this integration, updates such as "check completed" can be made to posts created and managed in Google Sheets, allowing them to be automatically posted to X.
This may enable smooth management of posts on social media.
For example, typically, after checking the post content, you would access X, copy the text, and post it. By eliminating the need to access X and post, the entire process from checking the post content can be simplified, allowing for smoother posting.

Benefit 2: Efficiency through Shortened Workflow

Since updating Google Sheets will result in posts being made to X, the workflow is shortened, and efficiency can be expected.
For instance, in a workflow where after creating content, you request confirmation from a checker, and after the check is completed, you request the poster, this integration should simplify the requests and posting tasks after the check is completed.
Since posts are made non-stop after checking, it can save time and enable efficient posting to X.

Benefit 3: Reduction of Post Errors

There are times when posts to X are created spontaneously each time and times when they are carefully crafted as solid advertisements. The former is suitable for light content posts, but if you are aiming for lead generation, you need to plan your posts in advance like the latter.
By implementing this automation, you can create post content in Google Sheets, revise it with team input, and achieve accurate posts with a final check by the manager.
For example, by creating content in advance and conducting a final check, it becomes easier to spot errors in the post content, making it easier to post accurate information.

Conclusion

Integration of Google Sheets with X allows for the automation of posts to X. Since the post is completed just by the checker changing the status, the workflow up to posting is shortened, enabling speedy posting.
This integration can also be utilized when creating and editing posts as a team. After carefully considering the post content and checking for incorrect information, it should become easier to post accurate information.
In the digital society, managing social media is an essential point for marketing and public relations. Why not make it more efficient and use it comfortably?

The person who wrote this article
a.ohta
After working as a general store manager, I started working from home as an SEO writer. Later, an outsourcing agreement was signed with a marketing startup for about 5 years. Surrounded by students at the University of Tokyo, I held a computer and spent my days studying various business terms and how to use SaaS tools. When I was a general store manager, time was taken over and over again by office work such as sales and inventory management, human resource management, and ordering, etc., and I was unable to serve customers and often missed sales times. Even when outsourcing, there are many detailed tasks such as input, etc., and “can't such monotonous tasks be automated?” I thought so, and I really sympathize with Yoom's vision!
Tags
Google Sheets
Automation
Integration
App integration
No items found.
What is Yoom hyperautomation?
Conventional RPA can only automate simple repetitive tasks, and the setup process was very complicated.
With “hyperautomation,” which combines various technologies such as AI, API, RPA, and OCR, it is possible to automate many tasks that could not be realized until now more easily than before.
Don't Just Connect Apps—Automate Everything
Most tools simply connect one app to another, leaving the complex tasks to you. Yoom goes much further: From document creation and browser automation to OCR and generative AI, Yoom handles it all seamlessly in one platform.

Why settle for basic integrations? Streamline your entire workflow with Yoom’s powerful hyperautomation.
Learn more about Yoom
Helpful Materials
I understand Yoom! 3-piece set of materials
Download materials
Understand in 3 minutes! Yoom service introduction materials
Download materials
Find out by Before After! Yoom Case Study Collection
Download materials
See a list of useful materials