

.avif)

In Yoom, you can set up business automation without coding by using templates.
This flow will proceed through four main processes.
1. Connect kintone and the Qualified Invoice Issuer Publication System to My Apps
2. Copy the template
3. Set up kintone triggers and connect with the Qualified Invoice Issuer Publication System
4. Turn on the trigger and verify the automation connection
If you are not using Yoom, please register for free here.
If you are already using Yoom, please log in.
Step 1. Connect kintone and the Qualified Invoice Issuer Publication System to My Apps
Register kintone and the Qualified Invoice Issuer Publication System as My Apps.
Completing the My App registration first will make the automation setup smoother.
First, register kintone as a My App.
Access the My Apps menu on the left side of the Yoom screen and click the new connection button on the right side of the screen.

Next, enter kintone in the search window and select "kintone" from the displayed options.
At this time, "kintone (Guest Space)" will also be displayed, but we will use "kintone" for this purpose.

A screen like the one in the image below will be displayed, so enter the information that can be obtained with kintone.
Please refer to the following help article for the service connection method.
If an error is displayed during the connection, please check the following article.
Once the input is complete, click "Add".
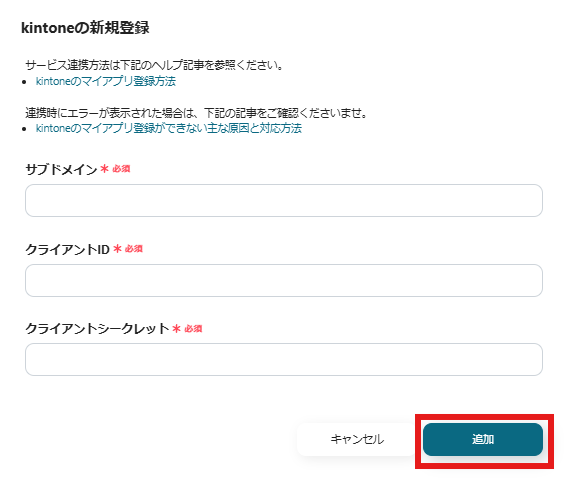
kintone will be displayed on the My Apps screen.
Register the Qualified Invoice Issuer Publication System as a My App.
Access the My Apps menu on the left side of the Yoom screen and click the new connection button on the right side of the screen.
Next, enter the Qualified Invoice Issuer Publication System in the search window and select "Qualified Invoice Issuer Publication System" from the displayed options.
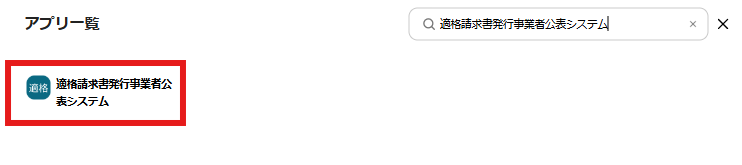
The connection screen for the Qualified Invoice Issuer Publication System will be displayed.
Enter the information according to the content.

The Qualified Invoice Issuer will be displayed in My Apps.
This completes the registration of the apps to be used this time in My Apps.
Step 2: Copy the Template
To set up automation, click "Try it" on the banner below.


.avif)
.avif)
.avif)
.avif)


