How to integrate Mazrica with CloudSign to create and send contracts in CloudSign when a project action is registered in Mazrica
How to Integrate Applications
・
2024-12-20
How to integrate Mazrica with CloudSign to create and send contracts in CloudSign when a project action is registered in Mazrica
m.wadazumi
When creating and sending contracts manually, it consumes a significant amount of time, doesn't it? Especially for companies with a large number of contracts, this task alone can drain both effort and time. If this entire process could be automated, it would allow you to allocate time to other tasks and reduce errors. This article introduces the setup of the template "Create a contract and send it via CloudSign when a Mazrica project action (contract sending) is registered."
Benefits of Integrating Mazrica with CloudSign
Here are two benefits of integrating Mazrica with CloudSign. Please take a look.
Benefit 1: Streamline the Process from Contract Creation to Sending
One of the benefits of integrating Mazrica with CloudSign is the ability to streamline the process from contract creation to sending. For example, when you enter contract information in Mazrica, you can automatically create and send the contract via CloudSign. Since you don't have to create contracts manually, input errors are less likely to occur. Additionally, since it handles sending, you can prevent forgetting to send contracts. Automating this entire process reduces the burden on the person in charge, which is also an attractive feature.
Benefit 2: Enable Quick Response
By integrating Mazrica with CloudSign, you gain the benefit of being able to respond quickly. From contract approval to sending, there are many steps, and surprisingly, it consumes time. However, by introducing automation, all responses become faster. Once contract approval is completed, the contract is immediately created and sent, making it less likely for any task to be delayed. When humans are involved, there are inevitably mistakes such as missing contract approval confirmations or forgetting to create contracts. This automation is recommended for companies with a large number of contracts or those handling multiple contracts simultaneously.
Benefits of Integrating Apps with Yoom
For those who are not engineers, the hurdle of API integration is naturally high. Since it is a highly specialized field, if you have never touched programming, you might give up before even attempting API integration. By using Yoom, even those with no programming knowledge can easily integrate apps and effortlessly set up automation. Even I, who have never touched programming before, was able to set it up immediately. App registration seems difficult, but it's easy as you just need to input according to the settings. This time, we will introduce how to automate by connecting Mazrica and CloudSign with Yoom.
How to Create an Integration Flow for Mazrica and CloudSign
This time, we will introduce the setup of the template "Create a contract and send it via CloudSign when a Mazrica project action (contract sending) is registered."
Automation can be achieved through the following flow.
It may seem like there are many steps, but it's not difficult as you will be setting it up using a template.
If you are not using Yoom, please register for free from here. If you are already using Yoom, please log in.
How to connect Mazrica and CloudSign with Yoom
Register your My Apps to connect Mazrica and CloudSign with Yoom. As mentioned in the benefits, it's easy as you just need to follow the on-screen instructions.
First, let's start with the My App registration for Mazrica.
Click "My Apps" → "New Connection" on the left side of the Yoom screen. A list of apps will be displayed, so search for Mazrica or use the "Search by App Name" feature.
The following screen will be displayed, so proceed with the settings.
"Account Name" → Set a name for management purposes
"Access Token" → Set the API key obtained from "Administrator Settings > API Usage" in the Senses management screen
Next, register Google Docs as a My App for document creation. Select Google Docs as you did earlier. Once the following screen is displayed, log in to Google Docs.
Next, register CloudSign as a My App, but please refer to Yoom's help page for registration.
Once both My App registrations are complete, Mazrica and CloudSign will be displayed in the My Apps section.
How to create a contract and send it via CloudSign when a Mazrica project action is registered
To set up automation, click "Try it" on the banner below.
The following screen will be displayed, so please check the "Title" and "Description". If you want to change them, you can do so from the page below. First, start with the Mazrica settings and click on "When a project action is newly registered".
When the following screen is displayed, please check the settings.
"App Trigger Title" → Can be changed if necessary
"Account Information Linked with Mazrica" → Check for discrepancies
"Trigger Action" → When a project action is newly registered
The following screen will be displayed, so set the "Trigger Activation Interval" as desired. Click "Test" → "Test Successful" → "Save".
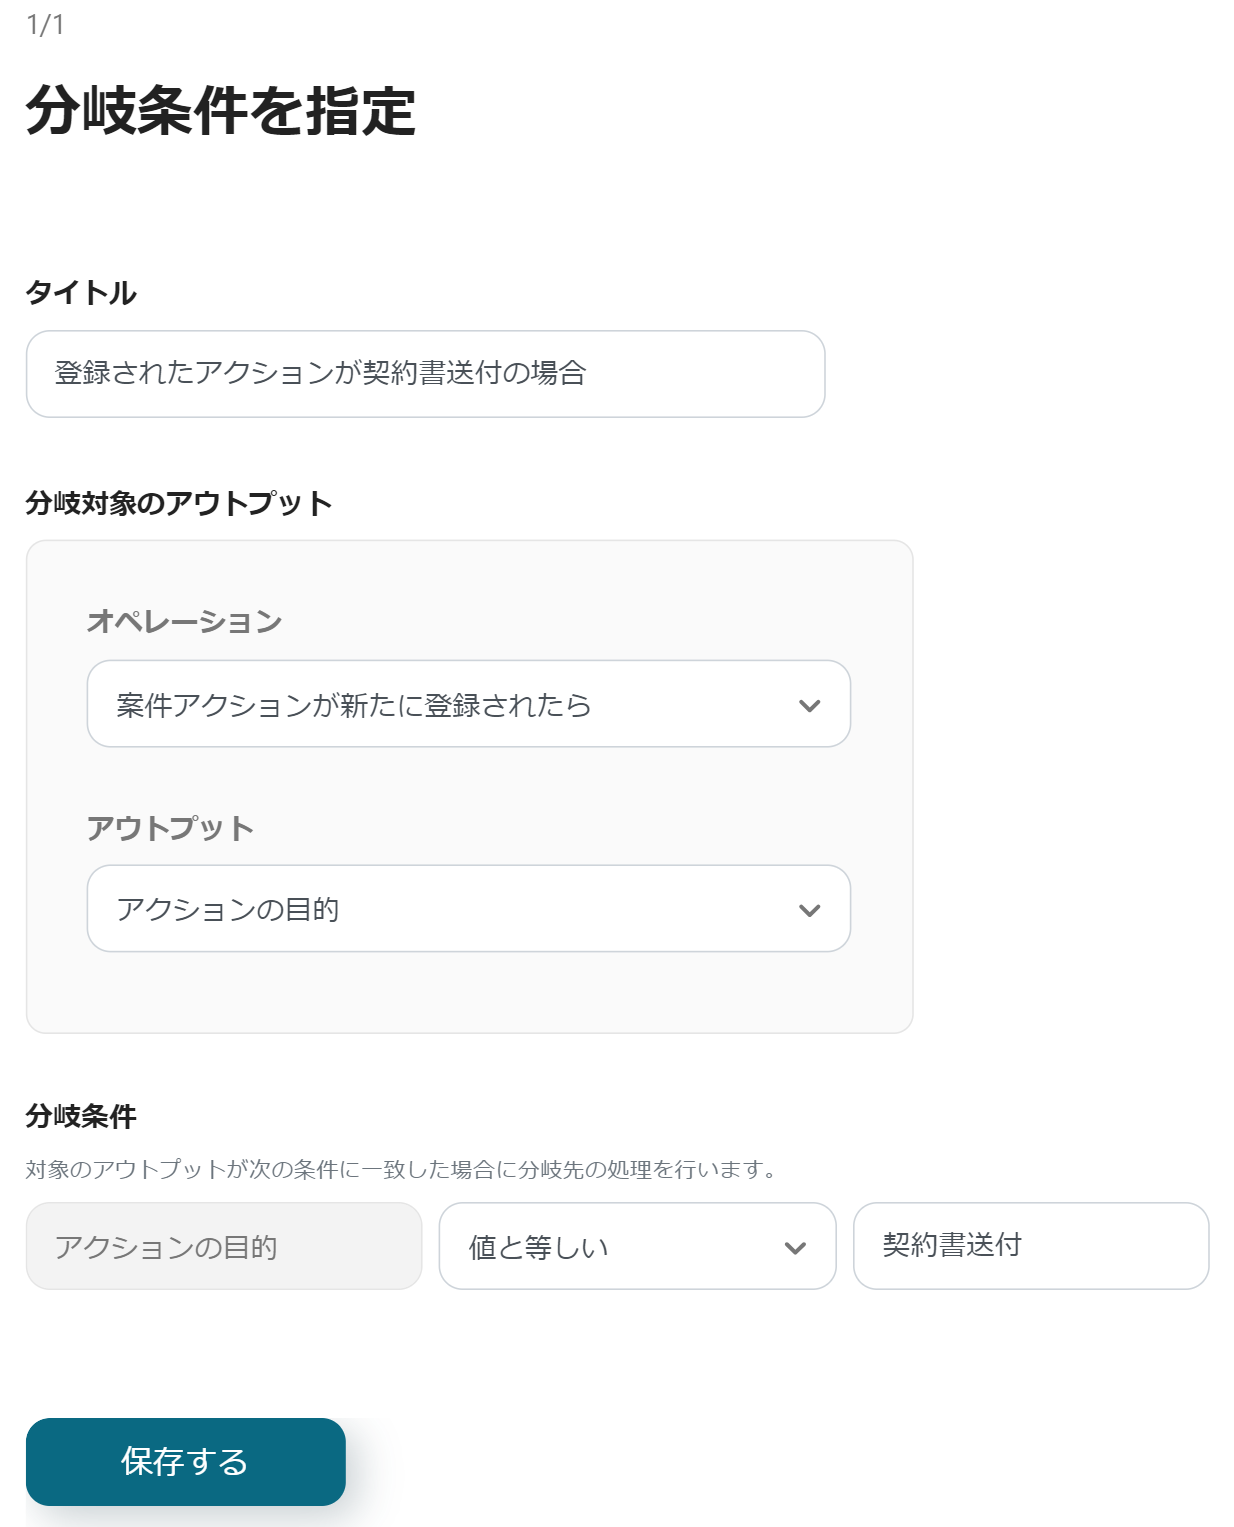
Next, use the Branch operation to set up a distinction between when a contract is sent and when it is not. Click on "When the registered action is sending a contract". The following screen will be displayed, so check the settings.
"Title" → Can be changed if necessary
Output for Branching
"Operation" → When a project action is newly registered
"Output" → Purpose of the action
Branching Conditions
"Purpose of the action", "Equal to", "Sending a contract"
Click "Save".
Next, configure Mazrica settings for the branch after sending the contract, so click on "Retrieve Specific Project Information". When the following screen is displayed, check the settings.
"Title" → Can be changed if necessary
"Account Information Linked with Mazrica" → Check for discrepancies
"Action" → Retrieve Specific Project Information
The following screen will be displayed, so check if the "Project ID" is {{Project ID}}, then click "Test" → "Test Successful" → "Save".
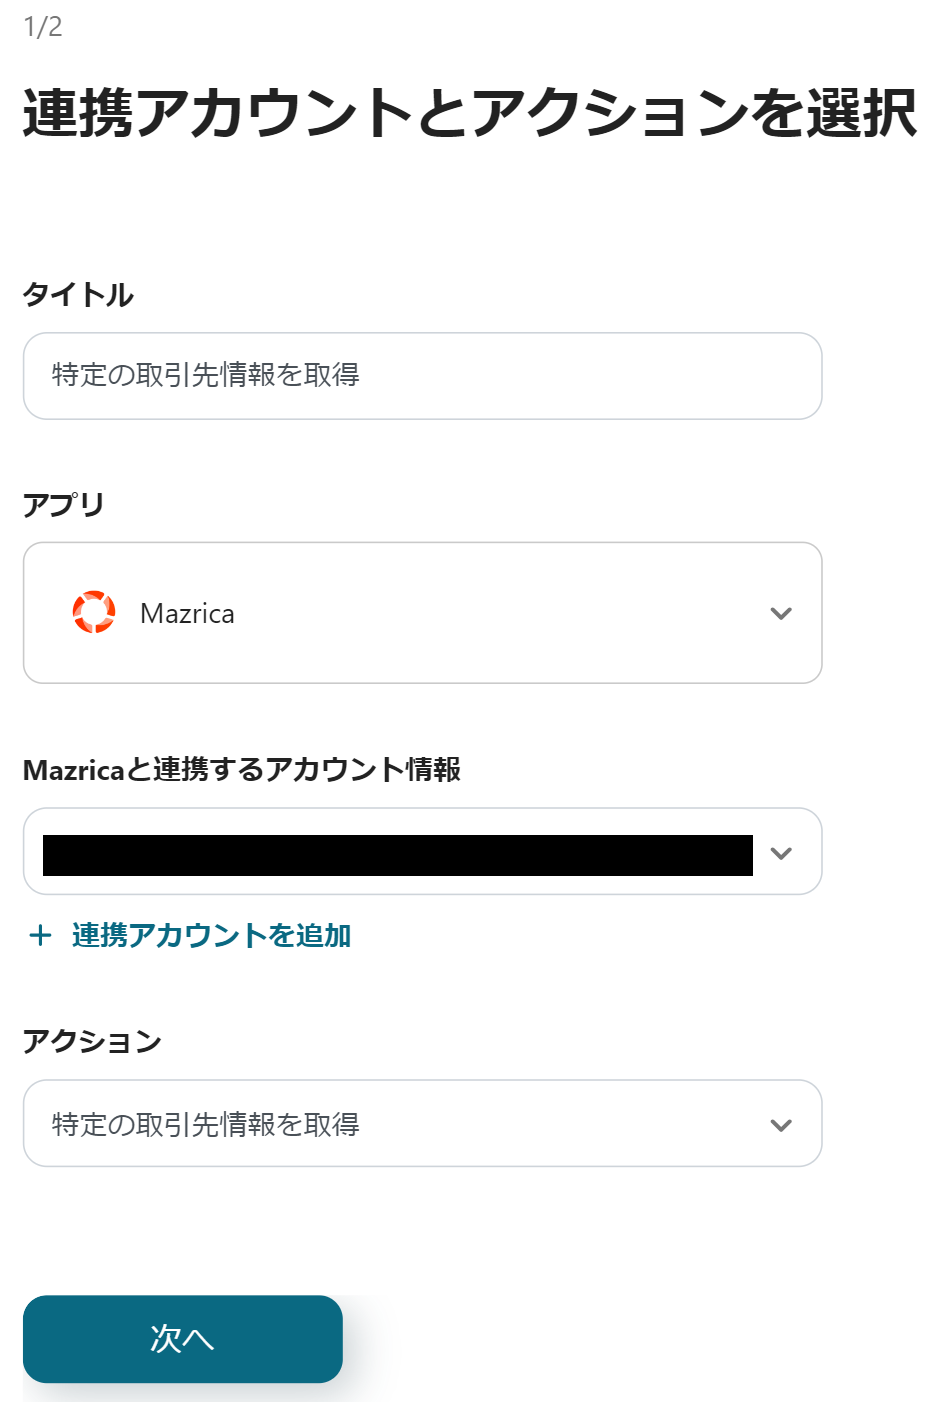
Next, configure Mazrica to retrieve specific client information, so click on "Retrieve Specific Client Information". When the following screen is displayed, check the settings.
"Title" → Can be changed if necessary
"Account Information Linked with Mazrica" → Check for discrepancies
"Action" → Retrieve Specific Client Information
The following screen will be displayed, so check if the "Client ID" is {{Client ID}}, then click "Test" → "Test Successful" → "Save".
Next, configure Mazrica to retrieve specific contact information, so click on "Retrieve Specific Contact Information". The following screen will be displayed, so check the settings.
"Title" →→ Can be changed if necessary
"Account Information Linked with Mazrica" → Check for discrepancies
"Action" → Retrieve Specific Contact Information
The following screen will be displayed, so check if the "Contact ID" is {{Contact ID}}, then click "Test" → "Test Successful" → "Save".
To set up document issuance in Google Sheets, click on "Issue Document". There is a video on the typical flow of using CloudSign here, so it will be smooth to set up after watching it. The following screen will be displayed, so make the settings.
"Title" → Can be changed if necessary
"Account Information Linked with Google Docs" → Check for discrepancies
Template Document Linkage
"Document File ID" → The ● part in "/d/●●●●" in the URL
Issued Document
"Google Drive Folder ID for Storage" → The ● part in "/folders/●●●●" in the URL
"Output File Name" → Can be changed if necessary
The following screen will be displayed, so prepare the template document first. Please create the template document according to the instructions here. Strings enclosed in {} in the template document will be automatically retrieved as "Strings to be Replaced". For each target to be replaced, enter the "String After Replacement".
"String to be Replaced" → {Company Name}
"String After Replacement" → {{Client Name}}
For sections set as lists, set the string after replacement in list format (comma-separated). If you update the content of the document, press the "Reacquire Replacement Conditions" button. Click "Test" → "Test Successful" → "Save".
Next, configure document creation in CloudSign, so click on "Create Document". Check the following settings.
"Title" → Can be changed if necessary
"Account Information Linked with CloudSign" → Check for discrepancies
"Action" → Create Document
When the following screen is displayed, change the "Document Title" if necessary. If there are any other necessary items, make the settings. Click "Test" → "Test Successful" → "Save".
To set up attaching files to a document in CloudSign, click on "Attach File to Document". The following screen will be displayed, so check the settings.
"Title" → Can be changed if necessary
"Account Information Linked with CloudSign" → Check for discrepancies
"Action" → Attach File to Document
When the following screen is displayed, check if the "Document ID" is {{Document ID}}. If there are any other necessary items, register them. * If you are attaching multiple PDFs, set this action multiple times. Click "Test" → "Test Successful" → "Save".
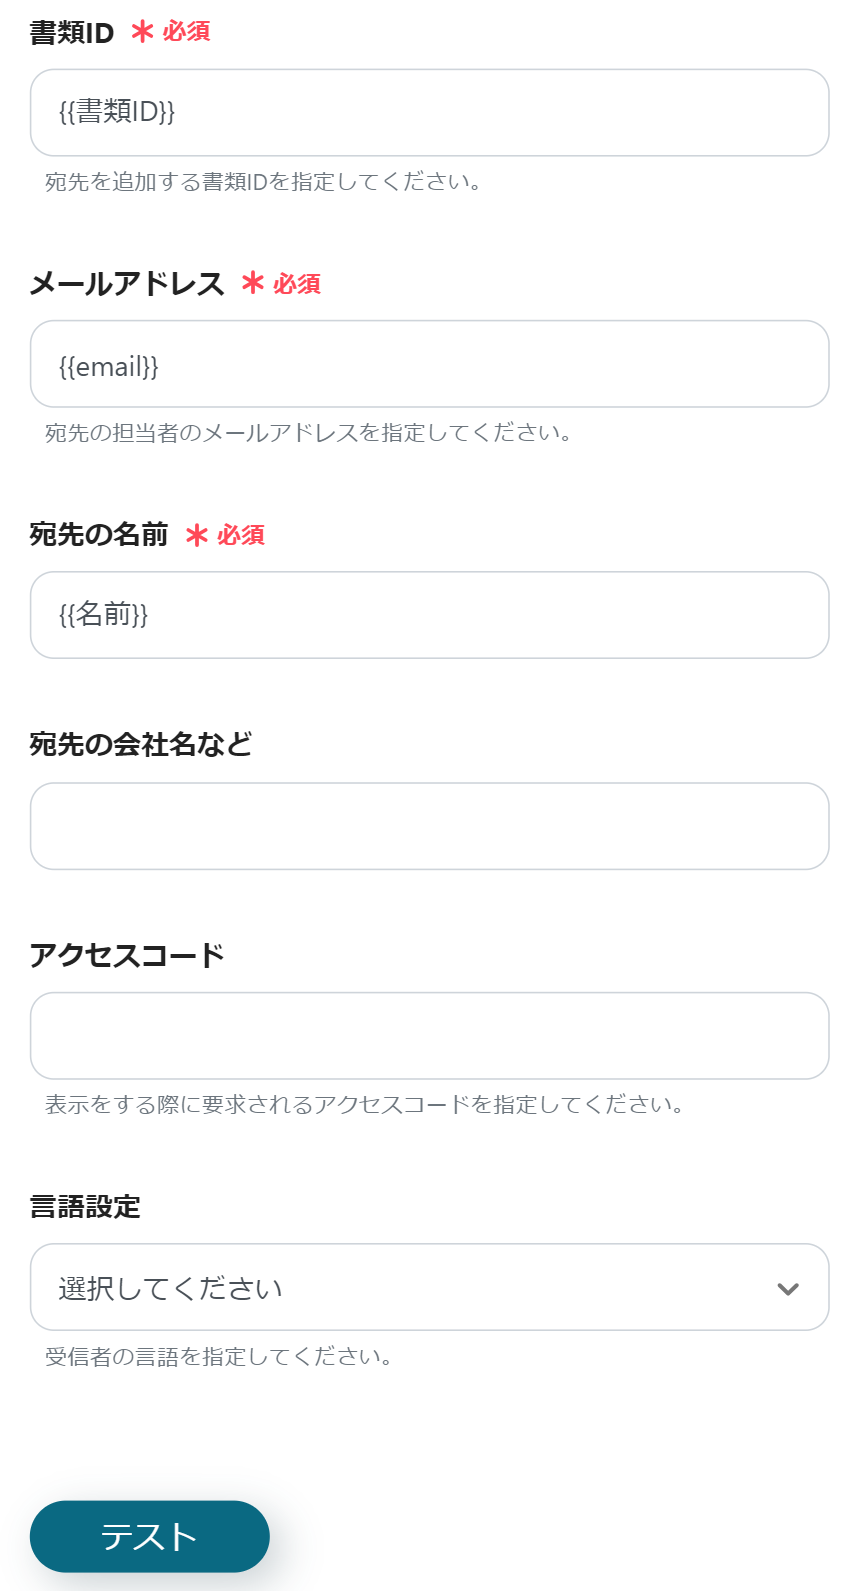
To set up adding a recipient in CloudSign, click on "Add Recipient". When the following screen is displayed, check the settings.
"Title" → Can be changed if necessary
"Account Information Linked with CloudSign" → Check for discrepancies
"Action" → Add Recipient
The following screen will be displayed, so check the settings.
"Document ID" → {{Document ID}}
"Email Address" → {{email}}
"Recipient Name" → {{Name}}
If there are any other necessary items, make the settings. Click "Test" → "Test Successful" → "Save".
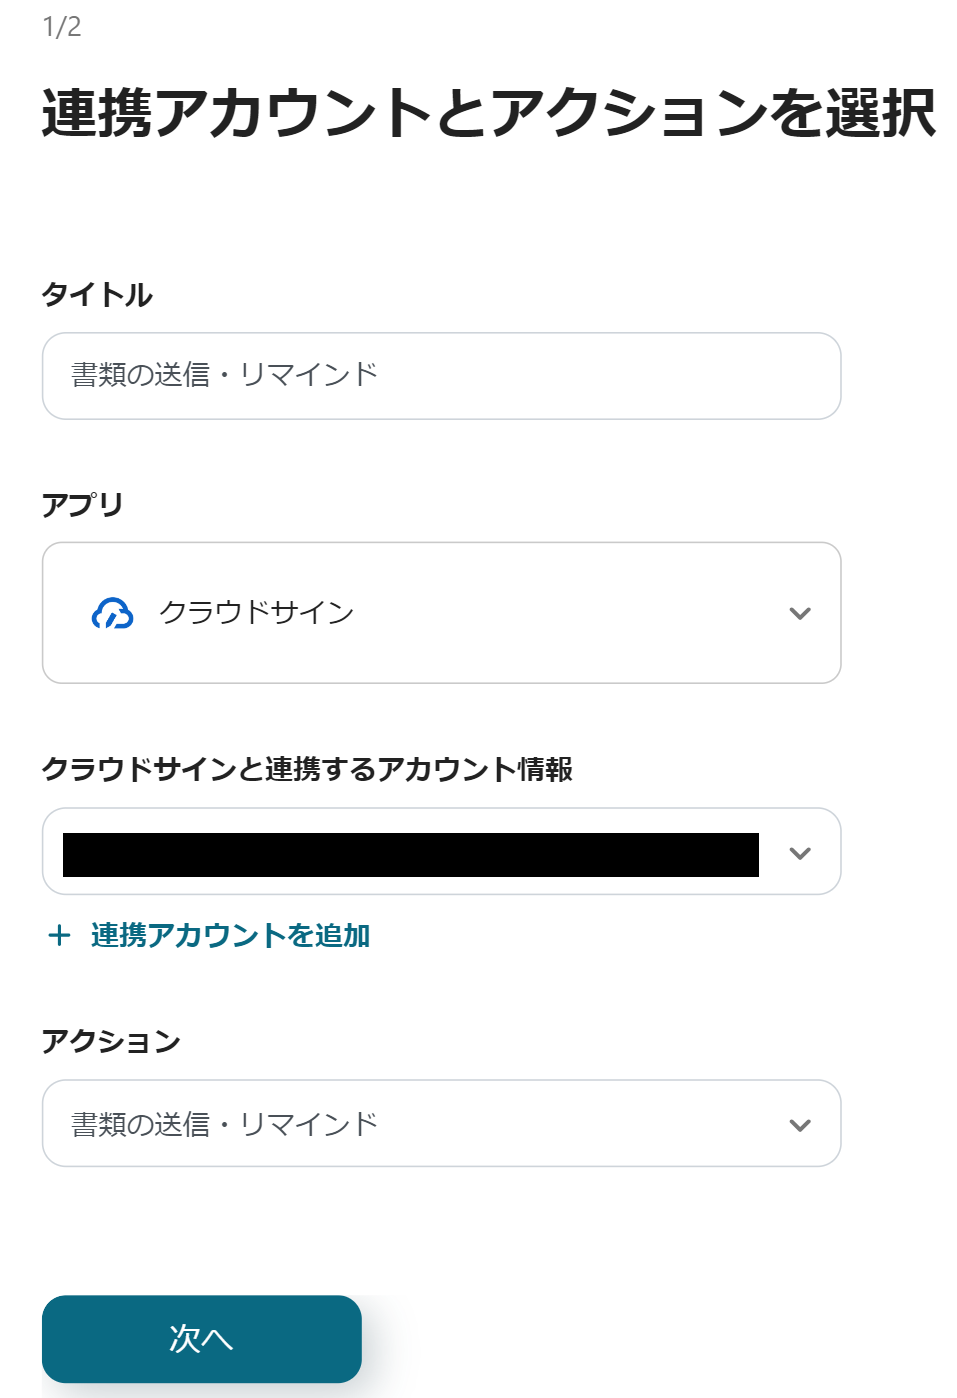
To set up sending and reminding documents, click on "Send/Remind Document". Check the following settings.
"Title" → Can be changed if necessary
"Account Information Linked with CloudSign" → Check for discrepancies
"Action" → Send/Remind Document
The following screen will be displayed, so check if the "Document ID" is {{Document ID}}. Click "Test" → "Test Successful" → "Save".
Finally, when you turn the app trigger "ON", the automation setup is complete.
Flowbot Template Used This Time
When a Mazrica project action (contract sending) is registered, create a contract and send it via CloudSign
Summary
By integrating Mazrica with CloudSign, the process from contract approval to automatic creation and sending is handled seamlessly. The introduction of automation significantly reduces the time previously spent on manual tasks. This is an ideal automation solution, especially for companies with a high volume of contracts or individuals managing multiple contracts simultaneously.
By implementing Yoom, you can easily achieve automation starting today. We recommend incorporating Yoom into your daily routine with this opportunity.
The person who wrote this article
m.wadazumi
I've been working as a writer since my job in child welfare, and I'm currently writing a blog on Yoom.
While being surprised by the work efficiency improvements that can be made with Yoom, I would like to share that excitement with everyone and contribute to society.
I'll tell you about application integration and automation that even I, who has zero programming knowledge, can do.
Conventional RPA can only automate simple repetitive tasks, and the setup process was very complicated. With “hyperautomation,” which combines various technologies such as AI, API, RPA, and OCR, it is possible to automate many tasks that could not be realized until now more easily than before.
Most tools simply connect one app to another, leaving the complex tasks to you. Yoom goes much further: From document creation and browser automation to OCR and generative AI, Yoom handles it all seamlessly in one platform.
Why settle for basic integrations? Streamline your entire workflow with Yoom’s powerful hyperautomation.


.avif)
.png)


