How to integrate Shopify with Airtable to add orders to Airtable when they occur in Shopify
How to Integrate Applications
・
2025-04-16
How to integrate Shopify with Airtable to add orders to Airtable when they occur in Shopify
k.ohshiro
When you receive a lot of emails every day, it can be quite a hassle to save files to Dropbox each time. Moreover, many people might have experienced the struggle of missing a file save or saving a file in the wrong folder, making it difficult to find later.
In this article, we will introduce a method to automatically save files received in Gmail to Dropbox!
By using no-code tools, you can easily set up automation between Gmail and Dropbox. You can start using it right away, so be sure to give it a try!
Recommended for
Those who want to automatically upload files attached to Gmail to Dropbox
Those who want to integrate Gmail and Dropbox to facilitate smooth file sharing within the team
Those who want to prevent the loss of attachments and ensure proper document storage
For those who want to try it immediately
In this article, we will introduce the integration method using the no-code tool "Yoom".
No complicated settings or operations are required, and even non-engineers can easily achieve it.
You can start right away using the template below, so please give it a try!
Many people use Airtable as their core database. It's a very convenient service because it has a wealth of data features and is easy to operate. Did you know that Airtable can be even more useful when integrated with Shopify? In this article, we will explain how to automatically add Shopify order information to Airtable using the no-code tool Yoom. It's recommended for those who run an e-commerce site on Shopify and want to centrally manage order information with Airtable. You can easily integrate without programming, so please refer to this article and try automatic integration with Yoom.
[What is Yoom]
Who we recommend this blog to
Those who run an online store on Shopify
Those who manually transfer Shopify order information to Airtable
Those who want to aggregate information in Airtable and centrally manage order information
Those who want to reduce input errors and missing information
Those who want to reduce clerical work and spend more time on other tasks
What issues can be solved by integrating Shopify and Airtable?
1. The effort required for input work
Manually entering order data from Shopify into Airtable can be time-consuming and labor-intensive. Especially if you handle various types of products and have a large number of orders, the workload increases significantly. By implementing the automatic integration described in this article, order data will be automatically added to Airtable, reducing the workload. The person in charge can effectively use the extra time for other tasks, which can lead to increased productivity.
2. Reduction of human errors
When managing a lot of information, the work can become complicated, increasing the risk of human errors. Have you ever experienced the following?
Mistaken the total amount of an order
Entered the wrong shipping address
Forgot to register information
Such mistakes can lower the reliability of information and may lead to company losses. By using the automatic integration described in this article, input work is automated, minimizing the occurrence of human errors. As a result, it becomes easier to maintain accurate data.
3. Optimization of inventory management
Manually transferring information from Shopify to Airtable can lead to time lags in reflecting information. This makes it difficult to check the latest information, making it challenging to replenish inventory at the right time or create optimal production plans. By utilizing the integration introduced here, you can link Shopify order information with Airtable inventory data, allowing you to quickly grasp inventory status and prevent stockouts or overstock. You can replenish products and create production plans at the right time, which may lead to cost reduction and maximization of sales opportunities.
Shopify and Airtable integration flow
※Important Notes ・Shopify is an app available only on some paid plans. Depending on the plan, the operation of the flow bot or data connect you set may result in errors, so please be careful. ・A 2-week free trial of the paid plan is available. During the free trial, you can use apps that are subject to restrictions.
Now, let's introduce how to actually integrate Shopify and Airtable. The flow introduced this time is "Add to Airtable when an order occurs in Shopify." The integration steps are as follows.
Set up the app trigger
Create a record
Yoom provides the above two steps as a template. You can create a flow bot more easily than creating from scratch, so first click the "Try it" button on the banner below to copy the template! Once the copy is complete, you can operate it from "My Projects" in the sidebar.
Integration of My App with Shopify and Airtable
After copying the template, register Shopify and Airtable in Yoom's My App as a preliminary step. If you have already registered, please proceed to "Step 1. Setting the App Trigger".
<Steps>
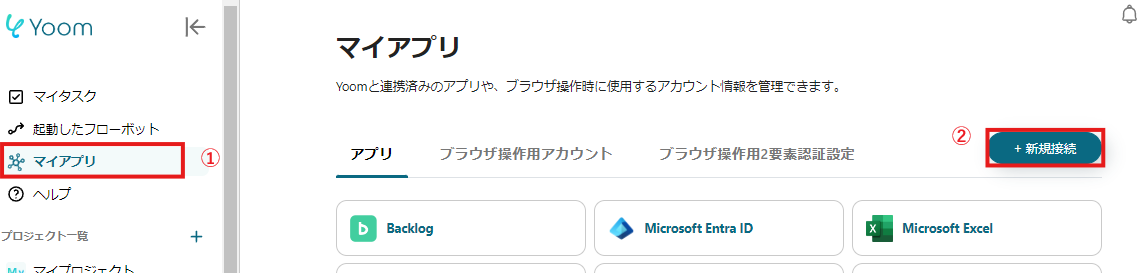
1. After logging into Yoom, click "My App" → "+ New Connection" in order
2. Search for the app name and enter the required information
If Shopify and Airtable are displayed in the My App list, you are ready! Let's proceed to the detailed settings right away!
Next, copy the template to My Project and create a Flowbot. If you haven't copied it yet, please copy the Flowbot template from below.
1. Hover over the banner and click "View Details" 2. Click "Try This Template" on the redirected page 3. Register with Yoom * If you are already registered, the login screen will be displayed, so please log in.
Step 1. Set Up App Trigger
First, click on the app trigger "When a new order is created".
On the first page, the pre-linked Shopify account information will be displayed, so please check it and click "Next" if there are no issues.
Next, set up the API connection in Shopify. Specify the "Trigger Interval" and "Subdomain" and check for errors in the test. * Please note that the time you can specify for the "Trigger Interval" varies depending on your plan. For details, please seehere.
If there are no issues up to this point, the trigger setup is complete by clicking "Save".
Step 2. Create a Record
Next, please click "Create a Record".
On the first page, the account information will be displayed as in Step 1, so if there are no issues, please click "Next".
On the second page, set up to create a record. Enter the "Base ID", "Table ID or Name", and "Field Information". Use the information output from Shopify to enter the values for "Field Information".
In the image above, it is set to register the order name, but if there are other values you want to add, select "Add Field Information".
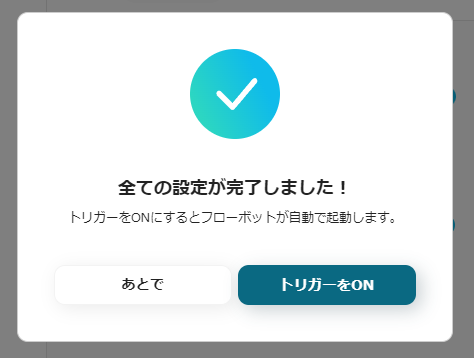
Click "Test" and if there are no errors, click "Save".
If a popup like the one below is displayed, all settings are complete.
Flowbot template used this time
Specific Use Cases for This Flow
1. Information Sharing with Other Teams
Airtable can also be utilized as a platform for sharing information with different teams. For example, if the marketing team checks information on Shopify but the sales team checks it on Airtable, this integration allows the sales team to access the latest information from Airtable. This can enhance information transparency and help avoid discrepancies in understanding between teams.
2. Enhancing Customer Support
With order information quickly reflected in Airtable, support staff can immediately grasp the accurate order status. This improves the speed and accuracy of handling inquiries, potentially increasing customer satisfaction. Higher customer satisfaction can lead to increased repeat rates, which may boost sales.
3. Report Creation
Airtable offers convenient features like filters and aggregation functions, allowing flexible analysis of daily sales and order data. With automatic integration, data is quickly reflected, enabling full utilization of Airtable's data functions for report creation. This can facilitate subsequent decision-making and lead to effective marketing strategies.
Other Automation Examples Using Shopify and Airtable
Yoom offers numerous automation examples using Shopify and Airtable. It is possible to integrate with various apps, so please refer to the following representative examples.
1. Register a Record in RakuRaku Sales When the Status is Updated in Airtable
If you are using RakuRaku Sales, try this integration. Records are automatically registered in RakuRaku Sales in conjunction with the status field in Airtable.
2. Update Shopify product information when kintone product information is updated
For those who use kintone regularly, please refer to the following template as well. Information from kintone will be automatically reflected in Shopify.
3. Create a folder in Google Drive when product information is created in Shopify
The flow introduced in this article was triggered by the occurrence of an order, but this integration triggers the creation of product information to automatically create a folder in Google Drive. For those who manually create folders for each product, this integration may help reduce the workload.
Summary
How was it? The above was the procedure for integrating Shopify with Airtable! By utilizing this automatic integration, not only can you reduce the workload, but it also helps in minimizing human errors. This ensures that accurate data is maintained, allowing subsequent operations to proceed smoothly. Depending on how you use it, you may be able to enjoy the benefits of this automatic integration in various scenarios, such as sharing information with other teams or creating reports.
If you are interested, please start by registering for free here!
The person who wrote this article
k.ohshiro
I've been working for SaaS companies as a customer success since I was a student.
I was working using multiple cloud services, and there were times when I thought it would be convenient if services could be linked more easily with each other.
Since apps can be linked without code with Yoom, anyone can easily set it up.
I would like to be able to convey the appeal of Yoom in an easy-to-understand manner and contribute to improving everyone's work efficiency!
Conventional RPA can only automate simple repetitive tasks, and the setup process was very complicated. With “hyperautomation,” which combines various technologies such as AI, API, RPA, and OCR, it is possible to automate many tasks that could not be realized until now more easily than before.
Most tools simply connect one app to another, leaving the complex tasks to you. Yoom goes much further: From document creation and browser automation to OCR and generative AI, Yoom handles it all seamlessly in one platform.
Why settle for basic integrations? Streamline your entire workflow with Yoom’s powerful hyperautomation.


.avif)
.png)
.png)
.avif)


