Why not stop manually creating folders for each client and introduce automation?
This will free you from the hassle of manually creating folders every time a client is registered.
Additionally, centralized data management becomes possible, reducing the time spent searching for data and improving operational efficiency.
This time, we will introduce a method to automatically create folders when a client is registered.
Recommended for
- Sales representatives who want to reduce the hassle of folder creation
- Those who want to reduce human errors and improve folder management accuracy
- Those who want to manage data uniformly for each client
Benefits and Examples of Integrating HubSpot and OneDrive
Benefit 1: Time-saving
One important aspect of streamlining operations is reducing working time.
For example, when a new client is registered in HubSpot, a dedicated folder for the client is automatically created in OneDrive.
This allows sales representatives to reduce the time spent on folder creation and data management.
As a result, an environment is created where they can focus on their primary task of sales activities.
Benefit 2: Centralized Customer Information Management
By integrating HubSpot and OneDrive, folder creation is automated, and customer information management is centralized.
This means that folders are automatically created for each client, making it easier to verify and manage unified folder data in HubSpot and OneDrive.
For instance, even when sales or support representatives need to verify necessary client data, it can be smoothly found as it is stored in OneDrive folders.
Moreover, centralized new client information may facilitate smooth communication with other departments.
Benefit 3: Minimizing Human Error
Automatically creating folders helps prevent manual operation errors associated with file management.
For example, when creating folders manually, there is a risk of inputting incorrect folder names or creating folders in the wrong location, but automation minimizes such errors.
Additionally, by integrating HubSpot and OneDrive, folders with names similar to the registered client data can be created, allowing for smooth data verification.
This ensures that the storage location for data is secured, allowing for safe data handling.
We will introduce the automation method using Yoom by integrating HubSpot and OneDrive.
[What is Yoom]
How to Create an Integration Flow between HubSpot and OneDrive
This time, we will introduce the setting method for the following template: "Create a folder for each client in OneDrive when a client is registered in HubSpot."
By using this template, there is no need to set up automation from scratch, which is convenient.
The integration flow is broadly created through the following processes:
- Register HubSpot and OneDrive as My Apps
- Copy the template
- Set the HubSpot trigger that serves as the starting point of the flow and configure the subsequent OneDrive operations
- Turn on the trigger button and verify the integration operation between HubSpot and OneDrive
If you are not using Yoom, please register for free on the official Yoom website [here](https://yoom.fun/members/sign_up?_gl=1*jrwzd7*_gcl_au*MTY3NDQ2MzE2MS4xNzE5MzgyMDY4*_ga*NTcxOTYyNzgyLjE3MTkzODIwNjg.*_ga_663H387CXM*MTcyMjQ4ODg2Ny4xNTEuMS4xNzIyNDkwMzk2LjYwLjAuNjYyMDU0NDY0). If you are already using Yoom, please log in.
**Step 1: Register HubSpot and OneDrive as My Apps**
Register HubSpot and OneDrive as My Apps to connect them to Yoom. Pre-registering My Apps will facilitate smooth automation settings.
First, register HubSpot as a My App. Click "My Apps" → "New Connection" on the left side of the Yoom screen.
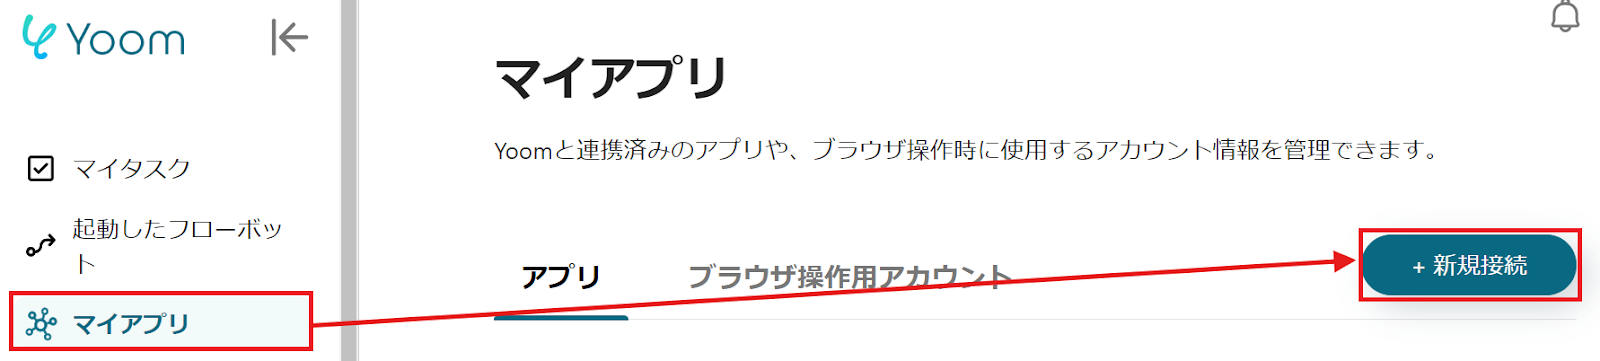
When the following screen appears, search for HubSpot using "Search by App Name" or find it from the app list.
The registration method for HubSpot as a My App is described on the [help page](https://intercom.help/yoom/ja/articles/5506345-hubspot%E3%81%AE%E3%83%9E%E3%82%A4%E3%82%A2%E3%83%97%E3%83%AA%E7%99%BB%E9%8C%B2%E6%96%B9%E6%B3%95), so please refer to it for registration.
Next, register OneDrive as a My App. Similarly, search for OneDrive from the app list or using "Search by App Name."
When the following screen appears, please sign in.
If HubSpot and OneDrive are displayed in My Apps, the My App registration is complete.
**Step 2: Copy the Template**
To set up automation, click "Try it" on the banner below.
Please check the screen display below and click "OK".
When the following screen is displayed, check the "Title" and "Description".
If you want to make changes, click on the relevant section to modify it.
First, to proceed from the HubSpot settings, click "When a new company is created".
Step 3: HubSpot trigger settings that serve as the starting point of the flow and the subsequent OneDrive operation settings. Check the settings when the following screen is displayed. "Title" → Can be changed as desired "HubSpot account information" → Verify that the account is correct "Trigger action" → When a new company is created When the following screen is displayed, set the "Trigger interval".
Choose from 5 minutes, 10 minutes, 15 minutes, 30 minutes, or 60 minutes.
*Note that the trigger interval varies depending on the plan.
Once the settings are complete, click "Test" → "Test successful" → "Save".
Next, to configure OneDrive, click "Create folder".
When the following screen is displayed, check the settings. "Title" → Can be changed as desired "HubSpot account information" → Verify that the account is correct "Action" → Create folder When the following screen is displayed, select the "Drive ID" from the red frame below.
You can select a candidate by clicking the input field.
Next, set the "Parent folder item ID" and "Parent folder name".
Scroll and set the "Folder name".
By using HubSpot's output to set the folder name, you can automatically create the folder name.
The output is displayed by clicking the arrow within the red frame.
Once the settings are complete, click "Test" → "Test successful" → "Save".
Step 4: Turn on the trigger button and verify the integration operation between HubSpot and OneDrive. Finally, click "Turn on trigger" to complete the automation settings.
Verify that the flow bot is operating correctly.
Here is the template used this time.
Other Automation Examples Using OneDrive
1. A flow that saves documents attached to a form in OneDrive and automatically sends emails via Gmail.
By automatically sending resumes and other documents attached to application forms via Gmail, sharing becomes easier.
Automatically saving to OneDrive can prevent the loss of documents.
2. This is a flow that automatically creates a folder in OneDrive when a page is created in the Notion database.
Every time you create a page in Notion, you save the effort of manually creating a folder.
By saving data from Notion to OneDrive, it becomes easier to organize the data.
3. This is a flow that automatically creates a folder in OneDrive at a specific schedule and sends a message linked to Slack.
It is an automation recommended for companies managing data using OneDrive.
Since the folder is automatically created in OneDrive at a set time, it saves the effort of manually creating folders.
Summary
By integrating HubSpot with OneDrive, folder creation for each client is automated, making file management easier.
This enables centralized data management, reducing human errors and saving time.
By reducing the workload, you can create an environment where you can focus on priority tasks.
Furthermore, by utilizing Yoom, which anyone can easily start using, you can implement it without specialized knowledge.
Take advantage of this integration to improve operational efficiency.