How to integrate kintone with HubSpot to add information registered in kintone to HubSpot
How to Integrate Applications
・
2024/10/11
How to integrate kintone with HubSpot to add information registered in kintone to HubSpot
n.watanabe
For those managing CRM data with kintone and organizing contact information with HubSpot, manual data updates can be time-consuming and burdensome. As a result, errors are more likely to occur, and there is a possibility of overlooking important information.
With Yoom, you can easily integrate kintone and HubSpot, automatically synchronizing data between the two tools to eliminate manual effort and ensure data consistency. No programming knowledge is required for app integration, so please refer to the flow creation guide.
Benefits of Integrating kintone and HubSpot
Benefit 1: Reduce Data Entry Errors and Improve Accuracy
By integrating kintone and HubSpot, data is automatically synchronized, reducing the likelihood of manual entry errors. As a result, sales representatives do not need to re-enter information into HubSpot, and the accurate data collected in kintone is directly reflected.
For example, when customer information is registered in kintone, it is automatically updated in HubSpot, allowing you to formulate sales strategies based on accurate information.
Benefit 2: Streamline Information Sharing Among Teams
Integrating kintone and HubSpot is expected to facilitate smooth information sharing among teams. New customer information added to HubSpot is automatically reflected in kintone, making it easier for the entire team to share the latest information. This can prevent information update omissions and lead to consistent responses across the team. Additionally, the integration can lead to follow-ups and proposals to customers, potentially increasing the success rate of deals and boosting sales.
[What is Yoom]
How to Create an Integration Flow Between kintone and HubSpot
Here, we will explain how to set up templates for kintone and HubSpot. This flow involves "adding information registered in kintone to HubSpot."
Integrate Yoom with kintone and HubSpot as My Apps
Set up an app trigger in kintone
Configure record retrieval in kintone
Set up contact creation in HubSpot
Including the My Apps integration as a preliminary step, the setup is completed in four steps. Of course, no complex programming knowledge is required! Copy the template from the "Try it" banner below and let's proceed with the setup together.
Step 1: Integrate kintone and HubSpot with My Apps
First, let's integrate Yoom with the apps we will use this time. After logging into Yoom, click "My Apps" on the left menu → "+ New Connection".
Search for kintone and HubSpot, and proceed with the input according to the displayed content. Since you need to log in to each app and obtain settings and information, please refer to the links below.
Once the integration is complete, it will appear in the My Apps list, so please check it.
Once you have confirmed HubSpot in the same way, the My Apps integration is complete.
Next, copy the template to My Project and create a Flow Bot. If you haven't copied it yet, please copy the Flow Bot template from below.
1. Hover over the banner and click "View Details" 2. Click "Try this template" on the redirected page 3. Register for Yoom * If you have already registered, the login screen will be displayed, so please log in.
Step 2: Set up an app trigger in kintone
Please click the first flow "Record has been registered". The account information of the kintone linked with My Apps is reflected on the first page.
If you are running multiple instances of the same template, change the title to something easy to understand. The trigger action cannot be changed, so after checking the account information, proceed to the next step.
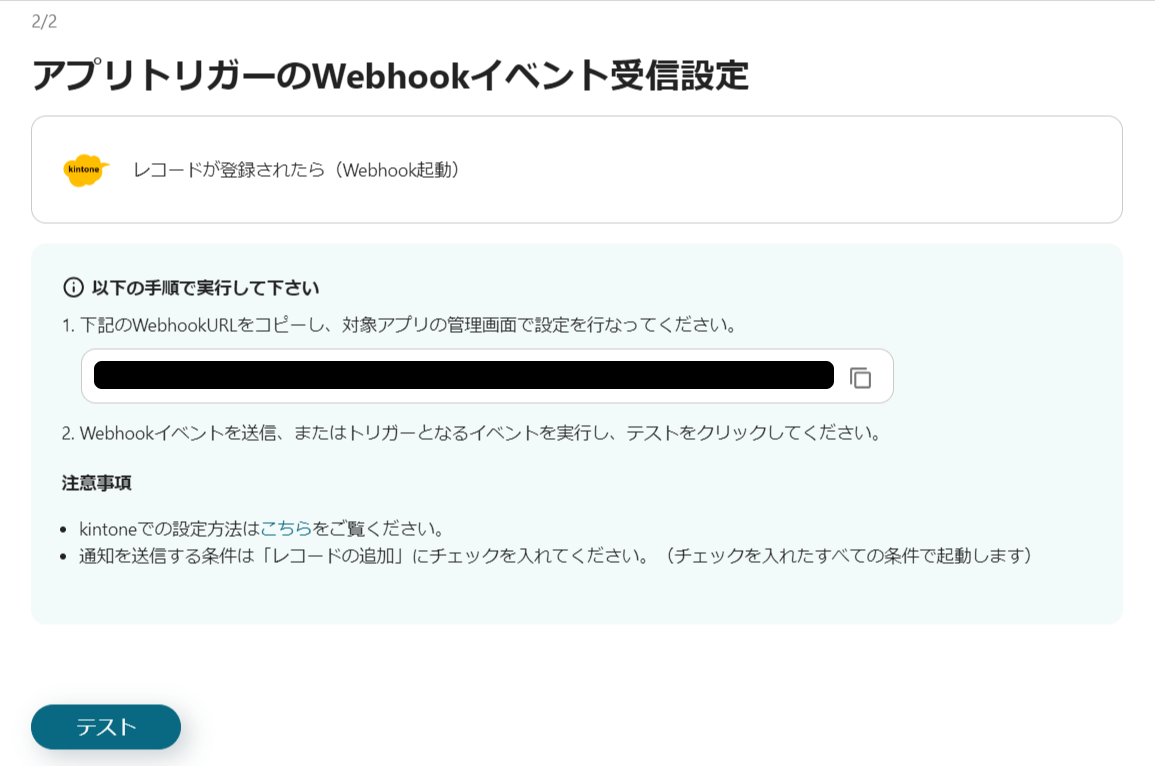
On the next page, set up the Webhook for the trigger activation.
Copy the displayed URL and set it on the kintone app settings page. Details are in the link below.
Once the setup is complete, click "Test" to obtain the output.
Confirm the output as it will be used in later settings, and click "Save". This completes the app trigger setup!
Step 3: Set up record retrieval in kintone
Next, click "Retrieve Record". Below the account information on the first page, a section for database linkage settings will appear.
Click the section, select the app ID from which you want to retrieve records, and click "Next".
On the next page, specify the location to retrieve the records.
Set it to retrieve the row where the record number matches the record ID. Click "Test" to obtain the output.
The output obtained here will be used in the next flow to create a contact. (The content obtained will vary depending on the specified app ID.
Confirm and click "Save" to complete Step 3.
Step 4: Set up contact creation in HubSpot
The final setup is "Create Contact". On the first page, as with kintone, only confirm the account information and proceed to the next step.
On the next page, make detailed settings to create a contact. In this setup, use the output obtained during the record retrieval setup.
Select the appropriate output for the input field and click "Test".
If the output of the contact ID created in HubSpot is obtained, click "Save" to complete the setup. Finally, turn on the trigger and run the flow.
Now, the information registered in kintone will be automatically reflected in HubSpot.
Other Automation Examples Using kintone and HubSpot
There are many other examples of automation using kintone and HubSpot available on Yoom, so let me introduce them.
1. When a form is submitted in HubSpot, you can store the information in HubSpot. This eliminates the need to switch between apps, and you can expect improved efficiency in data entry and management tasks.
2. In addition to kintone and HubSpot, you can also integrate with Google Chat. When a contact is added to HubSpot, the information is registered in kintone, and you can receive that information in Google Chat. For those who use Google Chat in their daily work, it becomes easier to confirm the addition of contacts.
Summary
By setting up the integration between kintone and HubSpot with Yoom, you can reduce complex tasks and improve operational efficiency. Even without programming knowledge, you can easily achieve integration by utilizing Yoom's no-code tools. Start by registering for Yoom for free and proceed with the setup using templates. Take the first step towards reducing complex tasks and making effective use of your time.
The person who wrote this article
n.watanabe
I have been an SEO writer for 5 years and have continued to write under the motto “easy to read” and “easy to convey.”
I want to bring the convenience of Yoom, which can be linked to apps without programming knowledge, to many people!
Conventional RPA can only automate simple repetitive tasks, and the setup process was very complicated. With “hyperautomation,” which combines various technologies such as AI, API, RPA, and OCR, it is possible to automate many tasks that could not be realized until now more easily than before.
Most tools simply connect one app to another, leaving the complex tasks to you. Yoom goes much further: From document creation and browser automation to OCR and generative AI, Yoom handles it all seamlessly in one platform.
Why settle for basic integrations? Streamline your entire workflow with Yoom’s powerful hyperautomation.


.avif)


.avif)
.avif)
.avif)


