How to integrate Money Forward Kakebarai with Airtable to automatically add to Airtable when an invoice is issued in Money Forward Kakebarai
How to Integrate Applications
・
2025-02-03
How to integrate Money Forward Kakebarai with Airtable to automatically add to Airtable when an invoice is issued in Money Forward Kakebarai
m.wadazumi
Are you spending too much time on invoice data entry in your daily tasks? This article introduces a method to automate invoice data entry by integrating Money Forward Kakebarai with Airtable. By implementing this automation, manual entry will no longer be necessary, improving the accuracy of information management. This time, we will explain in detail the benefits and setup method of integrating Money Forward Kakebarai with Airtable.
Benefits of Integrating Money Forward Kakebarai with Airtable
Benefit 1: Prevent Human Errors
Manually obtaining invoice information from Money Forward and registering it in Airtable is prone to human errors. However, by automating this process, you can save on registration effort and prevent duplicate entries and input mistakes. Typically, human errors require time for correction, but automation eliminates such double work. As a result, the accounting department can reduce working hours and focus on tasks such as invoice creation and payroll management.
Benefit 2: Enhance Information Management Accuracy
Integrating Money Forward Kakebarai with Airtable can improve the accuracy of information management. For example, by automatically registering invoices issued in Money Forward Kakebarai to Airtable, you can always keep your data up-to-date. This allows you to check invoices and customer information in real-time, which is expected to improve the efficiency of the person in charge. This automation is especially recommended for those managing client company information based on invoice data.
[What is Yoom]
How to Create a Workflow for Integrating Money Forward Kakebarai with Airtable
This time, we will introduce how to set up the following template: "Add to Airtable when invoice issuance is completed in Money Forward Kakebarai." By using this template, you don't need to set up automation from scratch, making it convenient.
The process consists of 6 steps and can be set up in 15-20 minutes.
Register Money Forward Kakebarai and Airtable as My Apps
Set a trigger to activate when invoice issuance is completed in Money Forward Kakebarai
Set an action to retrieve billing information in Money Forward Kakebarai
Set an action to retrieve customer information in Money Forward Kakebarai
Set an action to create a record in Airtable
Verify the automation between Money Forward Kakebarai and Airtable
If you are not using Yoom, please register for free here. If you are already using Yoom, please log in.
Step 1: Register Money Forward Kakebarai and Airtable as My Apps
Please register Money Forward Kakebarai and Airtable as My Apps in Yoom. Registering as My Apps will facilitate smooth automation settings.
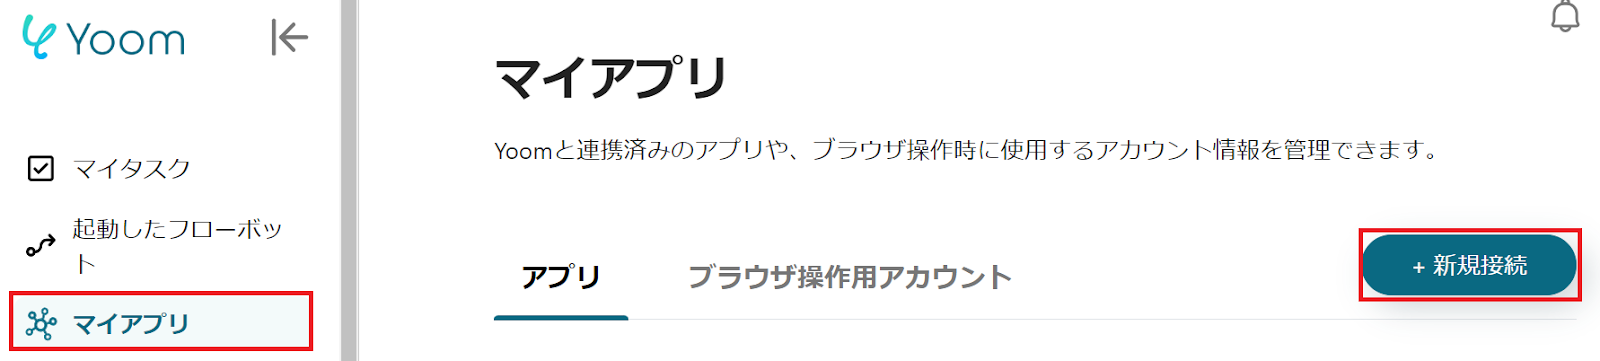
First, register Money Forward Kakebarai as My App. Click "My Apps" → "New Connection" on the left side of the Yoom screen. Find Money Forward Kakebarai from the app list or search for it using "Search by App Name".
The following screen will be displayed, so check the description and set the "Account Name" and "Access Token".
Next, register Airtable as My App. Refer to Yoom's help page for the registration method.
Once both My App registrations are complete, Money Forward Kakebarai and Airtable will be displayed.
Step 2: Set a Trigger to Activate When Invoice Issuance is Completed in Money Forward Kakebarai
To set up automation, click "Try it" on the banner below.
Read the following screen display and click "OK".
When the following screen is displayed, please check the "Title" and "Description". If you need to make changes, you can do so from the following page. To set up Money Forward Deferred Payment, click "When the invoice is issued".
The following screen will be displayed, so check the settings.
"Title" → Can be freely changed
"Account information linked with Money Forward Deferred Payment" → Check for discrepancies
"Trigger Action" → When the invoice is issued
When the following screen is displayed, click the red frame to copy the Webhook URL. Move to the Money Forward Deferred Payment screen and set it according to the precautions. After setting, click "Test" → "Test Successful" → "Save".
Step 3: Set up an action to obtain billing information in Money Forward Deferred Payment
Next, to set up obtaining billing information in Money Forward Deferred Payment, click "Obtain Billing Information". When the following screen is displayed, check the settings.
"Title" → Can be freely changed
"Account information linked with Money Forward Deferred Payment" → Check for discrepancies
"Action" → Obtain billing information
The following screen will be displayed, so set the "Invoice ID" using the output from "When the invoice is issued". Click the arrow in the red frame to use the output.
Scroll down and set "Switch to Sandbox Environment". After setting, click "Test" → "Test Successful" → "Save".
Step 4: Set up an action to obtain customer information in Money Forward Deferred Payment
Next, to set up obtaining customer information in Money Forward Deferred Payment, click "Obtain Customer Information". When the following screen is displayed, check the settings.
"Title" → Can be freely changed
"Account information linked with Money Forward Deferred Payment" → Check for discrepancies
"Action" → Obtain customer information
The following screen will be displayed, so check the precautions.
The following screen will be displayed, so proceed with the settings.
"Customer ID" → {{Customer ID}} Select from the output of "Obtain Billing Information".
"Switch to Sandbox Environment" → Switch to Sandbox Environment
After setting, click "Test" → "Test Successful" → "Save".
Step 5: Set up an action to create a record in Airtable
Next, to set up Airtable, click "Create Record". When the following screen is displayed, check the settings.
"Title" → Can be freely changed
"Account information linked with Airtable" → Check for discrepancies
"Action" → Create Record
The following screen will be displayed, so check the precautions.
When the following screen is displayed, proceed with the settings.
"Base ID", "Table ID or Name" → Check the description and set
Scroll down and set the "Field Information". Values are already set, but please set the Money Forward Deferred Payment information you want to check in Airtable as desired.
"Field Name" → Set to match the "Value"
"Value" → Use the output from Money Forward Deferred Payment * Click the arrow in the red frame to use the output from Money Forward Deferred Payment.
Once all settings are complete, click "Test" → "Test Successful" → "Save".
Step 6: Verify the automation operation between Money Forward Deferred Payment and Airtable
Finally, click "Turn ON Trigger" to complete the automation setup. Check if the flowbot is working correctly.
Other examples of automation using Money Forward Deferred Payment and Airtable
1. This is a flow that automatically adds to Airtable when the credit limit review is completed in Money Forward Deferred Payment. You no longer need to manually enter the review results from Money Forward Deferred Payment into Airtable. Automatic updating of review results also prevents human errors.
2. This is a flow that automatically notifies Microsoft Teams once the invoice issuance for Money Forward deferred payment is completed. Since you can notify Microsoft Teams of the invoice information for Money Forward deferred payment, it becomes easier to verify the data. By specifying the notification destination, information sharing can be easily conducted.
3. This is a flow to automatically reflect the list of unpaid invoices in Money Forward Kakebarai onto a Google Spreadsheet. You can retrieve the list of unpaid invoices at a specified date and time and automatically add it to a Google Spreadsheet. This allows you to grasp the status of unpaid invoices and respond quickly.
Summary
In this article, we introduced how to automate the registration of invoice information by integrating Money Forward Kakebarai with Airtable. This automation saves the hassle of manual registration, preventing duplicate entries and input errors. As a result, you can expect improved work efficiency and data management accuracy.
Additionally, app integration using Yoom is recommended as it can be done easily without any coding. If you're interested, please try it out by signing up for free here.
The person who wrote this article
m.wadazumi
I've been working as a writer since my job in child welfare, and I'm currently writing a blog on Yoom.
While being surprised by the work efficiency improvements that can be made with Yoom, I would like to share that excitement with everyone and contribute to society.
I'll tell you about application integration and automation that even I, who has zero programming knowledge, can do.
Conventional RPA can only automate simple repetitive tasks, and the setup process was very complicated. With “hyperautomation,” which combines various technologies such as AI, API, RPA, and OCR, it is possible to automate many tasks that could not be realized until now more easily than before.
Most tools simply connect one app to another, leaving the complex tasks to you. Yoom goes much further: From document creation and browser automation to OCR and generative AI, Yoom handles it all seamlessly in one platform.
Why settle for basic integrations? Streamline your entire workflow with Yoom’s powerful hyperautomation.


.avif)
.avif)

.png)


