マネーフォワード 掛け払いとkintoneの連携イメージ
How to Integrate Applications

2024/10/09

How to integrate Money Forward Kakebarai with kintone and add it to kintone once the invoice issuance is completed in Money Forward Kakebarai

k.hieda

Money Forward Postpay is utilized by many companies for its smooth credit screening and comprehensive management functions for invoice issuance and collection. By integrating this service with kintone, issued invoice information is automatically added, allowing you to utilize the latest data. In traditional manual operations, data entry errors and delays in addition were challenges, but by using the flowbot template developed by our company, these challenges are alleviated, and operations proceed smoothly. No programming is required, and we also provide an explanation of the setup method, so please read to the end.

Two Benefits of Integrating Money Forward Postpay with kintone

This time, we will consider how this automation can be beneficial from the perspective of the accounting team and auditors.

Benefit 1: Information is Centrally Managed, Streamlining Accounting Operations

kintone excels in information sharing with teams other than accounting (such as sales and management departments). By transcribing to kintone, not only the accounting team but also other teams can check the invoice issuance status in real-time, facilitating smooth information sharing across the entire team. As a result, the accounting department no longer needs to double-check or manually verify, significantly improving the accuracy and efficiency of operations.

Benefit 2: Streamlining Audit Response

To ensure smooth audit responses, it is important to have accurate and up-to-date data. By automatically aggregating data in kintone, you can quickly verify whether invoice issuance and payment processing are being conducted properly. Automated data is consistent, reducing the burden on the accounting department and auditors to manually check, and the entire audit process proceeds efficiently. Especially for companies with frequent audits, significant time and labor savings can be expected.

[About Yoom]

From here, we will explain how to create automation using Yoom's template to add to kintone once invoice issuance is completed with Money Forward Postpay.

Try it with the free plan! Please proceed to register first ♪

Register for free on Yoom

How to Create the Integration Flow of Money Forward Postpay and kintone

Things to Prepare in Advance

We will introduce the items needed during the integration work.

Money Forward Postpay

  • Login information (used for operations on Money Forward Postpay)
  • Access token (API key obtainable on Money Forward Postpay)
    • Click on the account name from the list of menus on the left side of the Money Forward Postpay management screen! Hover over "For Developers" to display "API Key" and click on it.
  • You will be redirected to the API key issuance page. Click "New Issue" at the top right to issue an API key.
  • Please save the API key as it will be used for My App registration.

kintone

  • Subdomain
  • Client ID
  • Client Secret

How to obtain each: >How to Register kintone My App

  • App to add information
    • It is smooth to create a table in advance with reference to the obtainable output.

Step 1: Register My App

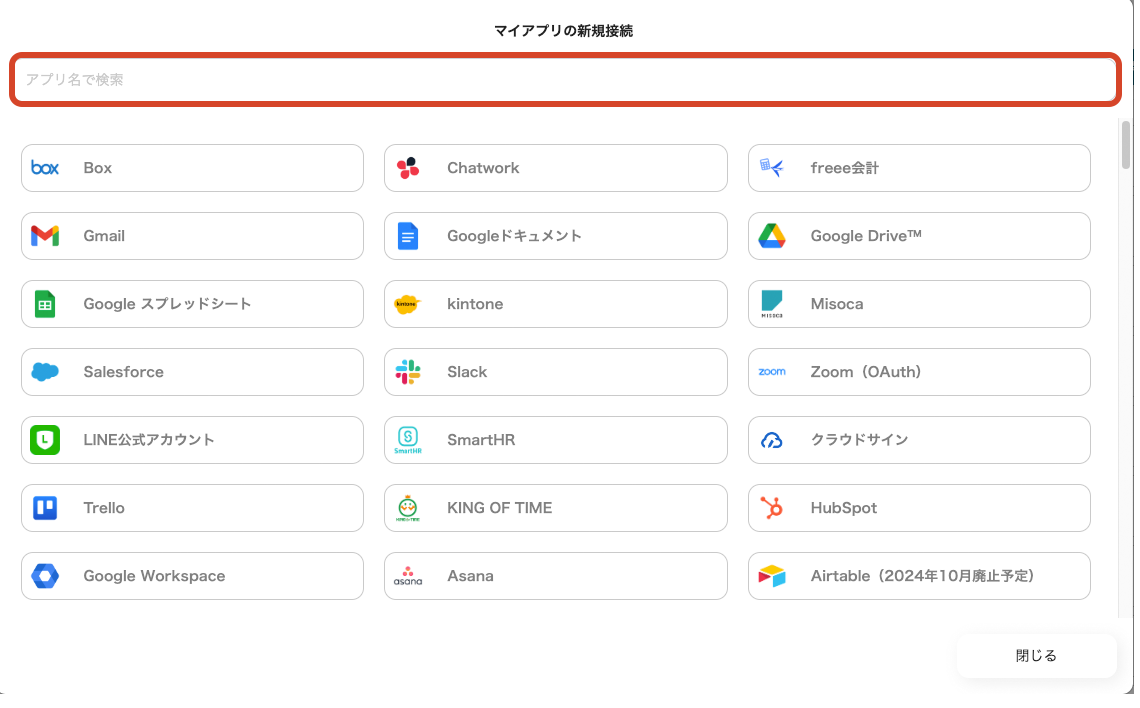
First, register the app to be integrated with Yoom. Log in to the Yoom workspace and click the new connection button from My Apps in the menu bar.

A list of apps that can be connected with Yoom will be displayed. Search for the app to be connected this time from the search window at the top and proceed with My App registration.

Money Forward Postpay

Search for "Money Forward Postpay" and click on the app name that hits. This screen will be displayed.

Enter the email address and password to be integrated from the next screen.

  • Account name
    • Arbitrary name (such as email address)
  • Access token
    • Paste the API key obtained in advance preparation.

Once you press add, the integration is complete.

kintone

Search for "kintone" and click on the app name that hits. Once this screen is displayed, please enter the subdomain, client ID, and client secret.

How to obtain each: >How to Register kintone My App

Main causes and solutions for not being able to register kintone My App: >Help Page

Once you press the add button, My App registration is complete.

Step 2: Copy Yoom's Template to My Project

Click this banner. The template will be copied to "My Project" in the Yoom workspace.

The template will be copied to my project.

Click on the title within the red frame to navigate to the settings screen.

Step 3: App Trigger "When Invoice Issuance is Completed"

Click on the first process. When the credit limit review is completed with Money Forward Kakebarai, the flow bot is activated, and the output is extracted.

(1/2) Select Linked Account and Action

The following is pre-configured, so no operation is required.

  • Title
  • Database App
  • Account information linked with Money Forward Kakebarai
  • Execution Action

→ Click Next

(2/2) API Connection Settings

Copy the Webhook URL. From here, configure the settings in the Money Forward Kakebarai management screen.

Click on the account name from the Money Forward Kakebarai menu. Another menu will appear, hover over "For Developers" to display Webhook, then click on it.

Click on "New Endpoint" at the top right.

  • URL
    • Paste the Webhook URL copied from the Yoom screen into the URL field.
  • Secret
    • Enter a 10-character string combining uppercase, lowercase letters, and numbers as desired.
  • Event Type
    • Check the box for Preliminary Review.

→ Click Add

Once added, a list of endpoints will be displayed, and the newly added endpoint will be at the top, so click on it.

Click on "Test Send" at the top right.

Select "Invoice Issuance" and click Send. This will be a test trigger. Alternatively, issuing an actual invoice will serve as a trigger. Return to the Yoom screen,

→ Click Test → Success. The output extracted includes the results of the credit limit review.

→ Click Save

Step 4: Integrate with App "Retrieve Billing Information"

Extract detailed billing information using the billing ID.

(1/2) Select Linked Account and Action

Pre-configured, so no operation is required.

→ Click Next

(2/2) API Connection Settings

  • Billing ID
    • Pre-configured with the reference code, so no operation is required.
  • Switch to Sandbox
    • Select "Switch to Sandbox Environment".

→ Click Test. → Success. Detailed billing information has been extracted into the output.

→ Click Save

Step 5: Integrate with App "Retrieve Customer Information"

Here, extract detailed customer information using the customer ID.

(1/2) Select Linked Account and Action

Pre-configured, so no operation is required.

→ Click Next

(2/2) API Connection Settings

  • Customer ID
    • Pre-configured with the reference code, so no operation is required.
  • Switch to Sandbox
    • Select "Switch to Sandbox Environment".

→ Click Test! → Success. The following items have been extracted into the output.

→ Click Save!

Step 6: Integrate Database "Add Record"

Click on the fourth process of the template. Set the information to be added to kintone.

(1/2) Database Integration

The following is pre-configured.

  • Title
  • Database App
  • Account information linked with kintone
  • Execution Action

◆ Database Integration

Proceed to Database Integration at the bottom of the same screen.

  • Click on the edit field to open a dropdown. App candidates will be displayed, and selecting one will automatically quote the ID.

→ Click Next!

(2/2) Detailed Database Operation Settings

Link the columns of the app to which records are added with the output extracted by Money Forward Kakebarai.

The headers of the linked sheet will be extracted.

Click on the edit field to open a dropdown, and the previously extracted output will be displayed as a candidate. Selecting it will automatically embed the reference code.

→ Click Test → Success

→ Click Save!

Step 6: Turn App Trigger [ON]

Once all processes are configured, a completion screen will pop up.

Turning the App Trigger [ON] completes the setup.

This completes the integration work! Integration was achieved in a short time without using programming. Here is the template used this time.

Make More Use of It! Money Forward Postpay and kintone: 3 Other Automation Selections

Money Forward Postpay and kintone have developed many other templates that can be automated.

1. Automatically Add Credit Screening Results from Money Forward Postpay

Once the credit screening is completed with Money Forward Postpay, the results are automatically added to kintone. This eliminates the need for manual input, allowing accurate information to be shared in real-time, thereby streamlining operations.

2. Automatically Reflect Billing Information for Subsequent Days in kintone

The list of bills for subsequent days in Money Forward Kakebarai is automatically added to kintone. This prevents manual transcription errors and delays in information updates, making billing management easier.

3. Automatically Reflect Unpaid Invoice Information in kintone

Unpaid invoice information is automatically reflected in kintone from Money Forward Kakebarai. This prevents manual input errors and omissions, enabling prompt reminders and responses.

Summary

With this automated flow bot, you can achieve a system where invoice data issued by Money Forward Kakebarai is automatically transferred to kintone. This significantly reduces the risk of data entry errors and the manual verification workload for the accounting department, potentially improving the efficiency and accuracy of operations. Additionally, real-time data sharing facilitates smooth audit responses and strengthens team-wide collaboration. Please take advantage of this solution to reduce the burden of accounting tasks and enhance overall productivity with simple, no-programming-required settings.

See you again!

The person who wrote this article
k.hieda
10 years as a web planner and director. When I worked for a web production company, my main focus was on proposing modifications and operation plans to clients and proceeding with production. I'm currently a parallel worker. We produce blogs in Yoom's content division, and receive external public relations projects for companies in our individual business. Since we are starting a private lodging, we aim to thoroughly improve the efficiency of routine work!
Tags
Money Forward Kakebarai
kintone
Integration
Automatic
Automation
App integration
No items found.
What is Yoom hyperautomation?
Conventional RPA can only automate simple repetitive tasks, and the setup process was very complicated.
With “hyperautomation,” which combines various technologies such as AI, API, RPA, and OCR, it is possible to automate many tasks that could not be realized until now more easily than before.
Don't Just Connect Apps—Automate Everything
Most tools simply connect one app to another, leaving the complex tasks to you. Yoom goes much further: From document creation and browser automation to OCR and generative AI, Yoom handles it all seamlessly in one platform.

Why settle for basic integrations? Streamline your entire workflow with Yoom’s powerful hyperautomation.
Learn more about Yoom
Helpful Materials
I understand Yoom! 3-piece set of materials
Download materials
Understand in 3 minutes! Yoom service introduction materials
Download materials
Find out by Before After! Yoom Case Study Collection
Download materials
See a list of useful materials