How to integrate ovice and KING OF TIME to clock in on KING OF TIME when entering an ovice space
How to Integrate Applications
・
2024/12/13
How to integrate ovice and KING OF TIME to clock in on KING OF TIME when entering an ovice space
m.wadazumi
Would you like to manage attendance more efficiently? Try implementing automation that triggers clock-in on KING OF TIME when entering an ovice space. This automation not only saves the manual clock-in effort but also allows for more accurate attendance management. Additionally, administrators handling payroll can proceed with their tasks smoothly without needing to instruct corrections.
Recommended for
Those using ovice and KING OF TIME who want to streamline attendance management
Those aiming for accurate attendance management
Those who want to automate attendance management to reduce employee burden
Benefits and Examples of Integrating ovice and KING OF TIME
Benefit 1: Reduce the effort of clocking in
By simply entering ovice upon arrival, clocking in on KING OF TIME can be automated, eliminating the need for manual clocking. For example, in a remote work environment, reducing the clock-in effort can allow for a smoother start to work. This way, employees can enter ovice without having to launch KING OF TIME to clock in, reducing their burden. Additionally, administrators can spend less time verifying attendance, allowing them to focus on other tasks.
Benefit 2: Reduce the risk of missed clock-ins
When employees manually clock in, there is a higher chance of forgetting or making input errors. However, by integrating and automating ovice and KING OF TIME, such errors can be reduced. For instance, even if an employee forgets to clock in on KING OF TIME after entering an ovice space, it won't be an issue. This makes clock-in management easier, allowing administrators to accurately track working hours. Moreover, it becomes clear when employees start their work, enhancing transparency in operations.
Benefit 3: Accurately manage attendance
By using the entry into an ovice space as a trigger to automate clocking in on KING OF TIME, human errors from manual clocking can be prevented. For example, since the entry time into ovice becomes the clock-in time on KING OF TIME, the risk of registering the wrong clock-in time can be avoided. This automation helps prevent errors in clock-in registration, which is beneficial for resolving discrepancies during payroll calculations. Additionally, avoiding human errors means there's no need for attendance corrections, saving time on adjustments.
Now, let's explain how to use the no-code tool Yoom to "clock in on KING OF TIME when entering a space in ovice."
[What is Yoom]
How to Create an Integration Flow between ovice and KING OF TIME
Automation can be achieved by receiving the entry into an ovice space via API and using KING OF TIME's API to clock in. Generally, programming knowledge is required to achieve this, but with the no-code tool Yoom, it can be easily accomplished without programming knowledge.
The integration flow is broadly created through the following processes:
Register ovice and KING OF TIME as My Apps
Copy the template
Set the ovice trigger as the starting point of the flow and configure the subsequent KING OF TIME operations
Turn on the trigger button and verify the integration operation between ovice and KING OF TIME
If you haven't used Yoom yet, please register for free here. If you are already using Yoom, please log in.
Step 1: Register ovice and KING OF TIME as My Apps
Let's register ovice and KING OF TIME as My Apps in Yoom. By registering My Apps in advance, the automation settings will be smoother.
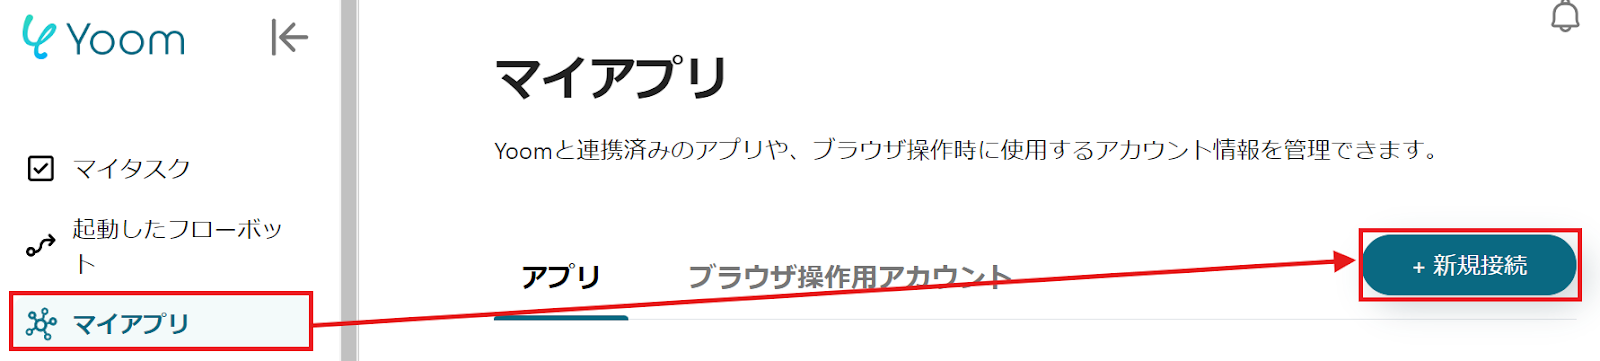
First, register ovice as a My App. Click "My Apps" → "New Connection" on the left side of the Yoom screen. A list of apps will be displayed, so search for ovice or use the search bar.
The following screen will be displayed, so set the "Account Name," "Access Token," and "Client ID." Check here to obtain the Client Secret and Client ID.
Next, register KING OF TIME as a My App. Search for KING OF TIME in the search bar or find it from the list as before. When the following screen is displayed, set the "Account Name" and "Access Token." For detailed settings, check here.
Once both My Apps are registered, ovice and KING OF TIME will be displayed in My Apps.
Step 2: Copy the Template
To set up automation, click "Try it" on the banner below.
Read the following screen display and click "OK".
The following screen will be displayed, so check the "Title" and "Description". If you want to make changes, please do so on the following screen. First, to set up ovice, click "When Webhook is received (Online)".
Step 3: Set up the ovice trigger that initiates the flow and the subsequent KING OF TIME operation
When the following screen is displayed, check the settings.
"Title" → Can be changed as desired
"Account information linked with ovice" → Check if correct
"Trigger Action" → When Webhook is received
The following screen will be displayed, so click within the red frame to copy the Webhook URL. Set up the Webhook in the ovice management screen. You can check the types of ovice triggers here. Set the value in the red frame at the bottom in the post data section. Send a Webhook event or execute the trigger event and click "Test" → "Test Successful" → "Save".
Next, to set up to retrieve one record that matches the conditions from the specified table in Yoom, click "Retrieve Record (Employee Identification Key)". When the following screen is displayed, check the settings.
"Title" → Can be changed as desired
"Database App" → Yoom
"Execution Action" → Retrieve Record
Pre-store employee list data in the Yoom database. If already saved, select the project where it is stored from the project list on the left side of the Yoom screen and check if the data is saved. If creating new, create a project from the "+" next to the project list and click "Database" to create an employee list.
This time, we will use the following database as an example.
Return to the "Retrieve Record (Employee Identification Key)" screen and set up "Database Integration". Select the "Project", "Database", and "Table" of the data saved earlier.
The following screen will be displayed, so set the "Conditions for the record you want to retrieve". This time, we will use the email address to retrieve the record. Use the ovice output to set it up as follows. The output can be displayed by clicking the arrow in the red frame. Once the setup is complete, click "Test" → "Test Successful" → "Save".
Next, to set up extracting data from text, click "Extract Data from Text (Timestamp Date & Time)". ※AI operations are features available in some paid plans. In other plans, the operation of the flow bot set will result in an error, so please be careful. A 2-week free trial of the paid plan is available. During the free trial, you can use restricted apps and AI features (operations).
When the following screen is displayed, check the settings.
"Title" → Can be changed as desired
"Conversion Type" → Extract text from data within 3,500 characters (2 tasks)
Check the following precautions.
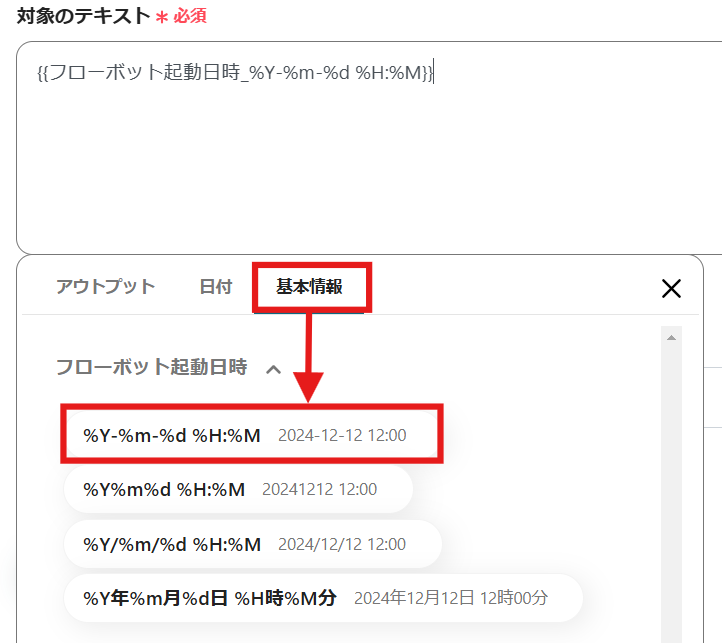
Next, set the "Target Text". Click in the order of "Basic Information" → "Flow Bot Activation Date and Time" → "%Y-%m-%d %H:%M".
Scroll and set the "Items to Extract". Since we are extracting the date and time, set it as follows. Once the setup is complete, click "Test" → "Test Successful" → "Save".
Next, to set up KING OF TIME, click "Register Timestamp Data (Clock-in)". When the following screen is displayed, check the settings.
"Title" → Can be changed as desired
"Account information linked with KING OF TIME" → Check if correct
"Action" → Register Timestamp Data
The following screen will be displayed, so set the "Employee Identification Key". Use the output from "Retrieve Record (Employee Identification Key)" to set it. Set it as follows.
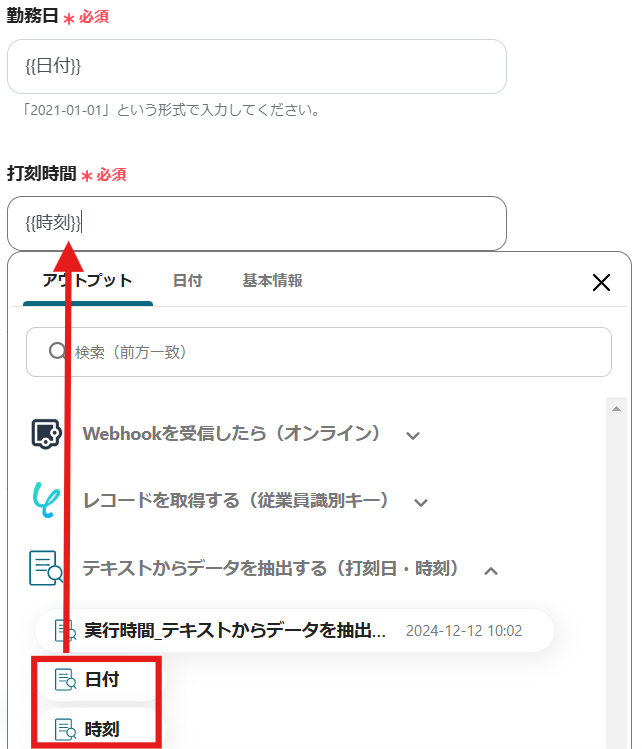
Scroll and set "Work Date" and "Timestamp". Use the output from "Extract Data from Text (Timestamp Date & Time)" to set it. Set "Timestamp Type Code" as clock-in. If there are other necessary items, set them and click "Test" → "Test Successful" → "Save".
Step 4: Turn on the trigger button and check the integration operation of ovice and KING OF TIME
Finally, click "Turn on Trigger" to complete the automation setup. Check if the flow bot is operating normally.
Here is the template used this time.
Other Automation Examples Using ovice and KING OF TIME
1. This is a flow where you automatically clock out in KING OF TIME when you leave a space in ovice. Contrary to this template, you can also automatically clock out when leaving. This eliminates the need for manual clocking and helps prevent human errors.
This is a flow that automatically notifies Microsoft Teams when entering or leaving 2.ovice. Notifications of entering and leaving are sent to Microsoft Teams, making it easier to manage and confirm attendance. Notifications to Microsoft Teams are no longer needed each time you enter or leave, saving effort.
3. This is a flow that automatically adds the previous month's attendance information from KING OF TIME to a Google Spreadsheet every month. It is an automation recommended for those who manage attendance data with Google Spreadsheets. It eliminates the need for manual input, reducing the burden on the person in charge.
Summary
The automation of KING OF TIME attendance stamping triggered by entering ovice significantly reduces the effort of stamping. Especially in a remote environment, there is no need to launch KING OF TIME for stamping, allowing work to proceed quickly. Additionally, it eliminates missed or incorrect stamps, enabling accurate attendance management, which is a significant advantage. As a result, it reduces the burden on employees and shortens the time administrators spend checking attendance, contributing to improved transparency in operations.
Please consider utilizing Yoom's automation for attendance management to aim for improved efficiency.
The person who wrote this article
m.wadazumi
I've been working as a writer since my job in child welfare, and I'm currently writing a blog on Yoom.
While being surprised by the work efficiency improvements that can be made with Yoom, I would like to share that excitement with everyone and contribute to society.
I'll tell you about application integration and automation that even I, who has zero programming knowledge, can do.
Conventional RPA can only automate simple repetitive tasks, and the setup process was very complicated. With “hyperautomation,” which combines various technologies such as AI, API, RPA, and OCR, it is possible to automate many tasks that could not be realized until now more easily than before.
Most tools simply connect one app to another, leaving the complex tasks to you. Yoom goes much further: From document creation and browser automation to OCR and generative AI, Yoom handles it all seamlessly in one platform.
Why settle for basic integrations? Streamline your entire workflow with Yoom’s powerful hyperautomation.


.avif)


.avif)


.avif)


