楽楽販売とDocusignの連携イメージ
How to Integrate Applications

2024/08/08

How to integrate Raku-Raku Sales with Docusign to create contracts based on Raku-Raku Sales information and send them via Docusign

a.ohta

If you are in a sales or management position where you frequently create contracts, don't you wish "it would be great if contract creation and sending could be automated..."?
Contracts are extremely important documents and are indispensable in business transactions.

However, if you have to manually create and send contracts frequently, it requires a considerable amount of effort. Additionally, since these documents must be error-free, checking them can take time.

However, with Yoom, it is possible to automate everything from contract creation to sending without any code!
This time, we will introduce how to automate the flow from contract creation to sending by integrating Raku-Raku Sales and DocuSign!

Benefits of Integrating Raku-Raku Sales and DocuSign

1. Automatically create and send contracts!
If you manage customer information and contract status with Raku-Raku Sales, you can obtain that information with DocuSign to create and send contracts!
This is expected to reduce the workload of sales and management positions responsible for contract decisions.

2. Time-saving through automatic online completion
When exchanging contracts, it is necessary to detail the other party's information and contract details, which takes time to create and check.
Furthermore, there is a waiting time for sending the completed document to the other party and waiting for their signature, which tends to strain resources until the contract is concluded.

However, if you can automate everything from contract creation to sending, these improvements are possible, and reducing the time to contract conclusion is not just a dream.

Benefits of Integrating Raku-Raku Sales and DocuSign with Yoom

For those who think, "I understand that contracts can be sent automatically by integrating Raku-Raku Sales and DocuSign, but isn't the setup difficult...?" rest assured!
One of the benefits of using Yoom is that you can integrate apps without programming knowledge, using no-code.

Normally, integrating apps requires knowledge like that of an engineer. Even with knowledge, it often takes time and is not very practical.
Yoom addresses these issues, allowing anyone to easily create flow bots for automating business processes without code!

How to Create an Integration Flow for Raku-Raku Sales and DocuSign

Now, let's create a flow bot that "creates a contract using a template stored in Google Docs based on Raku-Raku Sales information and sends it with DocuSign".
Using the domestic no-code tool Yoom, even those without programming knowledge can easily automate flows!

Register for Yoom here. You can register easily in 30 seconds!

Official documentation about Yoom is here. Please take a look!

Instead of creating a flow bot from scratch, use a template with a pre-configured flow.
Yoom offers various templates, allowing you to create the desired flow bot without code immediately!

Once you have completed the Yoom registration, please click the banner below to proceed.

Next, let's integrate Yoom with each app.

1. My App Integration

Click on the template banner, and you'll find a "Try this template" button at the bottom of the screen, so press it.
This will take you to a page called "My Projects", where you can select "My Apps" from the menu on the left side of the screen!
   ↓

Click on "Create New" at the top right! Enter "Rakuraku Sales" in the search box, and the Rakuraku Sales icon will appear, so click on it.

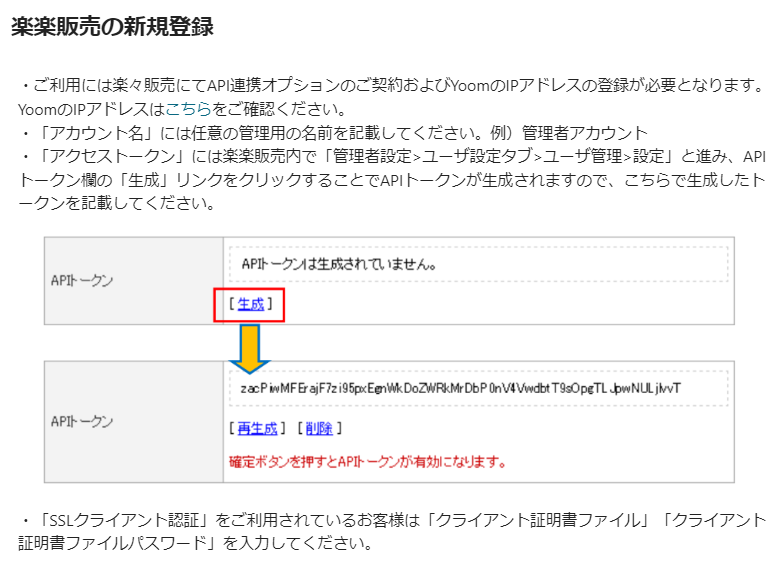
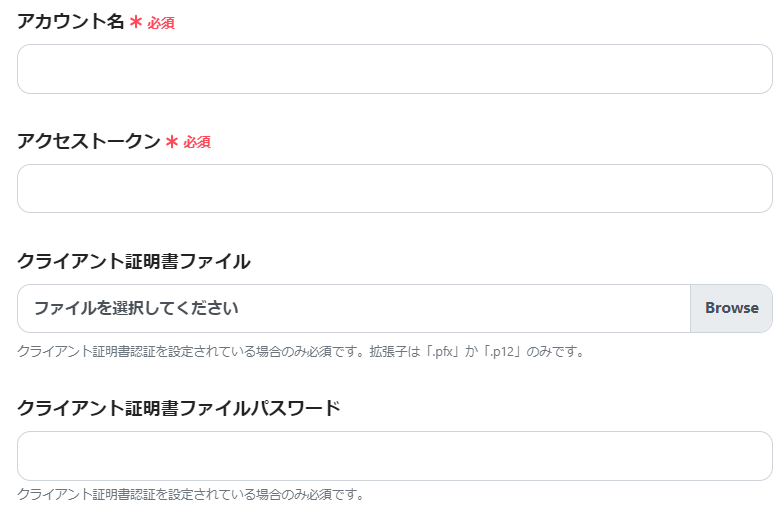
Please generate an API token according to the image above. Once generated, let's fill in the required fields.

After entering the information, click Add! This completes the integration of Yoom with Rakuraku Sales in My Apps.
     ↓

Next, we will integrate Google Docs with Yoom.
Just like Rakuraku Sales, click on "Create New" at the top right and enter "Google Docs" in the search box, and the Google Docs icon will appear, so click on it.

Click on the red frame.
On the page titled Select Account, click on the Google account of the Gmail address you want to integrate with Yoom!
Next, you'll be taken to a page titled Log in to Yoom, so press Next.

Finally, if a page appears saying Yoom is requesting additional access to your Google account, just press Continue, and you're good to go!

     ↓

DocuSign can be integrated with My Apps even more easily.
If you log in to DocuSign in advance, it will be completed quickly, so it's recommended to log in beforehand!

     ↓

Enter "DocuSign" in the search box from "Create New" at the top right, and the DocuSign icon will appear, so click on it.


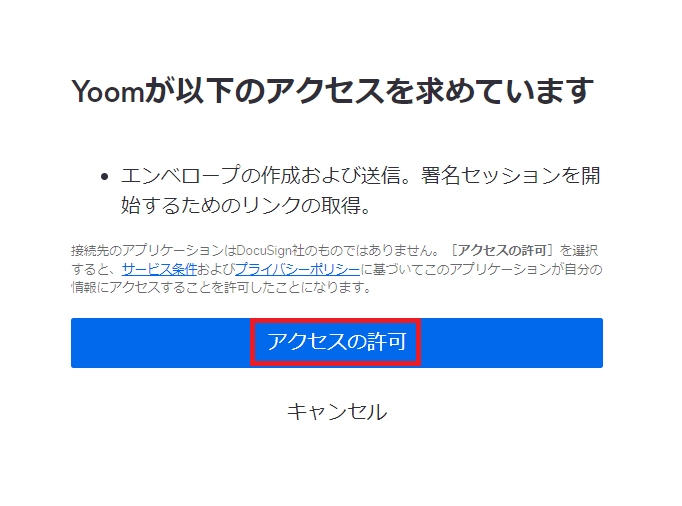
Then, as shown on the screen above, press "Allow Access" to complete the My App integration. It's very simple, isn't it!

Next, I'll explain how to create a template document to be used as a contract!

2. Creating a Template Document

This time, we will create a flowbot that inputs Rakuraku Sales information into a contract template stored in Google Docs.
Therefore, it is recommended to create a contract template in Google Docs at this stage.

About Creating Template Documents

Detailed explanations are written on the page above, so please refer to it and try creating a template document!
Next, let's proceed to the flowbot settings.

3. Trigger Settings for RakuRaku Sales

Click on "Create a contract based on RakuRaku Sales information and send it via Docusign" from My Projects on the left side of the screen! Press Edit at the top right.

Press "Execute HTTP transmission in automatic processing settings" on the RakuRaku Sales icon.
Since the necessary items are pre-entered using the template, click Next after confirming that the account information linked with RakuRaku Sales is correct!

Set up the Webhook. A help page is available, so please refer to it!

How to Execute HTTP Transmission in RakuRaku Sales and Activate Yoom's Flowbot

Once the Webhook setup is complete, press Test at the bottom of the screen, and if "Test Successful" is displayed in blue, save it.

4. Issue the Contract

Press "Issue Contract" on the Google Docs icon.
Select the template of the contract you have prepared.

Click inside the Document File ID box to display a list, and select the template file to proceed!

After selecting the template document, also input the folder to store the issued contract.
Similarly, click inside the box to display and select it. Don't forget the file name when outputting.

Once you have entered everything, click Next.

Follow the settings as above.
If you can set it according to the template created earlier, the strings to be replaced and the strings after replacement will be entered in conjunction as shown in the image below.

Once you have set it up to this point, press Test, and if "Test Successful" is displayed in blue, you're good to go!
Press Save and proceed to the final settings.

5. DocuSign Settings

Press "Send with DocuSign" on the DocuSign icon.
Since the necessary items are pre-entered using the template, click Next after confirming that the account information linked with DocuSign is correct!

Fill in the required fields. Please input according to the red frame!

Click inside the Template ID box to display candidates as shown above, and click on any template.
After that, fill in the recipient's details, press Test, and if "Test Successful" is displayed in blue, you're good to go!

This completes the integration of RakuRaku Sales and DocuSign.

If you think "I might want to try this...", please click the banner and check out Yoom.

Summary

This time, we automated the process of creating a contract based on information from RakuRaku Sales and sending it via Docusign. The flow from contract creation to sending has become automated, which is expected to save time!

If you frequently create and send contracts, be sure to incorporate Yoom's Flowbot and try automating your business processes!

The person who wrote this article
a.ohta
After working as a general store manager, I started working from home as an SEO writer. Later, an outsourcing agreement was signed with a marketing startup for about 5 years. Surrounded by students at the University of Tokyo, I held a computer and spent my days studying various business terms and how to use SaaS tools. When I was a general store manager, time was taken over and over again by office work such as sales and inventory management, human resource management, and ordering, etc., and I was unable to serve customers and often missed sales times. Even when outsourcing, there are many detailed tasks such as input, etc., and “can't such monotonous tasks be automated?” I thought so, and I really sympathize with Yoom's vision!
Tags
Automation
Integration
DocuSign
Rakuraku Hanbai
App integration
No items found.
What is Yoom hyperautomation?
Conventional RPA can only automate simple repetitive tasks, and the setup process was very complicated.
With “hyperautomation,” which combines various technologies such as AI, API, RPA, and OCR, it is possible to automate many tasks that could not be realized until now more easily than before.
Don't Just Connect Apps—Automate Everything
Most tools simply connect one app to another, leaving the complex tasks to you. Yoom goes much further: From document creation and browser automation to OCR and generative AI, Yoom handles it all seamlessly in one platform.

Why settle for basic integrations? Streamline your entire workflow with Yoom’s powerful hyperautomation.
Learn more about Yoom
Helpful Materials
I understand Yoom! 3-piece set of materials
Download materials
Understand in 3 minutes! Yoom service introduction materials
Download materials
Find out by Before After! Yoom Case Study Collection
Download materials
See a list of useful materials