[No Programming Required] How to Automatically Connect Zoom Meeting Data to ChatGPT
How to Integrate Applications
・
2025-04-30
[No Programming Required] How to Automatically Connect Zoom Meeting Data to ChatGPT
"It takes time to create meeting minutes" "It's challenging to accurately share meeting content with all participants"—Do you feel these challenges after meetings on Zoom?
Even if you have audio data, organizing and distributing the content can be cumbersome, potentially interfering with other tasks. However, when considering streamlining with Zoom and ChatGPT integration, many might feel, "The setup seems difficult" or "Do I need specialized knowledge?"
In this article, we introduce how to easily achieve automatic creation of meeting minutes and email distribution to participants by linking Zoom meeting data with ChatGPT using the no-code tool Yoom.
The major appeal is that you can significantly reduce the effort of organizing and sharing information after meetings without programming knowledge.
If you want to streamline post-meeting tasks and enhance the quality and speed of information sharing, be sure to check it out until the end.
For those who want to try it quickly
By using Yoom, you can easily integrate Zoom and ChatGPT without any code.
Yoom provides templates for integrating Zoom and ChatGPT, so you can achieve integration immediately just by registering, even without API knowledge.
What You Can Do by Integrating Zoom and ChatGPT
By integrating the APIs of Zoom and ChatGPT, you can automatically transfer Zoom data to ChatGPT!
For example, you can automatically perform data transfers like the ones below without human intervention.
Create meeting minutes with ChatGPT and send them via email to participants after a Zoom meeting
This is recommended for those who spend a lot of time creating meeting minutes after Zoom meetings. <span class="mark-yellow">It can be useful in situations with many meeting participants!</span>
Extract Key Points from Zoom Meetings with ChatGPT and Automatically Integrate with Task Management Tools
Automatically summarize meetings on Zoom and consolidate tasks into your task management tool. The great point is that you can immediately share the key points of the meeting with your team!
Transcribe Zoom Meeting Audio and Share Multilingual Translations with ChatGPT
This template is a valuable tool for company representatives who frequently have meetings and interactions with overseas teams. This flow is also recommended for those involved in international projects.
Let's Create a Workflow Integrating Zoom and ChatGPT!
Let's get started by creating a workflow that integrates Zoom and ChatGPT!
This time, we will use Yoom to proceed with the integration of Microsoft Teams and Microsoft SharePoint without any coding. If you don't have a Yoom account yet, please issue one from the registration form here.
[What is Yoom]
<span class="mark-yellow">This time, we will create a flow bot that "creates meeting minutes with ChatGPT after a Zoom meeting ends and sends them to participants via email!"</span>
The creation process is broadly divided into the following steps:
Integrate Zoom and ChatGPT with My Apps
Copy the template
Set up triggers and actions
Set the trigger to ON and complete the preparation for workflow operation
Step 1: Register My Apps
First, register the Zoom and ChatGPT apps that will be used this time.
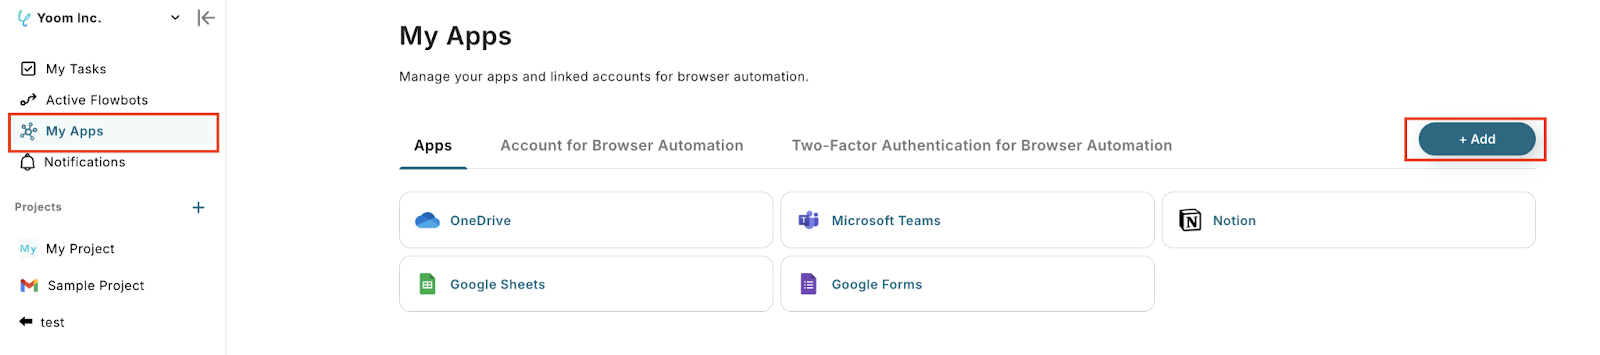
Click "My Apps" on the left side of the Yoom screen, then click "+ Add" displayed on the right side.
Register Zoom App
After clicking "+ Add", search for "Zoom" from the app list.
Refer to this article to input the Client ID and Client secret, click "Add", and proceed to the next step.
When the following screen appears, click "Allow".
If "Zoom" appears in My Apps, the integration is complete.
Register ChatGPT App
After clicking "+ Add", search for "ChatGPT" from the app list.
Follow these steps to obtain and input the access token. Enter an account name that is easy for you to use.
If "ChatGPT" appears in My Apps, the integration is complete.
Step 2: Copy the Template
Now, let's actually create the flow! To make it easy to set up, use the template. Click the banner below "Try it out" to copy the template.
Once the copy is complete, the following screen will be displayed. Click "OK" to proceed with the setup!
Step 3: Setting Up the App Trigger
First, set up the app launch settings.
Click "When the meeting ends".
When the following screen appears, check the account to be linked and proceed. You can also change the title if necessary!
Next is the API connection settings.
Select the "Trigger Interval" according to your business needs.
The trigger activation timing can be set to 5 minutes, 10 minutes, 15 minutes, 30 minutes, or 60 minutes. Depending on your plan, the shortest trigger interval you can set may vary, so be sure to check that! It is generally recommended to use the shortest activation interval for your plan.
Enter the email address associated with your Zoom account.
Once the settings are complete, end the Zoom meeting and conduct a test. If the "Test Successful" screen appears, the settings are correct!
The following output can be referenced in subsequent settings! Although not displayed on this screen, values obtained from Zoom will appear next to the output item names.
Once confirmed, click "Save".
Step 4: Copy: Get Meeting Details
Next, click "Copy: Get Meeting Details".
When the following screen appears, check the account to be linked and proceed.
Set up the API connection.
Select the "Meeting ID" from the output as shown below. It will retrieve the details of the Zoom meeting from the specified meeting ID.
Once the settings are complete, conduct a test.
If the test is successful, click "Save" and proceed to the next setting.
Step 5: Get Meeting Recording Information
Next, click "Get Meeting Recording Information".
This setting retrieves the recording information of the meeting conducted on Zoom.
When the following screen appears, check the account to be linked and proceed.
Select "Meeting ID" from the output as "Meeting ID".
It retrieves the recording information of the Zoom meeting from the specified meeting ID.
Conduct a test.
If the test is successful, click "Save" and proceed to the next step.
Step 6: Download Meeting Recording Files
Next, click "Download Meeting Recording File".
When the following screen appears, check the account to be linked and proceed.
Select "Download URL" from the output below.
Conduct a test.
If the test is successful, click "Save" and proceed to the next step.
Step 7: Transcribe Audio Data
Click "Transcribe Audio Data".
AI operations for OCR and audio transcription are features exclusive to Team Plan and Success Plan. Setting them up on Free Plan or Mini Plan will result in an error, so be careful!
Additionally, paid plans like Team Plan and Success Plan offer a 2-week free trial. During the trial period, you can try out all apps and AI operations that are usually restricted, so feel free to explore the features you're interested in.
Actions can be selected from the dropdown, so choose one that suits your business needs.
This time, we selected "Transcription up to 60 minutes (50 tasks)".
After setting, proceed to the next step.
Next, set the details. Select "Downloaded File" from the dropdown for the audio file.
Let's conduct a test.
If the test is successful, click "Save" to proceed to the next step.
Step 8: Generate Text
Click "Generate Text".
Here, we will set up text generation using ChatGPT.
When the following screen appears, check the account to be linked and proceed.
Next is the API connection settings.
Select "Analysis Result" from the output for "Message Content".
This is the analysis result of the transcribed audio data from the Zoom meeting content. It will create minutes based on this analysis result.
Please refer to the notes below each item for setting the following items.
Let's conduct a test. If the test is successful, click "Save" to proceed to the next step.
Step 9: Set Up Email Sending
Click "Send Email".
Next is the email settings.
Select the email address from the output.
For "Subject", refer to the following example settings.
This time, we selected "List of Topics" from the output and included it in the subject. "Here are the minutes of today's meeting" might also be a good phrase.
For "Body", refer to the following example settings.
Select "List of Topics" from the output.
"Response Content" can be selected from the output. If there are any additional phrases you want to add, please enter them.
Click "Next".
Here is the email sending test.
Check the recipient and email content, and conduct a test.
After the test is successful, click "Save".
Check to see if you have received an email to the email address you specified.
Step 10: Automate Flowbot Settings
When the following screen appears, click "Trigger on the trigger".
All settings are complete!
Generate a Draft with ChatGPT Based on Microsoft Teams Messages and Create a PDF
This is a recommended flow for automatically documenting interactions on Microsoft Teams without human intervention.
Other Automation Examples Using Zoom and ChatGPT APIs
In addition to integrating Zoom and ChatGPT, you can create automation flows that make daily tasks more efficient by leveraging these APIs. If any of these interest you, please give them a try!
Convenient Automation Examples Using Zoom
By integrating Zoom with other services, you can automate meeting preparation and documentation. "Creating URLs is a hassle" or "Sharing meeting minutes is difficult" - these problems can be easily solved!
Convenient Automation Examples Using ChatGPT
By integrating ChatGPT with other services, you can automate tasks like writing and organizing information. "Struggling with manual replies?" "Running out of ideas for posts?" These problems can be solved quickly and easily!
Conclusion
By integrating Zoom with ChatGPT, you can significantly reduce the effort required to create and share meeting minutes. In this article, we introduced a method to easily set up an integration flow using the no-code tool Yoom.
It's perfect for those who want to improve work efficiency without relying on engineers, as it can be used without programming knowledge. Why not start by registering for Yoom for free and begin an integration that suits your team?
Conventional RPA can only automate simple repetitive tasks, and the setup process was very complicated. With “hyperautomation,” which combines various technologies such as AI, API, RPA, and OCR, it is possible to automate many tasks that could not be realized until now more easily than before.
Most tools simply connect one app to another, leaving the complex tasks to you. Yoom goes much further: From document creation and browser automation to OCR and generative AI, Yoom handles it all seamlessly in one platform.
Why settle for basic integrations? Streamline your entire workflow with Yoom’s powerful hyperautomation.


.png)


.avif)

.png)
.png)


