Google フォームとHubSpotの連携イメージ
How to Integrate Applications

2025-04-15

How to Automatically Create Contacts in HubSpot Based on Information Submitted to Google Forms

a.ohta

Googleフォームで収集した情報をもとに、HubSpotに手動でコンタクトを作成していませんか?
手入力は、時間がかかるし、ミスが発生するしで、忙しい時は煩わしい作業ですよね。
そこで、Googleフォームで収集した情報を自動でHubSpotのコンタクトに追加する方法をご紹介します!
GoogleフォームとHubSpotをノーコードで簡単に連携できるので、ぜひ試してみてくださいね!

こんな方におすすめ

  • GoogleフォームとHubSpotでの業務効率化を考えている方。
  • Googleフォームで送信された回答をもとにHubSpotにコンタクトを作成している方。
  • GoogleフォームとHubSpotを連携して、コンタクトの作成漏れを防ぎたい方。

今すぐに試したい方へ

本記事ではノーコードツール「Yoom」を使用した連携方法をご紹介します。

難しい設定や操作は必要なく、非エンジニアの方でも簡単に実現できます。

下記のテンプレートから今すぐに始めることもできるので、ぜひお試しください!

[What is Yoom]

How to Create a Google Form and HubSpot Integration Flow

Now, let's introduce the steps to create a "Flow Bot" that "creates a HubSpot contact based on Google Form information".

Instead of creating a Flow Bot from scratch, we will use a pre-configured template. Yoom offers templates that connect various apps, allowing you to create the desired Flow Bot without any coding!

First, let's connect Google Workspace and HubSpot with Yoom. This is called "My App Integration".

My App Integration

Select "My Apps" from the menu on the left side of the Yoom management screen!
     ↓
Click on "Create New" at the top right! Enter "Google Form" in the search box, and when the Google Form icon appears, click on it.
On the page titled "Select Account", click on the Google account to connect with Yoom!
Next, you'll be directed to the "Log in to Yoom" page, so click "Next".

Finally, if a page appears saying "Yoom is requesting additional access to your Google account", just click "Continue" and you're all set!

The integration between Google Form and Yoom is complete, so let's proceed to connect HubSpot with Yoom.

     ↓

Just like with Google Form, search for "HubSpot" from My Apps. When the HubSpot icon appears, click on it!

You'll be directed to a page saying "Connecting Yoom to HubSpot", so select your account.

Next, check the box if you agree with the privacy policy, and click "Connect App" to proceed!
Let's continue with the Flow Bot settings.

‍Next, open the banner below and copy the template!

1. Hover over the banner and press "View Details"
2. Press "Try this template" on the page you navigated to
3. Register for Yoom

※ If you have already completed registration, the login screen will be displayed, so please log in.

Google Form Trigger Settings

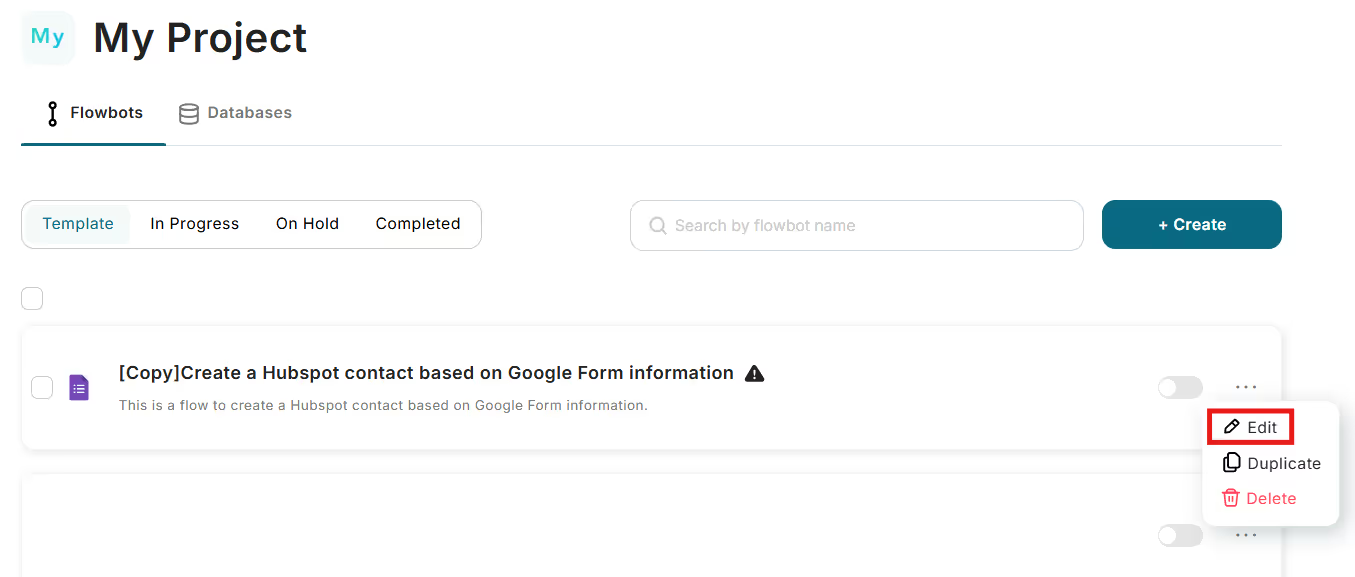
From the left side of the screen, click on "Create a HubSpot contact based on Google Form information [Copy]" under My Projects! Press Edit in the right corner.

     ↓

Press "When a response is submitted to the form" on the Google Form icon.
Since the necessary items are pre-entered by using the template, just click Next!

     ↓

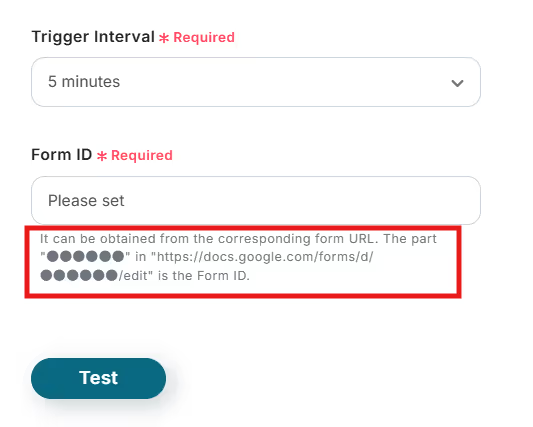
Next, create the Google Form you will actually use. After creating the form, enter the trigger activation interval and form ID, and test submit the response.
After submitting the response, press Test at the bottom of the screen and confirm that "Test Successful" is displayed in blue!
※ The trigger activation interval can be selected at intervals of 5 minutes, 10 minutes, 15 minutes, 30 minutes, or 60 minutes. The shortest activation interval varies depending on the plan, but a shorter setting is generally recommended.

     ↓

Next, set the Output.

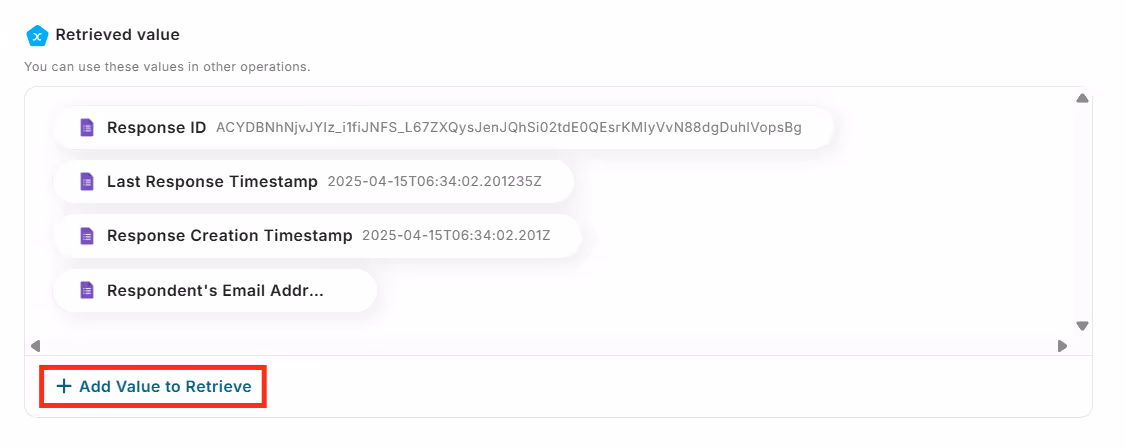
Click "Add value to retrieve" in the image above!
This will bring up a screen like the one below.

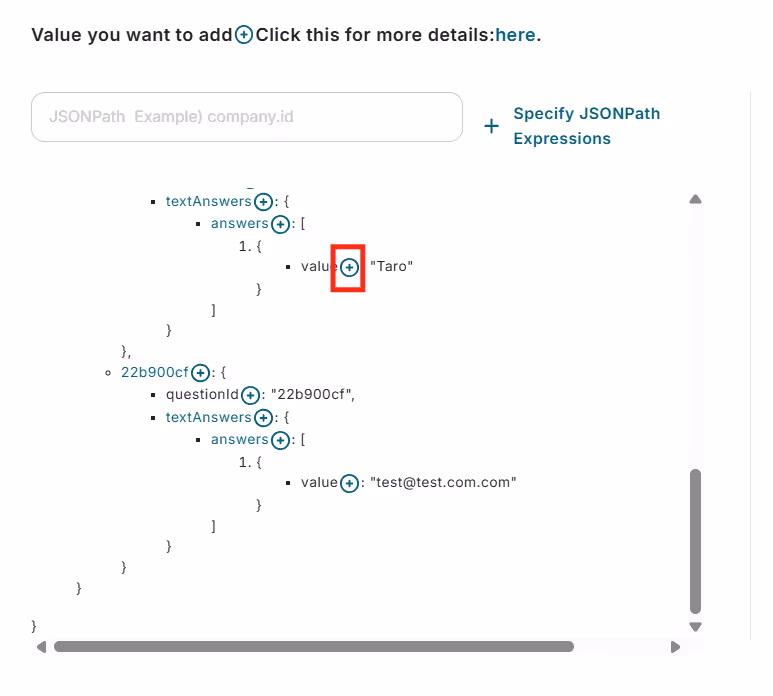
A lot of strings will be displayed, but this depends on the content you answered in the Google Form earlier.
Click on the content you want to register in HubSpot and add it as Output. You can add Output by clicking the blue + mark next to where it says value.

The clicked value will be added to the left side of the screen, so change it to a name linked to the response if necessary.

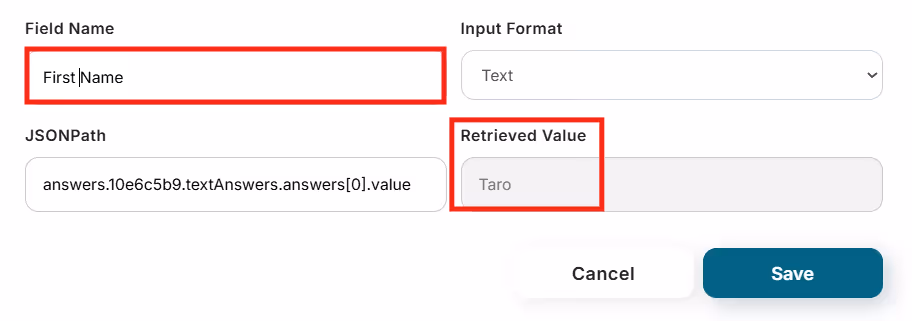
When you hover over the Output you want to change, a pen mark will appear, so click it. The screen will look like the one above.
It's okay if it matches the item name equal to the value obtained in the test!
※ Detailed setting methods can also be confirmed here.

Once you have finished obtaining the Output, don't forget to press Save. Continue to the HubSpot settings.

HubSpot Settings

Press "Create Contact" on the HubSpot icon.
As before, since the necessary items are pre-entered by using the template, you can just click Next.
Templates are very convenient, aren't they…!

     ↓

On the next page, enter the previously registered Output into each item.

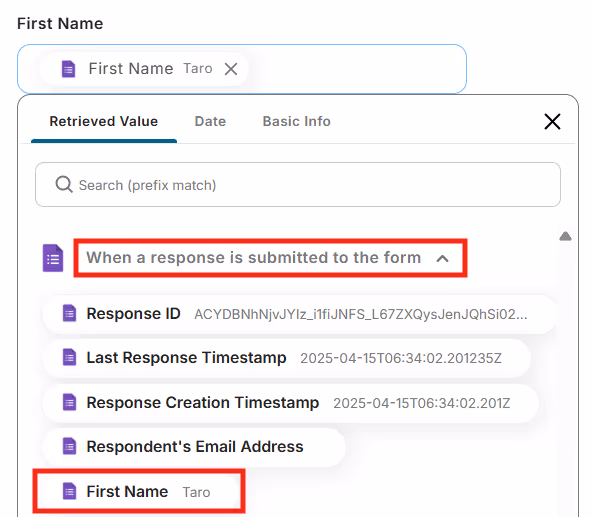
The input method is simple. Click inside the box to bring up a screen like the one above and click the red frame!
Then, the previously registered Output will be displayed in a list.

Just choose the one that matches the item name in the box, and you're good to go.

     ↓

Once you have filled in the necessary items, press Test. If "Test Successful" is displayed in blue, the creation of the Flowbot is complete. Thank you for your hard work!

Other Automation Examples Using Google Forms and HubSpot

In addition to the integrations introduced today, various automations can be achieved by utilizing the APIs of Google Forms and HubSpot.

If you find something interesting, please give it a try!

Automation Examples Integrating Google Forms and HubSpot

You can add a company to HubSpot after performing a duplicate check when a Google Form is submitted, or update the lead status in HubSpot when a contract agreement is submitted via Google Forms.
Additionally, it is possible to integrate the transcription and summarization of recorded business meeting data submitted through Google Forms and register it as a note in HubSpot.

Example of Automation Using Google Forms

Notify Chat Tools When a Response is Submitted in Google Forms

Automatically notify Slack, Discord, etc., when a response is submitted in Google Forms.

Create a Web Meeting When a Response is Submitted in Google Forms

Automatically create a meeting in Google Meet or Zoom when a response is submitted in Google Forms. (For Google Meet, a meeting URL is automatically created when an event is added to Google Calendar)

Upload Files Submitted via Google Forms to Cloud Storage

Automatically upload files submitted via Google Forms to Google Drive, Box, etc.

Examples of Automation Using HubSpot

Register an event in the calendar when information is registered in HubSpot

Automatically add events to Google Calendar based on information from HubSpot.

Create tasks in task management tools based on actions in HubSpot

Automatically create tasks in Asana, Trello, etc., based on deal closures in HubSpot.

Add to the database when information is registered in HubSpot

When information is added to HubSpot, it will be automatically added to Google Sheets, Notion, etc.

Benefits of Integrating Google Forms with HubSpot & Drawbacks of Not Doing So

Benefits of Integration

1. Automatically Register Customer Information Submitted to Google Forms in HubSpot

‍By enabling automatic registration of customer information submitted through Google Forms into HubSpot, you can save the effort of manual entry and prevent omissions or errors!
For instance, if there is a large amount of customer information that needs to be registered, it can take a considerable amount of time. However, by automating the registration, you can save time and quickly approach new customers.

2. Automatically Share Customer Information

‍With the ability to automatically share customer information submitted through Google Forms, you might speed up the process of assigning new customer representatives or forming teams!
Speed is crucial in sales. To ensure you don't miss the opportunity to make an impression, this is an automation you should definitely consider implementing.

Drawbacks of Not Integrating

Some people might save customer information received in Google Forms to another tool and then register it in HubSpot after reviewing it.
This might reduce errors, but it's a waste of time.
Since sales marketing requires a focus on speed, minimizing time lags is essential.
With manual entry, there might be lags in information sharing within the team, so integrating Google Forms with HubSpot to automate registration is a good idea.

Conclusion

HubSpot, which helps streamline daily tasks, can automate new customer registrations by integrating with Google Forms, potentially increasing efficiency even more.
By automating the surprisingly tedious data entry tasks, you can save time.
With Yoom, you can easily automate tasks without coding, so be sure to give it a try!

The person who wrote this article
a.ohta
After working as a general store manager, I started working from home as an SEO writer. Later, an outsourcing agreement was signed with a marketing startup for about 5 years. Surrounded by students at the University of Tokyo, I held a computer and spent my days studying various business terms and how to use SaaS tools. When I was a general store manager, time was taken over and over again by office work such as sales and inventory management, human resource management, and ordering, etc., and I was unable to serve customers and often missed sales times. Even when outsourcing, there are many detailed tasks such as input, etc., and “can't such monotonous tasks be automated?” I thought so, and I really sympathize with Yoom's vision!
Tags
Google Forms
HubSpot
Automation
Integration
Automatic
App integration
What is Yoom hyperautomation?
Conventional RPA can only automate simple repetitive tasks, and the setup process was very complicated.
With “hyperautomation,” which combines various technologies such as AI, API, RPA, and OCR, it is possible to automate many tasks that could not be realized until now more easily than before.
Don't Just Connect Apps—Automate Everything
Most tools simply connect one app to another, leaving the complex tasks to you. Yoom goes much further: From document creation and browser automation to OCR and generative AI, Yoom handles it all seamlessly in one platform.

Why settle for basic integrations? Streamline your entire workflow with Yoom’s powerful hyperautomation.
Learn more about Yoom
Helpful Materials
I understand Yoom! 3-piece set of materials
Download materials
Understand in 3 minutes! Yoom service introduction materials
Download materials
Find out by Before After! Yoom Case Study Collection
Download materials
See a list of useful materials