[No Code Required] How to Automatically Notify HubSpot Data
How to Integrate Applications
・
2025-05-20
[No Code Required] How to Automatically Notify HubSpot Data
n.fukuoka
How do you handle data that should be quickly shared with members or representatives, such as inquiries submitted through HubSpot forms, in addition to the data registered in HubSpot? In most cases, it remains as is until a representative checks it directly in HubSpot, or if it's urgent, the data is often manually forwarded via separate chat tools.
Actually, all these manual tasks can be automated! <span class="mark-yellow">By automating, you can send data and notifications more quickly and smoothly than doing it manually, which should improve work efficiency!</span>
In this article, we will explain in detail, with images, how to automate tasks using HubSpot. Even without difficult technical knowledge, you can implement automation, so make sure to check it out!
For those who want to try it quickly
Yoom offers templates for automating workflows using HubSpot! If you want to try it right away, click the banner below to get started!
Various Ways to Automatically Notify HubSpot Data
There are several ways to automatically notify HubSpot data. We've picked out a few methods for you to check out!
Simply click "Try it out" on the automation example you're interested in and register an account to immediately experience HubSpot's automatic updates. Registration takes just 30 seconds, so feel free to give it a try!
Automatically Notify HubSpot Data to Chat Tools
This is a flow where notifications are sent to chat tools like Google Chat, starting from a customer management app like HubSpot. You can easily check updates in chat without having to constantly visit HubSpot, making information sharing easier and more convenient.
Send and Forward Emails Using HubSpot Data
This flow starts with a marketing app like HubSpot and sends or forwards messages using email tools like Outlook. By automating the sending of frequently used messages, you can prevent manual sending errors and omissions, providing peace of mind!
Let's Create a Flow to Automatically Write and Transfer Data to HubSpot
Let's get started by creating a flow that automatically writes and transfers data to HubSpot! This time, we'll proceed with the setup using Yoom, a no-code platform! If you don't have a Yoom account yet, please create one using the registration form here.
[What is Yoom]
This time, we will create a flow bot that notifies Google Chat when a deal is created in HubSpot! The creation process is broadly divided into the following steps.
Integrate HubSpot and Google Chat with My Apps
Copy the template
Set up triggers in HubSpot and actions in Google Chat
Turn on the trigger to complete the flow operation setup
Step 1: Connect My Apps with HubSpot and Google Chat
First, log in to your Yoom account. If you are new to Yoom, please check out Getting Started with Yoom.
1. Click on My Apps and then click on + Add.
2. You can search by app name in the input field.
Register My Apps in HubSpot
Let's register HubSpot as My Apps! Enter HubSpot in the input field, and the HubSpot icon will appear. Click on the HubSpot icon.
1. The following screen will appear. Click on "Sign in to your HubSpot account".
2. The login screen will appear, so please log in. For detailed instructions on how to register My Apps in HubSpot, please refer to the following link. How to Register My Apps in HubSpot
Register My Apps in Google Chat
Integration with Google Chat is only possible with Google Workspace. For details, please refer to here. Search for Google Chat in the same way. Click on Google Chat (OAuth).
1. The following screen will appear. Click on "Sign in with Google".
2. Enter the Client ID and Client Secret. For detailed instructions on how to register My Apps in Google Chat, please refer to here. Once you have finished entering, click "Register".
Once My Apps registration is successful, the following screen will appear. Check if the icons for HubSpot and Google Chat are displayed on the My Apps screen.
Step 2: Copy the Template
Click on "Try it" from the link below.
If the following display appears, the template copy was successful. The copied template will be stored in My Projects.
Step 3: Set up a trigger to activate when a new company is created in HubSpot
First, click on the icon at the top that says "When a new deal is created".
Set up the account information to integrate with HubSpot. Select "When a new company is created" as the trigger. Once the setup is complete, click "Next".
Set the trigger activation interval! You can choose from 5 minutes, 10 minutes, 15 minutes, 30 minutes, or 60 minutes. The shortest time you can set depends on the plan you are using,so it's safe to check in advance in this article. Once the setup is complete, click Test.
If the test is successful, the information obtained from HubSpot will be displayed as output as shown below. If you are interested in the details of the output, please check the following link. About the output Once the test is successful, don't forget to click "Save"!
Step 4: Set up notifications in Google Chat
Finally, click on the "Send Message" icon.
Set up the account information to integrate with Google Chat. Select "Send Message" as the action. Once the setup is complete, click "Next".
Set up each item.
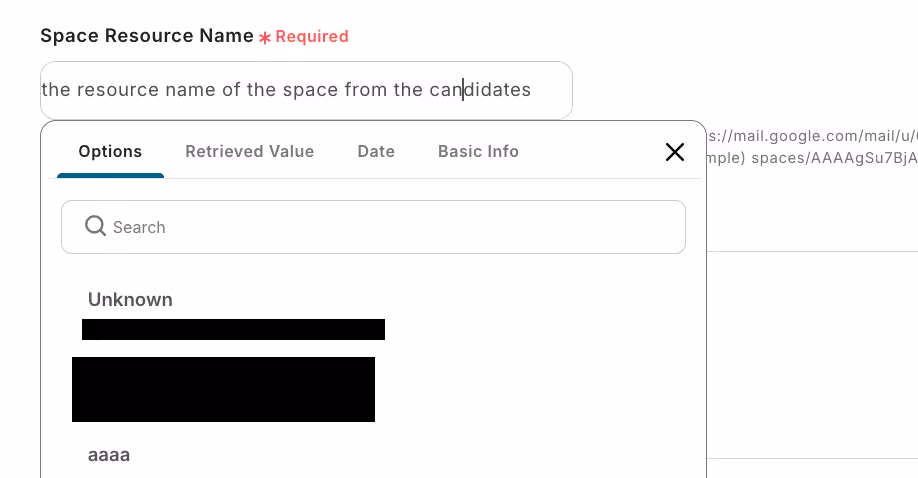
Space Resource Name: Click the input field to display suggestions as shown below. Select the appropriate one from the displayed options.
Message Content: Click the edit field to display the output. Try creating a message while quoting the output.
Once the setup is complete, test to ensure it works properly. If there are no issues, save and you're done!
Step 5: Test and Verify
Thank you for your hard work! The setup is now complete. Once the setup is complete, the following screen will be displayed. Click "Turn on the trigger" to activate the Flowbot.
This is how you can notify Google Chat when a deal is created in HubSpot!
Other Automation Examples Using HubSpot
In addition, you can automatically create meetings when a new contact is registered, or automatically transfer data from advertising tools!
In Conclusion
We introduced how to automatically send HubSpot data to chat tools and forward it via email tools using the no-code tool Yoom!
This makes it easier to quickly notice inquiries and new leads, and increases the likelihood of smoothly sending first messages, among other things. Improving response speed can also efficiently facilitate the transition to nurturing!
Additionally, this automatic sending and forwarding can be easily achieved using Yoom, which requires no programming!
Since no programming is required, it's easy to implement, and you can set it up smoothly even without specialized knowledge! Take this opportunity to reduce your workload and create a comfortable working environment by registering with Yoom now and implementing automation!
The person who wrote this article
n.fukuoka
In today's era where the number of tools is constantly increasing, it can often be confusing to decide which ones to use. We aim to provide clear and useful information to make your work a little easier!
Conventional RPA can only automate simple repetitive tasks, and the setup process was very complicated. With “hyperautomation,” which combines various technologies such as AI, API, RPA, and OCR, it is possible to automate many tasks that could not be realized until now more easily than before.
Most tools simply connect one app to another, leaving the complex tasks to you. Yoom goes much further: From document creation and browser automation to OCR and generative AI, Yoom handles it all seamlessly in one platform.
Why settle for basic integrations? Streamline your entire workflow with Yoom’s powerful hyperautomation.


.avif)


.avif)

.avif)
.avif)


