How to Integrate Applications

2025-04-16

How to integrate Jotform with Notion to automatically add submissions to Notion when a form is submitted in Jotform

m.wadazumi

When you receive a lot of emails every day, it can be quite a hassle to save files to Dropbox each time.
Moreover, many people might have experienced the struggle of missing a file save or saving a file in the wrong folder, making it difficult to find later.

In this article, we will introduce a method to automatically save files received in Gmail to Dropbox!

By using no-code tools, you can easily set up automation between Gmail and Dropbox.
You can start using it right away, so be sure to give it a try!

Recommended for

  • Those who want to automatically upload files attached to Gmail to Dropbox
  • Those who want to integrate Gmail and Dropbox to facilitate smooth file sharing within the team
  • Those who want to prevent the loss of attachments and ensure proper document storage

For those who want to try it immediately

In this article, we will introduce the integration method using the no-code tool "Yoom".

No complicated settings or operations are required, and even non-engineers can easily achieve it.

You can start right away using the template below, so please give it a try!

Have you ever wanted to automate the process of manually transferring responses from Jotform to Notion? When there are many form responses, the transcription work alone can take a considerable amount of time. Therefore, this time, we will introduce how to set up automation to "add responses from Jotform to a Notion database." By utilizing this automation, you can shorten the transcription work and significantly reduce the burden on the person in charge.

Benefits of Integrating Jotform with Notion

Here are the benefits of integrating Jotform with Notion.

Benefit 1: Efficient Transcription Work

By integrating Jotform with Notion, you can automatically add form responses from Jotform to a Notion database. Since manual transcription work is no longer necessary, the transcription process becomes more efficient, and the burden on the person in charge is reduced. This is particularly effective automation for companies that spend a lot of time on data entry.

Benefit 2: Prevent Human Error

Automating the transcription process can prevent input errors that are common with manual entry. For example, if you are using Jotform to record task progress in Notion, this automation will be helpful. If the task progress is incorrect, it can affect future work, so accurate data transcription is important.

[About Yoom]

How to Create a Jotform and Notion Integration Flow

This time, we will introduce the setup method for the following template, which is "adding responses from Jotform to a Notion database." By using this template, you don't need to set up automation from scratch, which is convenient.

The process consists of only 3 steps, so you can set it up in 10-15 minutes.

  1. Set up a flow bot that triggers when a form is submitted
  2. Set up an action to retrieve the latest response
  3. Set up an action to add a record

If you are not using Yoom, please register for free here.
If you are already using Yoom, please log in.

How to Connect Jotform and Notion with Yoom

Register your My App to connect Jotform and Notion with Yoom.
Once you complete the My App registration, you can easily set up automation afterward.

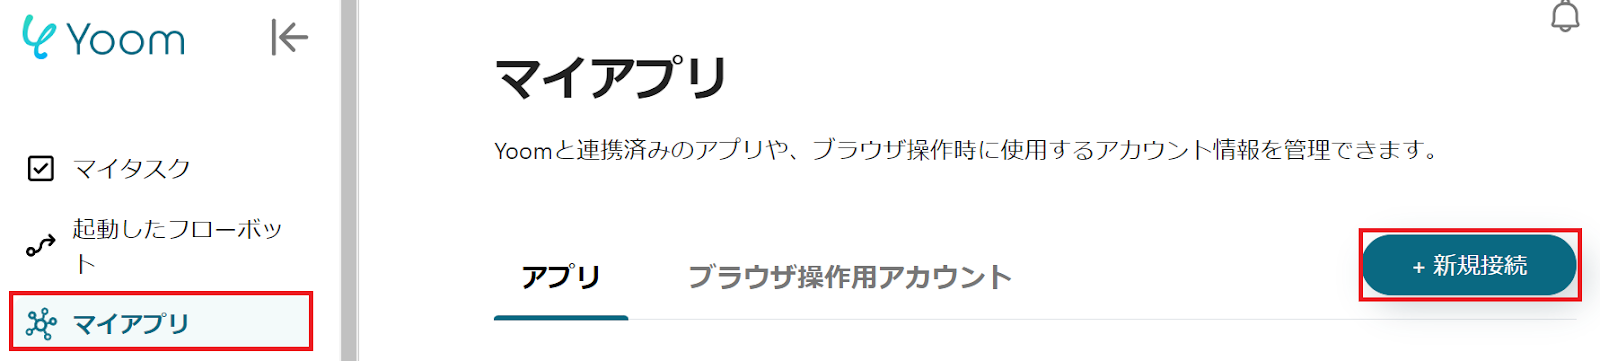
Let's start with registering Jotform in My App.
Click "My Apps" → "New Connection" on the left side of the Yoom screen.
An app list will be displayed, so search for Jotform from there or use "Search by App Name".

When the following screen appears, read the description and set the "Account Name".

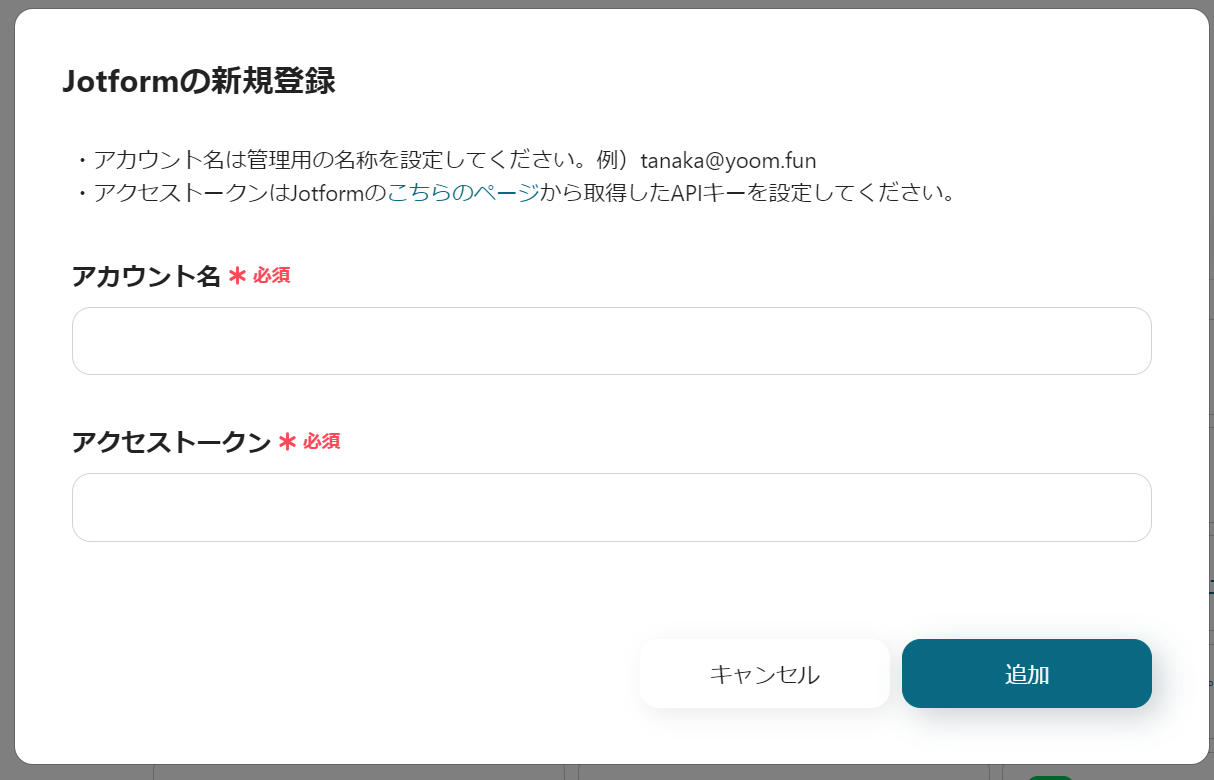
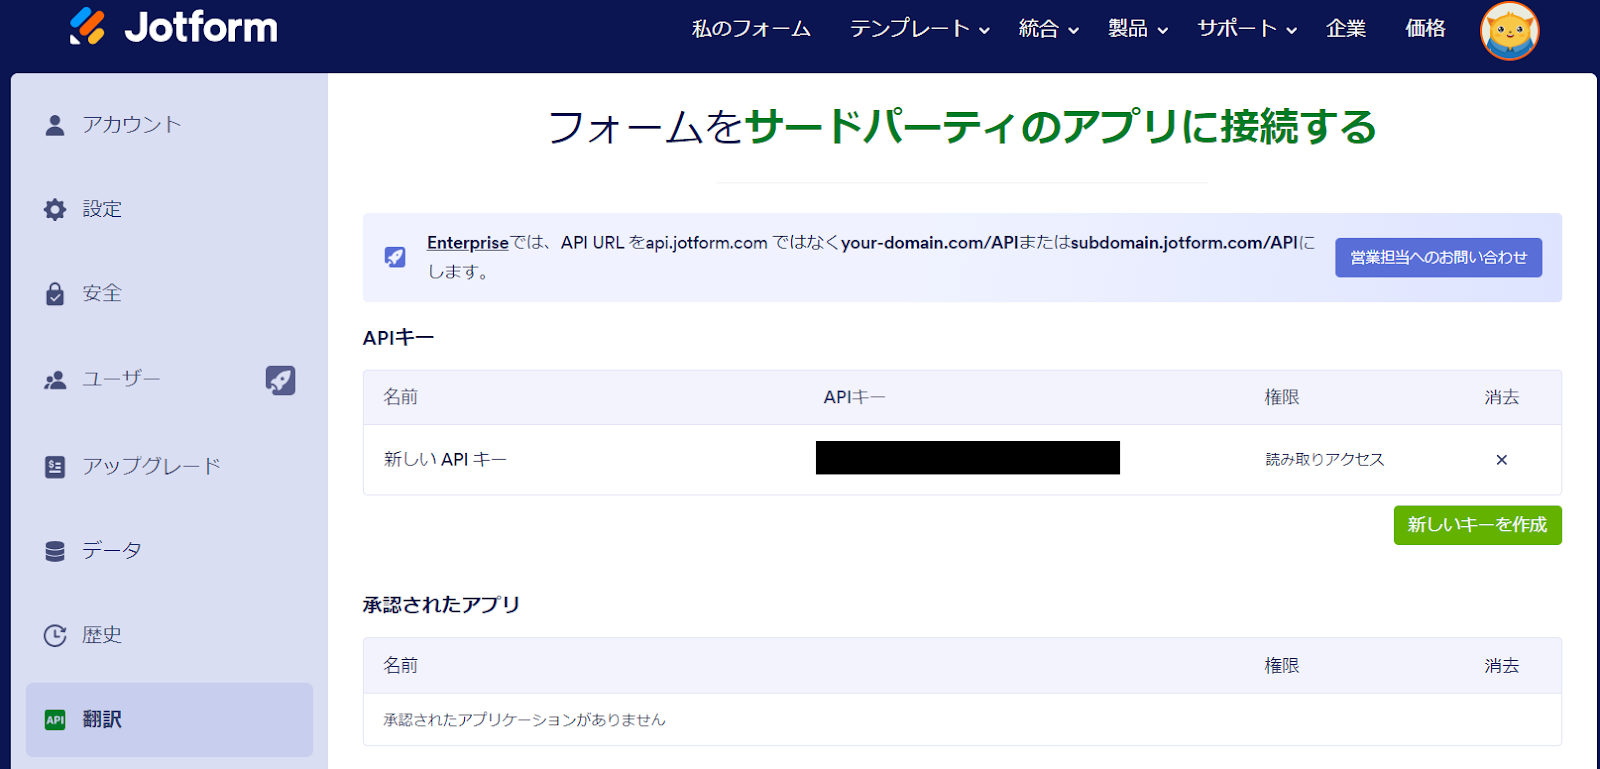
Set the "Access Token" with the API key obtained from here.
You can check it from the following screen of Jotform.
Return to the Yoom screen and set the "Access Token".

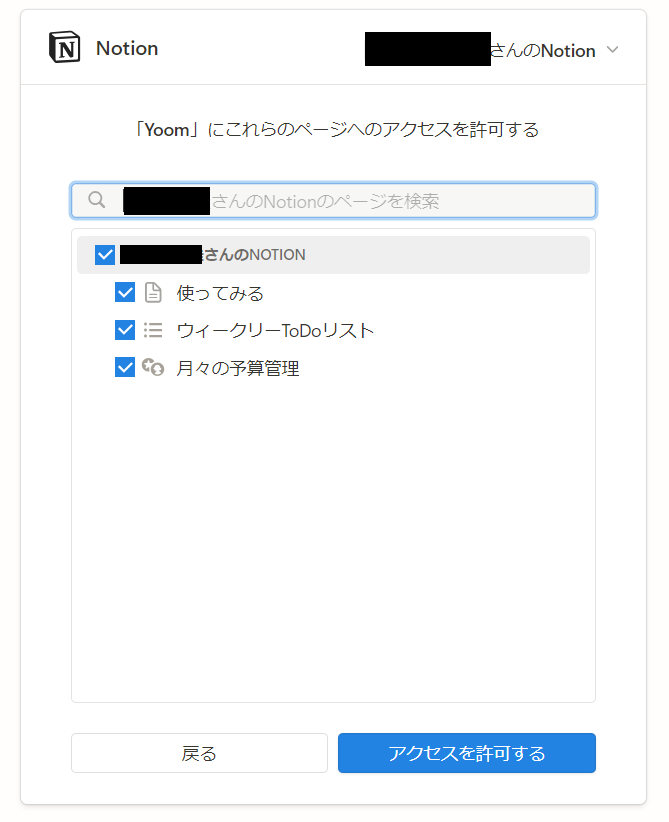
Next, register Notion in My App, and select Notion as you did before.
When the following screen appears, click the blue button "Select Page".

When the following screen appears, check the page to allow access.

If Jotform and Notion are displayed in your My Apps section, there is no problem.

How to Add Responses from Jotform to a Notion Database

To set up automation, click "Try It" on the banner below.

Read the following screen display and click "OK".

The following screen will be displayed, so please check the "Title" and "Description".
If you want to make changes, you can do so by clicking on the relevant section.
To start with the Jotform settings, click "When the form is submitted".

Once the following screen is displayed, check the settings.

  • "Title" → Can be freely changed
  • "Account information linked with Jotform" → Check for discrepancies
  • "Trigger action" → When the form is submitted

Move to the Jotform screen and prepare the form to be used for testing.
This time, we will use a form like the one below as an example.

Return to the Yoom screen, click the red frame, and copy the Webhook URL.
Read here to check the Webhook settings.
Click "Test" → "Test successful" → "Save".

Next, set up to retrieve Jotform responses by clicking "Get the latest response".
Once the following screen is displayed, check the settings.

  • "Title" → Can be freely changed
  • "Account information linked with Jotform" → Check for discrepancies
  • "Action" → Get the latest response

The following screen will be displayed, so proceed in the order of here "How to get the latest response after Webhook activation" → "2", read the explanation, and set it up.
Click "Test" and "Test successful" will be displayed.

Scroll down and click "Add value to retrieve" under Output.
Once the following screen is displayed, click the + button in the red frame on the left to retrieve the values to be transferred to Notion.
The retrieved values will be displayed in the upper right, so click the pencil mark to change the item name to something easy to understand.
Once changed, click "Add".

Items will be added to the output as shown below.

Next, set up Notion by clicking "Add record".
Once the following screen is displayed, check the settings.

  • "Title" → Can be freely changed
  • "Account information linked with Notion" → Check for discrepancies
  • "Execution action" → Add record

Move to the Notion screen and enter the form item names to retrieve the Jotform response content.
*Please use the table view.

This time, we entered the following content as an example.

Return to the Yoom screen, read the description, and set the "Database ID".

The following screen will be displayed, so set the "Value of the record to be added".
The item names you set earlier will be displayed, so enter the Jotform output in the corresponding items.
Click the red frame to select the Jotform output.
{{Name}}←The output will be displayed like this.
Once you have set the output for all items, click "Test" → "Test successful" → "Save".

Finally, click "Turn on trigger" to complete the automation settings.

Flowbot template used this time
Add responses answered in Jotform to the Notion database

Other Examples of Automation Using Jotform and Notion

1. This is a flow where records are automatically registered in Google Sheets when there is a response in Jotform.
This is slightly different from the template introduced this time, as the storage destination is Google Sheets.

2. This is a flow where a contact is automatically registered in Mazrica when a Jotform is submitted.
By being able to grasp contact information, you can smoothly approach prospective customers.

3. This is a flow for automatically sending emails with Gmail using information from the Notion database.
Since you can send the content of Notion directly via Gmail, there is no need for transcription work.

Summary

This time, we introduced how to set up automation to "add responses from Jotform to a Notion database." If there are transcription errors in the form content, you may miss important information. By implementing automation, you can prevent input errors by eliminating the need to manually transcribe form content. Why not use these automations to further streamline your daily tasks?

If you are interested in trying Yoom, please register for free from here.

The person who wrote this article
m.wadazumi
I've been working as a writer since my job in child welfare, and I'm currently writing a blog on Yoom. While being surprised by the work efficiency improvements that can be made with Yoom, I would like to share that excitement with everyone and contribute to society. I'll tell you about application integration and automation that even I, who has zero programming knowledge, can do.
Tags
Integration
Automation
Notion
Jotform
Related Apps
App integration
No items found.
What is Yoom hyperautomation?
Conventional RPA can only automate simple repetitive tasks, and the setup process was very complicated.
With “hyperautomation,” which combines various technologies such as AI, API, RPA, and OCR, it is possible to automate many tasks that could not be realized until now more easily than before.
Don't Just Connect Apps—Automate Everything
Most tools simply connect one app to another, leaving the complex tasks to you. Yoom goes much further: From document creation and browser automation to OCR and generative AI, Yoom handles it all seamlessly in one platform.

Why settle for basic integrations? Streamline your entire workflow with Yoom’s powerful hyperautomation.
Learn more about Yoom
Helpful Materials
I understand Yoom! 3-piece set of materials
Download materials
Understand in 3 minutes! Yoom service introduction materials
Download materials
Find out by Before After! Yoom Case Study Collection
Download materials
See a list of useful materials