How to integrate Notion with CloudSign to automatically send contracts via CloudSign after retrieving data from Notion
How to Integrate Applications
・
2024/10/18
How to integrate Notion with CloudSign to automatically send contracts via CloudSign after retrieving data from Notion
m.wadazumi
By integrating Notion with CloudSign, you may be able to automate the process from contract creation to sending, thereby streamlining your business processes. This can reduce manual work, minimize human errors, and save time.
In this article, we will introduce how to set up automation and the benefits of integrating Notion with CloudSign.
Benefits of Integrating Notion with CloudSign
Benefit 1: Reduce Human Errors
When creating and sending contracts manually, there is a higher risk of document errors and misdelivery. By integrating Notion with CloudSign and automating the process, you can avoid such risks. For example, you can automatically create and send contracts in CloudSign based on the data registered in Notion. This way, <span class="mark-yellow">you can always send accurate contracts to your clients.</span>
Benefit 2: Speed Up Contract Procedures
Automated contract creation and sending can be done more quickly than manually. For instance, by automatically creating and sending contracts based on Notion data, interactions with clients become smoother. This simplifies the process from contract creation to sending, <span class="mark-yellow">making subsequent tasks easier to handle.</span>
How to Create a Workflow for Integrating Notion with CloudSign
This time, we will introduce how to set up the following template for "Sending Contracts from Notion via CloudSign." Using this template is convenient as it eliminates the need to set up automation from scratch.
The process consists of 8 steps and can be set up in 15-20 minutes.
Register Notion and CloudSign as My Apps
Set a trigger to activate when a page is selected on the database using the Chrome extension trigger
Set an action to retrieve records in Notion
Set an action to issue a document in Google Docs
Set an action to create a document in CloudSign
Set an action to attach a file to the document in CloudSign
Set an action to add a recipient in CloudSign
Set an action to send the document in CloudSign
If you are not using Yoom, please register for free here. If you are already using Yoom, please log in.
[About Yoom]
Step 1: Register Notion and CloudSign as My Apps
Please register Notion and CloudSign as My Apps to connect them to Yoom. Once you complete the My Apps registration, automation setup becomes easier.
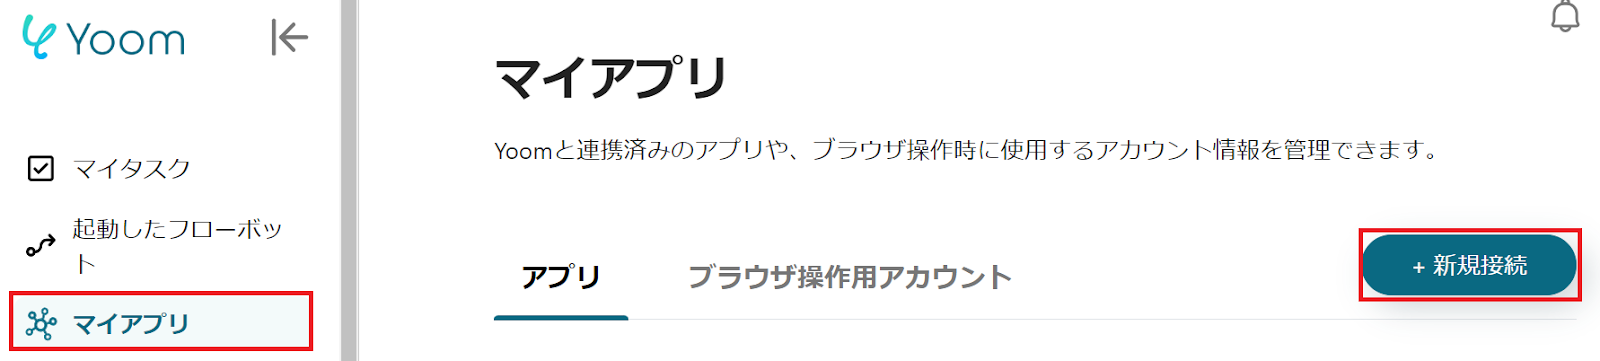
First, let's register Notion as My App. Click "My Apps" → "New Connection" on the left side of the Yoom screen. When the app list is displayed, search for Notion or use "Search by App Name".
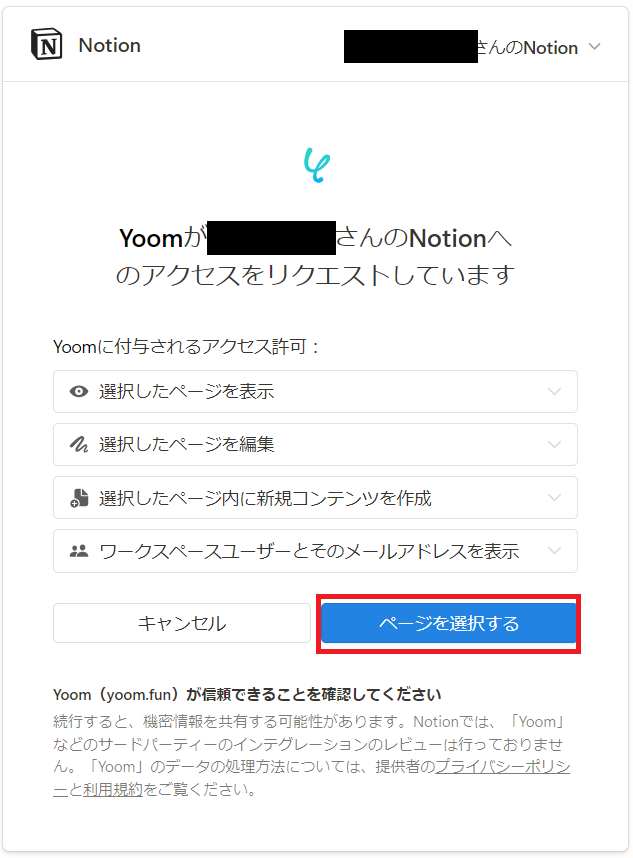
The following screen will be displayed, click the red box "Select Page".
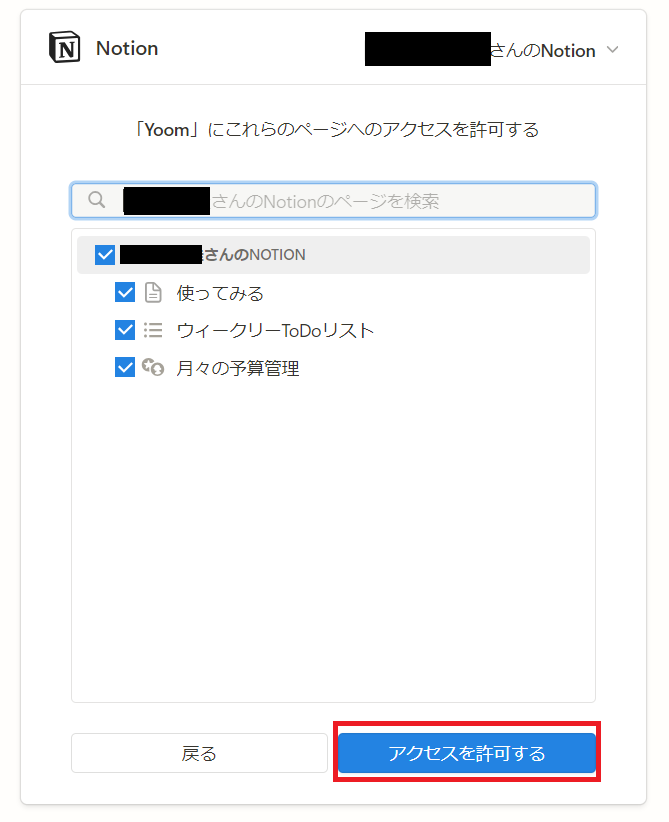
When the following screen is displayed, check the page you want to allow access to and click "Allow Access".
Next, register CloudSign as My App. Refer to the Yoom Help Page to register.
If Notion and CloudSign are displayed in My Apps, registration is complete.
Step 2: Set a trigger to activate when a page is selected on the database using the Chrome extension trigger
To set up automation, click "Try it" on the banner below.
Read the following screen display and click "OK".
The following screen will be displayed, please click "Install Extension" at the top right. For Chrome extensions, please check here. Check the following "Title" and "Description". If you want to make changes, you can do so from the screen below. To set up the Chrome extension trigger, click "Select and Launch Page on Database".
When the following screen is displayed, check the setup method. This trigger is only available with some paid plans.
Please check the following settings.
"Title" → Set as desired
"Account Information Linked with Notion" → Check if correct
"Action When Launched from Extension" → Select and Launch Page on Database
When the following screen is displayed, check the setup method.
Scroll down, check the description, and set the Notion URL in the "Sample URL of Launch Page". Once set, click "Test" → "Test Successful" → "Save". For notes on Notion's Chrome extension trigger, please see here.
Step 3: Set Action to Retrieve Records in Notion
To set up Notion, click "Retrieve Records". The following screen will be displayed, please check the settings.
"Title" → Set as desired
"Account Information Linked with Notion" → Check if correct
"Execute Action" → Retrieve Records (ID Search)
Scroll down, check the description, and set the "Database ID".
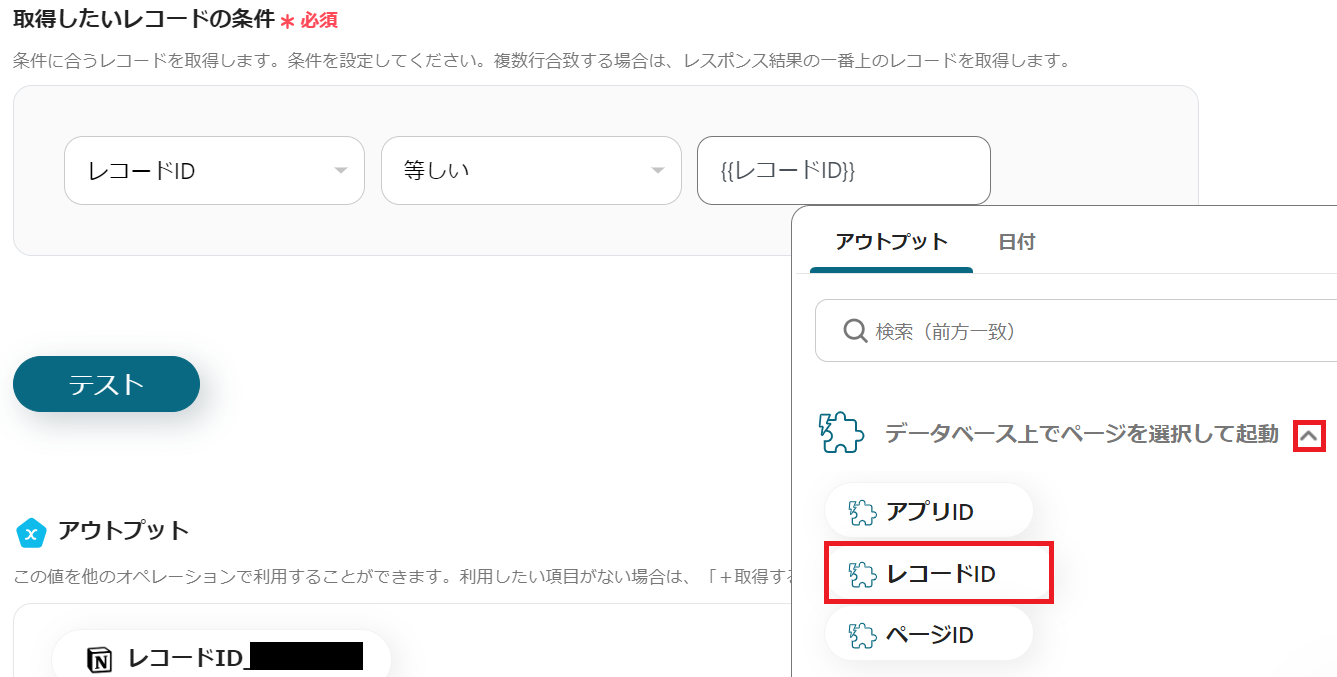
When the following screen is displayed, use the Chrome extension trigger output to set the "Conditions for Records You Want to Retrieve". Click the arrow in the red frame to use the output. Set it as follows. Once set, click "Test" → "Test Successful" → "Save".
Step 4: Set Action to Issue Document in Google Docs
Next, to set up Google Docs, click "Issue Document".
"Title" → Set as desired
"Account Information Linked with Google Docs" → Check if correct
Template Document Linkage
"Document File ID" → Check the description and set
Scroll down and set the "Issued Document".
"Google Drive Folder ID for Storage" → Check the description and set
"Output File Name" → Set using Notion's output Set as follows as an example.
When the following screen is displayed, check the setup method. Check here to prepare the template document.
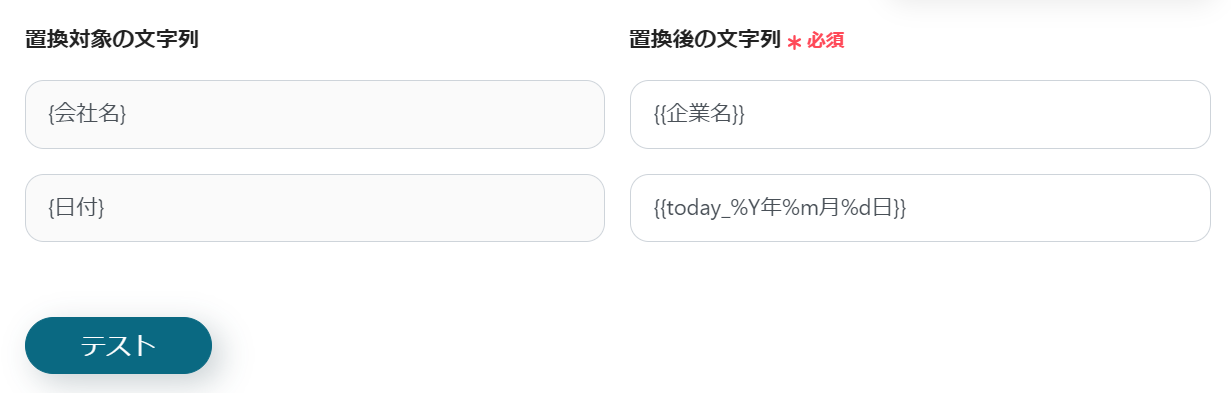
Scroll down to see that the strings to be replaced and the strings after replacement are already set. If changes are needed, set them as desired. Once set, click "Test" → "Test Successful", "Save".
Step 5: Set Action to Create Document in CloudSign
Next, to set up creating a document in CloudSign, click "Create Document". The following screen will be displayed, please check the settings.
"Title" → Set as desired
"Account Information Linked with CloudSign" → Check if correct
"Action" → Create Document
When the following screen is displayed, check the precautions. The flow of document sending can be checked from here.
Scroll down and set the "Document Title" using Notion's output. If there are other necessary items, set them. Once set, click "Test" → "Test Successful" → "Save".
Step 6: Set Action to Attach File to Document in CloudSign
Next, to set up attaching a file to a document in CloudSign, click "Attach File to Document". When the following screen is displayed, please check the settings.
"Title" → Set as desired
"Account Information Linked with CloudSign" → Check if correct
"Action" → Attach File to Document
The following screen will be displayed, please check the precautions.
Scroll down and set the "Document ID" using the output from "Create Document".
Scroll down and check the following settings. Once set, click "Test" → "Test Successful" → "Save".
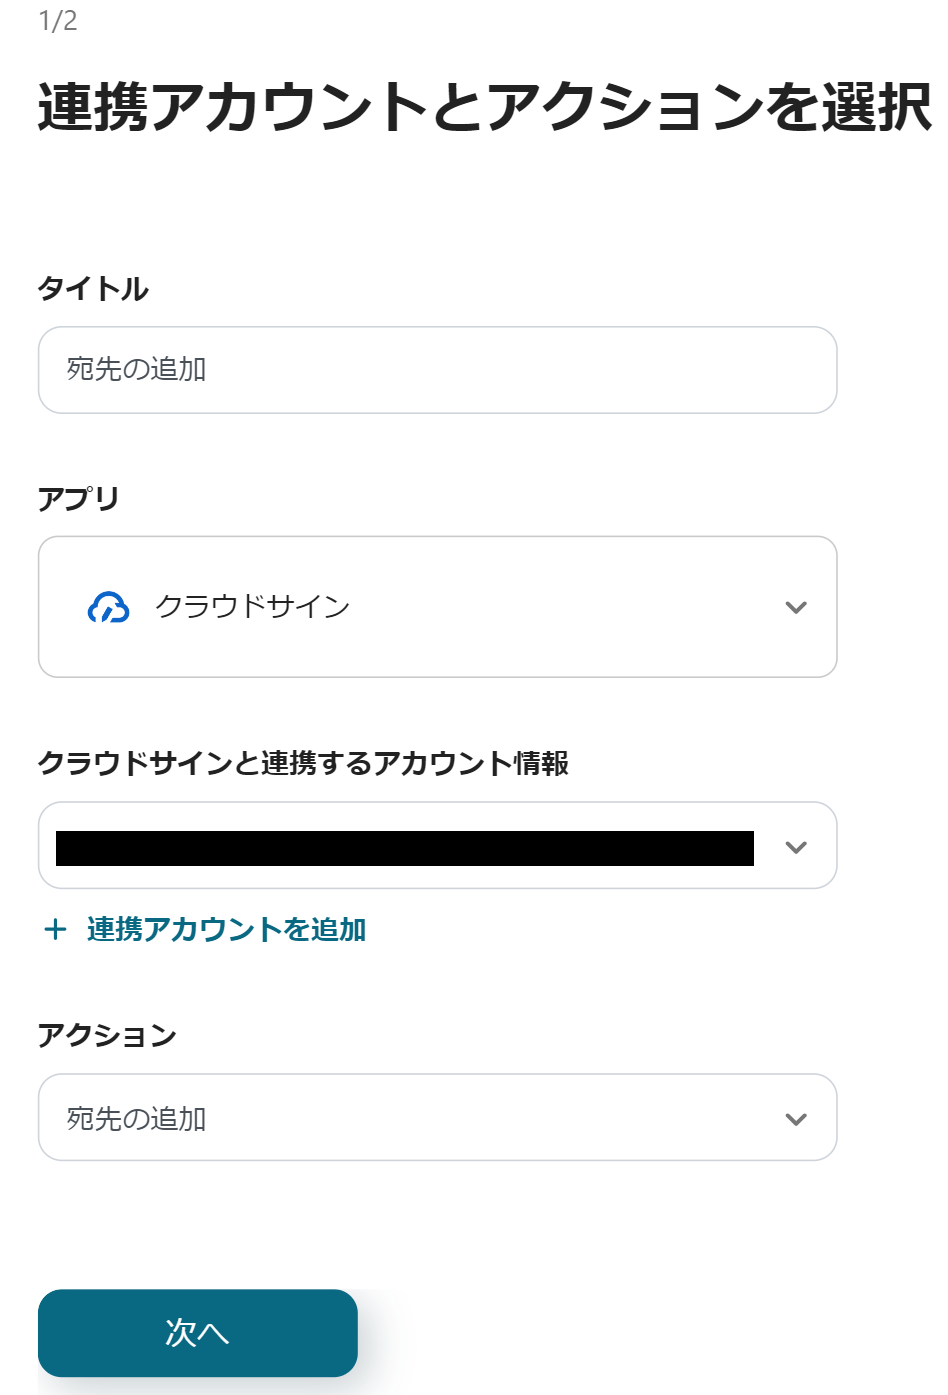
Step 7: Set Action to Add Recipient in CloudSign
Next, to set up adding a recipient in CloudSign, click "Add Recipient". When the following screen is displayed, please check the settings.
"Title" → Set as desired
"Account Information Linked with CloudSign" → Check if correct
"Action" → Add Recipient
The following screen will be displayed, please make the settings. Only use the output from "Create Document" for "Document ID". Other items are set using Notion's output. Once set, click "Test" → "Test Successful" → "Save".
Step 8: Set Action to Send Document in CloudSign
To set up sending a document in CloudSign, click "Send Document/Remind". When the following screen is displayed, please check the settings.
"Title" → Set as desired
"Account Information Linked with CloudSign" → Check if correct
"Action" → Send Document/Remind
The following screen will be displayed, please check the precautions.
Scroll down and set the "Document ID" using the output from "Create Document". Once set, click "Test" → "Test Successful" → "Save".
Step 9: Verify Automation Operation of Notion and CloudSign
Finally, click "Turn ON Trigger" to complete the automation setup. Check if the flowbot starts up correctly.
The flowbot template used this time Send Contract from Notion via CloudSign
Other Examples of Automation Using Notion and CloudSign
1. This is a flow where the Notion database is automatically updated once the contract is completed in CloudSign. Notion is automatically updated based on the client information obtained from CloudSign, saving the effort of manual updates.
2. Once the contract is completed with CloudSign, this flow updates the Notion database and automatically notifies Google Chat. This saves the effort of entering the same data multiple times and reduces time.
3. This is a flow that automatically stores documents signed with CloudSign into Google Drive. By automatically storing documents, you can prevent them from being lost.
Summary
By integrating Notion with CloudSign, you can automate the process from contract creation to sending, allowing you to proceed with your tasks quickly. This automation will likely reduce human errors and enable you to create highly reliable contracts. Be sure to utilize Yoom's automation to streamline your business processes.
If you are interested in automation, please register for free here.
The person who wrote this article
m.wadazumi
I've been working as a writer since my job in child welfare, and I'm currently writing a blog on Yoom.
While being surprised by the work efficiency improvements that can be made with Yoom, I would like to share that excitement with everyone and contribute to society.
I'll tell you about application integration and automation that even I, who has zero programming knowledge, can do.
Conventional RPA can only automate simple repetitive tasks, and the setup process was very complicated. With “hyperautomation,” which combines various technologies such as AI, API, RPA, and OCR, it is possible to automate many tasks that could not be realized until now more easily than before.
Most tools simply connect one app to another, leaving the complex tasks to you. Yoom goes much further: From document creation and browser automation to OCR and generative AI, Yoom handles it all seamlessly in one platform.
Why settle for basic integrations? Streamline your entire workflow with Yoom’s powerful hyperautomation.


.avif)


.avif)
.avif)
.avif)


