How to Add Outlook Calendar Events into a Notion Database Automatically
How to Integrate Applications
・
2025-06-23
How to Add Outlook Calendar Events into a Notion Database Automatically
m.wadazumi
"Is this meeting being shared properly with the team?" "Is anyone logging this email into Notion...?" “Did we miss the deadline because the schedule wasn’t synced…?”
If you have ever had these concerns, integrating Outlook and Notion with <span class="mark-yellow">Yoom is your solution</span>. You can automatically send Outlook calendar events to a Notion database, use AI to extract and record email content into Notion, and even keep summaries of important emails. All without manual effort.
Meet Yoom: No-Code Automation
Yoom is a next-generation no-code automation tool that lets you connect and automate tasks between your favorite apps. Yoom makes automation accessible to everyone.
🌐 Connect with apps like Outlook, Notion, Slack, and more.
📖 Use automation templates - no technical setup required
📈 Boost productivity and reduce human errors
<span class="mark-yellow">No need to go through a complex setup and IT jargon, Yoom keeps things simple and visual</span>. You can build your automation workflows with just a few clicks, saving hours of time and stress from repetitive work.
In this guide, you’ll learn the step-by-step process of how to use Yoom to automatically sync Outlook calendar events to a Notion database.
✔️ For Those Who Want to Try It Quickly
Yoom offers a ready-made template for easy setup in connecting Outlook & Notion. Click the “Try it” button to get started now!
We’ll also walk you through the step-by-step process of creating this automation flow later in this article.
🙌 What You Can Do by Integrating Outlook & Notion
By connecting Outlook & Notion, you can automate copy-pasting data tasks! Whether you're managing meetings, emails, projects tasks, this integration can help to streamline your workflow and improve team collaboration. Just click on the "Try it" button to use the ready-made templates. Set up takes only a few minutes :)
Add Outlook Calendar Events to a Notion Database
Automatically sync Outlookcalendarevents into a Notiondatabase in real time. <span class="mark-yellow">Ideal for teams who want to keep everyone on the same page without manual updates.</span>
Extract Outlook Email Info with AI & Add to Notion
Let AI automatically read and extract key information from Outlookemails and log it in Notion. This is perfect for tracking customerinquiries, importantupdates, or clientdetails without manually copying and pasting the data. <span class="mark-yellow">Recommended for those who want to simplify data capture and documentation.</span>
Summarize Outlook Emails & Add to Notion
Automatically summarize Outlook email content and store the key points in Notion. This can be used for project tracking. <span class="mark-yellow">Perfect for those who want to reduce manual effort in organizing data and ensure important details are easily accessible.</span>
🚀 Let's Create a Flowbot to Add Outlook Calendar & Notion
Let's walk through how to automatically save Outlook calendar events into a Notion database using Yoom!
⏱️ Setup time: 5 minutes
🔧 What You’ll Need
A free Yoom account
Access to Outlook & Notion
If you don't have a Yoom account yet, register now from the registration form!
Step 1: Register Outlook & Notion in My Apps
In Yoom, go to My Apps tab, and click “+ Add.”
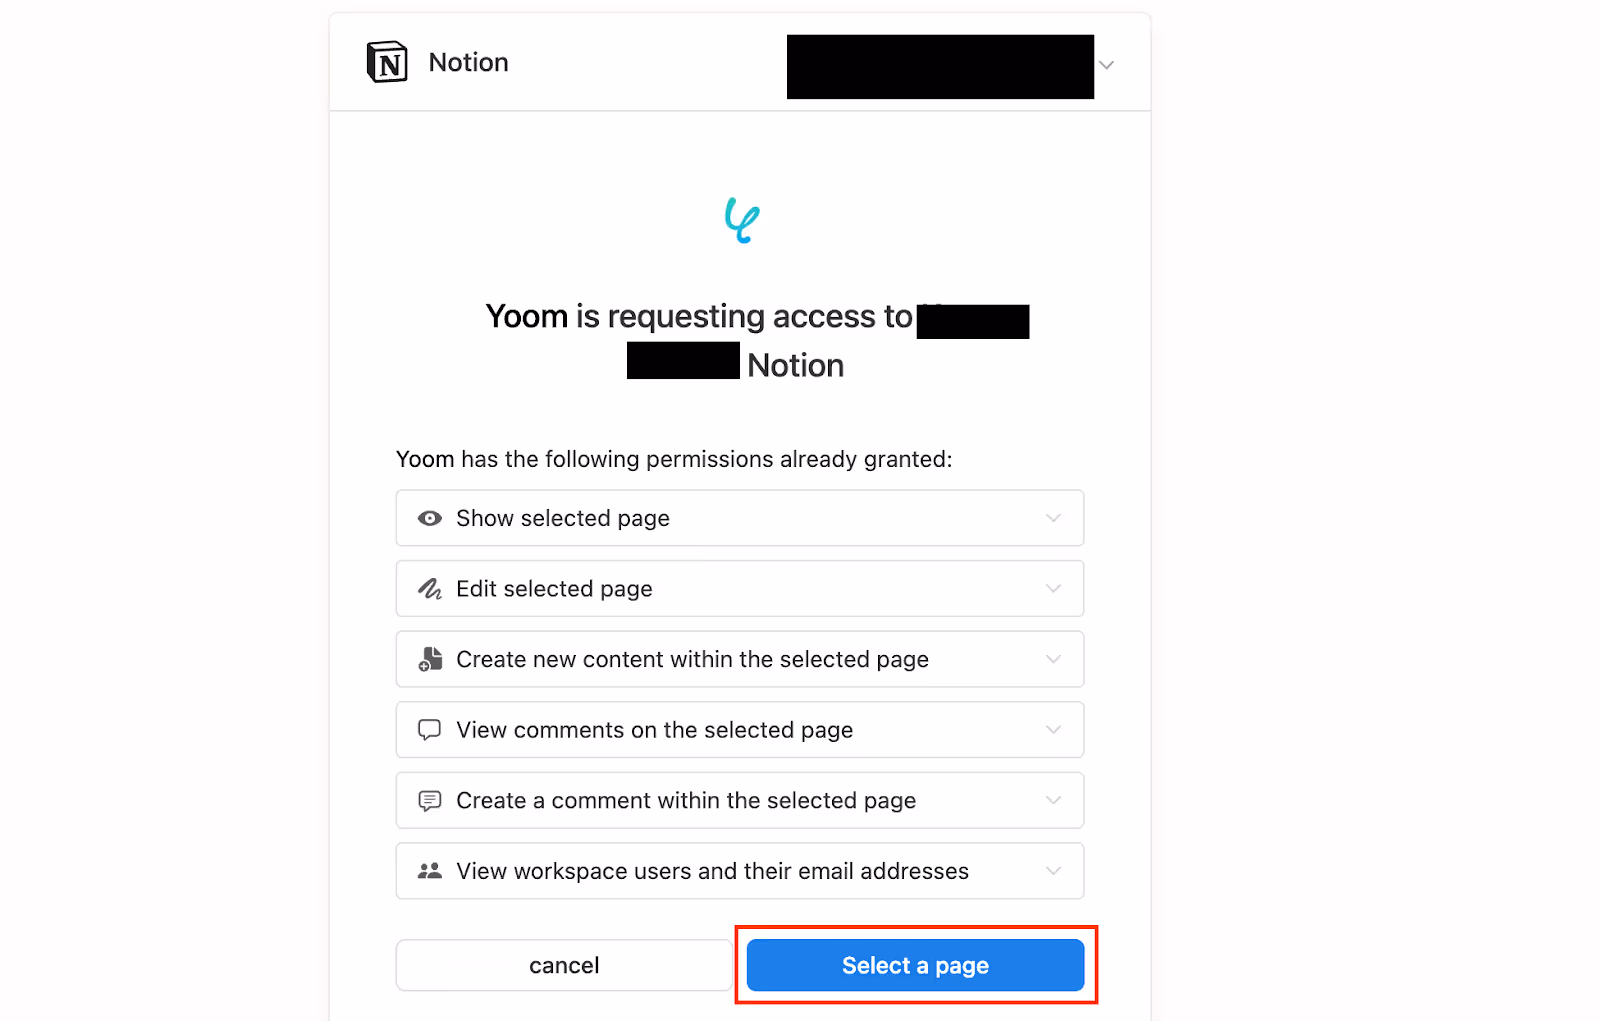
Select Outlook, log in, and grant permissions to Yoom. Then, connect Notion. Before connecting, make sure you’ve created a Notion database to add your Outlook calendar details. Similarly, select Notion in Yoom and authorize access to the database page. When the following screen appears, click "Select a page".
Check the page you want to allow access to and click "Allow Access".
Once both apps are connected, you’ll see them listed under “My Apps”. Now, you’re ready for automation :)
⚠️ Note: Databases created after registering with Yoom cannot be linked, so make sure to prepare the database you plan to use before registering in My Apps. If you’ve already linked it with Yoom but need to use a new database, you’ll need to register in My Apps again.
Step 2: Copy the Template
Click the "Try it" button to copy the pre-built template into your project.
This template will be copied to your “My Project”. Click "OK" and give it a name you’ll recognize for this Flowbot.
Step 3: Set Up the Outlook Trigger
Click on the app trigger step, “When an event is registered in the calendar”.
Give your trigger a title (anything you like). Select your Outlook account, and check the default settings. If there are no issues click “Next”.
⚠️ Note: "Microsoft 365 (formerly Office 365)" includes both personal and business plans. If you’re using a personal plan, Yoom’s authentication may not work properly. We recommend using a Microsoft 365 Business account for a stable connection.
Set your trigger interval (how often you want Yoom to check for new updates). It can be set to 5 minutes, 10 minutes, 15 minutes, 30 minutes, or 60 minutes. We recommend setting the trigger to the shortest activation interval available for your plan.
⚠️ Note: The trigger interval varies depending on your Yoom plan. Be sure to check your current plan’s limit.
Choose your "User ID". Once completed, run a quick test.
If successful, you’ll see items displayed below the "Retrieved Values ". You’ll use these data in the following steps to map fields to Notion, so check the details are correct! Click "Save".
📚 Reference: For more details on retrieved values and how to set it up, see the guide here.
Step 4: Configure Notion Action
Open Notion’s action step, "Add Record".
Give your action a name (anything you like). Select your Notion account, and check the default settings. If there are no issues click “Next”.
Select the "Database ID" from the dropdown.
Map the data from Outlook to Notion. Example:
Subject (Outlook) → Title (Notion)
Description (Outlook) → Summary (Notion)
Once the setup is complete, click "Test" to check if the data gets sent correctly.
If successful, a new row will appear in your Notion database with the event info.
Step 5: Activate the Flowbot
Toggle the "Trigger On"button to activate your flow! Check if the Flowbot you set up is working properly!
That’s it! Your Outlook calendar is now automatically synching with Notion :)
🔄 Want to Link Notion Data to Outlook Instead?
You can also go the other way around, send Notion data to Outlook.
Send Outlook emails based on Notion entries
Recommended for those who want to share customer or task info across the team..
Send emails when Notion status is updated
Send emails only when a specific status is updated in Notion. Recommended for those who want to notify the team of the progress.
💡 More Outlook + Notion Automation Ideas
Here are some ready-made automation flows you can try out. These automation flows can save you time, enhance collaboration, and reduce manual data entry by syncing information across platforms.
Outlook Automation Flows
These automations using Outlook can help you streamline communication, task management, and document handling. Whether you’re managing emails, scheduling meetings, or automating data processing, these can save you time and improve workflow efficiency.
Notion Automation Flows
These automations using Notion can help you keep your project management workflows smooth and up to date. Sync information from multiple apps directly into Notion, and keep your team informed and on track.
📖 Summary
Now you know how to add an Outlook calendar to Notion easily with no code. This integration can allow you to...
Share schedule instantly across platforms
Organize emails automatically
Improve team visibility and accuracy
You can expect an efficient, automated workspace that improves communication and time. Plus, Yoom offers many ready-made automation templates connecting with your favorite apps and tools. Make your free account and see for yourself! Register in less than 30 seconds!
Let automation handle repetitive tasks—start working smarter now!
The person who wrote this article
m.wadazumi
Having transitioned from a career in child welfare to working as a writer, I am currently blogging for Yoom. I am continually amazed by the efficiency improvements Yoom enables and am eager to share this excitement with others to contribute to society. I will be sharing insights on app integrations and automation that even someone like me, with zero programming knowledge, can accomplish.
Conventional RPA can only automate simple repetitive tasks, and the setup process was very complicated. With “hyperautomation,” which combines various technologies such as AI, API, RPA, and OCR, it is possible to automate many tasks that could not be realized until now more easily than before.
Most tools simply connect one app to another, leaving the complex tasks to you. Yoom goes much further: From document creation and browser automation to OCR and generative AI, Yoom handles it all seamlessly in one platform.
Why settle for basic integrations? Streamline your entire workflow with Yoom’s powerful hyperautomation.


.avif)


.avif)


