

Store Files Attached to Form in Box and Add File Information to Notion
This flow is recommended for situations where you frequently receive files through forms.
.avif)
・

"Can't file management and data organization be easier?"
When you start organizing data, it can unexpectedly take up a lot of time, leaving you unable to focus on other tasks.
This is especially true when using multiple tools, as it often leads to the hassle of data entry and potential errors.
The solution to these hassles and errors is the automatic integration of Box and Notion!
For example, after a file is uploaded to Box, you can automatically add the file data to Notion, or store files received via forms in Box and automatically add them to Notion.
By implementing this automation, you can save the effort of data management and prevent omissions and errors in data entry.
This will create an environment where you no longer have to worry about file and data management, allowing you to focus on other tasks.
This time, we will introduce in detail what you can do by integrating Box and Notion and how to set up automation!
Automation can be implemented starting today, so please read through this article and give it a try!
By using Yoom, you can easily integrate Box and Notion without any coding.
Yoom provides templates for integrating Box and Notion, so you can achieve integration immediately just by registering, even without API knowledge.
By integrating the APIs of Box and Notion, you can automatically link Box data to Notion!
You can experience the integration of Box and Notion immediately by simply clicking "Try it out" on the automation example that interests you and registering an account.
Registration takes just 30 seconds, so feel free to give it a try!
This flow is recommended for those who want to centrally manage file information or organize file information.
This flow is recommended for situations where you frequently receive files through forms.
This flow is recommended for those who want to digitize paper-based documents and organize information.
It eliminates the need for manual file management and data entry.
Let's get started by creating a flow that integrates Box and Notion!
This time, we'll use Yoom to proceed with the integration of Box and Notion without any coding. If you don't have a Yoom account yet, please create one using the registration form here.
[What is Yoom]
This time, we will create a flow bot that adds file information stored in Box to Notion!
The creation process can be broadly divided into the following steps:
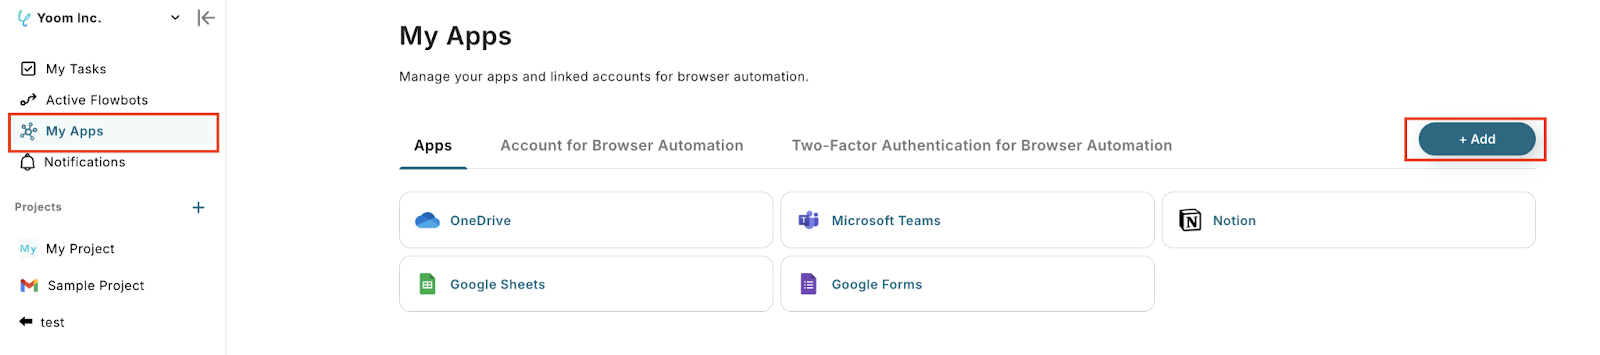
Click "+ Add" from "My Apps" in the left menu of the Yoom screen.
Enter the name of the app to connect in the search box.

When you search for Box, the login screen will appear.

After logging in, the access permission screen will appear.
Check the details and press "Allow Access to Box" to complete the connection!

When you search for the Notion app, the login screen will appear, so enter your login information.
After entering your login information, the access permission page will appear.
Check "Access Permissions Granted to Yoom" and click "Select a Page".

Check the page to allow "Access Granted to Yoom".
Check the database you will use this time.
Once you have checked, click "Allowing Access" to complete the connection!

Next, copy the template you will use this time.
When the template is copied to "My Project", this screen will be displayed.

Open the copied template from "My Project" in the menu on the left.

Click on "When a file is uploaded to the folder".

Enter the necessary information.
"Title": Can be changed if necessary
"Account information linked with Box": Ensure it is correct
"Trigger action": Select "When a file is uploaded to the folder"

Enter the "Folder Content ID".
Copy the ID from the URL based on the annotation!

For testing purposes, we have created a file like this in Box!

After completing the input, press "Test".
After the test is successful, click Next.
We will conduct the test based on the steps in the annotation below!

First, upload a test file to Box.
After uploading, press "Test", and if there are no issues, "Test Successful" and "Output" will be displayed.
Once confirmed, click "Save"!
For a detailed explanation of the output, please check here.

Click on "Retrieve File Information".

Enter the necessary information.
"Title": Can be changed if necessary
"Account information linked with Box": Ensure it is correct
"Action": Select "Retrieve File Information"

If the "Content ID" field already has the content ID displayed in the "Output" from Step 3, it's okay as is!
If not, select as follows:
① Click the input field to display the output
② Click "When a file is uploaded to the folder"
③ Select "Content ID"

After completing the input, press "Test", and if the test is successful, click "Save".
Click on "Operate Database".

Enter the necessary information.
"Title": Can be changed if necessary
"Account information linked with Notion": Ensure it is correct
"Execution action": Select "Add Record"

Next, enter the "Database ID" where the file information will be added.
For testing purposes, we created a table like this in Notion.

Click the "Database ID" input field to display the candidates, and select from them.

Enter the "Value of the record to be added".
Input fields corresponding to the Notion table will be displayed, so use the output from Step 3 and Step 4 to enter the values!

Enter other items in the same way.
After entering all items, press "Test", and if successful, click "Save".
Finally, click "Turn ON Trigger" to complete the automation setup.
Make sure the flowbot starts correctly.
Thank you for your hard work on the setup!

This concludes the integration procedure for adding file information stored in Box to Notion!
This time, we introduced how to integrate data from Box to Notion, but if you want to perform data integration from Notion to Box, please also use the following template.
This flow is recommended for those who want to avoid missing or duplicate folder creation.
Folder creation is automated, reducing the workload.
This flow is recommended for efficiently organizing data, such as creating folders according to task progress or client negotiation status.
It is possible to automate various tasks using Box and Notion APIs.
If you find something interesting, please give it a try!
You can automatically transfer saved files to other tools or transcribe file information.
Additionally, automatic file saving and folder creation are possible.
In addition to automatically adding to Notion, it is also possible to automate notifications and sending emails.
This is recommended for those who centrally manage data with Notion.
With the integration of Box and Notion, file and data management becomes simpler, reducing work time. You can automate the process of adding files uploaded to Box to Notion, as well as adding files received through forms to both Box and Notion. Additionally, by utilizing OCR, it becomes easier to capture paper-based data, which can be easily saved to Box or Notion. By implementing these automations, not only can you prevent data leaks and input errors, but you can also significantly reduce the workload.
If you want to "reduce manual data entry" or "accurately manage file data," please create a free account from here. You can easily register in about 30 seconds, so you can set it up during your work!
Let's leave file management to automation by utilizing the template introduced this time!

.avif)


.png)

.png)

